Long-term use of a VAZ car can easily damage any part. The variable gearbox of the modern model 2115 is no exception. Especially if an inexperienced driver has been behind the wheel for a long time.
If the gears begin to engage poorly, jump out spontaneously, or the gearbox begins to make extraneous noise, you need to contact the dealer or make an appointment at the nearest service station. Any service station will gladly accept the next client, trying to squeeze the maximum amount out of him. As a rule, prices are always inflated and do not correspond to the quality of the work performed.
If you know a master, you can contact him. Typically, such masters take care of each client, always performing their work with high quality and much cheaper.
But, when you know at least a little about the structure of the box and are not afraid of getting dirty, it is better to do the repairs yourself. After all, having done everything yourself and poured high-quality oil, you will always be sure that it will not let you down at the most inopportune moment. The design of the domestic VAZ 2115 car is quite simple; it does not require certain skills and knowledge during maintenance.
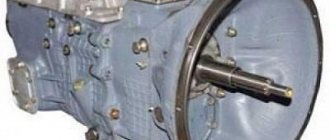
Box removal process
Removing the VAZ 2114 box is quite simple, although there are some peculiarities, so it is still advisable to have an experienced partner next to you for the first time.
Tools
- a set of keys;
- Screwdriver Set;
- WD-40 fluid in case you can’t unscrew some part;
Rust converter WD-40
container for draining old transmission oil; new oil (if the replacement was carried out a long time ago); rags; board.
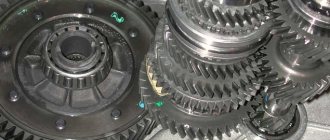
Gearbox VAZ 2114 disassembled
Stages
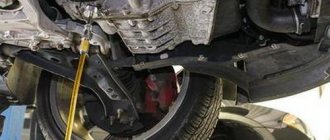
Since you will have to work under the car, it is better to place the VAZ 2114 car on a pit or overpass; a car lift would be a good solution, otherwise you will have to resort to jacks.
First you need to remove the terminals and remove the battery. Drain the oil from the gearbox into a prepared container by unscrewing the drain plug. We remove the starter. Remove the clutch cable. We disconnect the block with wires from the speed sensor, after compressing the spring. We unscrew the bolt attaching the ignition bracket to the gearbox. Then unscrew the remaining bolts. Under the car we find and disconnect the block of wires leading to the reverse sensor. Unscrew the bolts securing the linkage bracket to the gearbox. Having first loosened the gear shift rod clamp, we pull it out, pushing it back. Dismantling the wheel drives
You can leave the right one. In order for the gearbox to be removed without any complications, unscrew the bolts with which the left ball joint is attached to the steering knuckle. We disconnect the lower mount of the gearbox to the engine - sometimes you can get by by simply loosening the tightening of the bracket. After unscrewing the bolts, remove the transmission housing cover. Unscrew the bolt on the left of the gearbox. We carefully and carefully hang the engine using a board or other device. At the bottom of the car, unscrew the nut securing the left motor mount. We unscrew the two nuts with which the rear motor mount is attached to the body. We unscrew the two bolts with which the rear engine support is attached to the transmission (the second key is used to keep the nuts from turning), and remove the support. We move the box along the guides. This completes the process of removing the box; after completing all the necessary tasks, assembly occurs in the reverse order. When you put the box in place, do not forget to adjust the clutch and fill it with new oil.
Latest comments:
- Igor: I don’t have a fitting, the throttle is electronic, what should I do?
- Denis: Hello everyone. On the ventilators, what should the wires be attached to?
- Vova: I did everything as in the picture, except I didn’t install a new cigarette lighter.
- Mukhtar: Guys, salamaleikum to everyone, I have this problem: arrows on the panel and I have
- Vitaly: Hello, I have a VAZ 2115. I recently encountered the following problem:
Dismantling
To dismantle the box, we recommend that you rely on the instructions, strictly follow the sequence and reinforce your skills with visual videos.
- Disconnect the negative terminal from the battery and drain the oil from the gearbox system.
- Unscrew the bolts that hold the crankcase guard in place and remove it.
- Disconnect the ground (wire) from the clutch housing.
- At the end of the clutch cable, loosen the tension on the nuts slightly.
- Remove the cable end from the clutch lever.
- Disconnect the block from the traction relay.
- Disconnect the wire going to the starter traction relay.
- Dismantle the starter itself directly.
- Disconnect the drive rod from the joint tip. We are talking about traction, which switches gears.
- Disconnect the cable from the car's speedometer drive.
- Unscrew the tie rod ball joint.
- Remove and press the steering rod hinge pin out of the strut swing arm.
- The shank of the inner CV joint of the front wheel drive should be pressed out and moved to the side.
- Disconnect the second CV joint.
- Remove the clutch housing shield.
- Release the gearbox from the fasteners holding it to the engine.
- Remove the box.
Carefully remove the gearbox
Be sure to move it horizontally away from the engine before directly removing the gearbox. Then disengage the input shaft. Be careful not to damage the clutch spring petals.
Malfunctions and their elimination
Gearbox repair largely depends on the nature and type of fault. There are several options for the breakdown of this unit, in each of which appropriate actions should be taken to eliminate them.
Malfunction
Possible reasons
What do we have to do
There is noise in the gearbox
- The teeth on the gears are worn out;
- Bearings are worn out;
- The oil level in the gearbox has decreased
- Add oil;
- Replace worn bearings;
- Replace seals if necessary
Gears are difficult to shift
- The clutch is not fully depressed;
- The rod that controls the gear shift mechanism has become deformed;
- The integrity of the jet thrust has been compromised;
- The joint or rod that selects the gear is loose;
- The speed change drive is incorrectly adjusted;
- The plastic components of the gear shift drive are broken
- Try straightening the rods. If this is not possible, replace them;
- Tighten the mounting screws more tightly;
- Adjust the gear shift drive;
- Replace damaged components
Spontaneous gear disengagement occurs
- The ends of the synchronizer teeth on the gear and clutch are damaged or worn;
- Cracks appeared, the rubber on the rear supports delaminated;
- The gear shift drive was adjusted incorrectly;
- The traction guard was not tightened correctly, which is why the gear is not engaged completely
- Replace worn, deformed elements;
- Correct the position of the rod casing;
- Adjust the drive
Gears are switched on with noise and crackling
- The clutch does not disengage completely;
- The locking ring of the gear synchronizer, which is engaged, is worn out
There is an oil leak from the gearbox
- Wear of the input shaft oil seal; Wear of the rod
- speed selection;
- Breakage of the speedometer drive shaft seal;
- The cover on the gearbox or crankcase is loose;
- The sealant under the gearbox cover is damaged;
- The drain hole closure is loose
- Replace gaskets, use new sealant and gaskets;
- Tighten all existing fasteners;
- Check the condition of the drain plug
In most cases, problems with the gearbox are eliminated by dismantling and disassembling it. Do not take on this type of work without the proper skills and experience.
Oil
AvtoVAZ recommends gear oil of the following category:
- API group: GL-4
- SAE viscosity grade: 75w90t (synthetic), 80w85 (mineral), 85w90 (semi-synthetic)
- Recommended brands of oil by the factory (it’s not a fact that it’s good, I personally haven’t used it, and you won’t find them in stores): Lada trans KP, Lukoil TM 4-12, new trans KP, Nordix supertrans RXS, trans KP, Slavneft TM- 4 and other rare brands that you often cannot find in the store.
- Oil filling volume in the gearbox – 3.3 l
- As for viscosity, I would recommend 75w90 (synthetic), because... the most universal, freezes less in winter, and in summer without problems. As for semi-synthetics, they are mainly made only by Russian manufacturers, so synthetics are recommended.
- Rumors that synthetics squeeze out the gasket are nothing like that. Everyone uses it, no one complains, you just need to keep an eye on the seals.
- The only disadvantage of synthetics is that the gearbox is a little noisier than with semi-synthetics.
- Operating experience:
- Castrol 75w90 – freezes slightly in winter, but does not drive in neutral.
- Shell Getribeoil EP 75w90 – you can start without pressing the clutch pedal.
- TNK 75w90 - similar to Shell
- In fact, the most important thing when choosing oil is not to fall for a fake, so buy from trusted sellers and official dealers.
Gear shift mechanism
The gearshift mechanism is usually mounted in gearbox covers and is used to select, engage, and disengage gears. In addition, devices are installed in the gear shift mechanism that prevent the inclusion of two gears at the same time and prevent spontaneous gear shifting.
The main requirements for this mechanism are ease and simplicity of gearbox control, noiseless and smooth gear shifting, reliable locking of the engaged gear, prevention of simultaneous engagement of two or more gears, as well as protection from engaging a gear opposite to the vehicle's movement while moving. In addition, the activation mechanism must be reliable, durable, not requiring complex adjustments and easy to maintain. Malfunctions of the gear shift mechanism can lead to damage to parts and failure of such an expensive unit as a gearbox.
***
The gearbox shift mechanism of a truck (Fig. 1, a) consists of three rods, three forks, three clamps with balls, a fuse for engaging first gear and reverse gear and a locking device. Rods 8, 9, 11 are located in the holes of the internal bosses of the crankcase cover 1. Forks 5, 7, 10 are attached to them, connected to the synchronizer carriages and to the movable gear wheel for engaging first gear and reverse gear.
Clamps 4 hold the rods in the neutral or engaged position, which prevents spontaneous gear disengagement. Each retainer is a ball with a spring installed above the rods in special sockets in the crankcase cover. The rods for the clamp balls have special grooves (holes). Moving the rod with the fork, and therefore the synchronizer, is only possible when force is applied by the driver, as a result of which the ball sinks into its seat.
The locking device prevents two gears from being engaged simultaneously. It consists of a pin 12 and two pairs of balls 6 located between the rods in a special horizontal channel of the crankcase cover. When any rod moves, the other two are locked with balls that fit into the corresponding grooves on the slides.
In order to prevent accidental engagement of reverse gear or first gear when the vehicle is moving, a fuse is mounted in the wall of the gearbox cover, consisting of a bushing, a ring with a spring 3 and a stop. To engage first gear or reverse gear, it is necessary to press the fuse spring all the way, for which some force is applied to the driver control lever.
***
The gear shift mechanism of a passenger car (Fig. 1, b) is arranged as follows. Rod 14 of the third and fourth gear shift fork is installed in the holes of the front and rear walls of the crankcase, and rods 13 and 16 are installed in the holes of the rear wall and crankcase boss.
The 15, 21, 23 gear shift forks are secured with a bolt on each rod. To hold the rods in the neutral position and in one of the extreme positions when the gear is engaged, they have three sockets, to which the retainer ball 20 is pressed by a spring 19. The clamps are located in bushings and are closed with a cover 18. In the head of each rod there is a groove into which the lower end of the gear shift lever fits.
The locking device consists of three locking blocks 17. The two outer blocks are installed in the holes of the rear wall of the crankcase, and the middle block is in the hole of the rod 14. When the rod 13 or 16 moves, it squeezes out a block that fits into the socket of the middle rod and at the same time presses the other through the middle block cracker to the socket of the opposite rod. This way, these rods will be locked in the neutral position. When moving the middle rod 14, two crackers are squeezed out at once and the outer rods 13 and 16 are fixed.
***
Academic disciplines
- Engineering graphics
- MDK.01.01. "Car design"
- General structure of the car
- car engine
- Car transmission
- Steering
- Brake system
- Suspension
- Wheels
- Body
- Car electrical equipment
- Basic car theory
- Basics of technical diagnostics
- Fundamentals of hydraulics and heat engineering
- Metrology and standardization
- Agreecultural machines. Agreecultural equipment
- Basics of agronomy
- Transportation of dangerous goods
- Materials Science
- Management
- Technical mechanics
- Tips for graduate student
Olympics and tests
- "Engineering graphics"
- "Technical Mechanics"
- "Engine and its systems"
- "Car chassis"
- "Car electrical equipment"
DIY gearbox repair VAZ 2108-099, 2110-2112, 2113-2115
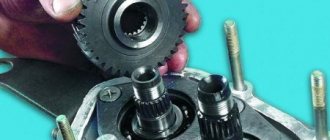
Problems with the gearbox began last summer, the 2nd speed was difficult to engage, in the spring the gear selector rod seal leaked, then the 3rd speed finally began to crunch when turned on. But the real juice was when you urgently need to go somewhere, and the reverse speed is not ALE!, and when you can go slowly, then with the reverse - everything is fine! Since I do the repairs myself, I decided to do everything myself this time (in the sense of not contacting service stations and other garage technicians), it’s not all that difficult.
We remove and disassemble the box (there are plenty of video instructions on the Internet).
in progress
old bearing
manufacturer
If you take it apart, you need to change all the consumables at once, so you don’t have to go through it again later.
We press out all the bearings and seals from the gearbox housings, remove the satellites, disassemble the secondary shaft, in short, throw everything into the trash. We carry out troubleshooting and find the reasons why our gearbox did not want to work properly.
We take old spare parts with us as an example, because VAZs also had parts of different sizes. Don’t forget to take a friend with you and let’s go with him for new parts. We buy everything we need and don’t need, spend all the money we had in our pocket, borrow money from a friend and spend it too.
Satisfied, we go to the garage.
What was purchased and replaced:
1. Front bearing of the input shaft 6-42205 A1E1USH1 2. Front bearing of the secondary shaft 6-42305 A1E1USH1 3. Rear bearing of the primary and secondary shaft 4. Differential bearings 5. All 3 BRT engine mounts 6. All 5 oil seals 7. Reverse gear 8 . Sliding clutch for synchronizer 1-2 gears 9. Axle of satellites and satellites 10. Synchronizers 1-4 gears 11. Shift forks 1-2 and 3-4 gears 12. Spring in the gear selection mechanism, which either allowed the reverse gear to be engaged or no 13. Bolts with washers for the rear cover of the 4th gear (for glasses) 14. Locking nuts of the shafts 15. Retaining rings for the 1st-2nd gear synchronizer and the bearing of the first gear gear 16. Gasket for the crankcase and the rear cover of the gearbox 17. Nuts for the speed-locking balls - 2 pcs. 18. Copper washers for these nuts - 4 pcs. 19. Sealant and thread sealant 20. Oil Lukoil TM-4 80W-90 GL-4 (recommended by VAZ)
Spare parts in the photo: 21082115
Before disassembling the gearbox, I watched several videos. Everything is easy and simple, I took it apart, changed it, installed it and went. BUT, there was a small problem during assembly! It turned out that everything was not entirely simple.
The repair was delayed for 2 weeks. At this time, in the evenings, I was looking for new videos and in one of them I learned about adjusting the differential preload. WTF! What a preload, geez! It turns out that preload adjustment is required when replacing at least one of the differential parts, namely: the differential box, differential bearing, clutch housing and/or gearbox housing.
The differential bearings are mounted with a preload of 0.25 mm. The tension is ensured by selecting the thickness of the adjusting ring installed in the gearbox housing socket under the outer ring of the differential bearing!
So, if the bearings are good, then it’s better not to touch them, since I was exhausted looking all over Kharkov for these rings, not every store has them, and if they do, then, as always, they don’t have the required thickness!
secondary shaft assembly
secondary shaft assembly
A small manual from the encyclopedia for assembling the gearbox:
1. When assembling the gear selector lever and the joint with the gear selector rod, first degrease the threaded holes in the joint body and the lever hub, as well as the mounting mounting bolts. 2. Apply thread sealant to the bolt threads. 3. We press the oil seals of the input shaft, drives and gear selection rod using mandrels or suitable pipe sections. 4. Lubricate the working surface of the oil seals with a thin layer of Litol-24 lubricant. 5. We install an oil seal with a right notch in the clutch housing (for right-hand drive), and an oil seal with a left notch in the gearbox housing (for left-hand drive). The arrows on the oil seal housings must coincide with the direction of rotation of the drives when the vehicle moves forward. 6. When assembling the secondary shaft, we replace the retaining rings of the synchronizer hubs with new ones. We press the outer and inner rings of roller bearings, ball bearings, gears and synchronizer hubs with mandrels or suitable pipe sections. 7. When assembling the hub with the synchronizer sliding clutch, before installing the retainer, apply a little grease to it and put it in the cracker. 8. Using a screwdriver, press the installed synchronizer spring towards the hub and put the block with the lock in place. In this case, the deepest socket should be located opposite the latch in the sliding coupling. 9. When assembling the differential, lubricate the satellites and drive gears with oil. 10. We mount the differential bearings with a preload of 0.25 mm. The tension is ensured by selecting the thickness of the adjusting ring installed in the gearbox housing socket under the outer ring of the differential bearing. 11. Selecting the thickness of the adjusting ring is necessary if replacing one of the following parts: differential box, differential bearing, clutch housing and/or gearbox housing. 12. After installing the differential into the clutch housing, it is necessary to secure one of the drive gears with a mandrel (plug) so that they do not move from their seats during further assembly. 13. Before assembling the gearbox housing with the clutch housing and the rear cover, apply a layer of sealant around the perimeter of the mating surfaces.
mileage 15 km after repair
Catalog numbers and spare parts manufacturers:
1. Primary shaft: 1.1.
Front single-row radial roller bearing: Catalog number
: 2108 - 1701031, 42205, NJ 205 (international name)
Manufacturers:
• EPK plants (Saratov, Volzhsky, Aviation Bearing Plant) produce the following varieties: 42205 KM (SPZ), 42205D1 (ZAP), 6-42205 A1E1USH1 (SPZ and VPZ), the latter is the most common and in demand.
• 10 GPP (Rostov-on-Don) offers modification 42205 AEM. These products occupy an intermediate position in the quality-price range. • The Samara SPZ-4 plant produces the simplest modification of this type, with a polyamide separator. They are very cheap, but knowledgeable motorists prefer not to use them. • If you are offered a “Vologda bearing” of this type, then it is a Chinese counterfeit (23 GPZ does not make them now). Catalog numbers
: SKF NJ 205 ECP; KOYO NJ205; Toyota 97123-06205; 6205ZZ; 93306-205U6-00 (Yamaha); 6205ZZCM
1.2. Rear radial ball bearing single row: Catalog number
: 2108 - 1701033, 50305, 6305 (international name) Quantity: 2 pcs.
Manufacturers:
• 3 GPP (Saratov) and VBF (Vologda), as well as HARP (Ukraine) - prices and quality are higher.
• GPZ (Moscow), SPZ-4 (Samara) (low quality, low price), • It is not recommended to buy bearings with other markings, since these are most likely Chinese products, which bear the markings of the companies ordering their production. The imported analogue is designated 6305. Closed 6305 ZZ and 6305 2RS (metal or rubber plugs). A bearing with a thermal gap is designated 6305/C3 (analogous to 76-305). Metal plugs - ZZ, rubber plugs - 2RS. Products of the SKF, FAG, KOYO brands are much more expensive and reliable than others. Catalog numbers
: SKF 6305 N; NTN-SNR 6305N; Toyota 90099-10142; 6305DDU; 6305NR; 90601-0012 (Subaru); 97100-06305; 5-81229-104-0
2. Secondary shaft: 2.1. Front single row radial roller bearing: Catalog number
: 2108 - 1701180, 42305, NJ 305 (international name)
Manufacturers:
• EPK plants (Saratov, Volzhsky, Aviation Bearing Plant) produce the following varieties: 42305 KM (SPZ), 42305LM (SPZ), 6-42305 A1E1USH1 (SPZ and VPZ ), the latter is the most common and in demand.
• 10 GPP (Rostov-on-Don) offers modification 42305 AEM. These products occupy an intermediate position in the quality-price range. • The Samara SPZ-4 plant produces the simplest modification of this type, with a polyamide separator. They are very cheap, but knowledgeable motorists prefer not to use them. • Some suppliers will also offer you the Craft brand. These Chinese bearings are the cheapest, but are completely unsuitable for installation in car gearboxes. Catalog numbers
: Koyo NJ 305; Coram NJ 305
3. Gearbox secondary shaft bearing, single-row needle without rings in a plastic cage (for speed gears): Catalog number
: 2108 - 1701108 Quantity: 5 pcs.
Dimensions: 30x36x25 Catalog numbers
: K32X37X27 (SKF), PW-P1108 (Pilenga)
4. Single-row tapered roller differential bearing: Catalog number
: 2108 - 2303036, 7207, 30207 (international name) Quantity: 2 pcs.
Catalog numbers
: NSK 30207, KOYO 30207JR; HR30207J; MB 393957; MT 202119; MA 125934 (Mitsubishi)
5. Seals: 5.1. Drive seal: Catalog number
: Corteco 12015250\Corteco 12015250B 5.2.
Input shaft oil seal: Catalog number
: Corteco 19034619B\Corteco 19034619 5.3.
Gear selector rod oil seal (yoke oil seal): Catalog number
: Corteco 12010803\Corteco 12010803B
6. Reverse gear Pilenga Catalog number
: GB-P 0850
7. Engine mounts. Manufacturer: BRT 7.1. Side engine mount bracket for LADA Samara 2108-1001040-10RU 7.2. Rear engine mount bracket for LADA Samara 2108-1001031-10RU 7.3. Front engine mount bracket for LADA Samara 2108-1001015-10RU
Gear selection mechanism VAZ 2109 repair
This is interesting
Downloads 1998Average speed 4351 Kb/s
Download
https://youtube.com/watch?v=h4wwwSsCNDk
To perform repairs associated with the dismantling and subsequent replacement of the mechanism, prepare a standard set of tools and perform the following sequence of actions:
After removing the decorative tunnel located between the front seats, remove the gear shift mechanism. The mechanism must be replaced if there are signs of wear, distortions, loose bushings and other defects.
How the box works
It has features that entirely depend on the configuration of the machine. This could be a four- or five-stage vase model. The structure of a four-speed gearbox is as follows:
- 1. Primary shaft;
- 2. Reverse gears, to which the front shaft is attached;
- 3. Synchronizers, 2 pieces;
- 4. Bearings placed on the secondary shaft;
- 5. Driven gear. Attached to the differential flange.
The element is controlled by a drive, rod, rod and ball joint. Only complete interaction of these parts can ensure full operation of the box.
Gearbox device
To determine the type of gear, there is an additional lever, which is attached to the inner end of the rod.
There are also axles in the body; a three-arm lever is attached to one of them. Its main purpose is to lock the bracket and bushing, which is necessary to ensure the strength and immobility of the mechanism.
The second axis is designed to fix the locking brackets from their rotation, passing through the center. In addition, there is a lock that prevents the box from loosening. The other axle also has a fork, which is necessary to engage the VAZ 2114 in reverse.
The five-stage type differs in the size of the shaft and the absence of a bushing in the element. Usually this is what is installed in the VAZ 2114, since the other one is not entirely practical to use. Like any spare part, a gearbox can also break down and fail.
The most common problems are:
Unknown noise: it may be caused by bearing failure or gear wear. In addition, you should play it safe and check the oil level;
The solution to the problem is to completely replace failed spare parts and add oil.
Difficulty shifting the VAZ 2115 gearbox: the drive rod may have become deformed. It would be a good idea to check how firmly all the screws are screwed on and how the box drive is adjusted correctly. There is a possibility of failure of plastic parts in the drive;
Solution: Strengthen the screws, adjust the drive, replace worn and failed parts, replace or correct the deformation of the rod.
Turning off the gearbox without the driver's participation: the cause may be damage to the teeth on the synchronizer, an incorrectly adjusted drive, or poor installation of the traction cover, which provokes incomplete engagement of the traction;
Solution: Adjust the drive and replace the covers, replace the failed spare parts.
Oil leak. The reason is still the same - wear of spare parts, which this time are oil seals, seals and hinge bodies
In addition, you need to pay attention to the strength of the fastening. If it becomes loose, it is necessary to tighten all the bolts and check the seals for damage;
Solution: Purchase new spare parts and replace them.
Where and how is it more profitable to buy a gearbox in case of its complete failure? Since the performance of the vehicle and safety depend on the VAZ 2114 gearbox, its technical condition must be taken very seriously.
That is why it is worth recalling that, like any element of the machine, the gearbox needs regular technical inspection. Saving on oil changes, untimely detection and replacement of breakdowns, complete ignorance of troubles with the machine’s mechanisms - all this leads to failure of the gearbox.
Don’t think that if you have a domestic car, that means you are lucky. The rise in prices for spare parts is indicated by the price of the box, which today ranges from 16 thousand rubles. up to 18 thousand rubles Add in fees for removal, installation and maintenance - the cost will be impressive.
Used manual transmission for Lada 2114
An easier option would be to purchase a used item. No one will give a guarantee that there are no defects in it, but the purchase will cost half as much.
The best option is to carry out timely maintenance and repair of the box. This approach will not only save the budget, but will extend the life of the parts.
Gearbox of a VAZ 2115 - 14
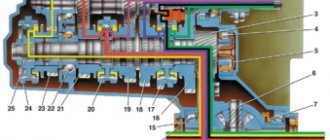
VAZ 2115 -14 vehicles are equipped with a five-speed gearbox combined with a differential and final drive.
Fig.1 Gearbox
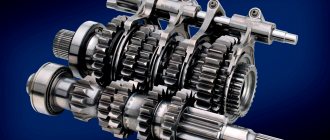
1-clutch release bearing, 2-guide bushing, 3-primary shaft, 4-roller bearing, 5-secondary shaft, 6-circlip, 7-pinion axis, 8-speedometer drive gear, 9-transport plug, 10- wheel drive oil seal, 11-roller tapered differential bearing, 12-axle gear, 13-pinion gear, 14-differential box, 15-clutch housing, 16-drive main gear, 17-drain plug, 18-adjusting ring, 19- driven gear of the 1st gear of the secondary shaft, 20-driven gear of the 1st and 2nd gears assembly, 21-driven gear of the 2nd gear of the secondary shaft, 22-circlip, 23-thrust half-ring, 24-driven gear of the 3rd gear of the secondary shaft, 25-synchronizer of the 3rd and 2nd gears 4th gear assembly, 26-driven gear 4th gear of the secondary shaft, 27-needle bearing of the secondary shaft gears, 28-ball bearing of the secondary shaft, 29-thrust plate, 30-driven gear of the 5th gear of the secondary shaft, 31-5th gear synchronizer assembly , 32-nut, 33-thrust washer, 34-drive gear V gear of the input shaft, 35-rear gearbox housing cover, 36-ball bearing of the input shaft, 37-gearbox housing, 38-roller bearing of the input shaft, 39-breather , 40-oil seal for input shaft
The input shaft 3 (Fig. 1) is made in the form of a block of drive gears of the 1st-4th gears and with a removable gear of the 5th gear, which are in constant engagement with the driven gears of all forward gears. The driven gears are located on needle bearings on the secondary shaft 5. In addition to them, three synchronizers are installed on the shaft. The output shaft and the main drive gear are combined.
The differential is two-satellite. The preload in the differential bearings is adjusted by selecting the thickness of the ring 18. The driven gear 16 of the main gear is attached to the differential box flange.
Fig.2 Gear shift drive
1-gearbox housing, 2-gear selection mechanism housing, 3-gear selection mechanism, 4-clutch housing, 5-rod lever, 6-gear selection rod, 7-rod hinge, 8-gearbox control rod, 9- rod protective cover, 10-shift lever, 11-spherical lever pin, 12-ball lever support, 13-clamp, X-distance between the ends of the clamp and the link
The gearbox control drive consists of a gear shift lever 10 (Fig. 2), a ball joint 12, a rod 8, a gear selection rod 6 and a gear selection and shift mechanism.
A lever 5 is attached to the inner end of the rod 6, which acts on the three-arm lever of the gear selection mechanism 3. This mechanism is made as a separate unit and is attached to the plane of the clutch housing 4.
Fig.3 Gear selection mechanism
1-gear selection mechanism housing, 2-gear selection lever (forward), 3-guide axis of locking brackets, 4-axle of gear selection lever, 5 and 12-spring, 6-circlip, 7-axle of reverse fork, 8 and 13-locking brackets, 9-gear selection lever lock, 10-reverse fork, 11-gear selection lever (reverse)
Two axles are attached to housing 1 (Fig. 3) of the gear selection mechanism. On axis 4 there is a three-arm gear selection lever, two locking brackets 8 and 13. Another axis 3 passes through the hole in the hub of the locking brackets, securing them from turning. Shoulder of the gear selection lever 2 is used to engage forward gears, arm 11 is used to engage reverse gear, and the third arm is used by lever 5 (Fig. 2) of the gear selector rod 6. A lock 9 is mounted in the hub of the gear selection lever (Fig. 3). A fork 10 for engaging reverse gear is installed on axle 7.
Gear shift diagram for VAZ 2114
Basin - lurkmore.
Repair of VAZ backstage. Repair of VAZ-2109 gearbox.
Buy a gearbox in Novosibirsk.
Repair, disassembly and troubleshooting of gearbox parts. Correct gear shifting, gear shifting, how.
The battery light is on on the dashboard of the VAZ-2114.
Diagram under the hood of a VAZ 2114 (solved) - 1 answer.
Universal gear shift youtube. VAZ backstage (gear shift lever).
Gearbox VAZ-2114: design, operation, maintenance and repair.
Replacing the ball joint VAZ 2108-2115: photos and videos.
Changing the oil in the VAZ 2108 gearbox.
How to diagnose and repair a VAZ-2114 gearbox?
Checkpoint How to properly disassemble and reassemble the gearbox? VAZ.
Gear shift mechanism of VAZ 2110 (photo). Buy VAZ (Lada): official dealer of Lada car showroom.
Speech monitor for gearbox and handbrake for VAZ-2114 Samara. Repair of gearbox VAZ 08 to 15.
Gearbox gear shift diagram Lada forum.
Gearbox of a ZIL-130 car: shift diagram
Every motorist who has ever encountered driving a ZIL 130 or 131 car will say with confidence that there are practically no obstacles for this “iron horse”. However, if this is your first time driving such a unit, then you will probably be interested in the ZIL 130 gear shift scheme. Moreover, it is quite original and unusual for the average motorist.
Diagnostics and minor repairs of the device
The gearbox, like many car components, sometimes malfunctions and requires maintenance. There are several main reasons that lead to problems. If you hear extraneous noise in a VAZ gearbox, it may be due to wear on the gear teeth or bearings. The box may make noise if the oil level is low. To solve the problem, it is necessary to replace worn mechanisms, oil seals and bring the oil level to normal.
Problems when shifting gears. In this case, it is necessary to inspect the control drive rods for wear. You should check the reliability of the hinge mounting and the gearbox lever rod. Incorrect debugging of the switching drive or breakdown of plastic parts of the assembly can also cause a similar problem. To troubleshoot problems, you need to adjust or replace the rod, tighten the screws and adjust the drive, and replace faulty parts.
- Unplug the box.
- Drain the oil and disconnect the starter.
- Remove the crankcase protection.
- Disconnect the fastening cable and remove it from the bracket.
- Remove the wires by pressing the spring.
- Remove the reverse control wires.
- Unhook the rod from the hinges, moving it back a little.
- Remove the clutch cover.
- Hold the box and unscrew the remaining nuts.
Gear ratios (row)
These are the gears of each gear, which also have their own size.
They characterize the speed of the car in one gear or another. The standard VAZ uses the following numbers:
| Gearbox ratios: | |
| I | 3,636 |
| II | 1,95 |
| III | 1,357 |
| IV | 0,941 |
| V | 0,784 |
| reverse | 3,53 |
Above are the specifications with standard parameters.
The standard series on 2114 is far from ideal. The first gear is too short, the second is too long. Due to this, there is a sharp drop in dynamics when switching from first to second. Not only is there a failure, but when switching sharply, the second speed synchronizer slowly dies.
Therefore, there are sports series where the gap between 1st and 2nd is removed, and not only: sports series are selected according to the type of engine. It could just be a good city engine, or a sports engine, or tailored for 402-meter racing. There are also “turbo” gears designed for a turbo engine.