On passenger cars with a hydraulic brake drive without an anti-lock braking system (ABS), a pressure regulator is used. Some car owners call it a “sorcerer,” considering it a mysterious and useless device. In fact, this is an important element of the braking system; it makes braking more stable even from high speeds on slippery roads.
Operating principle of the pressure regulator
The regulator creates an optimal relationship between the pressure of the working fluid in the front and rear brakes. Without regulation, they are the same, and for each vehicle loading option there must be a different ratio that ensures advanced blocking of the front wheels so that the car does not skid. The moment the regulator starts operating (turning on) depends on the settings of its drive, and the subsequent pressure ratio depends on its own hydraulic characteristics4, drive parameters and unloading of the rear suspension during braking.
The regulator input is connected to the master cylinder, and the output is connected to the rear brakes. The operation of the device is controlled by a drive in which a load spring (twisted or torsion bar) is connected to the rear axle (beam, transverse rod, suspension arm). Therefore, the pressure of the working fluid at the rear depends on the “dive” of the body of the braking car and its actual load - the number of passengers and luggage in the trunk.
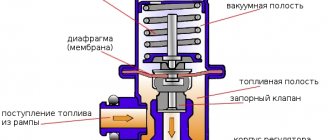
The volume of the regulator body is divided by piston seals into two cavities, one connected to the main cylinder, the other to the rear brakes. At the initial moment of operation, the fluid pressure in both is the same, but in the first it acts on a smaller area of the piston, and in the second on a larger one. Accordingly, it tends to move, but the centering (internal) spring resists this. Its force and area ratio determine the regulator’s own characteristics. They are selected so that when the piston is not pressed by the load (external) actuator spring, it is balanced in the position where the valve begins to close. The increase in pressure in the master cylinder overcomes the force of the centering spring, displaces the piston, and the valve completely blocks the flow of fluid, stopping further growth of its pressure in the rear brakes.
When the regulator operates in a car, a load spring additionally acts on the piston. When the body lowers, its force increases, moving the piston. The valve opens and the rear brake pressure increases until it closes again.
Checking the operation of the VAZ-2109 brake regulator
Frequency - Every 30,000 km.
Place the vehicle on a lift, overpass or inspection ditch.
Clean the pressure regulator from dirt.
If the pressure regulator is adjusted correctly, the front wheels should lock slightly earlier than the rear wheels when braking on a level paved road. If the rear wheels lock before the front wheels or the front wheels lock much earlier than the rear wheels, the pressure regulator is not adjusted or is faulty. In this case, we recommend contacting a technical service station.
Check to see if brake fluid is leaking from the pressure regulator.
Check that the plug should be recessed by 1-2 mm.
Rock the earring. There should be no play in the connections of the earring with the elastic lever and the bracket on the rear suspension beam.
adjusting the brake pressure regulator drive on VAZ 2108, VAZ 2109, VAZ 21099 cars
Improper adjustment of the brake pressure regulator drive can cause the vehicle to skid or pull to the side when braking, and also reduce braking efficiency. 1. Place the VAZ 2108, VAZ 2109, VAZ 21099 car on the inspection ditch and “push” the rear part of the car several times with a force of about 392-490 N (40-50 kgf) to install the rear suspension in the middle position.
2. Loosen the front bolt securing the brake adjuster to the bracket.
3. Using the wire as a feeler gauge, adjust the bracket so that the gap between the brake pressure regulator drive lever and the lever spring is 2.0-2.1 mm.
4. To do this, move the drive lever by the protrusion. In this position, tighten the bolt. 5. If the brake pressure regulator is correctly adjusted, when braking from a speed of about 40 km/h on a level section of paved road, the front wheels should lock slightly earlier than the rear wheels (this can be determined by an observer outside the vehicle). Otherwise, increase the gap (if the rear wheels lock earlier than the front ones) or decrease it (if the rear wheels lock much later than the front ones). After this, check the brake adjustment again and, if necessary, repeat the adjustment of the brake pressure regulator drive again.
Source
Handbrake
VAZ 2109 brake regulator
https://youtube.com/watch?v=OC10c-BVUvI
- garage room with inspection hole,
- regular set of keys.
- Engage forward gear.
- Place stands under the front wheels for safety.
- The rear suspension of the car must be jacked up and supported with reliable supports.
You need to start by checking the lever, which is located inside the car between the two front passenger seats. Raise it two or three clicks. When raised, one click is made, which means the handbrake cable is tightened. This causes the rear drums to become blocked by the brake pads. If more than 8 are produced, then the cable is weakened and the handbrake does not work:
- With the handbrake on, go down into the inspection hole.
- Loosen the first lock nut on the equalizer.
- Tighten the second nut so that the cable is in a taut position.
- If necessary, on the contrary, release it.
- Check the operation of the lever. It should respond with two or three clicks.
Then tighten the first nut from the hole, tighten with two wrenches to get the effect of tightening two nuts:
- After this, turn off the parking system.
- Check the rotation of the rear wheel rims.
Make rotational movements with your hands. Their rotation should take place without a jerk, calmly scrolling along the axis of the car. The sound should come out rustling. Consequently, the adjustment of the vehicle's brake system was carried out successfully. The vehicle is ready for continued operation. The brakes can also be adjusted in a car workshop. You can entrust this work to specialists. But the motorist experiences reliability when this work is done independently. A car can be considered technically serviceable when it is independently inspected and repaired. He will never let you down in difficult, dangerous times. In addition, the price of repairs at service stations can be high. When doing the work yourself, you need to carefully watch the video. You also need to study the photos and, if necessary, take them to the repair site. Place it on a rack or in the back seat of the car. If necessary, review them again. Read the instructions for the operation and the location of the necessary structures. Finish the adjustment and check the work done on a free asphalt area.
Welcome! In today’s article, we will examine in detail a question that plagues many car owners, and it sounds like this: “How to adjust the sorcerer on cars of the Samara family?” After reading, the following question appears: “What kind of sorcerer are we talking about?” Let's explain! The sorcerer is the popular name for the brake pressure regulator; you will find this very word in the article.
Note! You will need the following tools: a 13 mm wrench, a flat screwdriver, a short wire or a drill with a thickness of 2.0-2.1 mm.
When is it necessary to regulate? Adjustment of the sorcerer is necessary:
- If you have previously carried out work related to removing the rear suspension beam.
- After carrying out various work related to replacing springs, replacing the shock absorber and other suspension elements - in other words, any intervention to change the ground clearance.
Note! An incorrectly adjusted sorcerer causes the car to pull to the side during heavy braking, and the braking process loses its effectiveness. We recommend that you monitor the condition of the sorcerer very carefully.
Brake pressure regulator, or how the sorcerer works on VAZ cars
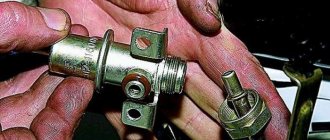
A brake force regulator, or sorcerer in common parlance, is a mechanical device designed to relieve excess pressure in the rear drum brakes.
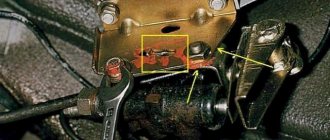
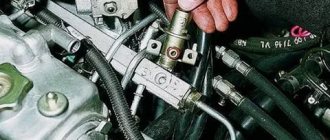
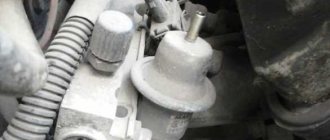
On VAZ-2109, VAZ-2108, VAZ-2114 and other front-wheel drive models produced in Togliatti, it was installed in the rear left part of the body, under the bottom, in front of the rear suspension beam. The brake pressure regulator on the VAZ-2107 model and other “classics” is located on the right in the direction of travel of the car.
New vehicles equipped with ABS and EBD do not use the sorcerer.
Why do you need a brake force regulator?
The function of the regulator is to temporarily reduce the braking force during heavy braking. The fact is that force evenly distributed on the rear and front axles can lead to a skid of the car. If the rear brakes start working a little later and weaker than the front ones, this does not happen.
Based on the above, we can conclude that the sorcerer is an element of the car’s safety system, partly preserving its stability on the road when the brake pedal is pressed in an emergency. On modern models, this function is performed by ABS. That is why there is no need today to use a technically outdated device in production.
The liquid turned into soda
The working fluid of brake hydraulics is capable of transmitting force only if it retains its incompressibility. Liquids and solids have this property, but not gases. The appearance of any of them inside the system ensures its failure. The reasons why the brake pedal fails can be different.
- The system seals are made of a material that blocks the path of both liquids and gases. But at a certain stage of their aging, a stage is possible when they still hold liquid with difficulty, but air begins to pass almost unhindered. As a result, during any braking, the moving parts are likened to a pump, pumping outside air into the hydraulic area. It accumulates and partially dissolves in the liquid. The incompressibility of the working fluid disappears, the stroke of the working cylinder rod increases.
- In addition to the external penetration of parasitic gas, it can also form from the liquid itself. It has the property of hygroscopicity, that is, it is capable of dissolving water vapor from the atmosphere well. The boiling point of water is significantly lower than that of the original composition, which engineers specially worked on, increasing its temperature threshold. The resulting water vapor is a gas, so the phenomena already described above occur. Moreover, this will happen at a critical moment, when the brakes work intensively, which is accompanied by heating.
- More prosaic reasons for airing the brakes are also possible. These are errors in their repair and poor pumping. This is what will appear the first time you try to brake urgently.
Treatment of the situation comes down to following basic brake care rules. The fluid must be changed on time, as specified in the instructions for the car, and not use cheap substitutes. Inexperienced personnel who have little understanding of the technological process should not be allowed to repair brakes.
It should be remembered that it is impossible to achieve ideal rigidity when the system is activated. There is always a certain finite elasticity of its elements. This is even associated with one of the methods for checking the functionality of the vacuum brake booster, when after a hard stop with the ignition off, the brake pedal still sinks a little while the engine is running.
How does a sorcerer work?
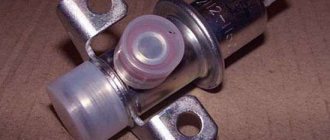
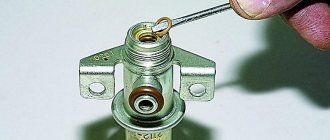
The regulator itself consists of a cylinder, valve, spring and rod. The latter is connected to the rear beam, which ensures the operation of the VAZ-2109 sorcerer. Also, brake fluid circuits pass through the rear brake pressure regulator. For their mounting on the device there are 4 threaded entries. » alt=»»> How does the sorcerer regulator work on a VAZ? During emergency braking, the front of the car is pressed to the ground, and the rear is raised. This causes the regulator rod to move, which blocks the flow of fluid to the rear cylinders. A spring located under the valve prevents it from closing completely. Therefore, the rear mechanisms still work, but later and weaker than the front ones.
Description of design
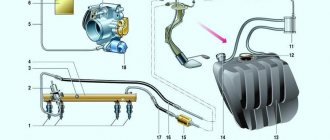
The service brake system is hydraulic, dual-circuit (with diagonally separated circuits), with a pressure regulator 10, a vacuum booster 5 and an indicator of insufficient brake fluid level in the reservoir. If one of the brake system circuits fails, the second circuit provides braking of the vehicle, although with less efficiency.
The brake mechanisms of the front wheels 13 are disc, with a single-piston floating caliper. Currently, brake pads are available with a mechanical (acoustic) or electrical wear indicator. At the factory, cars are equipped with pads without a wear indicator or with an electric indicator (if a control unit is installed on the car).
The brake mechanisms of the rear wheels 7 are drums, with two-piston wheel cylinders and automatic adjustment of the gap between the shoes and the drum. The automatic clearance adjustment device is located in the wheel cylinder.
The main brake cylinder 1 is attached to the housing of the vacuum booster 5 on two studs. A translucent polyethylene brake reservoir 4 with an insufficient fluid level sensor is inserted into the holes in the upper part of the cylinder on rubber seals. The tank has markings for maximum and minimum fluid levels. Two screws are screwed into the bottom of the cylinder to limit the movement of the pistons. The screws are sealed with copper gaskets. A plug is screwed into the front part of the cylinder (along the direction of the car), which serves as a stop for the return spring and is sealed with a copper gasket. The pistons in the master cylinder are located in series, the one closest to the vacuum booster operates the left front and right rear brake mechanisms, and the one closer to the plug operates the right front and left rear. The high-pressure rubber sealing rings (cuffs) of the master cylinder and rear wheel cylinders are interchangeable (nominal diameter 20.64 mm). The low pressure sealing ring is grooved, installed on the piston in contact with the vacuum booster rod.
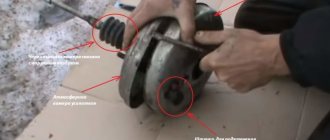
Vacuum booster 5 is located between the pedal assembly and the main brake cylinder 1 and is attached to a bracket, which, in turn, is fixed to the front panel of the body on four welded studs. The amplifier is of a non-demountable design; if it fails, it is replaced. The simplest way to check the serviceability of the amplifier: on a car with the engine turned off, press the brake pedal several times and, holding it down, start the engine. If the amplifier is working properly, after starting the engine the pedal should move forward. Failure to operate or insufficient efficiency of the vacuum booster may be caused by a leak in the vacuum supply hose from the intake manifold.
Setting the brake force regulator
Adjustment of the sorcerer should be done on an overpass or inspection hole. At the same time, the car is unloaded and driven to the work site. To perform the manipulation you will need:
- Socket wrench 13 or corresponding socket;
- Drill diameter 2 mm.
To adjust the sorcerer, use a wrench to loosen the bolt securing it to the lever bracket. Next, use a screwdriver to move the bracket until the resulting gap allows you to insert a prepared two-millimeter drill into it. After this, the bolt is tightened.
Note: the brake pressure regulator of the VAZ-2110 and previous VAZ models turns sour during operation so that it is not possible to move its bracket. In such a situation, you should pour WD-40 liquid over the rusted area, wait 15-30 minutes, and then use a hammer to move the part to the side using a soft drift.
Replacing the brake pressure regulator
The replacement of the sorcerer on VAZ-2110 cars and other vehicles equipped with an RTD is carried out on an overpass. You need a 13 mm spanner, a powerful screwdriver and a special 10 mm wrench designed for unscrewing brake pipes. Before starting work, the assembly must be cleaned of dirt and rust, doused with WD-40 or another penetrating compound, and then wait half an hour.
Work begins by unscrewing the bolt securing the bracket to the spring. Afterwards, the brake pipes are dismantled, the position of which is recommended to be pre-marked.
You can also unscrew the tube fittings with a regular wrench. However, using a special tool makes the job easier and reduces the likelihood of “licking” the edges. After the fittings, unscrew the two bolts securing the sorcerer to the body and remove the part. » alt=»»> It is necessary to install the new VAZ-2110 sorcerer in strict reverse order. After installing it and before adjusting the RTD, you should bleed the rear brake circuits. Next, the above-described procedure for setting up the sorcerer is performed.
Examination
The operation of the VAZ-2109, 2110 and other AvtoVAZ models is checked on the move, in closed areas. To do this, accelerate the car to a speed of 40 km/h and sharply press the brake. The rear wheels should lock 1/2 second later than the front wheels.
The wheels are monitored by an assistant located outside the car. If wheel locking occurs noticeably later or does not occur at all, and also if the rear axle is locked simultaneously with the front, the sorcerer adjustment procedure is repeated.
To increase the response time of the rear brakes, the gap between the adjuster and the bracket is increased; to shorten it, it is reduced accordingly.
Source
Operating principle
During braking, the distance between the axle and the body increases at the rear of the car. As the distance increases, the lever mounted on the bridge releases the sorcerer piston, and it blocks the flow of fluid to the rear brakes. What happens if the fluid can't get to the rear brakes? The wheels will not lock, but will rotate.
In simpler terms, the operating principle of the VAZ-2109 sorcerer is as follows. When the driver pushes hard, the rear of the car will rise. The front one, on the contrary, will go down. This is where the sorcerer begins to work. It will not allow the rear pair of wheels to brake immediately.
The fact is that if the wheels on the rear axle begin to brake along with the front ones, then there is a huge probability that the car will skid. In this regard, the rear brakes will start working a little later than the front ones. The risk of skidding is reduced.
VAZ 2109: adjusting the brakes yourself is easy and simple
Adjusting the brakes of the VAZ 2109
When the car starts to move away, you often get the feeling that someone is holding it from behind. You need to stop and check the temperature of the rear drum with your hand. If it is heated, therefore, the rear pads jam when braking. Conclusion: it is necessary to adjust the brakes on the VAZ 2109. On a VAZ 2109, adjusting the rear brakes is not difficult. For this reason, repair and inspection work must be carried out to adjust the free play of the brake pedal. Free play adjustment is carried out in the garage. Before starting repairs, you need to check the condition and operation of the rear brake system.
Examination
VAZ 2109 rear brake adjustment
- Raise the rear axle of the car with a jack.
- Remove the wheel rims.
- Remove the brake drums.
- Inspect the brake cylinders for leaks.
- Also check their operation, the cylinders should extend to the required distance for braking.
- After releasing the pedals, they should not jam. If this flaw is detected, the cylinders must be replaced.
- Check the condition of the springs; they should not have any spiral bends. They must also have a flat surface.
- Inspect the quality of the pads themselves. There should be no delamination on them, the thickness should be at least 2/3 of the standard.
- Also inspect the spacer bar; it should not have any defects, since a damaged bar can interfere with the operation of the pads.
- Check the brake drums. There should be no burrs or large grooves on them from the operation of the pads.
Attention. It is necessary to check both sides of the vehicle. After the inspection, replace worn or failed parts if necessary.
VAZ 2109 brake adjustment
To carry out regulation it is necessary:
- plate 3 mm thick;
- a set of keys;
- portable lamp with a protective glass cover, with a protective steel mesh.
The process of adjusting the free play of the brake pedal is carried out to ensure the normal functionality of the entire system. If the stroke is reduced, then the rear pads do not fully return to their position. This causes them and the drums to heat up. Uneven acceleration also occurs at the beginning of movement. With increased free play, pressing the pedal causes the brake pads to incompletely expand.
Pedal adjustment
After the inspection, it is necessary to adjust the brake system:
- Raise the hood.
- Disconnect the negative terminal from the battery.
- Move the front driver's seat from the instrument panel all the way to the rear passenger seats. This must be done for easy access under the steering column.
- Hang the prepared lantern in the car to provide sufficient lighting in the area where the adjustment is being made.
Note. Carry out work carefully and consistently.
- Press the brake pedal with the palm of your hand. Press without sharp jolts.
- With your other free hand, try to install the plate in the space from the pedal bracket to the switch button.
If the plate does not enter or if a larger gap of more than 2 mm is detected, the following actions must be taken:
- Hold the pedal with your hand without releasing it.
- With your other hand, using a wrench, slightly unscrew the two nuts along the threads. To loosen the brake warning light switch.
Move it carefully to achieve the required space between it and the brake pedal:
Note: The distance should be no more than 5mm.
- First tighten one nut, then tighten the second.
- Remove your hand from the pedal.
- Check the operations performed.
- The switch buffer rests against the brake pedal bracket, the adjustment is considered complete.
Installation
Set of rear disc brakes for VAZ 2110 As mentioned above, installing rear disc brakes is a delicate matter, but quite doable on your own. This way you can save a lot of money and achieve normal functioning of the brakes.
This is relevant, especially since car services, as mentioned, do not often pay attention to adjustments and the price for services of this kind costs about 10 thousand rubles
Purchasing a set of rear brake discs
Installed rear brake discs
It is recommended to install rear brake discs that are certified by an autonomous non-profit organization. For example, this could be a center that promotes certification or the like. You can purchase rear disc brakes on the market or by ordering online. There is another option, which involves installing rear discs from foreign cars, such as Ford Sierra or Audi A4. But again, when purchasing disks that do not have certification, you will have to make some changes, including sharpening, so that their operation goes smoothly.
Note. Additionally, some rear brake rotor kits do not include boots. In this case, they will have to be purchased separately.
Before starting the replacement process, it is recommended to watch this video. Everything is clearly shown here.
Getting ready for replacement
To get started, you will need the following components:
- brake hoses, pads and calipers, which can even be taken from the front brake kit;
- a set of brake discs (it is necessary to grind down the parts);
- bolts;
- washers;
- special fastening (faceplate).
Note. You can make a special washer for fixing the brake caliper yourself using a drawing. Although you can order this part on the Internet, as many do.
Replacement process
Begin:
- First, let's disassemble the rear brake mechanisms;
- dismantle the wheel;
- remove the brake drum;
- dismantle the pads;
- remove the wheel hub by unscrewing four 17mm bolts.
Note. Before unscrewing the bolts, it is recommended to spray them with a special product. In addition, when unscrewing the bolts, you need to act carefully so as not to tear off the edges of the bolts.
Installing disc brakes
unscrew the brake pipe.
Note. And here you will have to work hard, because if the brake cylinder has not been changed for a long time, everything is stuck there.
- We plug the end of the unscrewed tube with a piece of hose or a cap from a fitting intended for bleeding (this is done to prevent air from entering the system and loss of fuel fluid);
- we knock the hub on the beam out of its seat.
Note. To remove the hub, it is recommended to hit the support disk from the back side, doing this alternately: from above and from below.
Now we put the hub in place, but doing it in a different way than it was before.
Note. In this case, when installing the hub, it will need to be secured through a plate with a built-in brake caliper. The main thing is to make sure that all the holes match exactly
Careful attention must be paid to alignment
straighten the corner of the beam with a hammer (this is done so that the caliper does not rest against the beam);
Photo of disc brakes on a wheel
We put the brake disc on the hub, installing the bracket on the mount.
Note. Don't forget that spacers will need to be placed between the hub and the disc.
- install brake pads on VAZ 2110;
- We screw the brake hose to the caliper, and then to the tube.
Examination
After carrying out the above operations, you will need to check the entire system. The system is checked for leaks, and to do this you need to press the brake pedal. If the pedal is tight enough, then everything is in order.
Note. It is advisable to have an assistant check the brakes for leaks. You will need to ask him to step on the pedal, and at this time try to turn a component of the wheel. If it doesn't spin, then the brakes are holding properly.
Bleeding the brakes
Bleeding the brakes
This is an important operation that will allow you to get rid of the air that still gets into the system. It is worth noting that the brakes on the VAZ 2110 are pumped diagonally, as on other models of the brand. First the right front wheel is pumped, then the rear left, then the front left and rear right.
Brake pressure regulator
Attention. If there are problems with the brake system, then the problem may be hidden in the pressure regulator itself.
VAZ 2109 rear brake pressure regulator
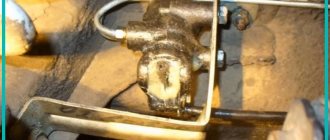
In order to regulate it, you need to know the basic principles of operation of this mechanism, popularly called a sorcerer. As a rule, the sorcerer is attached with two bolts from the bottom of the car. As for one of the bolts, it also simultaneously secures the fork element of the drive lever, which is responsible for pressure. This very element or bracket is the very object with which the movement is carried out and thus the pressure can be adjusted.
rav />Neoline CUBEX V50 DVR review – reviews and features
Neoline CUBEX V50 is a fairly expensive DVR that boasts good characteristics and positive user reviews. First of all, you need to pay attention to the type of mounting - the bracket is designed in such a way that it is very easy for the driver to rotate the camera in the vertical and horizontal plane. If you need to quickly remove the camera and capture what is happening on the street, this can be achieved by simply turning the DVR to the side.
A 3-megapixel camera in combination with a powerful Ambarella processor provides good picture quality with a viewing angle of 130 degrees diagonally, that is, not only the roadway, but also the side of the road is captured in the frame. Video recording is cyclic, carried out in small fragments from two to five minutes, even if the power is turned off, the last file will be recorded to the end. In order not to press the buttons on the device body again, you can set the Autostop mode, and the recording will stop as soon as the motor is stopped.
To ensure that all moments are displayed on the video, and the most important recordings are not erased after the memory card is full, there is a G-sensor that can be turned on or off at your discretion. However, a common problem with DVRs on CIS roads is that the shock sensor is too sensitive; it even perceives collisions with bumps or holes as a danger and saves these files in a separate folder, which can only be cleared after removing the memory card.
It’s nice to have a GPS module and the ability to receive GLONASS signals, thanks to which the video displays not only the video sequence itself, but also a map of the route, the speed on a particular section of the route, stamps of the license plates of the cars that were included in the frame, the time and date of recording. In addition, there is still access to the X-COP police radar database. This database includes all stationary installations on the roads of Russia and Belarus; updates occur every two weeks and can be downloaded for free on the manufacturer’s website – Neoline.
“>