The Lada Granta ignition module is an important component of the ignition system in a car. The main purpose of the product is to supply high voltage to the spark plugs, which in turn produce a spark to ignite the air-fuel mixture in the car engine.
In cases where the module is damaged or inoperable, engine malfunctions occur (misfires, fuel in the cylinders does not ignite, engine tripping and other troubles).
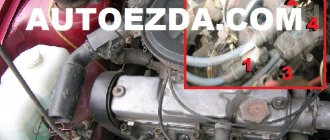
Ignition module VAZ 21214 injector connection order
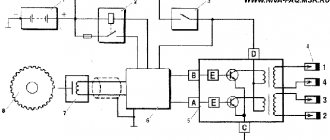
The ignition system (Fig. 1) uses an ignition module consisting of a two-channel electronic switch and two two-terminal ignition coils. The ignition system has no moving parts and therefore requires no maintenance. It also has no adjustments, since the ignition control is completely electronic.
Rice. 1. Ignition system VAZ-21214. 1 - battery, 2 - main relay, 3 - ignition switch, 4 - spark plugs, 5 - ignition module, 6 - controller, 7 - crankshaft position sensor, 8 - drive disk, E - matching devices.
The ignition system uses a spark distribution method called the "idle spark" method. The engine cylinders are combined in pairs 1-4 and 2-3, and sparking occurs simultaneously in two cylinders: in the cylinder in which the compression stroke ends (working spark), and in the cylinder in which the exhaust stroke occurs (idle spark). Due to the constant direction of current in the primary and secondary windings, the sparking current of one spark plug always flows from the central electrode to the side electrode, and the second - from the side to the central one.
Ignition control is carried out by a controller that uses information about the engine operating mode received from sensors of the engine management system.
The ignition system has the following four circuits
Ignition control circuit for cylinders 1 and 4.
The controller generates an ignition control signal to contact “B” of the ignition module. This signal is used to switch the primary winding of the ignition coil and provide high voltage to the spark plugs of cylinders 1-4.
Ignition control circuit for cylinders 2 and 3.
The controller generates an ignition control signal to contact “A” of the ignition module. This signal is used to switch the primary winding of the ignition coil and provide high voltage to the spark plugs of cylinders 2-3.
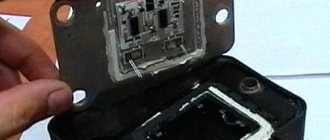
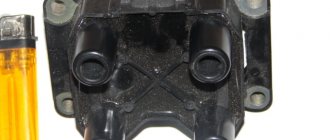
Ignition module.
The ignition module (Fig. 2) contains two ignition coils and two powerful transistor valves for switching the primary windings of the ignition coils. The controller controls the module by sending signals through the ignition control circuits “1-4” and “2-3”. If any element of the ignition module malfunctions, the entire assembly must be replaced.
| Rice. 2. Ignition module. |
Power circuit.
The car's onboard voltage is supplied from the ignition switch to contact “D” of the ignition module.
Ground circuit.
The ground connection circuit goes from the end of the cylinder head cover to contact “C” of the ignition module.
1. Disconnect the wire from the negative terminal of the battery. 2. Disconnect the wiring harness connector from the ignition module. 3. Disconnect the spark plug wires. 4. Remove the ignition module by unscrewing the fastening nuts.
Installing the ignition module
1. Install the ignition module on the bracket on the engine and secure it with nuts, tightening them to a torque of 3.3. 7.8 N. m. 2. Connect the spark plug wires. 3. Connect the wiring harness. 4. Connect the wire to the negative terminal of the battery.
Scanned and processed by Volodyushka, 01/12/03.
Source
Addresses of companies providing ignition replacement services (Moscow, St. Petersburg, Kyiv regions)
| № | Name | Address |
| 1. | "EuroSTO on Motorny" | lane Motorny 3, Kyiv |
| 2. | "AUTO" | st. Krasnotkatskaya, 42-E, Kyiv |
| 3. | "Vilgud car services in Moscow" | lane Seversky, 24 - 125 |
| 4. | "Car service 24 hours" | Moscow, 2nd Vyazovsky pr-d, 4 building 5 |
| 5. | "Car service Person" | St. Petersburg, Kurskaya st. 28 m. Obvodny Canal |
| 6. | "PIT STOP" | PARNAS, SH. VYBORGSKOE, 33, ETC. MARSHAL BLUCHER 41 BOLSHEVIK Ave. 10 ETC. ISKROVSKY, 7 |
Ignition order for Niva 21214 injector
The ignition system (Fig. 1) uses an ignition module consisting of a two-channel electronic switch and two two-terminal ignition coils. The ignition system has no moving parts and therefore requires no maintenance. It also has no adjustments, since the ignition control is completely electronic.
Rice. 1. Ignition system VAZ-21214. 1 - battery, 2 - main relay, 3 - ignition switch, 4 - spark plugs, 5 - ignition module, 6 - controller, 7 - crankshaft position sensor, 8 - drive disk, E - matching devices.
The ignition system uses a spark distribution method called the "idle spark" method. The engine cylinders are combined in pairs 1-4 and 2-3, and sparking occurs simultaneously in two cylinders: in the cylinder in which the compression stroke ends (working spark), and in the cylinder in which the exhaust stroke occurs (idle spark). Due to the constant direction of current in the primary and secondary windings, the sparking current of one spark plug always flows from the central electrode to the side electrode, and the second - from the side to the central one.
Ignition control is carried out by a controller that uses information about the engine operating mode received from sensors of the engine management system.
The ignition system has the following four circuits
Ignition control circuit for cylinders 1 and 4.
The controller generates an ignition control signal to contact “B” of the ignition module. This signal is used to switch the primary winding of the ignition coil and provide high voltage to the spark plugs of cylinders 1-4.
Ignition control circuit for cylinders 2 and 3.
The controller generates an ignition control signal to contact “A” of the ignition module. This signal is used to switch the primary winding of the ignition coil and provide high voltage to the spark plugs of cylinders 2-3.
Ignition module.
The ignition module (Fig. 2) contains two ignition coils and two powerful transistor valves for switching the primary windings of the ignition coils. The controller controls the module by sending signals through the ignition control circuits “1-4” and “2-3”. If any element of the ignition module malfunctions, the entire assembly must be replaced.
Power circuit.
The car's onboard voltage is supplied from the ignition switch to contact “D” of the ignition module.
Ground circuit.
The ground connection circuit goes from the end of the cylinder head cover to contact “C” of the ignition module.
1. Disconnect the wire from the negative terminal of the battery. 2. Disconnect the wiring harness connector from the ignition module. 3. Disconnect the spark plug wires. 4. Remove the ignition module by unscrewing the fastening nuts.
Installing the ignition module
1. Install the ignition module on the bracket on the engine and secure it with nuts, tightening them to a torque of 3.3. 7.8 N. m. 2. Connect the spark plug wires. 3. Connect the wiring harness. 4. Connect the wire to the negative terminal of the battery.
To generate a spark in Niva cars, an ignition module is used. Older Nivas were equipped with a distributor; this part did not inspire reliability and required special attention and frequent revision. With the transition of Niva to injection engines, the need for a distributor disappeared, and it was replaced by a more reliable ignition module.
In this article we will talk about the ignition module of a Niva car, namely how to check it, signs of malfunction and much more. After studying this article, you can easily find a breakdown in your car related to the MH.
List of online stores selling reels (Moscow, St. Petersburg, Kyiv regions)
| № | Name | Address |
| 1. | "AUTOKLAD" | https://www.autoklad.ua/ |
| 2. | "AUTOKLONDAYK" | https://autoklondayk.com.ua/ |
| 3. | "PITBIKECLUB" | https://pitbikeclub.ru/ |
| 4. | "ASTARTER" | https://www.astarter.ru/ |
| 5. | "AUTOPRIWOS" | https://www.autoprivos.ru/ |
| 6. | "DENSO" | https://www.denso-am.ru/ |
Related link:
We select tires and wheels for the Lada Granta
Purpose and design of the part
The purpose of this sensor is one thing - to supply a reliable spark to the combustion chamber of the car through high-voltage wires and a spark plug. To be more precise, the ignition module does not supply a spark, but only the voltage necessary to form a spark on the spark plug.
The design of the part is made of heat-resistant plastic, in which two coils are placed. Each of the coils is responsible for the operation of two cylinders. The coils have a primary and secondary winding in which high voltage is generated.
Candle making options:
Checking the DPD with a VAZ 2110 multimeter
To increase productivity when creating these products, some technological features are used, which in theory can increase productivity, and as a result, the highest quality fuel combustion:
- Platinum coating. Allows you to increase the service life up to 50 thousand kilometers due to the fact that the surface becomes more resistant to the combustion products of the fuel mixture.
- Multi-contact spark plugs. Typically used in cars that are operated in regions with predominantly low temperatures. Such products make it possible to improve the starting of a cold car in the morning. In summer, it is recommended to replace them with regular ones.
Examination
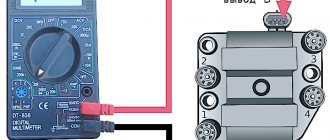
The module can be checked using a special diagnostic tool ELM327 or using a multimeter. Since not every car enthusiast has a diagnostic device, it would be most correct to talk about checking the MH using a simple multimeter.
To check the MH you will need a regular household multimeter, also known as a tester. The test consists of measuring the resistance of the windings.
Step-by-step verification process
Checking the resistance of the secondary winding
- To do this, set the resistance measurement limit on the multimeter to 20 kOhm.
- We connect the probes to the terminals of the module and look at the readings of the device.
- The winding resistance should be around 5 kOhm.
Checking the primary winding
- It is necessary to set the switch on the multimeter to measure resistance with a limit of 200 Ohms.
- We connect the multimeter probes as shown in the picture and measure the resistance.
- The resistance should be around 5 ohms.
Visual inspection of the IKZ
When visually inspecting an element, you will need to carefully examine the surface of its body; this is necessary to identify chips, cracks and burnt areas on it. In order to remove the IKZ from the engine, use a 10mm socket wrench or Torx E8 (this depends on the engine model).
After removal, carefully inspect each coil, paying special attention to the absence of melted areas and leakage of plastic, as well as the condition of the rubber cap and the correct location of the spring located in the inside of the coil. If any defects are found during a visual inspection, the part will need to be replaced. If they are absent, you can start checking the IKZ with a multimeter.
Why does the MH break down?
The ignition module fails due to the use of low-quality spark plugs, as well as due to the use of old high-voltage wires whose insulation has lost its properties.
If the MZ gets wet, for example, by driving a Niva along a ford, then the likelihood of it breaking is quite high.
In order for the ignition module to work much longer, it is necessary to change the spark plugs and high-voltage wires on time.
Review of manufacturers, article numbers of coils for 8 (16) valve Lada Granta
| Catalog article / OEM | Price, rub.) | Pump mileage (thousand km) |
| Coil BREMI 20466 | From 1300 | 85 – 95 |
| MEAT & DORIA 10573 | —/— | —/— |
| NGK 48336 | —/— | —/— |
| U5116 6545432 | —/— | —/— |
| NGK 48312 | —/— | —/— |
| U2065 5646534 | —/— | —/— |
| (module) SOATE 2111-3705-03 | From 950 | 55 – 65 |
| MZATE-2, article number 3705010-01 | —/— | —/— |
| FENOX IC16004O7 | —/— | —/— |
| SOATE 3705-03 | —/— | —/— |
| MZATE-2, 4601.3705 | —/— | —/— |
| RENAULT/LADA 3705010-03 | From 1100 | 65 — 75 |
*prices are current as of November 7, 2018.
Another online store selling spare parts for the ignition system:
- Ignition coils
- Glow plugs
- Denso spark plugs
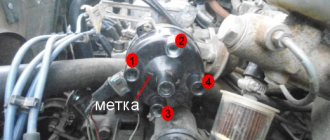
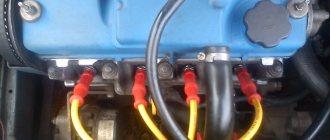
Connecting high voltage wires
The sequence of connecting the high-voltage wires plays a huge role, since the spark in the cylinder is supplied in a certain order, which is indicated by the crankshaft position sensor. As soon as the piston reaches TDC, a spark is supplied to it to ignite the air-fuel mixture.
Below is a diagram of how to connect high-voltage wires on a Niva.
Symptoms of a problem
Of course, repair of the distributor is carried out only after it has been diagnosed.
Listed below are the main symptoms of a distributor malfunction, in which it is necessary to disassemble and check the mechanism:
- the car began to jerk while driving;
- the engine basically won’t start;
- when the speed increases, detonation may be heard (knock of “fingers”);
- it takes longer to increase speed;
- Gasoline consumption has increased.
Of course, these symptoms may indicate other problems. Therefore, before repairing a disassembled unit, you need to know how to set, how to adjust and how to check the distributor.
To check it, you need to disassemble it and pay attention to the condition of the following components:
- slider;
- oxidized or burnt distributor cover contacts;
- failure of the Hall sensor (its bearing element could fail or become jammed);
- distributor capacitor;
- presence of cracks on the device body;
- stuffing box;
- Repair of the ignition distributor should also be carried out if engine fluid gets into its structure.
Distributor for car
Replacing the Niva 21214 timing chain on an injector with your own hands, video
Here we will talk about independently replacing the timing chain drive on a Niva 21214. The timing belt affects the operation of the entire car, so the importance of this unit should not be underestimated. Replacing a chain drive is a rather complicated process, which, however, can be done by any car enthusiast, provided that he follows the instructions and shows a little diligence.
A chain has significant advantages over a belt drive. These include, first of all, its reliability. While a belt can break, this rarely happens with a chain. Usually it just stretches. It lasts much longer than the belt, which means it needs to be changed less often. But still, the chain does not last forever, and after a while it also has to be replaced with a new one. When replacing the chain yourself, it is very important to set the marks correctly and follow safety precautions.
When to change the timing chain?
The manufacturer does not give clear recommendations regarding the timing of replacing the timing chain on the Niva. Experts assure that the need for replacement may arise no earlier than after 100,000 km. But it is very important to periodically carry out diagnostic procedures for chain transmission. It may well happen that the chain weakens. This will be noticeable by the characteristic sound that the running engine will make. First you need to try to tighten the chain. If this cannot be done in the usual way, replacement becomes necessary. In this case, you can contact a service center, where this repair will be carried out by professionals, or you can try to change the chain yourself. The latter option is preferable in terms of savings and gaining the necessary experience.
If the mark on the camshaft gear does not match the mark on the bearing housing, it's time to take action. The chain drive also needs to be replaced if chips or cracks appear on it. All this suggests that your chain has served its intended life and it is time to replace it.
So, you have decided that you will make the replacement yourself. What do you need to do next? First of all, go to the store and buy a new chain there. You can check the quality of the chain you are purchasing. We take the chain and place it flat on our palms. If its sagging exceeds 1 cm, you better look for consumables elsewhere. In addition to the chain itself, you will also have to buy a set of oil seals, a tensioner, dampers, and a set of gaskets. Then we prepare the tools that will be useful in the work and begin the repair.
Replacing the chain drive
- Place the car on a level surface. Open the hood. Disconnect the battery. Remove the air filter.
- The choke cable should be disconnected and moved away. It is also necessary to disconnect all electrical drives and pipes.
- Remove the fan, generator belt and pump roller. The belt should be thoroughly examined. If deep cracks or other damage is found on it, it must be replaced with a new one. Remove the tray protection and thoroughly clean its cover.
- Remove the valve plug. Unscrew the camshaft sprocket screw.
- Take a wrench and unscrew the ratchet nut.
- Now we begin to rotate the crankshaft until the marks on it and on the engine casing completely coincide. Make sure that the marks also match on the bearing housing and camshaft sprockets.
How to fix a breakdown
As for the question of how to fix a breakdown, there are two options - fast (“field”) and slow (“garage”). In the latter case, everything is simple - it is advisable to completely change the coil, especially if the breakdown is significant. As for quick repairs, either electrical tape or glue is used for this.
Isolating a damaged coil
The most interesting question for car owners in this context is how to eliminate a breakdown of the injection ignition coil? In the simplest case, that is, if there is a small spark breakdown on the body (and this is the most common type of breakdown), after localizing this place you need to use insulating materials (insulating tape, heat shrink, sealant, epoxy glue or similar means, in some In cases, even nail polish is used, but the polish should only be colorless, without any paints or additives), and isolate the place (path) of the breakdown. It is impossible to give universal advice; it all depends on the specific situation.
When performing repairs, it is necessary to clean and degrease the area of electrical breakdown before applying a protective insulating layer to it. This will increase the resistance value of the resulting insulation. If, when the insulation is damaged and there is a breakdown, liquid appears in the coil (usually from a damaged seal), then it makes sense to additionally use dielectric grease.
Well, in the most severe case, you can, of course, install a new coil. It can be original or not - it depends on the price. Many car owners are saved by the so-called “dismantling shops”, that is, places where you can buy spare parts from disassembled cars. They are cheaper there and you can easily find high-quality components.
Finally, a few words about preventive measures that will allow you to get rid of troubles and operate the reel for a very long time and without problems. The simplest measure in this context is to use heat shrink of a suitable (large) diameter, which must be applied to the surface of the tip of the ignition coil. The procedure is simple, the main thing is to choose heat shrink of the appropriate size and diameter, and also have a hair dryer (preferably a construction hair dryer) or some kind of gas burner on hand. However, before applying heat shrink, do not forget to clean and degrease the working surface of the tip. This procedure can also be used not as a preventive measure, but rather as a repair measure.
Also, for prevention, it is advisable to keep the coil housing, and other engine elements, clean so that there is no “sparking” through dirt and dust. And when replacing spark plugs, always use dielectric grease for spark plugs.
The ignition module (IM) of the Niva-Chevrolet car is highly reliable and, most often, provides sparking over many tens of thousands of kilometers. However, if it fails, it is difficult to diagnose due to the lack of obvious signs. The decent cost of a module does not always allow it to be replaced with a new one, which is called “blindly”. First you need to reliably verify that the old one is faulty. Read the article about how to check the ignition module of a Niva-Chevrolet.
Repair of VAZ 2109 distributor
One of the most common problems with the VAZ 2109 distributor is failure of the Hall sensor. If the sensor is faulty, the engine stops starting; we replace this part as follows:
- remove the distributor from the engine;
- unscrew the cover (two screws);
- dismantle the vacuum regulator;
- unscrew the screw holding the sensor connecting block;
- unscrew the fasteners of the upper bearing holder, it is secured with two screws;
- remove the bearing assembly with the sensor, remove the Hall sensor from the holder (two screws);
- we install a new part, assemble the distributor, and put it in place.
After repairing the VAZ2109 distributor, you may need to adjust the ignition; it is done very simply:
- loosen the three nuts of the PR housing itself;
- with the engine running, gradually turn the distributor in one direction or the other, apply gas with the throttle - we find the position in which the engine picks up speed faster, without dips;
- Then we tighten the nuts and check the car while driving. If it was not possible to find the desired position immediately, repeat the operation.
Repair of VAZ 2106 distributor
On older VAZ 2106 cars, a contact distributor is installed, but such a system is not very reliable - due to malfunctions in the contact group (CG), various problems often arise:
- due to burnt contacts, the engine may not start;
- too large a gap in the CG affects engine power - the engine stops developing speed;
- If there is a small gap in the contacts, the motor jerks and works unstably.
To repair the VAZ 2106 distributor, it must be removed and troubleshooting carried out. Removing the device on the “Classic” is very simple, but before repairing it, it is recommended to align the crankshaft to the mark - this will make it easier to install the distributor after repair. We remove the distributor as follows:
- rotate the crankshaft until the marks align;
- we pull off the tips of the high-voltage wires from the spark plugs;
- unclip the two latches of the distributor cap and see what position the slider is in. If it is directed to the fourth cylinder, we make another full turn of the crankshaft. Usually, with correctly set marks, it should be located as in the picture below;
- pull off the hose from the vacuum regulator;
- unscrew the nut number 13, which holds the distributor, and dismantle the distributor.
Now the PR should be disassembled, perform the following operations:
- unscrew the fastening screws of the runner, dismantle the rotor;
- unscrew the nut located on the body, hold the screw on the other side of the body with a screwdriver;
- dismantle the fasteners, take out the plastic insulator;
- tighten the screws holding the contact group (KG);
- dismantle the CG;
- knock out the shaft pin;
- remove the oil deflector and washer from the roller, pull the shaft out of the housing;
- to get to the bearing, remove the locking washer of the ignition timing regulator rod from the top of the housing;
- Unscrew the bolts securing the regulator, dismantle the ignition timing mechanism;
- unscrew the screws (2 pcs.) that hold the bearing fixing plates;
- dismantle the bearing, lifting it from different sides;
Repair of VAZ 2108 distributor (replacement of the vacuum regulator)
In distributors of VAZ 2108-09-099 cars, the VROZH quite often fails. Its performance can be checked without removing the PR from the engine - we suck in air through the hose, and if a vacuum is not created, the regulator should be changed.
The ignition timing regulator can be replaced on site without removing the distributor:
- unscrew the two screws of the distributor cover, and together with the high-voltage wires, move the cover to the side, disconnecting only the central wire;
- we pull out the slider, it can be removed by hand;
- Using a thin screwdriver, pull out the latch that secures the VROZH rod; you need to remove the fastening element carefully so as not to lose it;
- unscrew the 2 screws securing the “vacuum unit” and remove the device;
- We install the new part in place and put everything back together.
Replacing the VROZH can also be done by removing the distributor, which will even be more convenient. Remove the distributor as follows:
- disconnect the high-voltage wires from the PR cover;
- use a thin screwdriver to hook the retaining springy wire on the connector and remove the plug going to the distributor from the bottom left;
- we pull off the hose from the VROZH, make a mark on the PR body or notice how it stood;
- unscrew the three nuts that secure the distributor itself, and then remove the breaker - distributor.
Reinstalling the distributor is simple - the camshaft spline has a groove shifted to one side, and therefore the PR is installed in only one position, it is impossible to make a mistake here. During installation, you need to pay attention to the rubber O-ring - if the rubber has hardened, the part must be replaced. And in any case, the seal should be coated with an oil-resistant sealant, in which case oil leakage will be almost 100% avoided.
Distributor VAZ 2108-09
The PR on front-wheel drive VAZ cars with a carburetor engine is of the contactless type; it is fundamentally designed in the same way as the contactless distributor on the Classic, but has its own design features and looks completely different in appearance. The shaft of the VAZ-2108 distributor is short, it is driven directly from the camshaft, and is installed on the cylinder head.
Video “All about setting up a breaker”
Detailed instructions, as well as practical recommendations regarding setting the ignition breaker, are given in the video below (author - Andrey Gorinov channel).
A faulty ignition distributor (distributor) on VAZ 2108, 2109, 21099 vehicles can cause a number of problems in engine operation.
These are: the inability to start the engine or its difficulty starting, unstable operation and the tendency to stall at idle, a noticeable decrease in power and throttle response (for example, when driving uphill), increased fuel consumption, etc.
List of the most common faults in the distributor of VAZ 2108, 2109, 21099 cars
— the fastening of the distributor has become loose, causing the ignition timing to be off in one direction or another. A misaligned angle can lead to difficult starting, loss of power, unstable idling, and fuel gluttony. Tighten the distributor fastening with a 10 mm open-end or socket wrench - two nuts and one bolt.
— the wires to the distributor cap are connected in the wrong order. The engine either does not start at all, or it starts, but at the same time it “sneezes” and shoots into the carburetor.
procedure for connecting wires to the distributor cover on VAZ 2108, 2109, 21099
— the distributor cover is “broken” The places where the cover is “broken” are usually clearly visible during a visual inspection of the part. A faulty cover allows part of the current to leak, which causes interruptions in the engine’s operation in different operating modes from idle to power modes, and throttle response drops.
— the contacts in the cover have oxidized or broken. Oxidized contacts can be cleaned and wiped with white spirit. The cover with damaged contacts should be replaced. One of the common reasons for engine tripping in VAZ 2108, 2109, 21099 cars.
— the contact angle in the distributor cover has collapsed or worn out. The engine does not start or starts with difficulty. It is necessary to replace the ember or the entire lid.
— the runner is “broken” Very often, due to a “broken” runner, it becomes impossible to start the engine or it starts and stalls.
— the noise suppression resistor in the slider has failed . Same consequences. Replace the resistor.
— Hall sensor is faulty In this case, the engine does not start.
— the wires from the Hall sensor to the connecting block are broken. The Hall sensor should be checked.
— the upper bearing of the distributor is worn out. In this case, when setting the ignition timing on VAZ 2108, 2109, 21099 cars, in the strobe light the mark on the flywheel does not stand still, but continuously jumps (the reason for the jumps can also be a current leak through the “broken” cover and slider ). Idle speed is not stable. It is necessary to replace the roller with the centrifugal regulator and bearing or the entire distributor.
— the vacuum ignition timing regulator is faulty. The engine does not pull up, its power and throttle response are reduced, since the vacuum regulator makes the ignition timing a little earlier under load conditions. Perhaps the housing of the vacuum regulator is not sealed, or the hose going to it from the carburetor is jammed on its rotating plate. It is necessary to eliminate leaks and jamming of the plate either by replacing faulty parts, or by replacing the ignition timing regulator (distributor) assembly.