Whether or not to install a reversing camera is up to each driver to decide for himself. Connecting a rear view camera requires some knowledge and skills, so not everyone can do it themselves. With a small set of tools and basic removal skills, you can easily figure out how to connect a rear view camera.
Side mirrors, and even your head turned 180°, will not give the desired effect; you may still not notice some little things, or maybe not little things. And then a showdown with the owner of the scratched car may begin, and this can cost you tens of times more than connecting a reverse camera. Later in the article we will look at which camera you can choose, whether a Chinese manufacturer is right for you, or whether you prefer something more solid. We will also discuss whether it is possible to install a rear view camera yourself, and how to properly connect the device you have chosen.
Connecting a rear view camera yourself
There are several basic ways to connect a rear view camera in a car. The outgoing signal can be output to the display of a car radio or navigator, a head unit monitor, or to a separate screen included in the delivery package.
The last option is the simplest, since there is no problem of equipment inconsistency. At the same time, the remote screen requires a separate place in the car. The easiest way is to place the display on top of the dashboard. The second disadvantage of this option is the additional costs of equipment.
If you connect the output of the device to a monitor or radio, you save both space and money. Plus, in this case the display will be located in the most convenient place for viewing.
Installing a rear view camera yourself usually does not pose any particular difficulties. First of all, you need to decide on the type of product and its parameters. If you are going to connect the device to a car radio or navigator, you must first make sure that the equipment is compatible. The video camera’s power supply voltage, the transmitted image standard, resolution, device activation option, type of connectors, etc. may be important here.
Where is the best place to install?
So, a rear view camera is a useful device that allows the driver to safely maneuver the car while driving in reverse. The main thing is to establish a good overview, not limited by various obstacles.
Therefore, it is important to choose the correct location for installing the peephole. The best option is a niche under the rear bumper, above the license plate. There are also devices built into the license frame itself.
The disadvantages of this placement are susceptibility to rapid contamination and the risk of theft. However, if you equip the peephole with special protection (household chemicals, an automatic curtain or a washer device) or, simply put, carefully monitor its cleanliness, the first problem will disappear. As for the second, it is enough to ensure that the camera is firmly attached to the screws on the back of the bumper, and thieves are unlikely to want to mess with you.
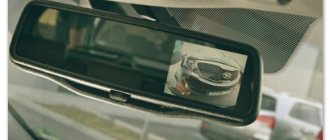
Also, a rear view camera can be installed in the cabin, which will solve the above problems in one fell swoop. But, at the same time, the viewing angles will narrow, half of the radio screen will be occupied by the image of the trunk, the closest area under the bumper will not be visible in the lens (what if there’s a cat?), and the image quality will also suffer (the presence of additional glass in the form of an obstacle). Also, the window may fog up in winter, become dirty in summer, etc.
How to connect camera wires and power
How to connect power is a rather important question and not always straightforward. There is an opinion that it is best to power the device from the reversing lights. This is often the most convenient. The camera itself is located on the car in the rear of the body. So here it is not difficult to take the 12V voltage from the rear light and connect the red wire to it. Here you can also take a minus.
Note that in order to avoid the appearance of additional potential differences, it is better to take the plus and minus from one place. This will reduce the likelihood of failures and interference with electronics.
An alternative option is to connect the camera's power directly from the on-board network, directly from the battery or through the ignition (for example, from a cigarette lighter). This method may be preferable if the video signal is sent to the monitor of the head unit.
In this case, the video camera will be constantly energized while driving, warmed up and ready for use. This improves picture quality, but may lead to overheating. Many models are designed for power supply less than 12 V. It is better to connect them via an adapter (voltage converter).
The last question is which wire or connector to connect the video output to. It all depends on the type of display device used and the connection diagram. The easiest way is if a standard RCA connector can be connected directly to the radio or navigator. Otherwise you will have to use adapters.
Below we will describe how to properly connect the video camera yourself when using different connection options.
Required tools and materials
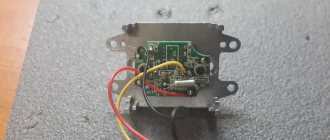
The standard set of video cameras includes a basic set of materials used in installation work. But Chinese-made equipment is equipped with low-quality wires and terminals, which are recommended to be replaced. The set of tools depends on the design features, installation method and equipment switching. For example, there are video cameras integrated into a plastic license plate frame (model Auto Expert VC-204).
To mount a camera with your own hands to view the space behind the car, you will need the following tools and materials:
- cordless drill with a set of drills;
- drawing set for marking;
- patch cables and plugs;
- hardware products for fastening components;
- devices for removing the radio, which is used to display images on the display;
- insulating tape or heat shrink tubing.
Schemes for connecting a rear view camera to a car radio and monitor
There are two main options for connecting the camera to the radio. The first is using a separate excitation wire. This pin may be designated on the diagram and body of the car radio itself as “reverse” or “parking”.
The wiring diagram for this connection option is shown above. Here, pin P3 is supplied with +12 V from the rear light of the car. In this case, the main power can be supplied either from the same point or separately, from the on-board network.
If the design of the radio does not provide for the use of a separate excitation (or parking) signal, then activation occurs simply upon the appearance of a video signal at the input. In this case, power is taken from the rear light.
The camera is connected to the monitor in a similar way. There is one main difference here. In some cars you need to go to the engineering menu of the head unit and select the appropriate type of activation.
Rating of the best models
These mirrors with monitor for view camera are in good demand and have all the necessary features. In some models, small monitors are installed under the mirror surface. Some mirrors are full-fledged video recorders with an input for a rear view camera.
Trendvision MR710GP
This device is a DVR in the mirror with a camera and monitor. The accessory has a high-quality matrix that allows you to shoot video with Full HD and Super HD resolution. The image update speed is 60 frames per second. Another advantage is the wide viewing angle of 147º. The volume of internal memory is 128 GB. There are 2 slots for memory cards in SD and MicroSD formats. A video input is provided to connect a rear view camera.
The built-in battery ensures autonomous operation of the device for 20 minutes. This mirror with a monitor is constantly powered from the on-board network with a voltage of 12 or 24 V. The device has a built-in 4.7-inch display located in the middle of the mirror. The built-in GPS informer warns of traffic police posts along the way. There is no navigator function.
Autoexpert DV-525
This mirror with a camera and a monitor for a car can be installed instead of the standard one. Dual video input allows you to connect not only the rear but also the front camera. The monitor, which has high-quality color reproduction and high contrast, is located on the left. Another advantage of the Autoexpert DV 525 device is the reliability of fixation thanks to spring fasteners with adjustable height. The limits of change are from 55 to 78 mm. The only drawback is the overpriced.
Dunobil Spiegel DUO
This device is a video recorder with a panoramic mirror, which is distinguished by the presence of a rear view video camera with standard VGA resolution. For connection, a wiring harness is provided, ending with a 4-pin plug. The device has various useful functions, such as a motion sensor and G-sensor. Screen diagonal is 4.3″. For short-term offline operation, a 250 mAh battery is provided.
Interpower Silverstone f1 Interpower HD-5
This camera mirror has a 5-inch display with a resolution of 800 by 480 pixels. The device is powered from the vehicle's on-board network. The display displays a high-quality image, the brightness of which may not be sufficient in the summer. Another drawback of this model is the short connection wires, which can cause installation difficulties. The mirror has a good viewing angle, which allows it to be used for its intended purpose.
SHO Me M43
This device with a monitor for a view camera is widely used due to its low cost. It has a 4.3-inch display with a low resolution of 480 by 272 pixels.
The car mirror of this model is small in height, which makes it difficult to use for its intended purpose.
Another drawback is the low contrast and color saturation of the display. But there is also an advantage - the presence of 2 video inputs.
How to connect a rear view camera to a navigator
To connect to a navigator, the device must have a video input or wireless connection.
In the first case, the circuit is practically no different from that described above, with excitation via the video input (see diagram above). The only difference is that most navigators have a different type of connector. This problem can be solved using an adapter or by purchasing a video camera with the appropriate output in advance.
See below for wireless connection option.
System selection
In one of the articles we already talked about which rear view camera to choose for a car. We won’t go into detail here; we’ll just remind you that you shouldn’t overpay for functions that you will never use. But here are the main parameters that are worth paying attention to:
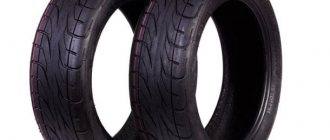
- Video resolution. Everything is logical here, because the higher the resolution, the better the quality on the screen.
- ISO. This is the sensitivity of the matrix and it affects the image, for example, at night.
- Viewing angle. Usually 120-180 degrees. The higher the indicator, the more space is visible in the frame. But do not forget about the distortion of the size of objects.
- Device body. Here we mean the type of installation - internal and external. The latter usually have moisture protection, and the former will not fall prey to criminals in your yard.
- Connection - wired or wireless. Here it is more convenient for you and what is your budget.
- Backlight function. This option will allow you to navigate more easily in the evening with the help of an additional lamp or diodes.
Connecting a wireless rear view camera
Many car enthusiasts are interested in how to connect a video camera without laying wiring in the cabin with the accompanying removal of the trim. This can be done using a wireless module. The video signal transmitter is installed next to the camera itself and is powered by the rear lights.
The receiver is placed close to the display device (car radio, navigator or monitor). This option is not suitable when using a radio with activation via a separate input.
Features and Specifications
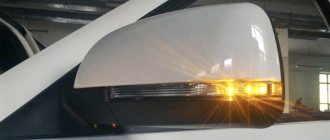
The viewing angle of a view camera with a monitor in the mirror characterizes how well objects located to the left and right of the vehicle will be visible. There are 2 options for installing a car mirror with a camera:
- Instead of a standard interior rear view mirror.
- As an overlay for a standard mirror using clamps.
Many mirrors with a camera have parking sensors, which makes parking the car easier in cramped conditions. A special radar, which is installed at the rear of the car and connects to the device via wire or Bluetooth, determines the distance to the nearest obstacle. Lines indicating dimensions will appear on the screen. If the device has a speaker, beeps will sound. The parking sensor function is useful for novice drivers to make maneuvering easier.
The size of the monitor built into the device can range from 3 to 6 inches. The larger the screen size, the smaller the mirror area allocated for viewing. More expensive models can be equipped with additional devices and functions, such as a navigator, clock, and video recorder. If the accessory has a built-in radar detector, the driver will be able to reduce speed in advance before approaching control equipment.
Connecting a rear view camera via a relay
Often it becomes necessary to connect a video camera via a relay. It is not uncommon for the display to experience severe noise due to unstable voltage or the use of PWM modulation. On some cars, in the latter case, the video cameras do not start at all.
The solution is to use a relay. The plus from the rear lights is supplied to the control input of the switch. The video camera is powered from a 12 V network through the power relay contacts.
Setting up a camera with a mirror
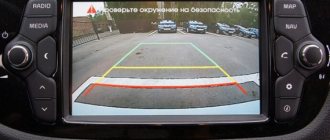
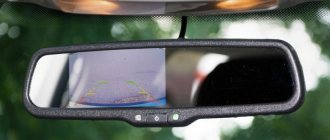
After installing and connecting the equipment, it is advisable to configure it. Algorithms can vary significantly depending on the type of models used. Therefore, we will only mention the most basic nuance - the use of a scale grid displayed on the monitor.
This function is not available everywhere, but many models are equipped with it. After engaging reverse gear, a characteristic grid appears on the display, helping to better navigate. If it is not possible to adjust its parameters, it is necessary to at least determine the correspondence of individual lines to real distances. To do this, you need to drive close to the obstacle (until the first line of the grid “rests” against it). After that, go out and measure the actual distance between the bumper and the wall.
Where to install a rear view camera on a car
The question of where to mount the camera is also very important. It is necessary to ensure full visibility and absence of interference. It is also advisable to reduce the likelihood of vandalism and dirt and liquid getting on the device. Based on this, there are several main options for placing a video camera:
- In the license plate light. This is a very convenient option, specially provided for by the design of a number of cars.
- In the bumper. An oval or round video camera can be installed in a pre-drilled hole.
- In the trunk handle. This is especially convenient if the handle is structurally made in a common body together with a molding above the number.
- Attach the numbers to the frame.
Why the car shakes at speed: looking for and eliminating the reasons
- to the radio;
- to the mirror;
- to the computer;
- to the DVR;
- to a video communication monitor;
- to the navigator;
- to the tablet;
- to standard car multimedia.
You can see for yourself that there are a decent number of options.
Even if you have some kind of Chinese monitor, or expensive multimedia from Pioneer, they should equally be enough to connect the KZV.
A much more serious question is where the camera itself will be located. There are also several options for such purposes. You can connect the equipment:
- To the license plate frame. There is nothing complicated here if the KZV body itself has a suitable design. The frame itself must be held firmly in place so that the camera does not become an easy target for thieves;
- To the lampshade, which is responsible for illuminating the license plate. Transitional glasses are now being produced. With their help, you can install a KZV, while maintaining the license plate illumination. If the manufacturer has provided such a solution for your car in some configurations, you just have to buy a similar cover for the lamp;
- To the handle for opening the trunk. It often has a single body with a plastic molding above the license plate. Due to the rectangular body, the KZV is easily attached using only self-tapping screws;
- To the bumper. On some cars, you don't even need to remove the bumper to install the camera. Here it is better to use cameras whose body has an oval shape. All that remains is to make a suitable hole in the bumper and apply sealant on the inside. Wires are routed inside the cabin through the ventilation holes provided in the luggage compartment.
You yourself understand that simply mechanically fixing the camera is not so difficult. Much more problematic is the issue of electrics and connections that ensure the functionality of the camera.
How to set up a rear view camera on a car
Another pressing question is how to properly set up a video camera. Sometimes after installation it turns out that there is no image at all or it is “unreadable”. A possible problem is a mismatch between the video standards of the equipment. In this case, you need to use adapters (video signal adapters). Although it may be cheaper to simply buy a product of a different model.
Another possible situation is incorrectly set monitor modes. In this case, you need to switch the parameters in the engineering menu.
Even if everything works correctly, it wouldn't hurt to adjust the camera further to get parking lines on the screen. How to adjust the product depends on the characteristics of the specific model.