Today we will tell you how to replace the Kio Rio cabin filter of several generations.
One of the most popular models of the Korean company Kia is a car called Rio.
This car is in the budget segment. It quickly became popular due to its affordable price, while this model has a good appearance and is not devoid of equipment that ensures comfort.
The designers also took care of the ease of carrying out some maintenance work, which can be done by any car owner.
This primarily concerns such an element as the cabin filter.
Periodic replacement of this element allows you to maintain clean air in the cabin, so timely replacement is very important, and the operation of replacing it will not take much time.
Stages of replacing the Kia Rio filter element
Compared to most other cars, replacing the cabin air filter in the Kia Rio 4 (FB) is relatively simple.
This operation does not require special preparation. All you need is the new filter element itself. There is no point in arguing about cabin benefits, especially when it comes to coal. Therefore, it is not surprising that installing filters on cars yourself has become commonplace. This is a routine and fairly simple periodic maintenance procedure; there is nothing complicated about it.
According to the law, the cabin filter must be replaced every 15,000 km, that is, with each scheduled maintenance. However, depending on the operational condition of the vehicle, the replacement period can be reduced to 8-10 thousand kilometers. The more often you change the cabin filter, the cleaner the air and the better your air conditioner or heater will work.
The fourth generation has been produced from 2016 to the present.
Where is
The Kia Rio 4 cabin filter is located behind the glove box shelf, which prevents access. To clear this obstruction, you must open the glove box and then follow the instructions below.
The filter element makes travel comfortable, so you should not neglect replacing it. Much less dust will accumulate in the cabin. If you use carbon filtration, the air quality inside your car will be even better.
Which side to install
In addition to replacing the cabin filter element, it is important to install it on the right side. There are simple notations for this:
- Just one arrow (without an inscription) indicates the direction of the air flow.
- Arrow and text UP - indicates the top edge of the filter.
- Arrow and inscription AIR FLOW - indicates the direction of air flow.
- If the flow goes from top to bottom, the extreme edges of the filter should look like this - ////
- If the flow goes from bottom to top, the extreme edges of the filter should look like this - ////
In the Kia Rio 4, the air flow comes from top to bottom. Based on this, in addition to the inscriptions on the side plane of the air filter, we carry out the correct installation.
Replacement frequency
Before you go for a new filter, it is still worth knowing when, according to the regulations, the Kia Rio cabin filter is replaced.
The technical documentation that comes with the car indicates the mileage after which this element must be replaced and it is 45 thousand km.
But in reality, the frequency of replacement may be different. It depends on the operating conditions.
So, in southern latitudes, it is better to change the Kia Rio cabin filter more often, since the dust content of the air is higher. In northern latitudes, frequent replacement is not necessary.
It is worth noting that often this car goes to the buyer without this filter; instead, a frame with a fine mesh is installed. Therefore, after purchasing a car, it is better to immediately check for a filter.
How to replace the cabin filter element of a Kia Rio with your own hands?
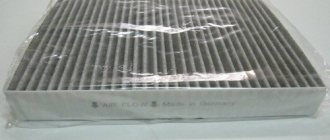
Before you start, you will need to purchase the consumables themselves. The optimal solution would be to purchase the carbon version, its catalog number MS-6307.
From a technical point of view, even an inexperienced technician will not have any problems with how to remove the cabin filter on a Kia Rio and install a new one. The work can be carried out in your own garage or just in the parking lot. The filter is located in the cab just behind the glove box.
Replacement algorithm:
- open the glove compartment and empty it;
- Find two plugs in the compartment and remove them by first turning them counterclockwise. The glove compartment lid must be lowered and the right door open to create the necessary working space;
- after removing the caps, a shelf with a filter, secured on both sides with clamps, will become visible;
- the latches are attracted to themselves and gently compressed, the cover is removed;
- the old filter element is removed;
- a new part is inserted into the frame. If its linear dimensions are slightly wider than the frame, the product can be cut along the edges. The arrow drawn on the surface of the fabric should face down when laying;
- then all the parts return to their places in the reverse order; when closing the lid, they turn until they click.
After watching the video on how to change the cabin filter of a Kia Rio, the driver can easily carry out the replacement operation himself, without wasting time and nerves by visiting a car repair shop.
Replacement procedure
First, we should tell you where the Kia Rio cabin filter is located? It is located behind the glove compartment, so access will require some minor dismantling work. Best of all, you don't need any specialized tools to perform the replacement. As a last resort, only a regular slotted screwdriver. It is fashionable to change the filter both in the garage and in an open space, preferably in good lighting.
All that remains is to find out how to change the cabin filter on a Kia Rio? Drivers just need to follow the following instructions:
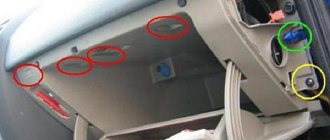
Open the glove compartment and remove all items from it. There are two limiters on the right and left inner sides. You need to pull them out. If they are difficult to give in, you can use a screwdriver
Be careful not to damage the seats. Lower the glove compartment all the way down and then carefully remove it from its hinges. Find a rectangular container in the space behind the glove compartment. It must be closed with a lid, which is secured with two clips on the sides
It is enough to squeeze the latches on both sides and pull the cover towards you. Remove the old filter and install the new one. Please note that the part has a special arrow-shaped pointer. The filter must be inserted so that it points down. Make sure that the filter fits tightly into place and is not wrinkled. Replace the cover by snapping the two latches into place. Place the glove compartment in its original position and reinstall the stoppers.
Consequences of a faulty filter
If the driver does not have time to change the cabin filter on the Kia Rio in time, every day more and more fuel combustion products, soot, dust, and various reagents that were previously deposited on the cleaning element will penetrate inside the car. All these microelements enter the human body, accumulating in the bronchi and lungs.
At first it manifests itself in the form of a sore throat and nose, later it can lead to more severe cases, including allergic reactions and chronic diseases.
Replacement procedure
First, we should tell you where the Kia Rio cabin filter is located? It is located behind the glove compartment, so access will require some minor dismantling work. Best of all, you don't need any specialized tools to perform the replacement. As a last resort, only a regular slotted screwdriver. It is fashionable to change the filter both in the garage and in an open space, preferably in good lighting.
All that remains is to find out how to change the cabin filter on a Kia Rio? Drivers just need to follow the following instructions:
Open the glove compartment and remove all items from it. There are two limiters on the right and left inner sides. You need to pull them out. If they are difficult to give in, you can use a screwdriver
Be careful not to damage the seats. Lower the glove compartment all the way down and then carefully remove it from its hinges. Find a rectangular container in the space behind the glove compartment. It must be closed with a lid, which is secured with two clips on the sides
It is enough to squeeze the latches on both sides and pull the cover towards you. Remove the old filter and install the new one. Please note that the part has a special arrow-shaped pointer. The filter must be inserted so that it points down. Make sure that the filter fits tightly into place and is not wrinkled. Replace the cover by snapping the two latches into place. Place the glove compartment in its original position and reinstall the stoppers.
As you can see, the whole process takes 5, at most 10 minutes. The main thing is not to damage the drawer stops. If you still have questions, watch the video at the end of the page.
What types of cabin filters are there for Kia Rio?
In total, two types of cleaning elements can be distinguished:
- For rough cleaning - designed to capture large dust and dirt. In addition to the price, it has disadvantages such as fragility and fragility.
- For fine cleaning: blocks the smallest particles, prevents the penetration of foreign odors into the car. Made from synthetic materials.
There are also regular and carbon filters. The latter more effectively trap particles of harmful substances.
How often to change
The filter is a consumable item; accordingly, there is a regulated replacement frequency. According to the requirements of the third generation Kia Rio, the filter should be replaced every 15 thousand kilometers, however, there are a number of factors that can reduce this period:
- In the summer, many drivers prefer to drive with their cars closed and the air conditioning on. Due to this, most of the air enters the cabin through the filters, which reduces their service life to 7-8 thousand kilometers.
- In spring and autumn, there is an increased level of humidity, which can lead to rotting of the filter material. In this case, naturally, you will need an emergency replacement of the cabin filter on the Kia Rio.
- During active driving in urban or industrial areas, the filter becomes actively clogged with soot, which reduces throughput. The part may become unusable after 5-7 thousand kilometers.
Technical documentation for a Korean car produced in 2010-2017 suggests replacing it every 15 thousand kilometers. But this period may be shortened depending on the intensity of vehicle operation and gas pollution on the roads.
In summer the air is more polluted than in winter, the urban climate is also less favorable than rural, so sometimes replacement will have to be done more often.
- feeling of burning and soot in the cabin;
- deterioration in the performance of the air conditioner;
- a distinct odor that occurs when the engine is running;
- increased humidity in the cabin, fogging of windows;
- hypoxia or allergic reactions in the driver and passengers.
There is no need to wait for these signs to appear; you need to change the filter at the first feeling of discomfort. Surveys of Kia drivers show that many change the filter not only once every six months, but every 2-3 months
It is important that the technical manual will not indicate how to change the cabin filter on a Kia Rio, but the replacement process can be viewed in specialized videos
Replacing a filter on a car produced in 2010-2011
First, we will consider the procedure for replacing this consumable on a second-generation car (2010-2011), after which we will replace the Kia Rio cabin filter of recent years of production.
- To do this, you may only need a flathead screwdriver.
- To get to the filter cover we are interested in, it is necessary to free the glove box from the restrictive clamps.
- They are located on the side walls of the glove compartment, so it must be opened and cleared of the things that are in it.
- To remove the clips, you need to move them down (away from you) and pry them off with a screwdriver: remove them.
- When lowering the glove compartment down, you will need to slightly press to the right from the outside to remove another small latch located on the wall from the front panel.
- The glove box will then lower completely, allowing access to the filter element cover.
- The cover itself is attached to the body with clips located on the sides. These clips need to be squeezed with your fingers and the cover removed.
- If there is no filter, you will need to remove the frame with the mesh; this will not be necessary in the future. If there is one, the used element is simply restored.
- The new filter must be installed correctly.
For this purpose, at its end there are arrows and the inscription “Air Flow”. When installing a filter with arrows marked with arrows, they should point downwards.
If there are no arrows, but only an inscription, the filter must be installed so that the inscription does not turn upside down.
After installing the filter element, it is closed with a lid, then placed and secured with clamps.
We are replacing
Manufacturers of 2010-2013 Kia Rio cars recommend after 15 thousand kilometers under normal operating conditions. If the machine is constantly located in conditions of large accumulations of dust, in a metropolis, then replacement can be done once every six months.
Why change?
The main function of the filter element is to clean the incoming air from dirt and dust particles. Over time, its throughput decreases, air circulation in the cabin worsens, humidity rises, and the windows begin to fog up.
Dirty filter
This situation has a bad effect on visibility, especially in winter. In frosty weather, windows freeze, reducing visibility. This is one of the reasons why replacement is carried out.
An additional function of a filter, especially a carbon one, is to retain foreign odors and harmful chemicals. Over time, all this accumulates in the filter material and after six months of operation, it no longer purifies the air, but, on the contrary, releases harmful substances into the cabin. Therefore, if you change it on time, it helps create a healthy atmosphere and comfortable conditions inside the car.
Often, car enthusiasts do not pay enough attention to the cabin filter in their car and decide to replace it after unpleasant odors appear in the cabin when the cooling system is turned on. These odors appear during operation of the air conditioner from the evaporator and a dirty filter. Thanks to the evaporator, the air conditioner not only cools the air, but also dehumidifies it. Therefore, the evaporator is constantly in a humid environment, which promotes the development of pathogenic microorganisms in it. To avoid their negative impact on the body of the driver and passengers, the evaporator must be cleaned with antibacterial agents.
The quality of the filter element is of great importance in megacities, as it traps in its layers smoke, dust, soot and exhaust gases that are contained in the air on the street, especially near roads. Therefore, you should regularly replace the filter in the car's interior, especially since the replacement procedure is simple.
Loading …
Step-by-step instruction
The procedure takes no more than 30 minutes. It is best to use a carbon filter for the interior of the Kia Rio 2010-2013.
New filter elementYou can install product category No. MS-6307, which provides good protection against dust. The place to install the cabin filter in the Kia Rio 2010-2013 is located behind the glove compartment (glove box). Therefore, before starting work, you should open the glove compartment and empty it of its contents.
Glove box
There are two plugs on the sides of the glove compartment inside; they need to be pulled out. To do this, the plugs must be turned counterclockwise. First, remove the left plug.
Unscrew the left plug
Then the right one.
Unscrew the right plug
After this, the glove box lid must be lowered as far as possible. When doing this, you should open the right passenger door to avoid scratching it during the process.
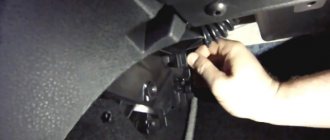
In the internal space you can see a shelf for a filter with two latches, which are located on the sides.
Cover with snaps
By pressing the latches with your fingers and pulling towards yourself, remove the cover. You should act carefully so as not to damage the rubber seals.
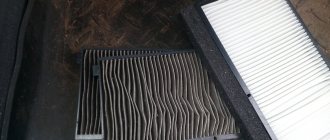
Now you can remove the old filter element. The degree of contamination shows how much dirt and dust it has retained during use.
Assessment of the degree of contamination
The next step is to install a new filter. If the inserted material is slightly larger in width, it is carefully cut with scissors along the ribs
When inserting a new filter element, you should pay attention to the arrow marked on it, it should be directed downwards
Installing a new product
Now you should install all the parts in the reverse order. When installing the plugs, screw them in until they click. This completes the replacement process.
The cabin filter of the Kia Rio 2010 - 2013, like any other, plays a big role in purifying the incoming air from the environment. Its timely replacement helps maintain a healthy microclimate in the car interior.
When to change, what interior to install
There are rules for conducting scheduled maintenance, as well as manufacturer recommendations. According to them, replacing the cabin filter of the Kia Rio IV (FB) heating and air conditioning system should be done every 15,000 kilometers or once a year.
Considering that the operating conditions of the car in most cases will be far from ideal, experts recommend doing this approximately twice as often, in spring and autumn.
Typical symptoms:
- windows often fog up;
- the appearance of unpleasant odors in the cabin when the fan is on;
- deterioration of the stove and air conditioner;
They may make you doubt that the filter element is doing its job and will require an unscheduled replacement. In principle, it is these symptoms that should be relied upon when choosing the correct replacement interval.
Suitable sizes
When choosing a filter element, owners do not always use products recommended by the car manufacturer. Everyone has their own reasons for this, some say that the original is unreasonably expensive. Some people in the region sell only analogues, so you need to know the dimensions by which you can choose the following:
- Height: 28 mm
- Width: 200 mm
- Length: 225 mm
As a rule, sometimes analogues for the Kia Rio IV (FB) may be a few millimeters larger or smaller than the original, there is nothing wrong with that. And if the difference is calculated in centimeters, then of course it’s worth looking for another option.
Selecting an original cabin filter
The manufacturer recommends using only original consumables, which, in general, is not surprising. They themselves are not of poor quality and are very popular in car dealerships, but their price may seem overpriced to many car owners.
Regardless of the configuration, the manufacturer recommends installing a cabin air filter with item number 97133-D1000 on all fourth-generation Kia Rios (including the restyled version). You can also use the product with article number 97133-D3000, this is a complete analogue of 97133D1000 in quality and size.
Please note that consumables and other replacement parts may sometimes be supplied to dealers with different part numbers. Sometimes this can confuse those who want to purchase the original product.
When choosing between a dusty and carbon product, car owners are advised to use a carbon filter element. This filter is more expensive, but cleans the air much better.
It is not difficult to distinguish it: the paper accordion filter is impregnated with a carbon composition, and therefore has a dark gray color. The filter cleans the air flow from dust, fine dirt, germs, bacteria and enhances lung protection.
Which analogues to choose
In addition to simple cabin filters, there are also carbon filters that filter the air more effectively, but they are more expensive. The advantage of SF carbon fiber is that it does not allow foreign odors from outside (outdoors) to penetrate into the car interior.
But this filter element also has a drawback - air does not pass through it well. GodWill and Corteco carbon filters are quite high quality and are a good replacement for the original.
However, in some retail outlets the price of the original fourth-generation Kia Rio cabin filter can be very high. In this case, it makes sense to buy a non-original consumer product. In particular, cabin filters are considered quite popular:
Conventional cabin dust filters
- Mann Filter CU23019 - technological consumables from a well-known manufacturer
- GB-98028 BIG filter - popular brand, good fine cleaning
- Filter Nevsky NF6548 - Russian manufacturer with an affordable price
Carbon cabin filters
- Mann filter CUK23019/1 - high quality dense carbon spray
- BIG filter GB-98028/C – activated carbon
- Filter Nevsky NF6548C - normal quality, affordable price
It makes sense to take a closer look at the products of other companies - they also specialize in the production of high-quality consumables for cars:
- Corteco
- Filter
- SCT
- Sakura
- Good will
- Fram
- JS Asakashi
- Sample
- Zeckert
- Masuma
- Nipparts
- Purflux
- Knecht Mahle
it is possible that sellers recommend replacing the Rio IV (FB) cabin filter with non-original, inexpensive substitutes with a much smaller thickness. They are not worth buying, since their filtering characteristics are unlikely to be at the proper level.
general information
There were two cabin filter options on the Rio. The first is a metal mesh. You probably won’t see one like this anymore, since it was installed on cars before January 10, 2012. On those machines where it was installed, it has most likely already been replaced with the usual one - paper.
Cabin filter, filter element - metal mesh
You might be asking, what is this all about? The idea was simple and beautiful. Eternal filter. You take it off, wash it and put it back. In practice, it did not take root in our conditions. Couldn't handle the dust. But in some countries this is used.
Starting from January 10, 2012 until the end of production, the most common paper filter was installed, the same for all years of production.
Original cabin filter 971334L000
Filter dimensions
| Length | Width | Height |
| 191 mm | 212 mm | 15 mm |
To switch from metal to paper, you will need a cabin filter frame and the filter itself.
Frame needed for cabin filter 976174L000
It is also advisable to replace the cabin filter cover. They are a little different. Needed under article number 971291R000. A lid numbered 971292J000 was installed with a metal mesh.
and frame for paper cabin filter 971291R000
The filter itself is made here in Russia: in St. Petersburg at the Doowon plant. Therefore, the original label always says: made in Russia (not in Korea). Once it was expensive, now you can find it from 120 rubles.
The original filter is made here in Russia
Manufacturer: Doowon
Changing the cabin filter of Kia Rio 4
Rio 4
The ease of movement of the Kia Rio 4 is obviously determined by many elements. But there are subtle details to enhance comfort. This includes a cabin filter that filters outside air. Most drivers do not realize how important it is to timely replace the air cleaner, so they rarely change the 2017 Kia Rio 4 cabin filter.
Part of original Hyundai/Kia 97133-D1000.
Why change the cabin filter often?
Kia Rio 4 has air intakes in the body, through which the air mass from the road enters the cabin. In large cities, outdoor air must be purified:
- exhaust gases (more than 200 toxins)
- road dust
- rubber tire microparticles
- dust from worn brake pads
- allergenic pollen
- pathogenic microorganisms.
If all this regularly gets into the lungs, a person gradually develops a decrease in reaction speed, shortness of breath, headache, and oxygen starvation. As a result, chronic respiratory diseases and cancer occur.
The consumable material for air purification in the Kia Rio 4 is capable of trapping approximately 99.5% of all listed pathogens. Provided the part is clean. To keep it working, standard cabin air filter replacement for 2022 Kia Rio 4 and other vehicle years must be done as scheduled or sooner. You can do it yourself, in the garage or on the street.
When is it time to change the interior?
The regulations require replacing the cabin filter in the Kia Rio 4 after 15,000 km. But in some cases this needs to be done more often. For example, if you constantly drive in the summer heat with the windows closed and the air conditioning on. This mode of operation reduces the service life of the part by half.
Spring and autumn are periods with high air humidity. Moisture will also shorten the life of the Kia Rio 4 cabin air filter due to the decomposition of materials.
The third reason for the rapid wear of an air purifier is frequent visits to industrial areas where the filter layers are heavily clogged. In such conditions, the interior consumables may require replacement after 5,000 km.
In such operating conditions of the vehicle, it makes sense to check the Kia Rio 4 cabin filter every 5 thousand km using the speedometer and, if necessary, change it ahead of schedule.
Signs of a clogged cabin filter
The operating instructions for the cabin filter element indicate the standard service life when used under normal conditions. Indeed, consumables become clogged with dirt and prematurely lose their functionality. Therefore, we learn to identify signs of part failure. Let's list them.
- The windshield sweats a lot.
- Even with a carbon filter, unpleasant odors appear in the cabin of the Kia Rio 4.
- The microclimate changes significantly.
- The heating system operates intermittently and temperature fluctuations are observed.
- Ventilation is poor.
- Dust began to quickly settle on the windshield and dashboard.
- The filter element is clearly dirty: gray, brown, black.
There is no point in blowing out the cabin filter or washing it; this part should only be replaced. The low price of consumables allows you to do this often.
We are replacing
Manufacturers of 2010-2013 Kia Rio cars recommend changing the cabin filter after 15 thousand kilometers under normal operating conditions. If the machine is constantly located in conditions of large accumulations of dust, in a metropolis, then replacement can be done once every six months.
Why change?
The main function of the filter element is to clean the incoming air from dirt and dust particles. Over time, its throughput decreases, air circulation in the cabin worsens, humidity rises, and the windows begin to fog up.
Dirty filter
This situation has a bad effect on visibility, especially in winter. In frosty weather, windows freeze, reducing visibility. This is one of the reasons why replacement is carried out.
An additional function of a filter, especially a carbon one, is to retain foreign odors and harmful chemicals. Over time, all this accumulates in the filter material and after six months of operation, it no longer purifies the air, but, on the contrary, releases harmful substances into the cabin. Therefore, if you change it on time, it helps create a healthy atmosphere and comfortable conditions inside the car.
Often, car enthusiasts do not pay enough attention to the cabin filter in their car and decide to replace it after unpleasant odors appear in the cabin when the cooling system is turned on. These odors appear during operation of the air conditioner from the evaporator and a dirty filter. Thanks to the evaporator, the air conditioner not only cools the air, but also dehumidifies it. Therefore, the evaporator is constantly in a humid environment, which promotes the development of pathogenic microorganisms in it. To avoid their negative impact on the body of the driver and passengers, the evaporator must be cleaned with antibacterial agents.
The quality of the filter element is of great importance in megacities, as it traps in its layers smoke, dust, soot and exhaust gases that are contained in the air on the street, especially near roads. Therefore, you should regularly replace the filter in the car's interior, especially since the replacement procedure is simple.
Step-by-step instruction
The procedure takes no more than 30 minutes. It is best to use a carbon filter for the interior of the Kia Rio 2010-2013.
New filter element
You can install product category No. MS-6307, which provides good protection against dust. The place to install the cabin filter in the Kia Rio 2010-2013 is located behind the glove compartment (glove box). Therefore, before starting work, you should open the glove compartment and empty it of its contents.
Glove box
There are two plugs on the sides of the glove compartment inside; they need to be pulled out. To do this, the plugs must be turned counterclockwise. First, remove the left plug.
Unscrew the left plug
Then the right one.
Unscrew the right plug
After this, the glove box lid must be lowered as far as possible. When doing this, you should open the right passenger door to avoid scratching it during the process.
In the internal space you can see a shelf for a filter with two latches, which are located on the sides.
Cover with snaps
By pressing the latches with your fingers and pulling towards yourself, remove the cover. You should act carefully so as not to damage the rubber seals.
Now you can remove the old filter element. The degree of contamination shows how much dirt and dust it has retained during use.
Assessment of the degree of contamination
The next step is to install a new filter. If the inserted material is slightly larger in width, it is carefully cut with scissors along the ribs
When inserting a new filter element, you should pay attention to the arrow marked on it, it should be directed downwards
Installing a new product
Now you should install all the parts in the reverse order. When installing the plugs, screw them in until they click. This completes the replacement process.
The cabin filter of the Kia Rio 2010 - 2013, like any other, plays a big role in purifying the incoming air from the environment. Its timely replacement helps maintain a healthy microclimate in the car interior.
This is interesting: Video of replacing the fuel filter Kia Rio 3: we explain from all sides
When is it necessary to replace the filter in a Kia Rio?
According to the automaker's recommendations, the cabin filter on a Kia Rio should be replaced at least 2 times a year. However, as practice has shown, the filter element fails much earlier.
It is best to replace the filter element once every three months. The price of these consumables is quite low, so purchasing a filter element four times a year should not be a problem. The average price of a cabin filter ranges from 250 to 450 rubles.
It should be noted that the use of high-quality filter elements will increase the interval between replacements.
Quality filters include the following brands:
- Mann filter;
- Kangguo;
- ADG BLUE PRINT (supplied from factory);
- NIPPART (factory supplied).
Of course, the price of original factory filters is much higher, but they also have a longer service life. The average cost of original filters ranges from 400 to 700 rubles. However, such filter elements should be replaced no more than 2 times a year. If a car with such a filter is mainly used in urban environments, it can be replaced once a year.
Do not forget that when using non-original filter elements, the frequency of their replacement increases.
Signs of filter wear
As mentioned earlier, it is recommended to change the filter more often than indicated in the regulations, because in fact the documentation indicates the service life under optimal conditions. This raises the question: how can we determine that the filter has become unusable? Here are a few signs that will help you:
- Fogging of the windshield is one of the most common signs that indicates that the Kia Rio 3 cabin filter needs to be changed.
- The appearance of foreign odors in the cabin in the presence of a carbon filter. This means that it has exhausted its absorbent capacity.
- Changes in microclimate and malfunctions of the heating system. A clogged filter may be causing temperature fluctuations.
- Insufficient air flow in the cabin.
- The inside of the dashboard and windshield began to get dirty much faster.
The suitability of a filter can also be judged by its appearance. If it has acquired a distinctly gray or even black-brown tint, feel free to change it. Do not attempt to wash or blow out filters. These methods are ineffective and therefore are not able to completely remove all contaminants. Considering the relatively low cost, it is much easier to change the cabin filter on a Kia Rio.
Which filter to choose: original or analogue
Before replacing the fourth generation Kia Rio cabin filter, the driver needs to decide between original and analog spare parts:
- The shelf life of high-quality products is allowed up to one and a half years. If you are planning a quiet and rare excursion around the city, this option is ideal.
- If the issue of replacement does not frighten the car owner, then for the price of an original spare part you can buy several low-quality products and change them every 3-4 months.
Original brands of cleaning elements (some supplied by the factory): NIPPART, Cangoo.
For pre-styling models of 2012 (2009, 2010, 2011), only non-original spare parts for large filtration with codes MANN CU1828, VALEO 698681, TSN 9.7.117 are suitable.
How much does a filter cost?
Replacing the cabin filter of Kia Rio 2016 and 2022 is not considered a general repair. The price ranges from 250 to 500 rubles for a carbon fiber analogue. The cost of one part with deep air purification starts from 600 rubles and reaches 1.5 thousand rubles.
Which filter to buy: varieties
Please note that models supplied to Russia are versions for China, and not for Europe. Accordingly, if you bought a foreign car in the Russian Federation, then you need the following article number for the filter - catalog number 97133-OSOOO
This is a filter for models before 2012 that have not yet been restyled. The filter involves only rough cleaning (only from leaves, therefore, it is not able to retain dust), so drivers buy non-original, but more advanced models such as MANN CU1828, MAHLE LA109, VALEO 698681 or TSN 9.7.117.
If we talk about models after 2012, then a classic filter is already used here, designated in the catalog - 97133-4L000. If you are looking for its analogues, we recommend looking at TSN 9.7.871, Filtron K1329, MANN CU21008. According to many drivers, the quality of original and non-original models is practically the same. Considering the frequent replacement of this component, it makes no sense to overpay for a branded part.
The price of filters is quite varied. The simplest and cheapest models can be found for 150-200 rubles. It’s difficult to call them effective, so we recommend choosing something from the middle price range. The most expensive models with high filtering qualities can cost up to 3,500 rubles. Some drivers try to make filters themselves. Technically, this task is feasible, but it is difficult to make a high-quality filter that fits exactly into the slot in the car.
Additionally, you can always find a lot of other filters on the Internet that may well be compatible with your foreign car. If you are going to buy a third-party Kia Rio 3 cabin filter, we recommend that you familiarize yourself with the general classifications and key advantages of each type:
- Anti-dust filter. It is a rectangular structure made of cellulose or synthetic fibers with corrugated paper. The key benefits of these filters include their affordable price and the ability to filter pollen and other small particles. Disadvantages - such a filter does not absorb unpleasant odors and does not cope with toxic substances. The highest quality models have a service life of up to 30 thousand kilometers.
- Carbon filter. Made of synthetic fiber that stops small particles (down to 1 micrometer) due to electrostatic voltage. Able to cope with 95% of all harmful substances and convert ozone into oxygen. The only drawback is the high cost of production. Some of the most durable ones can be used for 60 thousand kilometers.
Make your choice based on filter compatibility with your machine and your budget.
The process of replacing the cabin filter on Kia Rio 2010-2015
Of course, before starting work you need to purchase a new filter element. Carbon filters are considered the most recommended. Currently, their diversity is very great. Choose according to your taste.
First you need to clear the storage compartment of the front panel of foreign objects.
You have to remove the side plugs.
Now lower the glove box door all the way.
Inside there will be a special shelf for the filter holder with clips on the sides. Squeezing the clips, being careful not to damage the rubber seals, remove it.
Finally, the old filter element can be replaced with a new one. However, don’t be afraid if it doesn’t fit in width. In this case, simply compare the sizes of the filters and cut the purchased one with scissors along one of the edges.
The replacement can be considered complete. All that remains is to put everything in reverse order and enjoy the freshness and purity of the air entering the cabin.
Where is the cabin filter
Of course, this car has had several generations, and the Kia Rio is updated almost every year, but the designers do not change the location of the cabin filter.
It is located behind the glove box (glove box), located on the front passenger's side panel.
In addition, the cabin filter is installed on all Kio Rio models - II and III generations 2010-2015. Of course, there are also substitute shades for models from different years, but they are unimportant and we will talk about them below.
Recommendations
- To replace a Kia cabin filter, it is better to purchase an original one. You can also opt for analogues. In this case, you need to make sure in advance that the new filter element is completely sized.
- The reason is that it is extremely undesirable to bend, cut or in any way deform the filter element to install it. To avoid such problems, it is better to take the old filter with you and compare it with the new one.
Although replacing the filter element on all generations of Kia Rio is not difficult, you must be careful and careful. Do not press too hard on latches and plastic elements. It is also necessary to carefully remove the old cabin filter so as not to leave any remaining paper in the slot for the filter element.We also recommend reading the article on how to replace the cabin filter on a Lada Kalina. From this article you will learn about the features of replacing the cabin filter on Kalina.
- If the filter compartment is heavily contaminated, it is recommended to blow out the compartment with compressed air from the compressor, having previously closed the adjacent elements from dust. If possible, you can use a vacuum cleaner with a thin, long attachment. The nozzle can also be made from scrap materials. To attach the nozzle, use adhesive tape, electrical tape, etc. At the same time, cleaning the compartment before installing a new filter allows you to increase the service life of the filter element and the quality of the air entering the cabin.
Where is the Rio cabin filter located?
Thanks to the successful design, the cabin filter on a Kia Rio can be replaced by the car owner himself. On the Kia Rio, the position of the cabin filter is as follows: the cabin filter is located on the right side of the panel, behind the glove box. Please note that the filter in the Kia Rio cabin is installed in the same place, regardless of the generation of the car.
For example, a Rio 2 cabin filter or a Kia Rio 3 cabin filter will be installed exclusively behind the glove box, since designers, unlike many other manufacturers, do not change the position of the filter element on new models. However, the procedure for replacing the filter on different generations of Rio is slightly different.
Sources
- https://AutoZaliv.ru/service/zamena-cabin-filter/pomenyat-salonnyj-kia-rio-4
- https://FokSevmash.ru/dvigatel/zamena-salonnogo-filtra-kia-rio-3.html
- https://AutoTopik.ru/kia/814-zamena-salonnogo-filtra-kia-rio.html
- https://vpracing.ru/filtry/kak-menyaetsya-salonnyj-filtr-na-kia-rio.html
- https://avto-mekhanik.ru/salon/zamena-salonnogo-filtra-kia-rio-4.html
- https://chtocar.ru/servis-i-remont/kia-avtoservis/kia-rio-avtoservis/kak-zamenit-salonnyy-filtr-kia-rio.html
- https://tuning-mg.ru/avto-to/zamena-salonnogo-filtra-kia-rio-5.html
- https://razborov.net/kia/kia-rio-zamena-salonnogo-fil-tra.html
- https://FanKia.ru/zamena-salonnogo-filtra-kia-rio/
- https://KrutiMotor.ru/zamena-salonnogo-filtra-kia-rio/
Is it worth it to soundproof your car?
Published: March 28, 2019
Spread the love
Spread the loveSoundproofing - is it worth doing? See for yourselfContents1 Soundproofing - is it worth doing? See for yourself 1.0.1 What is the noise level in the interiors of modern passenger cars? 1.0.2 Cars with gasoline engines: 1.0.3 Cars with diesel engines: 1.0.4 Electric and hybrid cars: 1.1 What makes noise in a car? 1.2 Car sound insulation - what you should remember? 1.3 Why do you need sound insulation for a car? 1.4 Gluing a car with sound insulation