05 December 2014 Lada.Online 96 048 0
The door trim (trimming, panel) is removed in case of repair of the door lock, window regulator or speakers, as well as for modifications to the car, for example, installing additional sound insulation. Let's take a step-by-step look at how to remove the door trim of a Lada Granta with your own hands.
Tools and materials for dismantling door cards Grants
Although the procedure for removing door cards on a Lada Granta is not complicated, you need to have all the necessary tools, including clips. It is recommended to perform dismantling at a temperature not lower than +10C; if the temperature is lower, you should be very careful.
Article number of clips for Grants 38535-vo. They are inexpensive and are often found in sets of 40 pieces.
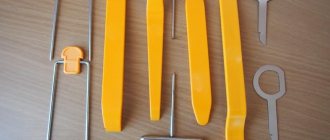
To remove parts you will need:
- Fastening elements (clips) that often break during operation.
- Flat and Phillips screwdrivers;
- Unnecessary credit card or similar item;
- Gloves;
- Rags.
Replacing the bearing of the input shaft of the VAZ 2107 gearbox
The easiest way to replace a worn element is on the removed box. On the VAZ 2107 it is possible to remove the bearing from the input shaft directly from the gearbox in the car, but this procedure is very labor-intensive and time-consuming.
To work, you need to prepare the usual tools for any driver:
- screwdriver with a powerful flat blade;
- hammer;
- puller if necessary.
How to remove the old one
With the gearbox already removed from the car, you need to remove the bell (casing) and retaining rings. There is no need to completely disassemble the box:
- Use a screwdriver to pry up the special groove in the input shaft bearing. (it looks like a ring).
- Pull the shaft towards you, using the bearing as a support for pressure.
- Carefully pull out the bearing, periodically hitting it with a hammer.
- After each hammer blow, it is recommended to rotate the shaft a little to avoid dents or distortion of the bearing.
- As a result, after these actions, the bearing can be easily removed from its support.
How to install a new one
Next, you will need to install a functional one in place of the old bearing. For this:
- Press the new bearing onto the shaft using a hammer.
- Use a hammer only on the inner ring of the bearing, otherwise it may become deformed.
- When pressing, it is necessary to pull the input shaft slightly forward so that the bearing fits in more easily.
Video: replacing the input shaft bearing on a VAZ classic
To summarize all of the above, we can say that the owner of a VAZ 2107 can carry out all the necessary work on the gearbox and input shaft himself. However, if you have doubts about your skills, it is better to turn to auto repair specialists. We also note that the VAZ 2107 gearbox rarely requires any intervention and usually serves for many years without a hint of a problem.
Replacing bearings in a classic gearbox (VAZ 2101, 2104, 2105, 2106, 2107) is an operation that requires complete disassembly of the gearbox. The exceptions are: the bearing of the input shaft of the VAZ 2107 gearbox, as well as the front intermediate rolling support. To replace these parts, disassembling the gearbox is not required.
The input shaft bearing (PSB) is a critical component in the gearbox (Gearbox). It is on the “primary” that the greatest dynamic and variable loads are concentrated. In the event of malfunctions and signs of failure, timely replacement of the VAZ 2107 gearbox input shaft bearing is required. If replacement is delayed, the gear shift unit may jam (in some situations, the clutch or release gear breaks).
Algorithm for removing and installing the front door trim of the Lada Granta
Before starting, it is advisable to disconnect the negative terminal of the battery. It is not necessary to remove the door handles. Removing the door trim is performed in the same way on a sedan and Grant cars with a different body type.
It is recommended to work in a warm room. During the warm season, work can also be done outside.
The part is removed according to the following algorithm:
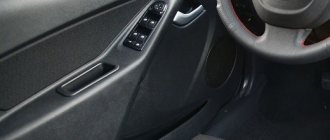
- Unscrew the lock cap counterclockwise.
- Remove the plug using a plastic object. Unscrew the bolt located underneath it.
- Remove the screw in the armrest.
- Remove the window regulator handle if it is mechanical. Pull out the plate using a screwdriver.
- Unscrew the pocket fastenings at the bottom.
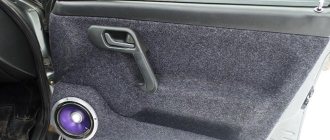
- Pull the trim towards you, carefully unfastening it from the clips.
- Disconnect the terminals of the wires of the speakers, power windows and mirrors.
Cards are removed in almost the same way on the driver's and passenger's doors. The only difference is to remove the cover and unscrew two screws.
Installation of the casing is carried out in the reverse order of removal.
Pros of sound insulation
Today, every car needs sound insulation, and it doesn’t matter whether it’s a domestic car or an expensive foreign car, the sound insulation rating of foreign cars is gradually decreasing in order to make the car cheaper and thereby attract buyers, even world-famous concerns produce cars without sound insulation at all. It is important to know the positive aspects of sound insulation, in other words, what it gives:
It is important to know the positive aspects of sound insulation, in other words, what it gives:
It is important to know the positive aspects of sound insulation, in other words, what it gives:
- Serves to reduce the noise level inside the car interior and improve the sound quality of acoustics
- Noise reduction allows for quiet communication without raising your voice
- Excessive noise causes rapid driver fatigue, slows down reaction time and irritates the driver, which can lead to an accident.
- Many people do not know that increased noise causes the blood vessels in the body to narrow, this causes additional stress on the heart, over time angina develops and the risk of heart attack increases.
- Therefore, sound insulation is a concern for your own health and safety.
You can do sound insulation yourself, it’s not complicated, or you can pay and specialists will do everything for you.
Removing and installing rear door trim on Grant
The rear door trim of the Lada Granta is removed in almost the same way as the front doors. But the operation has some peculiarities. It works like this:
- Remove the locking button by unscrewing it counterclockwise.
- Remove the window lifter handle if the windows are not electric.
- Remove the handle cover and unscrew the 2 screws underneath it.
- There are no screws at the bottom, unlike the front doors, so we unfasten the clips towards ourselves.
- Disconnect the wires if the windows are electric.
The element is installed in the reverse order of removal. If the clips were damaged when removing the trim, you need to install new ones.
Important points
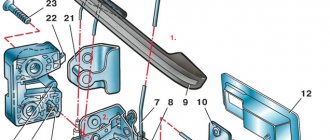
- It is necessary to remember that there are also plastic latches under the fastening screws of the casing. And after unscrewing all the screws, you will have to overcome the resistance of these latches, literally tearing the trim off the door. It will not be possible to pry these clips with any tool - they are too far away. So it is not uncommon for situations when, after removing the casing, half of the clips are broken. There is only one way out: have a set of spare door latches on hand;
- on cars with electric windows, control units are located only in the front doors. Therefore, when removing the rear door trims, you will not have to disconnect all kinds of wires from the connectors;
- The locking button has a left-hand thread only on the earliest Granta models, released in 2011. On later machines, the threads became right-handed.
So, removing the door trim from Granta is not a difficult task. Even a novice car enthusiast can do it. And an experienced car owner needs no more than 10 minutes to deal with one door. The picture is spoiled only by the internal plastic latches, the breakage of which, it seems, has never been possible for anyone. But this is an “innate” design flaw that you have to come to terms with.
- Author: ratico19
Rate this article:
- 5
- 4
- 3
- 2
- 1
(1 vote, average: 5 out of 5)
Share with your friends!
How to remove the trunk trim on a Lada Granta
Removing the trunk trim of a Lada Granta is important for owners of cars with a liftback or hatchback, as well as a station wagon. This procedure is necessary for soundproofing or installing a rear view parking camera, as well as in other cases.
It may be necessary to remove the side trim, tailgate trim, or all parts at once. For the job you will need the same tool and clips as for removing the interior door trim.
Removing the side trunk trim on a Grant
To dismantle the side elements of the Granta trunk trim, you need:
- Remove the mounting screws and clips.
- Remove the lamp cover.
- Unscrew the body trim through the hatch.
- Pull out the seat belts.
- Pull the casing towards you.
The part is removed equally from the left and right sides of the luggage compartment. Its installation is carried out in the reverse order of removal. Care must be taken when working with wiring.
Removing the tailgate trim of the Lada Granta
The luggage compartment door trim is removed in the following order:
- Remove the brake light panel by unfastening the fasteners.
- Remove the side plastic covers by removing their fastenings.
- Pull out the casing by unscrewing two screws and pulling out the pistons.
The tailgate trim is installed in the same manner as removal.
Show me the cubic capacity!
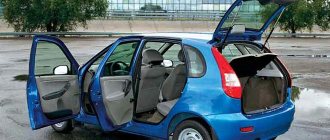
Having released the latches, we open the rear doors 180 degrees. Now we pull two plastic flags in turn - and the back of the rear sofa falls forward. Now we put the remaining parts in our hands in place and pull the sling - the sofa moves forward. All that remains is to unlock two more latches, grunt a little and pull the bench out of the cabin.
Then it’s even simpler: the middle sofa easily folds into the front seats - and here they are, the promised “two and a half cubes”! The permitted load capacity of 555 kg allows you to fill this volume with something not too heavy. For example, TVs, gas stoves and bicycles can easily be placed on a flat floor - and possibly at the same time.
Yes, you don’t have to throw the third row of seats in the parking lot, but take it with you - all you need to do is fold down a smaller part of the middle sofa. After loading the bench, there will still be quite a lot of space left inside for luggage.
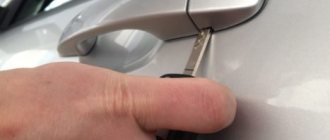
The door does not open in cold weather
Most often this happens after washing a car or driving in the rain, when dampness gives way to negative temperatures. Usually the larva freezes completely in the lock. Sometimes the lubricant in the drive or rod also hardens. Knowledgeable car owners advise warming up the constipation (for example, with a hairdryer) and then lubricating it with WD-40. Moreover, the procedure must be repeated after each significant wetness of the car.
In addition, it will also help:
- turning on autostart with constant heating of the interior;
- disassembling the door and adjusting the lock components;
- use any silicone-based lubricant.
Reviews
| № | Positive |
| 1. | Gennady: Grant has been a year and a half since purchase, no special comments. But the sound insulation is weak, and the vibration insulation is also poor. On the advice of my comrades, I additionally covered it with Visalis. Fortunately, the process is not complicated, I first read the instructions. |
| 2. | Vasily: the car is two years old, I’m happy with the assembly, after the showroom I immediately ordered additional sound insulation. There are no complaints about the body. I systematically carry out inspections at service stations, buy original consumables, and treat equipment with care. |
| 3. | Alexey: despite the fact that the car is in the budget segment, the assembly is decent, the quality is above average. Of course, there are breakdowns, but they are minor and can be easily fixed on your own. |
| 4. | Kirill: during the year of active operation of the machine, there were no comments; I made no capital investments, with the exception of the purchase of consumables for maintenance. Additionally, I sealed the perimeter of the card with a sealant, since it was knocking on the paving stones. Factory vibration isolation. |
| 5. | Dmitry: I’m happy with the car; finally, a domestic manufacturer has learned to make high-quality models. Of course, problems happen, but they can be easily fixed on your own, without going to a workshop. |
| 6. | Vasily: my positive review of the Lada Granta. The quality of workmanship, assembly of parts is above average, spare parts are available, prices are moderate. |
| 7. | Alexander: two years of active use of the car, no own garage, the car sleeps in the open air. There were no major damages, the plastic was not deformed, the fit was tight. |
| Negative | |
| 1. | Victor: the map began to creak already at 350,000 km. I didn’t contact the service department, I applied the sealant myself. At the 65,000 km mark, I replaced the plastic on the right side, it was deformed. |
| 2. | Gennady: after several times the car was idle under the sun, the plastic began to squeak and squeak. I ordered a bulkhead from the service station and additional sound insulation. |
| 3. | Ivan: problems with the car began after purchasing it: knocking, creaking plastic, depressurization of the interior. There are many shortcomings that need to be quickly eliminated. |
Source
Video
This video shows an analysis of the door of an Audi A6 C5 (Audi A6 C5).
Removing the driver's door trim on a Priora.
Mazda 3 trim (Mazda 3).
How to repair a window regulator.
Door trim Wolksvagen Polo sedan (Volkswagen Polo sedan).
Toyota Camry trim (Toyota Camry).
Dismantling the casing on Grant.
In general, the process of removing decorative trim on car doors, including the trunk door, is not as complicated as it seems. The main thing is not to damage it during dismantling. The principle of operation, depending on brands and models, is similar.
0
Author of the publication
offline 1 month