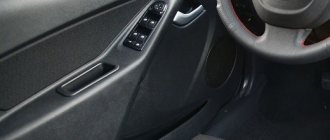
After prolonged use, the inserts on the inside of the doors wear out. The driver's door trim suffers the most. The trim is constantly in contact with the owner of the car. To understand how to remove the trim on the door on Kalina, you need to determine in what cases this procedure is carried out and whether it is possible to do it yourself.
Why is the door trim removed?
The technology of disassembling and replacing a decorated panel was first used by VAZ specialists in 2008. The main problem with self-dismantling is the mobility of the door, which is why in this process you will need an assistant who will hold the structure. Removing the Kalina rear door trim is necessary when:
- It is necessary to get to the elements that are inside the door in order to dismantle the window lifters.
- You need to install music speakers that are mounted in door structures.
- The electric window lifts have broken down or the mechanism requires lubrication.
- Glass tinting or replacement is carried out.
- The cladding has lost its appearance due to long-term use of the vehicle. The panels are worn or have scratches.
- The driver wants to change and refresh the interior.
- Body work is carried out: rotten fragments are cut off and then welded.
- Anti-corrosion treatment is carried out.
- Car painting is provided.
- Vibration and sound insulation of the body part is carried out.
Any of these procedures requires removal of the trim. Without disassembling the inner panel, it will not be possible to replace the lining or gain access to the internal mechanisms of the door card.
Withdrawal algorithm
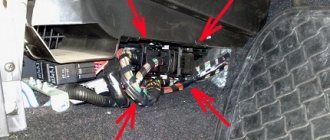
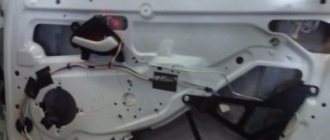
- To provide access to the two fastening screws, you must first remove the decorative trim on the door handle. To do this, carefully, so as not to damage the casing, insert a screwdriver or a knife blade into the gap between the handle and the trim and pull it towards you. On some models, on the decorative trim there is a control unit for adjusting the outside mirror, from which you need to disconnect the connector with wires.
After snapping the clip, the card must be pulled up to pull out another clip from the groove. You can see it by slightly bending the trim.
Click off the part indicated by the red arrow. The opposite part (yellow arrow) is simply disengaged.
Sheathing installation
When removing the trim without a clip remover, the clips remain in the door in the unlocked position. If the clamps are not damaged, before installing the casing, they must be “cocked” using a spatula, first inserting it between the membrane and the washer, and then pushing it up.
Broken or defective clips must be replaced with new ones, otherwise a loose fit of the trim to the door will contribute to the appearance of extraneous unpleasant sounds when the car is moving.
Installation of the casing is carried out in the following sequence:
- Connect the door lock release cable.
- Secure the electrical wiring harnesses and connect all previously disconnected connectors to the central locking, power window and mirror control units.
- Connect the speaker.
- By connecting the negative terminal of the battery, check the functionality of all electrical mechanisms. A preliminary check will allow you to correct any problems in time before the door is fully assembled.
- Place the trim in place and make sure that the clips align with the seat. Secure the clips with light blows or hand pressure.
When installing the trim, you should pay attention to this protrusion that fits into the groove of the door near the glass. The plastic here is very soft, often bends and stands up unevenly
Preparation for dismantling
Our instructions will help you understand how to remove the rear door trim on Kalina and determine the further algorithm of actions. Before this, dismantling is carried out. Required::
- slotted screwdriver;
- awl;
- flat screwdriver;
- sharp knife.
The door of the Lada Kalina Cross and other sedans is held on by plastic fasteners, so dismantling is prohibited at sub-zero temperatures. If there is a need to remove the casing in winter, then this should be done in a heated room to eliminate the risk of breaking the connecting clips. For the front door you will need 8 pieces, and for the rear door 10. Preparing for dismantling step by step:
- The handles are removed, the latches, which are designed to lock the door lock, are unscrewed.
- The speakers are unscrewed using a Phillips screwdriver. To do this, you need to unscrew the four bolts and then disconnect the wires.
- The blocker and acoustics are turned off. Sometimes the elements of the music system are attached to a metal frame.
After 5 years of operation, car fastenings become brittle, so it is better to purchase additional parts in advance.
Theory and preparatory actions
On the front doors in the “Lux” and “Norma” trim levels, the upholstery is equipped with an acoustic trim:
On the front cards in the Luxury there is an overlay with slots
There are no such additions in the “Standard” package:
To protect the door to the maximum, the card was made blind
Everything said above also applies to the rear door trim. It has already been said that before dismantling, all windows must be lowered. It will also be necessary to remove the negative terminal installed on the battery:
Negative battery terminal
To perform this action you will need a 10mm wrench.
Be aware that you cannot work with electrical equipment while there is a battery in the on-board network. It’s easier to disconnect the connector with a minus sign, which is what is recommended in practice.
Removal from passenger door
Once the music system is removed, you can begin the main part of the repair. You need to remove the door trim on Kalina in the passenger seat in a certain sequence:
- The decorative panel is removed. To do this, unscrew 8 clips and 2 screws. The inner handle is held on by two self-tapping screws.
- An awl is used to pry up the edge of the plug for removal. There are two of them, so you need to remove both.
- The opening mechanism is pulled back to remove the securing screw. After this, two screws are unscrewed from the inside of the handle. They are located opposite the cavity of the plastic pocket.
- One edge of the panel is pryed off; you can use a screwdriver to do this. When it becomes possible to grab the edge, all that remains is to pull the element towards you.
- The wires from the electric window lifter are disconnected, the block is removed.
Removing the front seat slide
We move the seat slide so that the bolts securing the slide to the seat frame are visible through the technological holes in the slide.
Using a 8mm socket, unscrew the bolts securing the slide to the seat frame.
Removing the panel on Lada Kalina 2
Remove the slide assembly with the longitudinal movement mechanism lever
We remove the end of the lever shaft of the longitudinal movement mechanism from the hole in the inner slide and from the hole in the outer slide
A spring is installed between the lever and the outer herrings. Similarly, we remove and disassemble the front passenger seat.
We assemble and install the front seat in the reverse order.
Before installing the lever shaft into the hole of the outer slide, first put a spring on the shaft and place the short mustache of 1 spring on the latch, then, squeezing the long mustache of 2 springs (can be tied with wire), insert the shaft into the hole of the slide so that this mustache goes under the slide .
Removing the trim from the driver's door
The algorithm for disassembling the driver's door structure is similar, but there are some subtleties of this process:
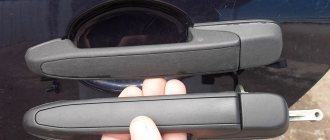
- First, the plugs are removed from all fasteners. They are pryed off with a screwdriver.
- The panel plastic will be easier to remove if you first unscrew the fragment for adjusting the mirror structures. Unlike the passenger door, the driver's door has one screw. It is located under the plug.
- The opening mechanism is removed last.
- If your car is equipped with electric mirrors with remote control, then to remove the rear view adjustment panel you need to unscrew the screw located at the bottom.
Overlays are used as decorated elements.
Advice from car enthusiasts and recommendations from experts
Removing the door card, being a popular operation, fits into optimal action algorithms based on the experience of numerous car enthusiasts and auto repair specialists. At the same time, in addition to general recommendations, advice is also useful that takes into account the specific features of removing door trim related to climatic conditions, the age of the car and similar variations:
- In cars whose age has exceeded five years, the plastic retainers dry out and become brittle. Therefore, when separating the trim from the door, some of the clips inevitably break. Hence the advice that before this operation, take care of purchasing a certain number of new latches, based on the fact that there are almost 40 of them on the front and rear doors.
- In regions with low winter temperatures, it is extremely undesirable to dismantle upholstery in the cold, since the plastic of the fasteners under its influence becomes brittle and therefore easily destroyed. It is better to carry out this operation in a heated garage.
- In summer there are no temperature restrictions, however, in windy weather it is not recommended to remove the door trim, since an open interior can cause a lot of dust.
- Although the speakers are attached to both the door trim and the metal part of the door, experts advise that when replacing the trim in place, if the acoustic devices were previously attached to the door frame, attach them to the door metal. Here you must adhere to the following rule: the speakers should be mounted on the door itself, and not on its trim.
- When prying up the door trim with a flat screwdriver, be sure to place soft material under it so as not to damage the paint surface on the metal.
- It is recommended to combine the removal of the door trim with the subsequent installation of noise and vibration insulation, after which the car acquires more comfortable qualities for passengers and the driver.
Removing the rear door trim
The rear door structures are secured with 10 plastic holders and 2 screws. The first fasteners hold the door panel, and the second fasteners hold the handles. Disassembly technique:
- The handle of the mechanical window lifter is being removed. It is important to note that this element is held in place by a plastic half ring. It is carefully pryed up with an awl.
- The plugs on the door handle are removed, then the fasteners are unscrewed.
- The lower far corner of the panel is pulled back, and then the first piston is removed.
- Hold the door card with your hand and remove the remaining clips.
- The covering is changing.
There are differences between Kalina 1st and 2nd generation. In the first case, the opening handle lever is unscrewed, but in the second option this is not required, since it is screwed directly to the door.
Changing the front door trim
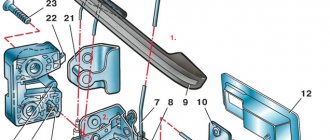
To dismantle the plastic door card, you need to prepare a Phillips and flathead screwdriver, as well as a set of clips that hold the part in place. For the driver's door, the actions will be as follows:
- Unscrew the lock lock handle “1”;
- After removing the plug, completely unscrew screw “2”;
- Unscrew all screws “4” and “5”;
- Using a flathead screwdriver like a wedge, you can dismantle it starting from the bottom corner at the front;
- At the last stage, disconnect the connector of the wires going to the key module.
All the elements named above are indicated in the following figure:
Front left door of Kalina-2
For the right door you need to follow a different sequence:
- Unscrew the lock handle “4”;
- Completely remove the Phillips screws “2” by unscrewing them;
- After removing the door handle trim, unscrew screws “3”. Then handle “1” can be removed completely;
- Dismantle the upholstery in the same way as point “4”, as indicated in the list above.
All that remains is to wish you success. Installation is carried out in reverse order. All designations related to the list are indicated in the photo below.
Front right door of Kalina-2
How to disassemble the trunk lid on a hatchback and station wagon
To unscrew the fasteners on a station wagon or hatchback, remove the trim and disassemble the luggage compartment lid, you will need a standard set of tools. The rear hatch is held in place by 4 clips, 2 retainers and a metal tab with two brackets. Step-by-step algorithm of actions:
- The connectors for the power window buttons are disconnected.
- To remove the handle, two latches are unscrewed. They must first be unlocked.
- The latches are removed. To do this, the panel is pulled along the entire contour.
- After removing the staples, the trim around the locking mechanism is pulled out.
- The panel is detached from the glass side. This action is performed along the entire perimeter, moving towards the castle.
Backseat
You will need: a 13mm socket.
Procedure for the Lada Granta sedan:
- Remove the rear sofa (in Fig. No. 3) by lifting it by the hinge and remove the cushion brackets from the stops. Tilt the back of the rear seat by pressing the latches (in Fig. No. 4).
- Remove the rear seat backrest by unscrewing 2 bolts (no. 2 in Fig.).
Rear seat catalog number: 21900-6820210 and 21900-6820200.
Instructions for station wagon/hatchback Kalina 2:
- pull loop No. 3.
- fold back cushion No. 4 of the rear seat, right or left.
- remove the pillow brackets No. 1 from the stops No. 2, remove the pillow.
- press handle No. 3, locking the right or left back of the rear seat.
- tilt the backrest No. 1.
- Unscrew nut No. 1, right and left fastening the right or left rear seat backrest to the bracket.
- remove the backrest (replaceable head 13, knob).
- if it is necessary to dismantle the rear seat back brackets: unscrew bolts No. 2 securing the brackets to the body, remove the brackets (replaceable head 13, knob).
Let us remind you that on the website you can read reviews about the sound insulation of the Lada Grant.
Keywords: Lada Granta seats | Lada Kalina seats
3
Found an error? Select it and press Ctrl Enter..
Main functions
Holders, stoppers and restrictive elements installed in the interior guarantee reliable and comfortable use of door leaves. Any door can be opened slightly or left completely open. This prevents possible injuries and ensures complete safety for children.
According to the necessary functions, limiting mechanisms are divided into groups for fixing the position of the doors:
- Locking. The process is ensured by such types as limiters or latches. If you use them, you will no longer be able to open the door from the outside.
- Partial, that is, incomplete opening. Stopping devices stop the movement of the canvas, leaving the opening half-open.
- Full closure. Typically, the role of locking doors in this position is performed by floor mechanisms and door closers.
- Both limiting and holding the door in a certain position (universal devices with magnetic properties are needed).
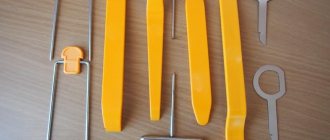
Required Tools
If your car doesn't have power windows, the job will be a little more difficult than working with power doors.
The only tools you will need are the following:
- Phillips screwdriver;
- A clip puller is a device for pulling out clips (the principle of operation is like an anti-stapler). Using a clip-on tool, you can carefully remove the fastening elements without damaging the surface.
Recommendation: It is better to use a plastic clip. It pulls out the clips more gently, while an iron clip puller can leave scratches. Some people use improvised means, such as a flat-head screwdriver to pull out clips and staples, but using this method leaves damage to the trim. Therefore, if the car is expensive, then you need to buy a clip cutter.
Video
This video shows an analysis of the door of an Audi A6 C5 (Audi A6 C5).
Removing the driver's door trim on a Priora.
Mazda 3 trim (Mazda 3).
How to repair a window regulator.
Door trim Wolksvagen Polo sedan (Volkswagen Polo sedan).
Toyota Camry trim (Toyota Camry).
Dismantling the casing on Grant.
In general, the process of removing decorative trim on car doors, including the trunk door, is not as complicated as it seems. The main thing is not to damage it during dismantling. The principle of operation, depending on brands and models, is similar.
0
Author of the publication
offline 1 month
What is it and why is it needed
Door position clamps are devices that are installed on or near the door leaf in order to limit its movement in a certain direction. Structurally, these elements can be different, since their design depends on their purpose.
The simplest example is an ordinary rod that was inserted into the floor in the path of the doors. He only allowed it to open to a certain angle. Door stops are used for various purposes:
Protection from injury. The main purpose of using holders is to protect people from accidental slamming of doors. This is especially true if there are small children in the house who will not be able to open the door from the inside if it accidentally closes. They also protect the person entering from accidental blows. This can happen due to the fact that someone from the inside suddenly opens the door or the panels simply begin to move under the influence of a draft.
Such mechanisms are perfect for interior structures.
- Protecting furniture from damage. Very often, a closet, bedside table or mirror may be located in the path of the door leaf. If it is opened, the impact can destroy the structure or simply damage the decorative layer. Therefore, it is better to install the lock and forget about this phenomenon.
- Protection of door hardware. If the doors are opened to the maximum angle, this proportionally increases the load on the hinges, so many install limiters so as not to think about this phenomenon and preserve the fittings for a long time.
Why do the doors fly off the casing?
Most often, the front or front door trims are removed to reach the interior cavities where the power windows are installed. Although there are other situations during the life of the vehicle when it is necessary to take off
frame:
- install speakers built into door cards;
- in case of failure of electric window buttons;
- for disassembling glass for tinting or replacement;
- For repairing or lubricating windows;
- Replace worn or scratched panels over many years of machine use.
- Lada Kalina entrance door maps
- It is also impossible to do without removing the cladding during body work, when you need to weld rotten elements, update a paint machine, or carry out anti-corrosion treatment.
The note. Many motorists remove the gasket to add additional vibration and sound insulation to the body.
Preparing for disassembly
Unscrew the fastenings and take off
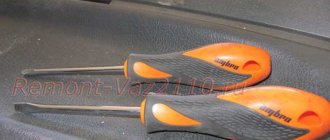
Door trim, you need to prepare a simple set of tools:
- a screwdriver with slots in the shape of a cross;
- long flat screwdriver;
- sharpened tool, for example, sewing.
Door disassembly tool
How to Remove Nissan Qashqai Wipers
Kia Dashboard Doesn't Work
How to Remove the Trunk Button Ford Focus 2
A former employee shares what it's like to work for Tesla
Since the door card of the Lada Kalina car rests on plastic clips (otherwise - clips, plugs), there are warnings about operating conditions.
It is strongly not recommended to disassemble door freezers when the plastic becomes brittle and breaks easily. Therefore, there is a risk of breaking all the clips when removing the decorative panel.
Replacement door handle Lada Kalina
disassembling and gluing vinyl boots Kalina
2 hatchbacks.
There are no summer residency requirements; remove skin even outdoors. There is only one recommendation: in windy weather it is better to drive the car into the garage, otherwise it will cause a lot of dust when opening the doors.
This is what a door card latch looks like
Advice. In cars over 5 years old, the plastic from which the locks are made dries out and becomes brittle. Separating the Trim from the Door With a machine like this, you're bound to ruin some of the clips.
Instructions for removing cladding in Kalina
The first three operations are the same for all Lada Kalina doors. The exception is the hatchback hatch in hatchback and station wagon bodies; the disassembly procedure is much simpler. How to remove the front and rear door trim on a Kalina Lada. Here's what to do:
- Unscrew and remove the lock cover designed to lock the door lock inside.
- Using a Phillips screwdriver, remove the 4 screws that secure the music speaker.
- Remove the speaker and disconnect it from the speaker.
Unlocking the blocker and acoustics
- Replacing Shock Absorbers Toyota Camry 30
- How to Lock a Skoda Octavia Without a Battery
- Replacement Rear Door Handle Kalina
- How to Disassemble the Rear View Mirror of a Kia Sportage
- Which Diesel Engine is Suitable for Moskvich 2141
Advice. The acoustics can be attached either to the door card itself or to the metal frame of the door. If, after removing the speaker, you stick to the first option, it is better to repeat it when installing the mounts, drilling holes for the screws. The acoustics should be installed on the door, not on the trim.
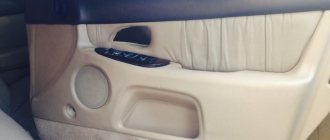
Front passenger door
Here the decorative panel is supported by 8 clips, 2 screws for attaching the internal handle and two screws located under the plastic pocket. The disassembly algorithm looks like this:
Carefully support the awl with the edge of the plastic plug that covers the screw in the door handle, gave it away. Remove the screw with the second cover in the same way. Remove both handle screws. Pull the handle to open the door, turn the locking screw and remove the lever
Then succeed in taking off the whole pen. Remove the 2 screws at the bottom of the door card, under the plastic pocket. Take a flathead screwdriver and support the top right corner of the trim panel to close the first latch. Grasp the skin with your fingers and remove the rest of the cap by hand. After removing the panel from the door, disconnect the wires coming from the power button. how to remove the door trim from the viburnum on the carriage door (rear). To do this, turn the screwdriver on the protrusion of the connector and pull the block out of the button assembly. Dismantling of the cladding is completed.
Door seal
All four doors have a double seal to protect the interior of the body from water and dust. The first seal is external, carried out by a continuous seal 2 made of sponge rubber, glued to the door along its entire perimeter, including the upper frames of the door 7. At the lock chord of the front door, the seal is additionally pressed with a steel lining.
The second seal 4 is internal, made in the form of an elastic, also continuous rubber profile, attached to the doorway of the body. In the lower part of the doorway, in the threshold area, the seal 4 is pressed against the flange of the opening by the threshold lining 8.
The rotating window glass is equipped with rubber seals 1 and 8. The sliding glass 5 is sealed with pile grooves 6 along which the glass slides, as well as with an internal pile seal 2 on the window sill 3 of the door and an external rubber seal 6 clamped in the lower decorative lining 7 of the door.
The effectiveness of the main outer door seal depends primarily on the tension (adjusted by the position of the lock latch on the pillar) at which the door closes with a slight push, and the sponge seals are deformed to the point that there are no gaps between them and the door. To do this, check the tight fit of the door seals to its opening by rubbing the seals with chalk. When the door slams, there should be a chalk imprint on the body.
If, with a well-adjusted door tension and correct operation of the lock, the chalk imprint is missing, then in these places you need to carefully separate the seal from the door and place a rubber pad of the required thickness under it on the glue
How to remove the left and right door trim
For each brand and model, the fastenings of the left and right door trims are different, but if you know the principle of disassembly, you can remove the trim on any car.
The basic rules are:
- if it is frosty, then carry out the work in the garage, as there is a risk that the light and fragile plastic on some elements will crack (in an unheated garage, as a rule, it is 10 degrees warmer);
- prepare tools;
- dismantle so that you can put it back.
Sheathing installation
The fabric sheet should be removed after removing the fasteners on the back. Actions step by step:
- A new piece of material is attached. First, the outer side of the panel is lubricated, a cloth is applied and smoothed well.
- The edges are fixed at the back with hardware. It is better to use a construction stapler. The panel must be left alone for an hour so that the glue sets and the material spreads across the card.
- If there is a car radio, then a niche is cut for the speaker. At the back, around the rim of the hole, a special plate is attached to which the column is attached.
- The lower fixing pins are attached and the electrical wiring is connected.
- After the handle is in place and secured with bolts, the top fasteners are fastened.
- The overhead fragment is installed, the mounting screws are screwed in and the plugs are attached.
We must not forget about the mandatory treatment of internal elements with an anti-corrosion agent and silicone lubricant; they are performed as a preventative measure. It is advisable to carry out these actions at least twice a year: before the onset of winter and in the spring.