Print this article Font size 16
Contents:
- Signs of wear
- Features of TC
- Rear TC
- Front TC
Front and rear brake pads are an important component of the VAZ 2109 braking system. Before replacing them, you should make sure that there is a malfunction.
Rear TC
Signs of wear
There are several main signs that indicate the need to replace the pads at the front and rear in the very near future.
| Sign | Peculiarities |
| Long service life | With a significant mileage, the probability of brake pad wear gradually reaches 100%. Therefore, it is purely a matter of time. But there’s no need to delay |
| Doesn't hold the handbrake | If the handbrake does not work properly, although everything is in order with the manual braking mechanism itself, the pads are simply worn out |
| Extraneous sounds from brakes | If the discs or drums begin to knock, squeak, or grind, this means there is a problem in the braking system. One of the most likely options is pad wear. |
| Low brake fluid level | When the pads wear out, the brake fluid in the reservoir is used up faster because consumption increases due to ineffective operation of the brake system |
| Small thickness of the friction layer | If the thickness of the friction layer on the pads has reached less than 1.5 millimeters, this indicates serious wear of the elements and the need to replace them |
These are the main signs of pad wear that any car owner can detect without disassembling the structure.
What rear pads are installed on the VAZ 2109
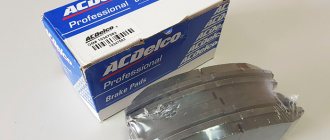
The most common rear pads that car owners install are original VAZINTERSERVICE (VIS-Auto) brake pads. Article - 21080-3502090-55. The average price is 730 rubles. Such pads are good because they ideally match the model in size, composition and service life.
Among analogues, the most reliable manufacturers are:
- ATE - Germany (03013702312);
- TRW - USA (GS8210);
- FERODO - UK (FSB240);
- STS - Russia (11524-STS);
- EzATI - Russia (2108-3502090).
Brands ATE, TRW and FERODO offer a reliable composition of materials that does not damage the inner surface of the drum. The cost of such pads ranges from 800-1500 rubles. per set. Domestic manufacturers STS and EzATI produce overheat-resistant pads. They are worse in composition, but the price is more affordable - about 600 rubles. per set.
Features of TC
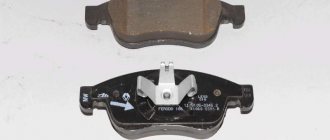
Brake pads (TC) installed on the VAZ 2109 have their own features and characteristics, which you should know about before purchasing new parts.
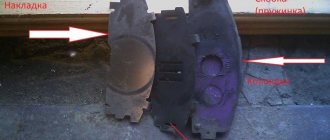
- The base of the block is made of fairly durable metal.
- A friction lining is glued on top of the base using special glue under the influence of a temperature of 100 degrees Celsius.
- The rear brakes include 4 pads. The body and base are stamped from sheet metal and then welded.
- The roughness on the surface of the pads, necessary to speed up the grinding in of the brake pads, is achieved through special processing.
- Efficiency during control braking from 80 km/h - 320 Nm. The pressure inside the brake system is 40 bar. The pads are cold.
- All elements of the brake system are made in accordance with strict international standards and requirements.
- The service life of a vehicle directly depends on driving style, road conditions and a number of external factors.
The operating manual states that the service life of the TC on the VAZ 2109 is within 70-90 thousand kilometers. But in practice this period is somewhat shorter.
Rear TC kit
Golden rules
There are four golden rules that must be strictly adhered to when replacing front and rear TCs.
- When cleaning brakes, never use mineral solvents such as diesel fuel, gasoline, etc.
- When replacing pads at the rear or front, both should be changed at once.
- You cannot swap front and rear TCs, as well as left and right, and vice versa. Otherwise, braking will be uneven.
- If there is a maximum level of brake fluid in the reservoir (MAX mark), part of the brake fluid must be pumped out.
Taking into account all these rules, you can begin to replace the TC.
Necessary tool
Tools you will need:
- hammer;
- wooden stand;
- 2 bolts for “8”;
- screwdriver (preferably flat);
- pliers;
- steel wire (the wire needs to be bent at the end with a small hook);
- a set of keys, which contains a special key for unscrewing the nut of the parking brake cable equalizer.
It looks like this:
Rear TC
The algorithm for replacing rear TCs on a VAZ 2109 is as follows.
- Place the car on a flat surface and loosen the tension on the wheel bolts.
- Unlock the pads by fully lowering the parking brake handle.
- Raise the rear of the car with a jack and remove the wheels.
- Place wheel chocks under the front wheels to prevent the vehicle from moving.
- Unscrew the brake drum studs from the rear wheel.
- Using a wooden block and a hammer, knock the drum off the TK.
- Clean the surfaces using the dry method and compressed air.
- We begin full dismantling work.
- Remove the upper garter spring. For this you will need pliers.
- The lower spring is removed in the same way.
- Remove the front TC guide spring.
- Remove the expansion bar.
- Next, the guide spring of the rear TC is dismantled and moved to the side.
- Remove the end of the parking brake cable from the lever.
- Remove the hand brake drive. To do this, you will need to remove the cotter pin from the finger, and then remove the finger itself.
- The dismantling work has been completed, so now everything should be reassembled in the reverse order, only with a new rear TC.
- Before installing the drum, be sure to compress the cylinder pistons so that the outer diameter of the shoes is smaller than the inner diameter of the drum.
- Assemble the unit, steps in reverse order.
- Lower the car to the ground, press the brake pedal several times, which will allow the pads to fully take their place.
Perform the procedure on both wheels. The principle of replacing rear TCs is the same. Just don’t forget to bleed the brake system after completing the work.
Auto repair school - Do-it-yourself car repair
Sep 30, 2016 VAZ 2108, VAZ 2109, VAZ 2110, VAZ 1117 Kalina, VAZ 2170 Priora by admin
change the front brake pads in VAZ-2108, VAZ-2109, VAZ-21099, VAZ-2110, VAZ-2114, VAZ-2115, VAZ-1117, VAZ-1118, VAZ-1119 cars. But even an experienced motorist cannot replace the rear brake pads Since for this operation it will not be enough to have a jack and a pair of open-end wrenches. And in order to make your work easier and save your nerves (which, as you know, do not recover!) when replacing rear brake pads , it is better to prepare seriously and thoroughly. You can start by choosing a location for work.
And in this place there must be an inspection hole or a lift. I can explain why. You will have to perform two operations that will be not only difficult but also dangerous to do from the ground. For example, to remove the rear brake drum and replace the brake pads , you will have to release the handbrake cable . It will be very difficult to do this “from the ground”, even with a special key (without this key, getting to the equalizer and unscrewing the nut will only be possible by removing the resonator. And this is extra work that no one needs). Also, quite often it is not possible to remove the brake drum “in an amicable way”, due to the fact that it is tightly stuck. And it will not be possible to remove the drum using two M8 bolts, which are screwed into the threaded holes of the brake drum and press it from the hub (although you can try, of course). In this case, you will have to knock down the brake drum using a hammer and a wooden attachment (a metal one is not suitable, crumble the drum). And you can imagine how you can lie on the ground with a hammer and a guide in your hands, methodically tapping a drum (with two hits you may not be able to knock it down). It won't be work anymore, it will be... song! Plus, extreme elements are added to this (don’t forget that the car is on a jack).
Well, I think we have decided on the place, we can move on to the necessary tool.
Your arsenal should consist, in addition to the wheel wrench and jack: a special wrench for unscrewing the nut of the parking brake cable equalizer ( photo 1a), a hammer, a wooden adapter, a screwdriver, pliers, a steel wire bent at the end with a small hook (a very useful thing), a metal wrench for tensioning the spring (I use a homemade device to tighten the spring (it can be found in photo 1). Which you can also do yourself or with the help of a turner).
Everything seems to be done with the instrument! We bought the pads... Now we move on to the process of replacing brake pads on cars VAZ-2108, VAZ-2109, VAZ-21099, VAZ-2110, VAZ-2114, VAZ-2115, VAZ-1117, VAZ-1118, VAZ-1119 .
1) We drive the car into the inspection hole, leave the gear engaged and install anti-roll stops under the front wheel.
2) Loosen the wheel bolts and lift the required side with a jack, remove the wheel. We go down into the pit and, using a special wrench, unscrew the nut of the parking brake cable equalizer (photo 2).
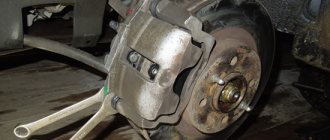
3) Using pliers, unscrew the guide bolts of the brake drum (photo 3).
4) And after that we try to remove the brake drum (I described the methods above).
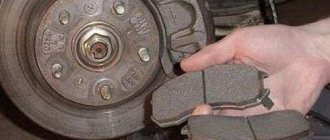
5) When the drum is removed, disconnect the guide springs (photo 4) and the tension spring (photo 5) the brake pads
6) Transfer the drive lever from the old block to the new block (photo 6).
7) When installing and tensioning the springs, make sure that the brake pads fit exactly into the grooves of the brake cylinder , and the handbrake bar fits into the slots on the pads (photo 7). Don't forget to hook the end of the handbrake cable to the drive lever on the block! After that, using a screwdriver or a pry bar, we cling to the edge of the support disk and bring the brake pads together (you can also “bring together” the pistons of the rear brake cylinder before installing the pads).
We put on the brake drum and install the wheel. We do the same work on the other side, but do not lower the wheel to the ground. Press the brake pedal several times. We go down into the pit and tighten and adjust the handbrake cable . Tighten the nut on the parking brake cable equalizer and check the tension. Raise the parking brake handle and count the clicks; if more than 8, then tighten the nut a little more and check again. The optimal number of clicks can range from 7 to 2. The main thing is that when the parking brake is raised, the wheels are blocked (the wheel is not lowered yet, we try to turn it by hand). And with the parking brake handle in the lowered position, the wheel should rotate freely, without rubbing the pads. Otherwise, when moving, the drum may heat up and jam.
When using an article or photographs, an active direct hyperlink to the website www.avtorem.info is required!
Did you like the article? Share it on your page!
Additional recommendations
- If you cannot depress the brake cylinders, open the cap of the brake fluid reservoir to reduce the pressure.
- If the pads wear unevenly, pay attention to the caliper. Most likely it will need repairs.
- When replacing the rear pads, change all the springs as well. They are inexpensive, but they will protect you from possible failures until the next replacement.
- The front caliper guides can be lubricated with graphite grease for smoother operation.
Replacing the pads on the front axle will not cause problems even for “dummies” of automotive repair. But from the back it’s not so simple. Assess your strengths and capabilities in advance: can you reach the handbrake cable and cope with a stuck brake drum? If yes, then everything will definitely work out.
Replacing the VAZ 2114 heater tap with your own hands
Do-it-yourself repair and replacement of the gas tank cap
When and why to change
Why, of course, is a rhetorical question. No motorist wants to be left without brakes. Possible complications will only lead to higher repair costs:
- one of the wheels will jam while driving;
- due to extreme wear, brake fluid will leak;
- the caliper will break.
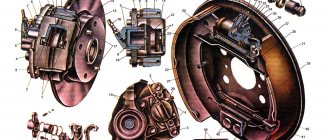
Rear wheel brake mechanism: 1 - brake shield, 2 - wheel cylinder, 3 - upper tension spring of the pads, 4 - brake pad, 5 - pad lining, 6 - brake drum, 7 - dowel pin, 8 - guide spring, 9 - lower tension spring
The question of “when” is directly affected by driving style and the quality of the pads. There are average indicators: for the front axle - 15-20 thousand km, for the rear axle (drum) - up to 100 thousand km. But this does not exempt you from regular checks.
Front wheel brake mechanism: 1 - brake disc, 2 - pad guide, 3 - caliper, 4 - brake pads, 5 - cylinder, 6 - piston, 7 - pad wear indicator (inspection window), 8 - o-ring, 9 - protective guide pin cover, 10 - guide pin, 11 - protective cover