Owners of LADA cars with an electronic gas pedal may encounter error P0504 (mismatch of brake pedal sensors). Along with it, malfunctions in the engine may appear (stalls, speed fluctuates, does not start, etc.). Most often the cause is the brake pedal position sensor (brake light sensor or frog).
The brake pedal position sensor and brake light switch are mounted in one housing. Most often, the cause of its malfunction is a broken spring. In this case, you can repair the sensor yourself by replacing the spring with a new one. Or replace the sensor with a new one.
Search principle
To find a fault in any vehicle on-board network system, you should use the method of sequential elimination of elements. The point is to consistently check electrical appliances and sections of the circuit, excluding elements from the list of reasons that could cause a breakdown. To do this, you need to clearly understand the design and operating principle of the system. When troubleshooting, you need to move from the components that require the least effort to check, to the most difficult to diagnose elements.
Electrical diagram
We immediately emphasize that the pinout of connectors and color markings of wires may differ not only between different models of the same automaker, but also among one model of different years of manufacture. Before you start searching for the cause of the breakdown, you need to find an electrical diagram specifically for your car model.
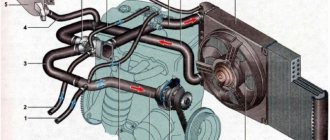
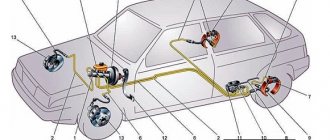
We will consider the principle of operation of brake lights and the troubleshooting algorithm using the example of the VAZ 2101-2102 circuit. The photo shows the general diagram of the vehicle's lighting and light signaling. We need to isolate the components involved in the operation of brake lights.
- 6 – mounting fuse block;
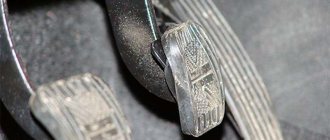
- 13 – brake light switch. It is a non-locking button (returns to its original position after removing the force). Located directly next to the brake pedal. When the brake pedal is released, the contacts of the limit switch are open, no current passes through it. Accordingly, when pressed, the contacts close, allowing flow through the lamps;
- 19 – lamps that light up when you press the brake pedal.
We do not have a diagram of the mounting block, but we know in advance that the brake lights only work when the ignition is on. There is a wire from the mounting block to the brake light limit switch, on which there is a constant + after the ignition is turned on. As soon as the limit switch contacts close, + goes to the brake light bulbs, which are connected in parallel. The “ground” of the rear lights is common and consists of a wire screwed to the car body.
In the diagram we presented, the elements are depicted as close as possible to how they look in reality. Don’t be alarmed if you only find a schematic diagram for your car with symbolic images of the elements. Schematic diagram of external lighting for VAZ 2114, 2115:
- 3 – mounting block;
- 8 – lamps for side lights and brake lights;
- 11 – brake light limit switch;
- K4 – relay for monitoring the serviceability of brake light lamps and side lights.
Location and performance check of the DZH
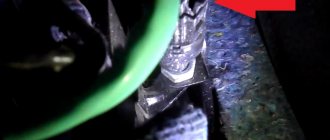
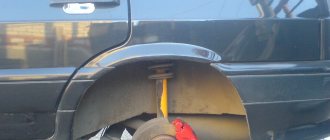
You can easily find out where the reverse sensor is located by looking up at the suspension of the fourteenth. It is located on the gearbox; there are two meters in total: the one we need and the one that signals the speed of movement. If it is not possible to get under the bottom of the car, you can get to the reverse sensor by opening the hood. But the first option is more convenient.
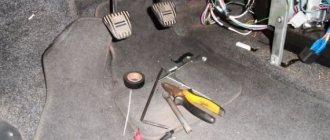
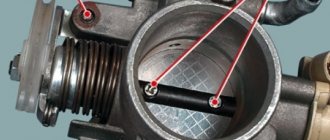
- To make sure that the auxiliary gearbox is faulty, you need to turn the wheels to the left, looking from the driver’s side: on the side of the gearbox there is a protection with contacts inside.
- We remove the protection, look at the device and the two contacts that go to it, close them on the frog and start the fourteenth, putting it in reverse gear. If everything is fine with wires, contacts and lamps, then the white lights light up.
- The lights do not light up - with a tester we measure the voltage on the ground and the wire (orange) leading from the frog; if there is voltage, then you should check the board of the white lights and the contacts to it. There is a possibility that the contact between the fuse block and the sensor contacts has failed; you should find it and measure the voltage in it.
- Oxidation of rear light contacts
- The sensor may become loose, it needs to be screwed in deeper
- No contact with transmission wiring
- No contact between plug and fuse box
- Any fuse can blow and disrupt the contact circuit.
It also happens that the DZH is normal, and the contacts are safe and sound, but the reversing lights do not light up . The lamps themselves may become covered (elementally burn out), or the contact may be lost (for the same lamps).
Fault localization
Understanding the operating principle allows you to determine exactly why the brake lights may not light up:
The fuse has blown. In the diagram, the fuses are marked with the letter F (from English - Fuse) and the serial number of the seat in the fuse block, for example, F3;- poor contact at connectors;
- the light bulbs have burned out, but since the lights are connected in parallel, the likelihood that 2 lamps will burn out at once is extremely low;
- poor contact on the negative terminal of the lights. In this case, problems may begin not only with the feet, but also with the lighting of the remaining lamps in the lanterns;
- Damage to the negative track in the lamp board. From the total mass directly to the brake light lamp, the minus goes along a special path on the board. The path may collapse from water or mechanical impact;
- malfunction of the brake light switch, the so-called frog;
- broken wiring, oxidation of contacts.
Troubleshooting algorithm
To detect a fault in the electrical network, you will need a multimeter or a tester, which you can make yourself. Previously, we told you how to use a multimeter, so we won’t focus on that.
The sequence of searching for the cause of the breakdown:
- Check the fuse for the brake light circuit. The location diagram of the fuse links can be found in the repair and operating manual for your car; often the symbol of the protected circuits is located on the back of the cover covering the fuse mounting block. If the installed fuse of the required rating immediately blows, there is a short circuit (short circuit) in the circuit. Please note that the fuse can protect not only the feet, but also other circuits. Installing a fuse with an increased rating is fraught with the risk of a car fire;
- If oxidation is detected on the terminals, clean the contacts mechanically or use an aerosol contact cleaner.
- Having turned on the ignition first and holding the brake pedal depressed, check whether there is power on the positive wire that goes from the limit switch to the rear light connector. If there is power, there is a malfunction in the lights themselves;
- check whether the positive signal is coming from the mounting block to the limit switch. If + comes, but when you press the brake pedal it does not appear on the second terminal of the limit switch, then the problem is in the “frog”;
- If there is no + at the limit switch terminal, examine the circuit up to the mounting block. If the wire is intact and securely fastened in the connectors, then the problem is in the mounting block.
Old style sensor
On Lada Granta, Kalina, Priora and Lada 4×4 cars with E-Gas, a brake pedal position sensor with article number 1118-3720010 is used.
- Screw the sensor until the pedal goes down.
- Turn the sensor slightly (counterclockwise 90 degrees) and secure with a lock nut.
As a result, when the brake pedal is released, the switch rod should be completely “recessed”, and when the pedal is pressed, it should completely come out of the switch body. Details in the video:
How does a brake light work?
In order to set up a brake light that lights up at the right time on the bumper, you must first understand how the system for supplying information from the brake pedal of the VAZ-2114 works. Without the necessary knowledge, you don’t even need to start doing everything manually, because most likely the driver won’t succeed.
When the driver presses the brake pedal, the brake light comes on. From it, voltage is supplied through all the necessary wiring to the device for dividing the same current, from where it is supplied to the analog input. After this, 14 digital pins are activated thanks to specially tuned pulses.
They are connected to the corresponding keys so that the glow power increases if the LED bulbs have 1 Watt, after which the load on the microcontroller is reduced. The output shows that the brake light LEDs of the VAZ-2114 spoiler are connected to a transistor circuit; after all operations they become active.
The power of the LEDs doesn't really matter. It is important to remember that in order for the brake light to be correctly displayed in the spoiler and visible to the driver driving behind, it is not necessary to install high power bulbs; 1 W will be quite enough.
Price issue
If the price of a VAZ 2114 reverse sensor varies between 100-300 rubles, and you can install it yourself, then the problem in the wiring or with the headlight board will not be so easy for you.
Before purchasing wiring components, clean the contacts and spray with WD-40, this should help. Because the purchased wires also need to be installed wisely, and this is electronics - a delicate matter - available to craftsmen in the service for a good fee.
As for the headlight circuit board, this is also a controversial issue, requiring investment both in the part itself and in the work of a professional who will take care of it. Burnt out light bulbs in a headlight are the cheapest consumables; one light bulb costs 20-50 rubles.
Guys, can you tell me who has encountered this!? how much does a brake pedal sensor (frog) cost? and are there any nuances during installation!?
I'm about to change the clutch
by Adminrive · Published 07/29/2015
Side mirror adjustment lever can be changed
by Adminrive · Published 11/29/2016
What to pay attention to
The brake light in the bumper must perform its function as correctly as a regular VAZ-2114 brake light. This kind of tuning can attract attention with its unusual animation. Drivers and other road users may pay more attention to this animation than to the actions of the driver himself in terms of actual braking on the highway. Therefore, not everyone has time to immediately assess the situation and may confuse turning with braking. In this case, a traffic accident may occur.
When you press the brake pedal, all the brake light bulbs should light up at the same time in order to attract the attention of the driver behind as much as possible, and only then you can turn on the necessary animation for visual display. Basically, for drivers, the brake light performs a completely different function.
If the driver makes a turn, he must first slow down before turning in the direction he wants, after which the brake light comes on. For safety, it is recommended to turn on 2 animations at once for at least 2 seconds, so that other drivers understand that the car will first slow down and only then turn. Many people act differently: first they turn on the turn signal, then they brake, so it is not always clear that the driver will brake or turn, because the flashing turn signal is difficult to see on the LEDs, although it is on.
Running turn lights can look more impressive if the animation speeds up towards the end of its action. This gives great elegance to the spoiler, but also adds attention to other road users. With such turn signals, it is clear that the driver is already turning in the right direction and has already finished braking.
As a rule, all these subtleties decorate a car on the road, but many drivers believe that these “things” are a threat to traffic and can lead to a traffic accident.
How to check
Turn on the ignition and press the brake pedal, the brake lights should light up. After releasing the pedal they should go out. If the lamps do not light up, check the brake pedal sensor and the voltage supply from the battery to the wiring harness block.
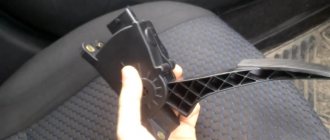
(Largus, Vesta, XRAY) Move the rod lock to the right position using a screwdriver. We check the brake pedal sensor using a multimeter in ohmmeter mode. Circuit 3-4 should be closed (resistance value is close to zero), and circuit 1-2 should be open (resistance should tend to infinity). After pressing the rod, circuit 3-4 should open, and circuit 1-2 should close. Before installation, move the rod to the left position.
(Priora, Kalina, Granta, Niva 4x4) Circuit 1-4 should be closed, and circuit 2-3 should be open. After pressing the rod, circuit 2-3 will close, and circuit 1-4 will open.
Thus, the cause of error P0504 may be:
- faulty sensor or its wiring
- Brake pedal sensor is not adjusted
- it is necessary to reprogram the ECM (instruction No. 46-15 for Lada Granta and Kalina 2 with automatic transmission, site users can download it)
To download files you need to log in to the site.
Checking pipelines and connections
To prevent sudden failure of the brake system, carefully check the condition of all pipes and connections, paying attention to the following:
– metal pipelines should not have nicks, scratches, chafing, active foci of corrosion and should be located away from sharp edges that could damage them;
– brake hoses must not have any cracks on the outer shell or signs of chafing visible to the naked eye; they should not be exposed to mineral oils and lubricants that dissolve rubber; by pressing the brake pedal firmly, check to see if any swelling appears on the hoses, indicating their destruction;
– all pipeline fastening brackets must be intact and well tightened; loosening or destruction of brackets leads to vibration of pipelines, causing their breakdowns;
– liquid leakage from the connections of the master cylinder with the tank and from the fittings is not allowed; if necessary, replace the tank bushings and tighten the nuts without subjecting the pipelines to deformation.
When tightening the pipeline nuts, use wrench 67.7812.9525.
Eliminate any detected faults by replacing damaged parts with new ones.
Flexible hoses, regardless of their condition, should be replaced with new ones after 125,000 km or after five years of vehicle operation to prevent sudden ruptures due to aging.
Checking the functionality of the vacuum booster
Press the brake pedal 5-6 times with the engine off to create equal pressure close to atmospheric in cavities “A” and “B” (see Fig. 6-2). At the same time, by the force applied to the pedal, determine whether the valve body is jammed.
Features of this tuning
The brake light in the spoiler has a number of advantages:
- It's stylish, that's why they buy spoilers. Without a spoiler, the VAZ looks like a simple classic car, even a kind of retro, but with a spoiler it looks quite original.
- The spoiler best conveys the stop signal, and you can come up with any animation that attracts attention, but you need to be careful with this.
- The spoiler has a low price, and almost every driver can install it independently.
- The spoiler is installed once for many years, so it is beautiful and profitable.
- The brake light on the spoiler is more visible, so even from a road safety standpoint, the spoiler wins.
Why does the brake pedal fail?
One of the elements of the described hydraulic system is a special composition circulating through tubes and other cavities. The main feature of brake fluid is that it cannot be compressed. As a result, the force from pressing the pedal is transferred “unchanged” to the pads, which stop the rotation of the wheel. “Sinking” indicates that the line has become larger in volume or has depressurized. The main causes of the problem are discussed below.
Low quality brake fluid
The composition circulating in the system is quite aggressive. Gradually, bad brake fluid begins to corrode rubber and even metal parts, hoses, and tubes through which it moves. The walls of the latter become thinner to such an extent that they swell when pressure is created. Because of this:
- an excess volume is created into which the brake fluid goes;
- when you add it, the pressure is restored, but the tubes may not be able to withstand it: microcracks form through which the liquid gradually leaves and air enters instead (when the pedal moves in the opposite direction, it is literally sucked in). In the worst situation, the hoses may burst.
Air in the brake system
Its entry into the line is a consequence of depressurization of components and parts of the brake system. A plug may also form due to the fact that the fluid level in the tank has dropped below the existing MIN mark. Another reason is improper bleeding of the brakes when replacing the circulating compound. The danger with air in the system is that, unlike liquid, it is compressed. As a result, the force applied to the pedal goes to waste - in the literal sense of the word.
Stop lights don't light up
Almost any problem with electronics in a car can be solved in the same way. You need to look for the problem either in the device itself, which is faulty, or in the power supply system to it. The situation is similar with the main reasons for the breakdown of brake lights. If they do not light up, it may be due to one (or several) of the following reasons:
- Problem with the brake light fuse: its oxidation or failure;
- Malfunction of the lamp(s) installed in the brake light;
- Problem with the brake light activation mechanism when pressing the brake pedal;
- Oxidized contacts in the socket for installing the brake light lamp;
- Damage to electrical wiring.
As you can see, among the problems listed above, only one can cause serious problems for the driver if he wants to repair the brake lights himself, and we are talking about wear and tear on the electrical wiring. Modern cars are equipped with dozens of electronic devices, and a worn, torn or improperly clamped wiring harness can cause your brake lights to turn off.
If none of the troubleshooting steps below resolve the problem, it is most likely a wiring issue. In such a situation, you will need to find a detailed plan for the car's electrical wiring and check with a tester for the presence of voltage in the sections, and after finding the problem, solder or replace the wires.
But don’t rush to get a tester, most often the brake lights don’t light up due to much more mundane faults, the elimination of which will be discussed below.
It is advisable to start troubleshooting the brake lights by checking the lamps. To do this, you need to open the trunk and remove the taillights, after which you can get to the brake lights. Depending on the make and model of the car, the method of removing the taillights will vary, and on some cars you can even get to the brake lights without this procedure.
The most reliable way to check whether the cause of the malfunction is burnt out lamps or oxidation of the contacts in the socket for installing them is to replace them with new ones. It is not always possible to determine by eye whether the lamps have burned out or not, so it is better to acquire new light-emitting devices in advance and install them.
If it turns out that no new copies of the required size were found, you can remove the working lamps from the turn signal indicators, side lights or other lighting devices of the car. Try them, and if the problem is solved, then it is enough to buy new lamps and replace them so that the brake lights begin to work as before.
Important: Some car models are designed so that if one brake light fails, the second one turns off automatically. Accordingly, when checking, it is better to screw the lamps into both brake lights to make sure that the problem is not related to their malfunction.
When replacing the lamps does not resolve the problem, you need to make sure that there is no oxidation of the brake light “cartridges”. Also check that the sockets are connected to the vehicle's wiring. If there is any doubt about this, you can disconnect the wiring contacts, clean them with fine-grit sandpaper, lubricate them with electrically conductive grease and reconnect them.
Please note: To check the sockets after performing the above manipulations, use new (removed from other lighting devices) lamps, since it is possible that previously installed lighting devices have become unusable simultaneously with damage to the contacts.
In a car's electrical circuit, a malfunction often occurs due to fuses that may fail. There are several ways to check fuses in a car, including visually or using a multimeter. In this case, there is one “household” method for diagnosing the brake light fuse.
You can make sure that the brake lights are not on due to a failed fuse. To do this, just start the car and press the horn. If the sound is heard, then the fuse is good and the brake light malfunction is due to another reason. If there is no sound, you need to determine from the fuse block diagram which one is responsible for the brake lights and horn, and then replace it.
Try our service station selection service
Creating an application is absolutely free and will take you no more than 5 minutes
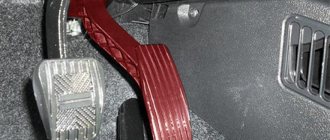
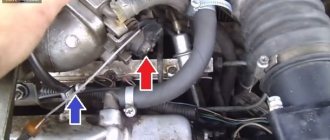
The mileage of the car is 2500 km, and the check is already lighting up with alarming frequency. The pre-installed BC multitronic displays a message that error P0504 is a problem with the brake pedal sensor. I erase it so that it doesn’t become an eyesore, but nevertheless, the error pops up. What to do? How can I adjust/change this button? In the photo this bastard is indicated by a red arrow. As people write, you need to play with adjusting it, which is done with two nuts. The most common thing is that people adjust so that the sensor button barely touches the brake pedal pad. In general, let's give it a spin and see. My BC immediately starts yelling as soon as I start the car, saying there is a mistake. I'll go dig around this weekend.
I noticed that the error pops up more often when you stand on the brake with the selector “D” on. I think the problem is deeper than just adjusting the sensor.
Yesterday, April 14, 2014, I was at the dealer for maintenance. In particular, he voiced hemorrhoids with error P0504. The dealer cheerfully undertook to fix everything. But he didn’t fix it, he said that we need to order a brake sensor, they say it’s defective. I drove out of the gate and wasn’t even surprised when the CHECK light came on again. And this morning the car did not start from the remote control, the BRAKES light was displayed on the key fob, which was corrected by pressing the brake a couple of times, then the car simply did not move, became dull, twitched, but after hitting the brake pedal again, everything was corrected, but then again. In general, the morning did not go well. I freaked out, went to the store and bought this damn sensor.
Here he is, the bastard, in the photo. I went to the dealer, where they changed it for me in 25 minutes without charging a penny. On my part, the cost is 170 rubles for a purchase in a store. So far nothing lights up or jerks. I want to disassemble the removed sensor at home and see what in such a cheap and simple part for 170 rubles was ruining the life of a car worth 450,000 rubles! The truth is, I don’t know how to assemble it, the upper part is on three clips, which are very hard, I wouldn’t want to break it.
Auto-assistance
In the diagram we presented, the elements are depicted as close as possible to how they look in reality. Don’t be alarmed if you only find a schematic diagram for your car with symbolic images of the elements. Schematic diagram of external lighting for VAZ 2114, 2115:
- 3 – mounting block;
- 8 – lamps for side lights and brake lights;
- 11 – brake light limit switch;
- K4 – relay for monitoring the serviceability of brake light lamps and side lights.
Fault localization Understanding the operating principle allows you to determine exactly why the brake lights may not light up:
Replacement of reverse sensor VAZ 2114
You can change the frog in two ways: climb into a hole (or drive the car onto an overpass) or do it while lying under the car. Many who have changed the rear light signal device themselves claim that it is easier in a pit, the sensor is clearly visible and does not splash with oil. There is an option, take the fourteenth one to a service center, where they can easily replace this device with a new one (and they will charge you the cost of two such sensors, if not three).
Reverse sensor VAZ 2114
When replacing the DHZ yourself, it is important not to waste time and quickly insert a new one! Otherwise, the oil will pour out of the box and leave a lot of pleasant memories on your clothes and the floor of the pit.
A simple diagram of how to change the reverse sensor on a VAZ 2114:
- Drive the car into a hole or onto an overpass and put the handbrake on.
- Remove the protection from the frog contacts and disconnect them.
- You should prepare some container in advance for the oil that will pour out of the sensor hole.
- Place the container, you can unscrew the sensor (if it does not give in, then you can unscrew it with a wrench with a 22-mm head; it also happens that the wrench does not help either, it can literally become stuck (the oil is nearby), then we take a chisel and a hammer and pray that everything went smoothly)
- They took out the non-working one, inserted a new one, and screwed it on.
- If the box crater is filled with oil, wipe it to remove excess dirt.
- We connected the contacts and returned the protection back.
- If enough oil has spilled out, add the required amount.