On a Lada Vesta car, the door handle is considered a consumable item. This also applies to other VAZ cars where Euro handles are installed. The door handle of Lada Vesta cars is a weak element; they often break and peel off. The outer part of the front door is especially susceptible to this - due to frequent opening by the driver, it suffers more than others. He pulled sharply in the cold, not careful handling - the door handle does not forgive this. Sometimes it does not return to its original position and jams. If suddenly your outer or inner handle breaks, you can deal with the problem by contacting the warranty service of a Vesta dealer yourself. Repairing and replacing consumables is not a tricky matter; to do this, it is enough to know the structure of the door handle on Vesta. Read the article and we will answer your questions in detail: remove, replace, buy the original according to the article number!
Instructions: Lada Vesta door handle - repair
On a Lada Vesta car, the door handle is considered a consumable item. This also applies to other VAZ cars where Euro handles are installed. The door handle of Lada Vesta cars is a weak element; they often break and peel off. The outer part of the front door is especially susceptible to this - due to frequent opening by the driver, it suffers more than others. He pulled sharply in the cold, not careful handling - the door handle does not forgive this. Sometimes it does not return to its original position and jams. If suddenly your outer or inner handle breaks, you can deal with the problem by contacting the warranty service of a Vesta dealer yourself. Repairing and replacing consumables is not a tricky matter; to do this, it is enough to know the structure of the door handle on Vesta. Read the article and we will answer your questions in detail: remove, replace, buy the original according to the article number!
Handle price and article number
Vesta comes equipped with European-style handles as standard. If replacement is necessary, you can order the same kit in the store or from any official dealer. The price of a set of 4 painted external parts will range from 750 to 2200 rubles. To order, use article number 8450007739.
Salon handles can be sold as a set, but in two pieces, or individually. The average price of 1 part is 400-600 rubles. The article numbers of the interior unlocking elements differ according to the side on which they are installed. To purchase right handles you need to use the number 8450007743, and to buy left handles - 8450007744.
When ordering a set, pay attention to the color of the purchased parts. If interior elements are sold in silver, then the exterior ones can be matched to the color of the car, avoiding additional repainting.
Problems arising with Lada Vesta handles
There are many options for problems that may require replacing door elements on Vesta. The following door faults are recognized by car enthusiasts as the most common:
The outside door handle does not return to its original position. Many Vesta owners encounter this, and immediately after purchase. The company's management even issued an order obliging dealers to check the mechanism and replace it in case of malfunction before sale. Therefore, if you find this problem, please contact us for warranty service. The driver's euro handle is loose. This is also a common malfunction and often appears simultaneously with the first one. Euro door handles creaking. The problem is eliminated by installing a madeline on the top edge of the disassembled part. The likelihood of the above breakdowns increases if you pull the door sharply when opening it towards you. This part of the Lada Vesta car requires careful handling. If a problem occurs during the warranty period, you must contact an authorized service center. This applies to both situations when a part breaks and situations when it does not work well enough.
Installation of a new larva
To replace the lock core due to mechanical failure, remove it from the vehicle as described above. Then follow this algorithm:
- Insert the key into the slot and use a Phillips screwdriver to unscrew the 3 screws holding the 2 halves of the lock body together.
- Separate the housing while holding it with the key facing up. If you hold the lock in a different position during disassembly and do not insert the key, the insides will spill out and you will not understand how to put them back together. In this case, the ball with springs may get lost.
- Remove the locking mechanism, which consists of two spring-loaded parts, and pull out the spring itself.
- After removing the key, carefully remove the core so that the ball with the spring (located on the side of the cylinder) is not lost.
Before replacing, it is necessary to remove the return spring from the old cylinder, since it is not sold complete with a new core. The spring is inside the part on the back side in a cocked state; it must be installed in the same form on the new cylinder. Also, do not forget to remove the thin spring from the hole where the ball is inserted.
Important point. Remember that if you replace the core because it is broken, the new key will no longer fit the door lock. There are 2 options: use two separate keys or simultaneously change the cylinder in the door. The last method becomes the only applicable one when all the keys are lost.
When installing the core, you need to move the spring for the ball into the hole and insert the part into the body. Then push the larva all the way, while simultaneously inserting the ball into the socket. After that, all that remains is to assemble the locking mechanism and tighten the housing with screws. When finished, check the operation of the ignition switch by turning the key to different positions.
What to do if the handle does not open - reasons
Sometimes problems with the external elements of Vesta lead to the fact that the door completely stops opening from the outside. The reason may be one of the malfunctions that we mentioned above. In this case, you will have to change the part under warranty or yourself.
The second reason why a car door does not open or close is a malfunction of the lock itself. Even with the rod working normally, it cannot be lowered and raised smoothly, since the lock mechanism is jammed. To solve the problem, it is often enough to lubricate the rod a little and design the part properly so that the lubricant reaches its destination.
Replacing the contact group
In the event that, as a result of diagnostics, a malfunction of the contact group is detected, you will still have to remove the ignition switch, since it will not be possible to get to it in any other way. After removing the element, disassemble it using the following algorithm:
- Disconnect the connectors with the backlight power wires.
- Remove the decorative plastic cover by releasing the 4 latches. Work carefully because these clips are easy to break off, and buying a cover separately is quite a task. It is not advisable to change the entire lock because of it.
- By bending the 2 clamps holding the contact group, remove it from the ignition switch.
Note. You will additionally need a small flat-head screwdriver as a tool to bend the latches.
First of all, examine the status of the contacts. If they have darkened (oxidized), then clean the current-carrying surfaces with fine sandpaper P1000. Then put the group in place and, without installing the lock, connect it to the vehicle's on-board electrical system to check its functionality. If unsuccessful, the part must be replaced. The same will have to be done if the contacts are burnt or the group does not work without any external signs of malfunction.
Checklist: How to disassemble the Lada Vesta handle and install a new one
You can repair the Lada Vesta door handle yourself. The process will take a few minutes. First you have to remove the part and then replace it with a new one - it's simple. The work is a little different. It all depends on the side on which the part is installed.
External handles
Typically, the outer front European door handle on the driver's side needs to be replaced. It is the one that is used more often, so its opening mechanism wears out quickly.
To replace an element you need to perform a series of sequential actions:
- The inner door trim is completely removable;
- The lock drive rod is carefully disconnected from the cylinder;
- Using a screwdriver, remove the lock cylinder cover from the outside of the door;
- The plug at the end of the door is removed;
- Using a Torx screwdriver, the screw securing the lock cylinder is turned out;
- After this, all that remains is to remove the lock cylinder;
- The Euro handle is moved back and carefully removed from the door, first the back part, and then the front;
- The gasket of the outer euro handle is removed, and a rivet is drilled under it. This allows you to remove the mechanism.
From the passenger doors, it is removed in the same way! With the exception that they do not install a lock drive rod, which means you can skip the first points. Installing the new part is done in the reverse order.
Disassembly/assembly
Left door:
Remove trim 2, Figure 3-2, by pulling the upper corner away from the door, overcoming the resistance of the plastic holder. Unscrew the screws 4, self-tapping screws for the lower fastening of the upholstery 1 (replaceable Torx T20 head, knob).
Figure 3-2 – Fastening the left front door trim of the Lada Vesta Cross: 1 – door trim; 2 – inner lining of the exterior mirror; 3 – left front door trim handle; 4 – screws for the lower fastening of the door trim; 5 – handle fastening screw; 6 – screw for the upper fastening of the door trim; 7 – plug.
Unscrew the plug 7 and unscrew the self-tapping screw 6 for the upper fastening of the upholstery (flat screwdriver, replaceable Torx T20 head, wrench). Unscrew the self-tapping screw 5 securing door handle 3 (replaceable Torx T20 head, knob). Remove the handle from the door trim by pulling its edge away from the door to overcome the forces of the mounting clips. Disconnect the connectors 3, Figure 3-3, of the wiring harness from the driver's door module 4. Unscrew screw 2 of the middle fastening of the upholstery (replaceable head Torx T30, knob).
Figure 3-3 – Fastening the left front door trim of the Lada Vesta Cross: 1 – front left door trim; 2 – screw for the middle fastening of the upholstery; 3 – door wiring harness blocks; 4 – driver’s door module; 5 – left front door trim handle.
Overcoming the resistance of the holders, disconnect the trim 1 from the door (flat-head screwdriver).
Door right:
Remove trim 1, Figure 3-4, by pulling the upper corner away from the door, overcoming the resistance of the plastic holder.
Figure 3-4 – Fastening the right front door trim of the Lada Vesta Cross: 1 – inner trim of the exterior mirror; 2 – right front door trim; 3 – trim of the front right door trim handle; 4 – door handle fastening screws; 5 – plug; 6 – screw for the upper fastening of the door trim; 7 – screws for the lower fastening of the door trim; 8 – power window switch.
Unscrew screws 7, self-tapping screws for the lower fastening of the upholstery 2 (replaceable Torx T20 head, knob). Unscrew the plug 5 and unscrew the self-tapping screw 6 for the upper fastening of the upholstery (flat screwdriver, replaceable Torx T20 head, wrench). Remove the decorative plug 3 and unscrew the screws 4 securing the door trim handle, remove the handle. Overcoming the resistance of the holders, disconnect the trim 1 from the door (flat-head screwdriver). Disconnect the door wiring harness connector from the power window switch. Disconnect terminal 3, Figure 3-5, of the door wiring harness from the outside mirror. Unscrew screws 2 securing the exterior mirror to door 1, remove the mirror (replaceable Torx T20 head, knob).
Figure 3-5 – Mounting the exterior mirror of Lada Vesta Cross: 1 – front door; 2 – mirror mounting screws; 3 – door wiring harness block.
Move the edge of the outer 1, Figure 3-6, horizontal seal of the sliding window away from the door 3, so that the seal retainer 2 comes out of the hole in the door panel, then pull up to remove the seal from the door panel (flat-head screwdriver).
Figure 3-6 – Lada Vesta Cross door seals: 1 – outer horizontal door seal; 2 – retainer of the outer seal; 3 – front door; 4 – internal horizontal seal of the door sliding glass; 5 – upper door glass seal; 6 – sliding window door frame seal.
Remove the inner 4 horizontal and upper 5 seals of the sliding glass (flat-head screwdriver). Remove the seal 6 of the sliding window door frame (using a flat-head screwdriver). Turn 90° and remove holder 1, Figure 3-7, from the door panel, for the upper trim fastening screw. Unscrew screws 8 and remove the inner door lock handle, disconnecting the lock drive cable 3 from it (replaceable Torx T30 head, knob).
Figure 3-7 – Lada Vesta Cross door fittings: 1 – holder for the upholstery fastening screw; 2 – nuts for fastening the window lifter guides; 3 – cable of the internal handle of the door lock drive; 4, 7 – glass clamp bolts; 5 – nuts for fastening the window regulator; 6 – door trim handle bracket; 8 – screws for securing the internal lock handle; 9 – wiring harness seal; 10 – door wiring harness; 11 – rivets for fastening the loudspeaker.
Temporarily connect the power window control unit, connect the negative terminal to the battery, lift the glass until the glass fastening clamps appear in the door panel openings.
Loosen the tightening of bolts 4 and 7 of the glass clamps and remove the glass from the door cavity. Unscrew the four nuts 2 securing the window lifter guides (replaceable head 10, knob). Unscrew the three nuts 5 securing the window lifter electric motor, remove the window lifter from the door cavity, disconnect the wiring harness block 10 from the electric motor (replaceable head 10, knob). Unscrew the screws securing bracket 6 of the door trim handle, remove the bracket (replaceable Torx T30 head, knob). Disconnect the wiring harness block from the loudspeaker, drill out three rivets 11 securing the loudspeaker, remove the loudspeaker (drill, 5 mm drill bit). Disconnect the door wiring harness block from the door lock, the wiring harness attachment points from the door panel, remove the wiring harness seal 9 from the hole in the door panel (flat-head screwdriver). Disconnect block 2, Figure 3-8, of the rear wiring harness from block 3 of the door wiring harness. Unscrew screws 1 securing the door wiring harness block to the door panel, remove the harness from the door cavity (replaceable Torx T20 head, wrench). Unscrew screw 4 securing the door limiter 6 to the front pillar of the body (replaceable Torx T40 head, knob). Unscrew the nuts 5 securing the door stop to the door panel, remove the stop (replaceable head 10, knob).
Internal handles
To change interior door elements, you will have to spend even less time than on external ones. Let's look at the step-by-step instructions for the driver's door:
- Decorative trim is completely removable;
- Next, the screws are unscrewed to secure the part to the door;
- The handle is carefully removed from the door panel;
- The drive rod is removed from the holder;
- Disconnect all wires and remove the element;
- To install a new part, proceed in reverse order.
Before starting work, make sure that there is really a need to completely remove it from the door. Very often, troubleshooting problems in interior elements requires only removing its top cover, and further work is carried out on the inside of the part. This is the method that is used if it is necessary to eliminate the creaking of opening elements.
Execution Sequence
3. Remove the internal door handle in the same way as the internal front door handle (see “Internal door handle - removal and installation”).
4. Press the latch and disconnect the wiring harness block from the lock.
5. Remove the outer door handle with bracket (see “Outer door handle - replacement”). Disconnect the lock drive cable from the bracket.
7. Using a TORX T30 wrench, unscrew the three fastening screws and remove the lock.
Recommendation. Lubricate the lock mechanism with grease and apply thread locking agent to the lock mounting screws.
8. Install the parts in reverse order.
Recommendation. After installing the lock, check that the door closes easily and tightly. Adjust the lock if necessary.
9. Mark the position of the lock latch so that you can return to the original setting.
10. Using a T40 TORX wrench, loosen the two bolts securing the lock retainer.
11. By moving the latch back and forth and left and right, we achieve easy and tight closing of the door.
12. Upon completion of the adjustment, tighten the screws securing the lock retainer to the prescribed torque of 22 Nm.
Source
Door handle covers
Often, in order to hide defects that have appeared during operation, car enthusiasts install chrome plates on the door opening elements of Lada Vesta. Such a decorative element is inexpensive, but gives the car a fresh look. The linings are sold as a set, and you can find them for external and internal ones.
Installing the element does not require special knowledge or skills. The cover is attached to the factory part using double-sided tape, sealant or other adhesive material. Be careful during installation to avoid problems in the future. If the chrome door handle trim is not installed tightly enough, dirt and moisture can get into the resulting cracks, which means there is a risk of rust.
Before purchasing items, study the offers of different stores. Some companies seriously inflate the price and instead of several hundred rubles, you have to pay a couple of thousand for them. However, the quality does not change. You can only pay a large amount for linings made of stainless steel, since their service life is long and their wear resistance is superior to chrome ones.
Source
If the external door handle on a Lada Vesta does not return back
Some Lada Vesta owners are faced with a problem when the outer door handle does not return to its place. If you contact your dealer about this malfunction, the door opening mechanism can be replaced (warranty repairs performed). In response to this situation, AVTOVAZ issued Order No. 28-18 dated March 13, 2018 “to replace the left door opening mechanism module.” The order was sent by one of the Lada.online readers.
If there are cars from the list (Appendix 1) on the territory of the dealership center (unsold, check-in for maintenance and repair), it is necessary to inspect the door opening mechanism module of the left front and left rear. If there is a number “2” on the counterweight (Appendix 2), the module must be replaced. The module with the number “1” on the counterweight must be replaced only if the handle is clearly stuck. When replacing the module, the lock switch lever 8450030224 may break. Module 8450039482 and lock switch lever 8450030224 must be ordered from LADA IMAGE JSC.
Have you ever encountered a situation where the outer door handle on a Lada Vesta broke and does not return? Was the mechanism replaced under warranty?
Source
Let's sum it up
The Lada Vesta car is gradually becoming popular and replacing many other options for inexpensive budget sedans. This is not the simplest or most budget car, but it is a quite confident horse for Russian roads. Of course, this is a VAZ, so you shouldn’t hope that everything in the car is perfect and nothing will have to be modified. Most likely, you will have to perform many different modifications yourself while using the machine, especially after it is removed from the warranty. However, there are far fewer problems and improvements needed here than in most other cars in this price class.
It is quite possible to remove the door card and perform the necessary work in your own garage. To do this, it is enough to carefully carry out all the work according to the instructions. Each stage should be performed with due caution, otherwise you will not avoid problems with the car. A broken mount or a scratched power window control unit will have to be replaced, and this costs some money. It is best to be as vigilant as possible so as not to break anything. In this case, doing it yourself will pay off and save you a lot of money. Have you ever disassembled a car door card with your own hands?
Typical problems with Lada Vesta door handles
- Most often, door handles on Vesta jam or do not return to their original position. This is especially true for the driver's door, which is used more intensively. This problem sometimes occurs immediately after purchasing a new car. The manufacturer knows about this defect and replaces these parts in the warranty service without problems, so if such a malfunction occurs, you can simply contact the service center, where they will fix it for you. But you can cope with this problem yourself.
- In addition to jamming, many drivers are worried about such a nuisance as the constant squeaking of internal door handles. This intrusive sound can be eliminated by installing additional insulating material or sealant from the inside, which will require dismantling and disassembling the internal element.
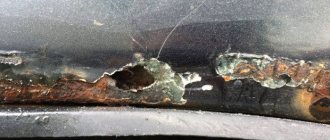
- Another common problem is damage to the paintwork near the outer trim. To prevent them from scratching the paint, it is necessary to fix the gasket between the moving element and the body, which can sometimes not be held securely. In order to do this, you need to glue the gasket under the rubbing parts using double-sided tape.
The window is Niva’s weak point
On many automobile forums dedicated to the Niva car, you can read information that their owners are periodically bothered by rear windows that randomly drop down. Of course, they do not open completely, but only a couple of centimeters, but sometimes this is quite enough.
When the car is just standing, you should constantly rock them up and down. Using similar maneuvers, we open the glass for ten to twenty minutes. During this time, as a rule, you will be able to move the glass down about ten centimeters, and this will allow you to stick your hand into the interior and lift the flag yourself. At this stage, you can finish the review of ways to open a Niva without a key, but we bring to your attention a few more interesting options:
- using a tennis ball;
- wires;
- using a loop of regular rope.
And also interesting: Do-it-yourself Niva tuning - 95 photos of new products with the best options!
Details about each of these methods
You can watch videos on the Internet where professional car enthusiasts perform these procedures, showing everything by their own example.
However, it is also worth paying attention to such a moment as what to do so that such situations do not occur at all. It's better if you always have a backup option.
Why solve problems if they can be eliminated altogether?
Details about each of these methods
Removing the door handle on a Lada Vesta car
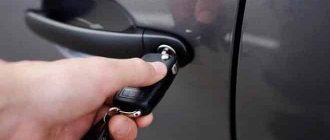
- Looking at the handle from the outside, it seems that it does not have any fastening elements and it is completely unclear how to dismantle it. In fact, access to the fasteners is located under a rubber plug at the end of the door.
- There is a bolt inside under the plug. It needs to be unscrewed using a T15 key. There is no need to completely unscrew the screw; you can simply loosen it a few turns - this will be enough.
- Next, you need to carefully pull out the plastic stopper.
It should come out easily, without any extra effort. The plastic here is quite fragile, so you need to act carefully. If the element does not slide out, you can spray a little liquid lubricant, such as VD-40, into the gap and try again.
- After the corner is removed, the door handle must be moved slightly back and towards you. First the back part is released, and then the front. You also need to act carefully, with smooth movements.
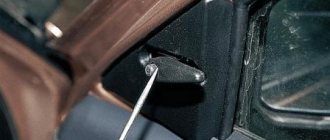
The process described concerns the passenger handle. If you need to remove the driver's, then first you need to disconnect it from the lock that is located in it. To do this, the door cards are removed to open access to the door rods, and the fastenings are carefully disconnected.
Seals
The seals from the manufacturer fit quite tightly in all places except the gap between the front and rear doors. This can be corrected by installing the RKI-19 seal, article number - 000017504293020.
Before installing it, the trailing edge must be cleaned and degreased. Before installation, it is recommended to warm up the seal for a couple of minutes at a temperature of 40 - 50 degrees. This is done to give it elasticity. Then, in an area of 5 - 7 cm, peel off the protective tape and fix the seal to the upper edge of the door flange. Then, removing the protective tape in areas of 5 - 10 cm, glue it along its entire length, avoiding stretching the material.
Sometimes, for better insulation, the rear part of the tailgate is also modified. To do this, use a universal D-shaped seal. Size 14x12 mm.
How to remove interior door handles on Lada Vesta?
Internal handles often bother drivers with squeaking and unpleasant squeaking noises while driving. This problem can be solved by using a gasket inside the Madeleine part or automotive sealant. You must act in the following order:
- Remove the plastic cover. To do this, you need to carefully pry it over the edge with a flat object and remove it. It is better to use special plastic spatulas that will not damage the decorative coating of the door. This interior element does not have any fasteners in the form of screws or bolts, so it is very easy to remove. The main thing is to act carefully so that the thin plastic does not break.
- After the handle is dismantled, you need to carefully glue the joints with insulating material. To do this, you can use madeline, a special anti-creaking noise-insulating tape that is sold in car dealerships, or fabric electrical tape. It is necessary to glue along the entire perimeter, excluding the clamps, so that the part can hold on. Some drivers use sealant instead of insulating material, but after this treatment it will be difficult to dismantle it again if necessary, and it may need to be completely replaced.
- Reinstall the handle in the reverse order. After gluing it will snap tighter, and you need to tighten it well and press it. We check that everything is done correctly by closing and opening the doors several times.
How much will it cost to replace Lada Vesta door handles?
Many Vesta car owners prefer to completely replace them instead of repairing them. Sets of new parts are sold in car dealerships everywhere, and purchasing the required color is not a problem. You can order the necessary spare parts on the Internet, for which you need to know their article number.
Marking and cost of Lada Vesta door handles:
| Number | Installation location | Price |
| 8450007739 | Front outer (right) | from 940 rub. up to 1451 rub. |
| 8450007873 | Front outer (left) | from 940 rub. up to 1451 rub. |
| 8450007872 | Rear outer (left) | from 800 rub. |
| 8450007739 | Rear outer (right) | from 800 rub. |
The cost of a set for four doors is approximately 2500-2700 thousand rubles, depending on their color and point of sale. Craftsmen charge an average of 500 rubles for installing door handles, but knowing how to remove a Lada Vesta handle, you can make the replacement yourself.
conclusions
Making minor modifications to the door handles of a Lada Vesta car is not particularly difficult. This does not require any special skills or complex tools, so anyone can cope with the task. The driver just needs to remember that removing external and internal elements requires care and caution, since the plastic on Vesta is quite fragile.
Complete replacement of handles if necessary is also not a problem. In online stores or on shelves, you can purchase sets of a suitable color, or cover parts that have lost their appearance with plastic covers.
Source
What tools will you need for the job?
The set of tools depends on the goals you are pursuing. For example, to install new sound insulation you need high-quality insulating materials, special mounting parts, and sharp office knives. To replace the speaker with more powerful equipment, you will also need a set of electrical equipment to install and connect all the elements. We will consider a set of tools directly for removing the door card, and we will leave further actions at the discretion of the car owner.
So, you will need the following devices:
- work gloves - it is better to carry out work in thick protective gloves, otherwise the plastic can crush the hand and damage the upper tissues of the skin, this is an unpleasant injury;
- a flat-head screwdriver with a thin working part, as well as a set of Phillips screwdrivers and Torx 20 - it is better to have several sizes on hand at once in order to choose the optimal one and not lick the fastening bolts;
- several plastic spatulas made of soft material, which will serve to carefully pry up the plastic elements; this cannot be done with a screwdriver, otherwise marks will remain;
- flashlight - you will need high-quality light in places where regular lighting does not reach, so a headlamp will be a very necessary piece of equipment to get the job done;
- door trim clips for Lada Vesta - usually several clips break during dismantling, so you will have to buy them at once; for all four doors it is better to have a dozen spare clips.
Of course, the set of tools may be smaller. Many craftsmen manage to make do with a hole, which is used to pry off all the parts. But if you don’t have much experience, it’s better to prepare more tools to get the job done. Otherwise, already in the first stages, you can severely damage expensive parts of your car and completely eliminate the financial effect of doing the work yourself. In this case, there will be no savings, but there will be more problems for the car owner.