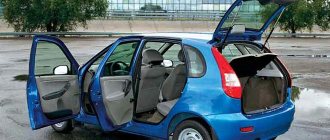
Removing the car door trim is a mandatory procedure if you need to carry out certain operations - repairing wiring, installing new equipment such as speakers or window lifts. Cars from the Lada Priora line have a standard door mechanism design, which allows you to open it by following the same instructions regardless of the model.
The vehicle owner only needs patience, a set of tools and strict adherence to instructions to avoid damage to the trim. The design of the rear and front doors on cars is slightly different, but the general principle of operation is the same.
Tools for removing car trim
The standard list of tools includes:
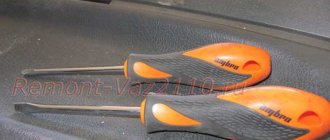
- It is advisable to have a special kit for removing the trim; if you don’t have them, you can use a flat-head screwdriver or something similar;
Set of tools for removing trim and clips
- Phillips screwdriver;
- TORX key (T20);
- spare pistons/clips for fastening.
It should be taken into account that the clips may crack when removed, so it is better to stock up on additional copies just in case. It is preferable to buy the kit in advance to save time at work. It is worth paying attention to what model the clips are purchased for - only for the Priora, the rest do not match in size.
Clips for door trim of different Lada models
If electronic elements are installed in the doors, you will need a wrench - this applies to window lifts. It is necessary to have space to open the doors to the sides, so you need to empty the garage/box of unnecessary things that interfere with the procedure. Another option is to take the car outside in warm weather, and collect all the removed elements in a tool box with pre-prepared compartments, so that nothing gets overlooked during reassembly.
It is imperative to disconnect the battery if there are electronic components in the doors, so as not to provoke a short circuit and the need for premature replacement of wiring and other spare parts - just remove the negative wire. When using screwdrivers, the best option is to wrap them in electrical tape so as not to scratch anything (including the paint on the metal), and you need to work with the tools carefully - without sudden movements.
Specifications
Power unit
The “Chinese Diamond” received an independent suspension and a semi-independent beam, the wheels were disc brakes, ventilated in front. The electric booster complements the rack and pinion steering. In Russia, only one powertrain option is offered for the Brilliance V5. We are talking about a Mitsubishi 4A92S gasoline engine equipped with 4 cylinders. The working volume is only 1.6 liters, which could not but affect the power of 110 horses.
This engine, modest in all respects, is equipped with either a five-speed manual transmission or a hydromechanical automatic transmission. Within the city, the car consumes about 10 liters per 100 km, while on the highway it can reduce consumption to 7.8 liters. A car equipped with a manual gearbox accelerates to 100 km/h in 11.9 seconds. The maximum possible speed is 170 km/h. The Diamond with an automatic transmission is a little slower, its acceleration to hundreds is 13.9 seconds. The maximum permissible speed is only 165 km/h.
While driving, the crossover from China does not show anything surprising; on sharp turns it tilts significantly to the side. The weight of the car is almost 1.5 tons, the engine power is not enough for such a mass. Many people, after test driving a diamond, reported that the Brilliance B5 is equipped with uncomfortable pedals.
The main deliveries to the Russian Federation will be the Luxury version, which has an engine with a power of 110 horsepower and a torque of 151 Nm. By the way, specifically for Brilliance B5, a license was obtained from Mitsubishi to use their engine. The gearbox is similar to that of the Hyundai and supports five gears. The similarity with BMW is observed only in appearance; it is very far from any technical similarities. What distinguishes the Diamond from other Chinese crossovers is that it can start the engine from the start button.
Drivers who have driven Chinese cars will not be surprised that, despite the brutal appearance, the Brilliance V5 does not experience any aggression during acceleration. The engine works properly, even growls, but it picks up speed slowly, and not as much as we would like. Therefore, if you own such a diamond in the future, take this technical feature into account when overtaking on the highway.
The car's suspension leaves a pleasant impression.
It is elastic and overcomes any pits and potholes without any special obstacles. Thanks to good sound insulation, any knock is heard quietly and does not cause discomfort. But on sharp turns you feel a strong lean to the side. Specifications
| Modification | engine's type | Engine capacity | Power | Transmission | Acceleration up to 100 km/h, sec. | Maximum speed km/h |
| Brilliance V5 1.6 MT | Petrol | 1590 cm³ | 110 hp | Mechanical 5st. | 11.9 | 170 |
| Brilliance V5 1.6AT | Petrol | 1590 cm³ | 110 hp | Automatic 5 speed | 13.9 | 165 |
Safety
Safety in the Chinese crossover is at a decent level; the car has the following functions:
- Door locking in automatic mode at speeds over 25 km/h;
- Automatic door unlocking in case of an accident;
- Signaling;
- Steering wheel lock;
- Two airbags;
- Locking window lifts;
- The windows can be closed using a remote control, and they also have an injury protection function;
- Seat belts in the rear seats;
- Front seat belt tensioners;
- Headrest height adjustment;
- ISOFIX child seat support;
- The seat belt sensor is activated at speeds above 25 km/h;
- Children's castle;
- Steering column with injury protection.
How to remove the front door trim on a Priora
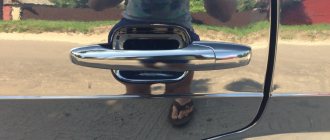
Dismantling begins by unscrewing the screws located near the door handle. Next, you will need to remove the screws holding the power window control module. At this stage, care must be taken not to damage the glass itself. The window lifter element will need to be removed along with the module for controlling the mirrors. Next you need to work in the following sequence:
- if there is a speaker in the door, then it is necessary to dismantle it;
- unscrew three screws from the bottom of the casing;
- the screw at the door handle is unscrewed;
- Next you will need a TORX wrench; use it to unscrew two bolts in the recess on the armrest;
- The pad on the armrest itself, in addition to the bolts, is attached to latches - you may need a flat-head screwdriver to unlatch them. Be careful! The latches are quite fragile and can break if pressed hard.
- the wires are connected to the removed cover with a special plug; it is simply removed;
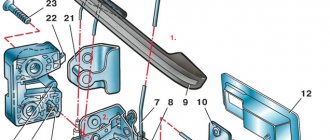
- the door lock is twisted;
- Now the trim is held in place only by clips around the perimeter of the door. Removal is recommended to be done using special trim removers so as not to break the clips. You can operate from any of the angles - the casing is pryed up and carefully, but with little effort, removed from the clips.
Location of clips on the Priora door
- the casing has been removed.
Useful and visual videos of removing the front door trim from a Priora:
Reassembling the door after carrying out the necessary operations is carried out in the reverse order. You just need to make sure that all electrical and mechanical components are connected correctly. Contacting a workshop will not be a rational decision if you study the instructions in detail and do everything exactly as described and shown in the pictures. The first time the process will take a little longer, but later working on the car will become much easier.
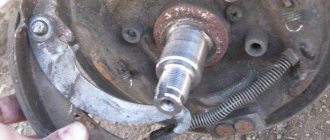
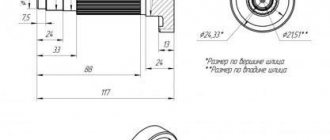
We specify the tightening torque of the cylinder head bolts during the installation process
Do-it-yourself cylinder valve body maintenance
The cylinder head (cylinder head) is the most important component in the car engine system. The process of tightening the cylinder head bolts will be within the capabilities of a car enthusiast with certain skills. To work, we need a special tool and self-confidence. The instructions provided will help you cope with the task and avoid common mistakes.
First, let's determine in what cases it is necessary to tighten the bolts.
Most modern cars do not require cylinder head bolts to be tightened. On earlier car models (for example VAZ 2109), it is necessary to tighten the bolts in a timely manner in order to successfully pass the technical inspection.
As a rule, the accumulation of moisture in the places where the block comes into contact with the cylinders indicates the need to tighten the bolts. The reason for the appearance of moisture in these places may be a leak of lubricant. There are several most popular reasons for tightening bolts, including:
Violation of the block head structure. Such consequences most often result from engine overheating. Cylinder head gasket leak. This fact also indicates the need to tighten the bolts. It is recommended to adjust the tightening torque after passing a certain mileage and without fail, after repairing the cylinder head.
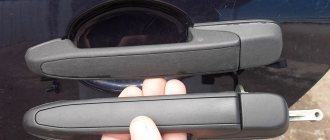
How to remove the rear door trim on a Priora
For the rear doors, the sequence of actions is approximately the same, and even easier, but it is worth considering the design features and location:
- use a Phillips screwdriver to unscrew the bolt from the recess for the door handle;
- Two bolts are also unscrewed in the recess of the armrest. If necessary, the entire pad is removed from the clips and removed;
- If the rear windows are manual and not automatic, then the handles are simply pryed off with a flat-head screwdriver and snapped off;
- the cap from the door lock is twisted off;
- Three bolts are unscrewed from the bottom of the casing;
- Using a special puller or a flat screwdriver, the trim is carefully removed from the clips. It is done!
Assembling the door will require the same steps, but in reverse order.
Methods for tuning Priora door cards
All methods of adding originality to the appearance of doors can be divided into three groups:
- replacing door cards with tuned ones;
- coloring of door cards;
- door card trim.
The first method does not raise any special questions or difficulties. The only problem is to find tuned door cards that suit your taste.
Painting door cards is the easiest and cheapest way of tuning. Its disadvantages:
- only the color changes, not the texture of the material;
- Even high-quality paint can peel off over time, requiring the door panels to be repainted.
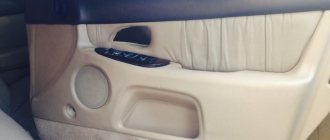
Covering Priora door cards with fabric or leatherette is the most complex method, which allows you to achieve the best appearance of the interior. Regardless of the tuning method, it is necessary to dismantle the door cards
Door trim repair
In case of noticeable damage to the surface of the door trim, it is possible to eliminate the consequences using several materials:
- leather;
- plastic;
- textile.
To fix the material, you will need gel or glue, depending on the situation, and the cost of the work for the machine owner directly depends on the area being processed. You can do the same with inserts. The following materials are used:
- eco leather;
- Genuine Leather;
- velours;
- leatherette;
- fabric for covering the ceiling of a car;
- Alcantara.
The choice of material depends solely on the preferences of the car owner and his budget.
Replacement/installation of sound insulation
Installing insulation will protect the driver and passengers not only from unnecessary noise, but also from other factors:
- vibration from a running engine and/or driving on rough roads;
- heat/cold retention depending on the time of year, giving additional comfort to everyone inside the cabin;
- improving the sound of car acoustic systems in the low frequency range;
- The formation of condensation inside the door during constant temperature changes is eliminated. This will also protect wires and other electrical elements.
Soundproofing a car door
It should be taken into account that the installation of vibroplast involves an increase in weight and, accordingly, shrinkage of the door, so it is worth:
- adjust the door again to give it a stable position;
- do not use too much insulating material to avoid permanent shrinkage;
- Use only recommended sizes.
There should be no gap left between the casing and the frame, since such imperfections lead not only to dirt getting inside, but also to excess noise when opening/closing doors or during a trip.
Choosing racks for Priora: the main differences between modern products
Domestic and foreign manufacturers offer high-quality parts. Standardly installed on the SAAZ oil type product model. Their approximate price is 1800-2000 rubles. They are optimal for driving in urban areas and on minor off-road conditions, and cope well with long journeys along the highway. Travel on uneven surfaces is well tolerated for the first 30-40 thousand km, and then they may require replacement.
The Japanese Kayaba racks have also proven themselves positively. The company has recently appeared on the domestic market, but has pleased customers with both a reasonable price and good quality: the elements cope with both off-road driving and highway racing. They have good stability and are able to absorb strong shocks.
When purchasing products, it is important to study the certificate, since there are also low-quality fakes on the market. A novice motorist who is determining which struts are best for a Priora will definitely like the Japanese elements: they are easy to use and install
Domestic Demfi racks are highly durable and reliable. The service life with careful and careful driving can be more than 70 thousand km. The cost of the products is low and every Priora owner can afford to purchase the parts.
It is important to focus on modern motorists who are accustomed to using personal transport for both work and leisure.
Therefore, when choosing which racks to install on a Priora for long-term use, you should pay attention to Demfi products
You can roughly determine which racks on the Priora are better, and which of them will last longer, based on the degree of rigidity of the products.
For example, SS 20 products differ in the degree of shock and vibration absorption. But the buyer needs to remember that rigid elements, completely eliminating roll in corners, will not provide sufficient comfort when driving on uneven road surfaces. Soft types, while guaranteeing ease of control, will not hold the road so well when passing sharp turns and spiral roads.
When studying suitable racks, you should not be guided by price. Cost will not indicate high or low quality. It is set according to the market segment, company rating, and delivery price. Therefore, custom-made products are usually more expensive than domestic analogues.
The benefits of working independently
Dismantling the casing on Priora on your own will allow you to obtain the following advantages:
- saving time and money. You won’t have to wait in line to have your car repaired when it is needed for its intended purpose;
- gaining experience working with the design, which allows you to repair cars of more than one brand;
- the ability to find other problems in the vehicle;
- prevention of corrosion and other troubles.
As a result, self-repair of a car will become not only a personal experience, but also an opportunity to help others when changing the interior of the car or correcting deficiencies acquired as a result of an accident and careless handling of doors.
Recommendations for working with car doors
General principles for working with front and rear doors include fixing the structure in one position so that there is no chance of injuring your fingers and simply exposing yourself to discomfort due to constantly moving doors. There are several tips to make repairs easier:
- if the casing is being removed for the first time, it is preferable to use video/photo recording in order not to confuse the fasteners and installation paths of individual elements;
- after dismantling the casing, it is necessary to clean the structure inside: remove all dirt, dust, moisture, and remnants of insulating materials;
- To save money in the future, it is best to eliminate all shortcomings. For example, if there is corrosion under the casing, it must be removed. Similarly with faulty wiring - this will eliminate problems with the speakers (wheezing, broken sound) and other problems;
- When painting doors and correcting defects, dismantling may be required to facilitate further work. When installing back, adjustment of the hinges is required.
It is mandatory to check how easily the doors close after installation - you will need to close and open the car several times. If there are difficulties, this is a reason for additional adjustments. In any situation, you will need to clean the frame with alcohol. Under no circumstances should the anti-corrosion coating be removed from the bottom, since this is the part that is subject to the greatest loads.
5/5 — (1 vote)
How to replace coolant in a Niva Chevrolet
To prepare for replacement, you need to decide on a location. This could be an inspection hole or a place where the car stands level. Before replacing the coolant, it is necessary to cool the engine. It is obligatory to work in special clothing.
List of required materials:
- Spanners.
- O-rings.
- Wire cutters.
- Capacity 10 l.
- Flushing liquid.
- Distilled water.
- 4 liters of coolant.
There are three stages of replacement in total.
Stage I (draining of waste):
- Remove the crankcase protection shield.
- Relieve pressure by opening the expansion tank cap.
- Attach the hose to the drain faucet and lower the other end into the container.
- Turn the valve.
This is how the liquid is drained.
Stage II (flushing the system):
- Pour distilled water into the expansion tank.
- Pour out the water containing scale and debris from the system.
- Close the tap and fill in the product for rinsing, followed by distilled water until the original volume is reached.
- Start and warm up the engine before the fan starts operating.
- Turn off the car and repeat the process.
- We flush the system with water.
Stage III (step-by-step instructions for pouring):
Prepare coolant: mix antifreeze with water. The phase transition temperature depends on the proportion. (3 parts antifreeze and 2 liters of water). Pour into expansion tank
Attention. To avoid air bubbles, shake the hose
The resulting amount of mixture is 5 or 6 liters. Turn on the engine and bring it up to operating temperature until the fan turns on. Check the fluid level in the tank and, if necessary, bring it to the maximum level. Reinstall the reservoir cap and protective shield in their original place.