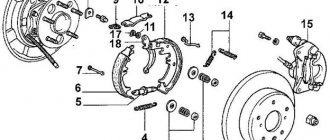
Replacing Lada Granta pads Can be done by any car enthusiast. At the front, the Lada Granta has disc brakes with a floating caliper. As practice shows, the front pads wear out about twice as fast as the rear ones, but they are also easier to replace. There is a drum mechanism at the back of the Lada Granta. Replacing the rear pads is more difficult; in addition to the usual set of tools, you will need a pit or overpass. After all, you will need to get under the bottom and loosen the handbrake cable, without which you simply won’t be able to remove the drums. How to check brake pad wear can be found on the website dexpens.com, where you will find detailed instructions on this matter.
1448279137_snimokrlrlrlrlrl444
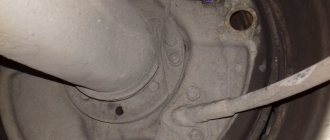
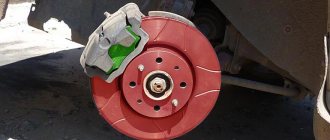
Through the caliper window we estimate the thickness of the brake pads.
Through the caliper window we estimate the thickness of the brake pads.
Through the caliper window we estimate the thickness of the brake pads.
Replacing Lada Granta pads is mandatory when the linings are worn to a thickness of 1.5 mm, the linings are peeled off from the base of the pads, charring, or chipping.
Attention! The brake pads of the front wheels must be replaced as a set - all four pads. Replacing the pads of only one brake mechanism can lead to the car pulling to the side when braking.
So, let's start replacing the pads. If the fluid level in the brake hydraulic reservoir is at the MAX mark, then before installing new pads, use a syringe or a rubber bulb to pump out some of the liquid from the reservoir so that when the piston is recessed into the working cylinder of the brake mechanism, liquid does not flow out from under the reservoir cap. After removing the front wheel, we securely fix the car on a factory-made support stand.
How to change rear brake pads on a Lada Granta
- We hang the rear wheel in the same way as the front. You just don't have to use the handbrake. On the contrary, it needs to be weakened.
- We remove the wheel, and then unscrew the two drum screws with a 7mm wrench. But it can turn sour. Then we screw the same screws into adjacent holes. Wrap them slowly and evenly. They will resist and will pull off the drum. You can tap it lightly. Usually a characteristic click is heard and the drum starts moving.
- Using two mounts, we compress the pads and, accordingly, the brake cylinder. The liquid goes back into the tank.
- Now, using a special hook made of strong wire, remove the four springs. Two of them hold the pads in the center (small ones), and the other two tighten them at the top and bottom (large ones). You can work without a hook, but it is much more difficult, and without experience it is painful.
- Remove the spacer bar. It has different cutouts - the back one is larger to accommodate the handbrake lever. It must be removed from engagement with the cable, and then removed from the block. To do this, you need to unscrew it and knock out the finger.
- If everything is in order except the pads, you can reassemble the system in reverse order, after thoroughly cleaning all components.
- After assembly, adjust the handbrake according to the instructions.
If the design differs in the presence of a master disk and an ABS sensor, the disk must be removed, and of course, do not forget to install it. The sensor is removed from the back of the wheel, but careful craftsmen can do without dismantling it. Otherwise the procedure is similar to that described above.
1447430332_snimok8888888888888
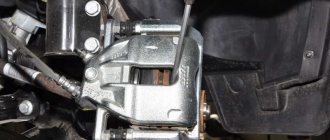
We remove the brake pads from their guide.
We remove the brake pads from their guide.
We remove the brake pads from their guide.
Attention! Once the caliper has been rotated relative to the shoe guide, do not press the brake pedal as the piston may come out completely from the cylinder.
We clean the pad seats in the caliper and the pad guide from dirt and corrosion. Before installing new pads, it is necessary to move the piston as much as possible inside the cylinder. This operation can be performed in different ways.
How to change the front brake pads on a Lada Granta
The repair instructions are drawn up by the car manufacturer and are the only guiding document for carrying out the work.
The process of replacing brake pads on Grant:
- Open the hood and brake fluid reservoir.
- Chock the rear wheels or put the car on the handbrake.
- Loosen (“tear off”) the wheel bolts a little.
- Raise the car from the desired side with a jack and place the car on a reliable support by loosening the jack.
- Remove the wheel, turn the steering wheel all the way towards the removed wheel.
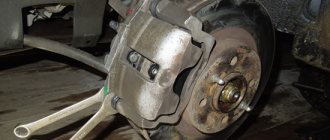
- Bend the locking plate and unscrew the bolt 13 mm. Hold the caliper pin with a 17 key.
- After removing the bolt, lift the bracket by turning it upward around the caliper pin. The mechanism may become sour.
- Check the mobility of the caliper pins. If necessary, remove the bracket completely by hanging it from the strut spring using a wire hook.
- Remove the caliper pins. They can turn sour very seriously. Use WD, other chemistry, swing with the seventeenth key. The main thing is not to break it.
- Clean the fingers, the holes under them and lubricate. Experienced craftsmen highly recommend MS 1600 (article 1505), change the boots if necessary.
- Remove the pads. Most likely they will need to be knocked out with a hammer and an old screwdriver.
- Clean the seats perfectly - this is the key to reliable and durable operation of the part. The dimensions of the brake components are very precise and ensure assembly with clearance. Do not force the block in. Over time, it will not disperse, but will overheat, erasing the disk.
- Insert the pads by hand.
- In order for the caliper to lower into place, the piston must be recessed. A special device is used for this.
- Lubricate the piston boot. Then it will not become stiff and will protect the piston from corrosion.
- Now the caliper can be lowered into place and the assembly can be assembled in the reverse order. Press the brake several times. Make sure the wheel rotates normally when you release the pedal.
1448279137_snimokrlrlrlrlrl
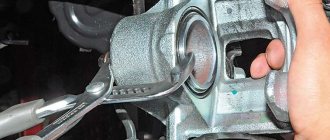
We insert a screwdriver with a wide blade or a mounting spade through the caliper window and, resting it on the brake disc, move the bracket, recessing the piston into the cylinder.
We insert a screwdriver with a wide blade or a mounting spade through the caliper window and, resting it on the brake disc, move the bracket, recessing the piston into the cylinder.
We insert a screwdriver with a wide blade or a mounting spade through the caliper window and, resting it on the brake disc, move the bracket, recessing the piston into the cylinder.
After replacing the pads, press the brake pedal several times to set the gaps between the pads and discs. We check the fluid level in the tank and, if necessary, bring it up to normal.
During operation, the surface of the brake disc becomes uneven, as a result of which the contact area of the new, not yet worn-in pads with the disc decreases. Therefore, during the first 100 km after replacing the pads, until the new pads have broken in, be careful, as the car’s braking distance may increase. In this case, the pads may become hotter than usual, up to the appearance of slight smoke and odor, especially in hot weather.
[14 Lada Granta maintenance operations that will help you save]
[How to save money on scheduled maintenance of Lada Granta] [Maintenance of Lada Granta at 2.5 thousand km] [Maintenance of Lada Granta at 15,000 and 105,000 km] [Maintenance of Lada Granta at 30,000 and 60,000 km ] [Maintenance of Lada Granta at 45 thousand km] [Maintenance of Lada Granta at 75 thousand km] [Maintenance of Lada Granta at 90 thousand km] [Carrying out maintenance yourself - general recommendations] [Safety rules for doing it yourself carrying out maintenance] [Tools required for maintenance of Lada Granta] [Lamps used in the Lada Granta car]
Lada Granta and Kalina: replacing the brake pads of the front wheels
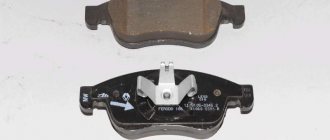
Choosing pads for Grant
Pads are consumables. Sooner or later they will have to be replaced, so it is advisable to have a set in stock. Then, most likely, defects will smoothly turn into replacement, and the work can be completed faster.
The original pads are produced by the Russian company TIIR.
The catalog number of the front brake elements Grants with an anti-squeak plate is 21920-3501080-10.
At the rear, components are installed for both a system with and without ABS. The version for ABS differs not only in the hole for the sensor, but also in the lining material, adapted to work with the anti-lock system.
Catalog numbers of rear brake pads for Grant:
- With ABS - 21920-3502090-55
- without ABS - 2108-3502090
Among foreign analogues, such eminent manufacturers as TRW, ATE, Brembo, Bosch and others enjoy the largest number of positive reviews. They all produce high quality products. Therefore, the choice of the best parts depends on the preferences and financial capabilities of the owner.
For a quiet ride, softer linings are suitable, which will ensure comfort and safety of discs and drums. At the same time, they themselves wear out faster. The wear of brake elements for sports driving is more intense. There are pads with and without a wear sensor.
Not the least indicator is the tendency of the pads to squeak. When the brakes squeal constantly, it becomes unbearable. Customer reviews will help in this matter.
In order not to make a mistake when choosing, it is best to provide the VIN of the car to the seller, who will not make a mistake when determining catalog numbers or article numbers.
Conclusion
Despite all the recommendations of manufacturers or familiar car enthusiasts, deck wear is an individual matter. After all, this factor is influenced by certain qualities that differ for each driver. The level of wear of brake discs, their technical condition, the driver's driving style and much more lead to the fact that the frequency of replacement is different for everyone and does not always coincide with the manufacturer's terms. Therefore, learn to understand your braking system, because in reality it is not that difficult. Plus, carry out periodic diagnostics for the appearance of various cracks or other mechanical damage to both the disc and the pad and you will be happy! With this in mind, be careful and don’t take things to extremes. See you!
Post Views: 13,989
Memo
- We replace the pads only as a set;
- When replacing, secure the vehicle with anti-rollbacks;
- For replacement, we select only suitable analogues;
- After completing the work, monitor the brake fluid level. If necessary, top up.
Please note that after replacement the brakes are ground in . Therefore, squeaking and heating of the wheel rim is acceptable in the first 2-3 hundred kilometers after work.
Did you like the article or have something to add? Write!
At the same time, you can read about the best cars for 600 thousand.
Rear pads for Lada Granta Sport
The rear brakes on the Grant are disc, and the pads are changed almost identically to the front ones.
There are small differences:
- The wheel does not turn;
- The caliper does not fold up, but is completely removed;
- To retract the piston, you need to not only push it in, but also turn it clockwise.