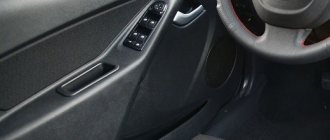
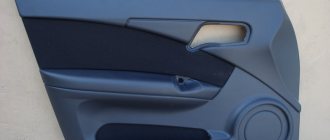
The four-door VAZ 2110 sedan is the flagship model in the Lada 110 family. The last car rolled off the assembly line in 2007 after a twelve-year production cycle. The door trim of the VAZ 2110 is made of durable, hard plastic, the material is resistant to wear and mechanical damage.
The disadvantage of the door trim is the same type of texture and three types of colors; most drivers prefer to tune the interior and change the trim to a more modern material.
Replacement options
Drivers have several options for replacing door trim, each of which has its own advantages and is chosen based on taste:
- Eurocard;
- European cladding;
- panels from the manufacturer;
- independent re-upholstery.
Factory trims from AvtoVAZ are replacement kits for the original trim. They are made of plastic and additionally covered with decorative inserts. The advantages are the exact overall dimensions, ease of installation of clips, and compliance with the door dimensions. Frequently used sheathing kits Lux 1 or Lux 2.
With European cladding, the door lining is made of high-strength polymers and comes in a variety of colors. Manufacturers are small companies specializing in car tuning.
Self-upholstery does not require large investments and is within the capabilities of every driver. The material you can use is textiles, natural, artificial leather, velor, etc.
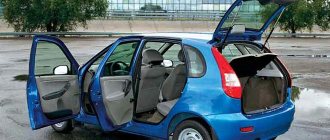
Removal
Dismantling work is the beginning of your journey to replacing the door panel trim. It's nice to know that this task is quite simple. This is especially true for the front doors.
We will tell you separately about the nuances of dismantling the front and rear door trims of your VAZ 2110.
Disassembled cards
Front
Let's say right away that the likelihood of damaging the standard clips is very high. But this is not scary, since new products are cheap, and their installation is much simpler than repairing old caps.
If you are installing Euro panels, you will have to remove the lever from the window regulator.
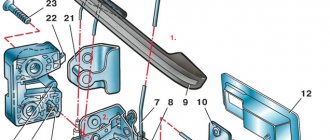
The process is performed according to a certain algorithm:
- Using a thin screwdriver, pry the window handle trim away from the socket. Direct it in such a way that it disengages. Now remove the lining. This item is not relevant for those whose car is equipped with electric windows;
- Remove the socket now;
- Using a screwdriver, press out the latch on the plug for the inner handle of your armrest, and then remove it;
- Remove the handle mounting screws;
- Press the inner handle of the lock and turn the armrest handle up. This way you can remove the element;
- Next, unscrew the button that blocks the door lock;
- Remove the screw that secures the exterior mirror control mechanism. It must be removed from the lever;
- Remove the triangular trim. To do this, the fastening pins are removed from two holes in the door.
Upholstery in all its glory
Rear
The rear trim is removed slightly differently. But this does not make the procedure significantly more complicated.
- Remove the three mounting screws;
- Remove the trim;
- Using a screwdriver, press out the upholstery. This will allow the pistons to pop out;
- Try to keep the screwdriver as close to the piston as possible to avoid breaking the holders;
- Don't forget to also remove the spacer sleeve from the window lift shaft.
Self-upholstery
Now we can begin to create a new look for your interior by independently reupholstering the dismantled door panels.
Preparations are in full swing
Before starting work, be sure to clean the cards, go over them with a vacuum cleaner, and replace the door seals if necessary. This will allow them to close better, without unnecessary noise.
The job of re-upholstering yourself is not difficult. Especially if you already have experience working with fabric or leatherette in or outside the car.
- Measure and cut the pieces from your chosen fabric or vinyl to size.
- An allowance of 5-7 centimeters must be provided for each side. This is necessary in order to avoid the use of patches when covering.
- Gradually apply adhesive to the cards, letting it dry a little. Just be sure to make sure that the glue does not dry completely.
- When you have coated the doors, use the same glue to treat the surfaces of fabric or leatherette, depending on what you choose. Let these elements sit for about 10 minutes so that the glue dries a little, but does not dry out.
- After the specified time has passed, begin gluing elements of the material onto the door cards. Vinyl is good because it stretches well and fills all the differences and depressions in the card structure.
- To ensure that the vinyl stretches and fills all the gaps, preheat the material using a hair dryer.
- Smooth the material by hand, but it is better to wear gloves for this.
- The edges with the allowance are carefully folded to the wrong side, after which they can be trimmed.
- Do the same with all the doors of your VAZ 2110. As you can see, there is nothing complicated here.
- Experienced car owners and fans of comprehensive tuning of domestic cars note that some other interior elements should be covered with the same material in order to achieve an ideal picture of the car’s interior. This could be the glove compartment lid, a triangle near the mirrors, a steering casing, etc.
- When reassembling cards with new skins, use pistons. To install them, you will need to make appropriate holes in the casing. This is where a sharp utility knife comes in handy.
Tools and materials
To reupholster yourself you will need to prepare:
- Sheathing material.
Experienced drivers recommend using vinyl, but keep in mind that the material shrinks significantly. Before purchasing, you must take measurements and leave at least 10 cm for allowances and internal bends. If genuine leather or suede is used, allow up to 5 cm for allowances.
- Scissors with a long blade.
- Glue. For repairs they use Moment, Master, Titan.
- A construction knife with a small blade and a sharp end.
- Construction or household hair dryer. It is not recommended to use a heating lamp as it may deform the material.
- Glue brushes: thin, wide.
- Set of clips.
For the VAZ 2110 they produce special sets of fasteners, the cost of a set of 10 clips is 30 rubles. Each door will require 8 clips. It is recommended to buy latches with a reserve. During installation, several clips often break, since the fasteners are consumer goods and the quality of the fasteners is not regulated.
- Self-tapping screws. If you use independent re-upholstery of the cladding on the old casing, then use standard short self-tapping screws; when installing factory casing or Eurocard, purchase a set of long self-tapping screws.
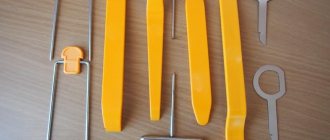
- Crosshead screwdriver.
- A thin screwdriver with a wide blade.
Lux 2 panels and Euro casings have standard places for speakers with a diameter of 17 cm. If the standard Lada audio system has smaller speakers, then you will need to select it to fit the size of the hole or add a rubber or plastic insert to the part to fit the speaker tightly to the mesh.
Manufacturing of door cards for AutoSound
- Production of cards with plywood base and fiberglass body
- Manufacturing a card with a fiberglass base and body
- Making a card case from fiberglass with fastenings from standard casings
Speaker selection
Door cards are made in order to place the required number of speakers on them, with the help of which you can get loud and enveloping music. Car owners who undertake such a transformation pursue a variety of goals. Some people want to delight others with loud music from their car, others participate in loud sound competitions, and others have taken the path of improving the quality of music in their car and want to get surround and clear sound. In any case, we calculate the selection of speakers and the production of door cards on an individual basis and create door cards for a specific purpose.
When we receive the car for work, we first evaluate the shape of the door and the existing door card. We determine how many speakers and what diameter can be placed on the inside of the door in the new door card. We decide on the shape of the door card, the materials for its manufacture and the location of the speakers. We draw up a drawing indicating the dimensions and permissible connections, and draw a sketch of the project. After this, we proceed to its practical implementation.
Determining the number of speakers
When selecting speakers, we proceed from the rule that the speakers must be balanced in frequency and reproduce their fullest range. To achieve the desired result, we will install door cards on your car with a reasonable number of speakers, including speakers with a diameter of 16.5 cm, 20 cm and horn tweeters. As a rule, we place the places on the new door card for midbass and mid-frequency speakers in the lower part of the door, and tweeters in the upper part. We determine the place for the midbass column in the standard position so that the bass/midrange speaker plays into the volume of the door. Midrange speakers and tweeters will play into the volume of the casing.
When determining the number of speakers for new door cards in a car, we recommend stopping at 4-5 speakers. This is the optimal number of dynamic heads to get loud and high-quality music in the car. At the final stage of setting up an audio system, using channel-by-channel control, you can achieve harmonious sound from all speakers by setting the correct time delays for them and coordinating the reproduced frequencies for each speaker in the channel.
Loud front in the car door
When installing a loud front in a car, using 4-5 or even more speakers, we have to make a new door trim. We take a responsible approach to the manufacture of new door cards and ensure optimal strength to the products so that their base and body can support the weight of the speakers and do not resonate during operation of the audio system. The design is provided with a fastening system, with the help of which you can reliably attach the door cards to the metal of the door and eliminate the appearance of additional resonant frequencies and vibrations.
Depending on the design of the door and the number of speakers installed on the door card, we offer to produce a new trim in three options:
- plywood base and fiberglass body;
- fiberglass base and body;
- fiberglass body with fastenings from standard door cards.
As a result of the work, we create a new door card with speakers fixed on it. We install the card on the car door and get:
- free closing and opening of the front doors of the car;
- between the speaker grids and the front seats there is a gap sufficient for the free passage of sound;
- modernized aesthetics of the car interior, which does not violate the overall style;
- Loud front speakers with excellent performance.
Materials and tools
Door cards for the front doors in our design are always a successful combination of design ideas for placing speakers in the housing and covering it with decorative materials. In addition, the installed speakers operate within the strictly calculated volumes of the card cases. To obtain successful results in the manufacture of door cards, we use only high-quality materials and consumables, and use professional tools.
Materials
- MDF, multilayer plywood - the materials from which we cut out spacer rings, the base for the door card body, partitions between the speakers (midbass and midrange and high-frequency speakers).
- Fiberglass, glass mats, which are used for the manufacture of door card housings.
- Epoxy glue, polyester resin, and hardeners for them are intended for impregnation of fabrics and gluing layers of fiberglass.
- Fasteners: self-tapping screws, bolts, nuts, mortise nuts.
- Stretch fabrics, with the help of which we form the frame of the card body.
- Putties for starting (with fiberglass) and finishing the product.
- Solvent, special glue for attaching materials to the door card body.
- Masking tape.
- Natural leather, Alcantara, leatherette, materials for upholstery of our products.
Tools
- Circular saw for cutting MDF and plywood blanks.
- Router, jigsaw - tools for cutting spacer rings.
- A sewing machine, with which we sew blanks from automotive fabrics (leather, leatherette) for reupholstering door cards.
- Scissors, construction knife.
- A construction hair dryer is designed to heat leatherette and leather when re-stretching cards.
- Screwdriver, grinder, grinder, Dremel, electric drill.
- Spatulas designed for applying putty to the surface of manufactured cards.
- Paint brushes, rubber roller, sandpaper of different grits.
The procedure for making door cards for speakers is a responsible job that requires accuracy and scrupulousness from the performer. We have extensive experience in producing maps of varying degrees of complexity.
Stages of door card manufacturing
Having prepared all the materials and tools, we begin manufacturing. The shape of the new door skins will depend on the number of speakers installed and the size of the door. If you want to install speakers over the entire area of the door, we suggest making cards that will have a plywood base and a fiberglass body. This combination of materials will ensure structural strength and sufficient volume for dynamic heads.
Production of cards with plywood base and fiberglass body
We carry out the production of door cards using the specified method in stages, following the technologies of working with plywood and fiberglass, so that the structure does not move during assembly, and it fits accurately into the fastening points and is securely fixed to the metal of the door.
At the initial stage, we work with plywood and cut out the base of the body, which exactly follows the contours of the standard door card and is a few millimeters smaller around the perimeter.
According to the drawings prepared earlier, we use a jigsaw to cut out the base from plywood on which we will create the door card body. We cut out the dimensions of the plywood blank with a gap so that it can be connected to the fiberglass body and filled with decorative material. We process the edges of the base with a grinder, remove burrs and smooth them. We transfer the attachment points to the metal of the door to the plywood blank and use a drill to drill holes for the bolts.
Next, we make spacer rings from plywood or MDF. We cut out square blanks on a circular saw and transfer the dimensions from the drawing onto them: circles of the internal and external diameters of the rings. First, we cut out a landing pad for the speaker in the workpiece using a milling cutter, then, using the same tool, we cut out a ring along the inner diameter, and then along the outer diameter.
At the third stage, we place the spacer rings for the speakers on a plywood base in accordance with the drawing and sketch. We secure the spacers using self-tapping screws of different lengths, while setting the previously determined angle of inclination of the columns.
We use wooden slats as supports for the rings or place the rings on wooden blocks. Then, when the card body is poured, we remove the screws, bars and slats from the structure, thereby providing it with the necessary volume.
After the rings are installed on the base, we attach it to the car door and once again make sure that the new card with the speakers will be level and the speakers will not encounter obstacles when the door is closed.
The next step in the manufacture of the door card is associated with the formation of its fiberglass body. We carry out work according to the following algorithm:
- We place the plywood base with rings on a flat surface and cover the structure with stretch fabric;
- We fix the fabric on the rings with a stapler around the perimeter;
- we stretch the material along the edges and shoot it on the back side of the base with the same stapler, ensuring an even, wrinkle-free tension;
- dilute the epoxy resin with the hardener and coat the fabric surface with one layer with a brush;
- after the resin has hardened in the plywood base, on the back side, cut a hole around the perimeter with a jigsaw, leaving an edge of 10 centimeters;
- cut off the excess stretch fabric along the edges of the workpiece with a knife and cut it out along the perimeter of the rings;
- We reinforce the inside of the body with glass mats, cut pieces of glass material and glue them with polyester resin on the inside of the body;
- We pour polyester on the joints of the body and the plywood base.
After the polyester resin has hardened, we proceed to puttying the door card body, and then preparing it for reupholstery with decorative material.
Before starting the putty work, we remove the metal staples that secured the stretch fabric to the plywood parts. Using a Dremel, we clean off the epoxy resin on the rings and along the edges of the frame. Degrease the surface of the body and apply a layer of putty with fiberglass using a spatula. After the putty has dried, we process the body with sandpaper in an open space with a sanding machine, and in the places where the rings meet, by hand.
Next, we putty the frame with finishing putty and use it to remove risks, depressions, and pits on the surface. We clean the top layer of putty with fine-grained sandpaper. We control the condition of the surface with our hands and achieve a perfectly smooth base.
The door card prepared in this way is then reupholstered with decorative material: leather, leatherette, Alcantara, etc.
Manufacturing a card with a fiberglass base and body
Another option for door cards we produce are designs in which all elements are made exclusively of fiberglass. We produce such cards as follows:
- remove the door from the car, having previously dismantled the trim and disconnected the wires;
- We place the door on a flat area, which we cover with a soft cloth so as not to damage the paint surface of the door;
- we treat the inside of the door with a special compound;
- We cover the surface with masking tape with an overlap that extends beyond the boundaries of the standard cladding;
- We cover the edges of the door with paper so as not to stain the surface with glue;
- dilute polyester resin with hardener;
- We place small pieces of glass mat on the prepared surface and coat them with polyester resin;
- dry the layer and apply a new one, we get several layers;
- after the last layer has dried, the resulting base, which follows all the contours of the inside of the door, is removed from the metal;
- Using a grinder, we cut the edges to a size that is several millimeters smaller than the seat for the door card;
- in the base, we make holes with a drill for the fastening bolts, which will attract the new trim to the metal of the door;
- on the resulting fiberglass plate we place spacer rings for the speakers, pre-cut according to the previously described technology;
- we fix the rings on the site using one of the methods mentioned earlier;
- stretch the stretch fabric over the rings and tuck it over the edges of the base;
- Apply polyester resin to the surface and after drying, glue the frame layer by layer with fiberglass;
- carefully pour the joints of the body and the base.
After the last layer with the workpiece has dried, we carry out all the operations of cleaning, filling, sanding the putty and preparing it for reupholstery with decorative material. In this version of manufacturing door cards, all speakers will play the volume of the card.
Making a card case from fiberglass with fastenings from standard casings
We offer another option for manufacturing door cards, in which we retain the frame of the standard casing with places for attaching to the metal on it, and make the card body from fiberglass.
The production of such skins is carried out in the following way:
- remove the card from the door and place it on a flat surface;
- we place spacer rings on the casing in places that were determined by previously carried out calculations;
- we fix the rings on the casing, giving them the desired angle of inclination;
- Using the previously described technology, we create a frame for a new card;
- in the same way as before, we treat the surface and prepare for decoration.
In this version of making cards, after applying the resin to the stretch fabric and drying it with a Dremel, we cut out the bottom along the perimeter from the back of the standard door card. We treat the inside of the body with resin and glass mat. This way we get a durable body for the new door card with places for installing a set of speakers. In the new casing, we create a partition for the midbass and direct its sound flow into the volume of the door.
Re-upholstering new door cards for a loud front
Reupholstering prepared door panels with decorative materials is a responsible and painstaking job. At your request, we will reupholster the car door trim with the speakers installed on them using any of the materials available for auto tuning: leather, leather substitute, Alcantara, velor, etc.
For example, we carry out wrapping cards with leather, a popular material among car owners, in the following way:
- the card removed from the door is installed on a flat surface;
- throw a piece of leather onto the card with a margin around the edges and align it;
- We start pasting from the central part, where the rings for the speakers are located;
- coat the base of the card and the back of the skin with special glue;
- after the glue has dried, heat the area to be glued with a hair dryer and smooth the surface with your hands;
- on relatively flat areas we roll with a rubber roller;
- we move from the center to the edges and carefully straighten the folds, obtaining an even and smooth surface;
- trim off excess skin.
To ensure that the glue bonds the surfaces firmly, let the cards sit for 24 hours before installing them on the door.
After updating, our door cards will become not only the basis for high-quality sound, but also a decoration for your car.
Dismantling
At a service station, a mechanic spends no more than 15 minutes to disassemble door panels. Self-replacement will go quickly if you adhere to the order of work and do not change the sequence.
Front doors
The work algorithm for the front and rear doors of the VAZ 2110 is slightly different. Before work, you must disconnect the negative terminal from the battery. If the standard trim is reinstalled on the Euro trim, then it is necessary to remove the window lifter lever.
How to remove the front door trim of a VAZ 2110 step by step:
- Wrap the screwdriver in a rag or cover the tip with electrical tape.
- Using a screwdriver, press the trim of the window handle away from its socket.
- Guide the screwdriver so that the panel comes out of the grooves.
- Dismantle the cladding and remove the socket.
- Using a screwdriver, press out the lock of the driver's door armrest plug.
- Remove the clamp.
- Unscrew the two screws that hold the handle.
- Press the inner handle of the armrest, turn it up, and remove the part.
- Unscrew the screw that holds the mirror mechanism and remove it from the lever.
- Remove the two fastening clips from their seat and remove the triangular trim.
- Carefully slide the screwdriver under the panel and unfasten the 6 clips.
If the driver's or front passenger's door is equipped with a power window, then after removing the handle lock, you need to disconnect the plug.
Rear doors
The differences in work when removing the door trim are based on the fact that power windows are rarely installed for rear row passengers. Removal of the rear door trim is carried out in the following steps:
- Use a thin screwdriver to pry the trim on the door handle and remove the part from the grooves.
- Unscrew the two bolts located under the trim.
- Carefully move the handle to the side, remove it from its seat, and pull it out.
- Unscrew the three screws securing the lower rear door trim panel.
- Remove the bottom panel.
- Unscrew the latch blocking the door from the inside.
- Pry off the cladding panel with a screwdriver; you can use a wooden wedge, bend it back and snap off the fastener clips.
The plastic clips must be reinstalled with new ones when assembling the updated door card.
Door trim for VAZ 2110
The VAZ 2110 car itself is quite nice. An important advantage of the model is that it interacts well with various tuning methods. This car is literally made to be customized.
Moreover, the improvement should be not only technical and external. Many people do the right thing when they decide to replace their door trim. So the interior looks richer, more interesting, newer, the inside looks no worse than modern foreign cars. The most important thing is that you can do all this yourself. More about this in our article today.
What you can get
Self-upholstery
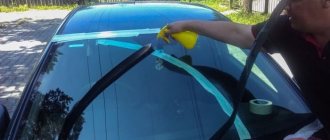
Before directly reupholstering, it is recommended to check the condition of the inner door panel, remove pockets of corrosion, check or replace sound insulation, replace rubber seals, so the doors will open better. For VAZ 2110, the service life of door seals is up to 3 years. The process of re-covering a door part yourself step by step:
- Clean the outside of the card. You can sand it with fine-grain emery for better adhesion of glue and leather.
- Attach the door card to the material, cut around the perimeter, leaving at least 7 cm around the edges.
- Treat the outer surface with glue and the inside of the future cladding with glue. Apply glue according to the manufacturer's recommendations. If an adhesive composition is used, then after coating you need to wait up to 10 minutes.
- Place the vinyl on the door card, constantly heating the material with a hairdryer, and level the surface so that the leatherette fills all the curves of the part: the space for the speaker, for the central panel, the recesses for the handles.
- Cut out all the holes that are covered with vinyl in the door card from the center and not reaching the perimeter, carefully wrap it on the wrong side, making sure that the edges of the fold do not exceed 2-3 cm. Trim off the remaining vinyl.
- After gluing the card, trim off the remaining vinyl, leaving at least 3-5 cm on the inside of the card perimeter.
Tuning
After finishing removal, clean the cards from dust using a vacuum cleaner, and begin tuning yourself.
First of all, measure and cut the necessary “patterns” for all door cards, taking into account an allowance of 5 or even 7 centimeters for each side.
This is so that during the process of gluing the sheathing material you do not have to install patches or redo everything all over again.
The glue must be applied to the cards with brushes one at a time so that it has time to dry a little, but not dry out. Having coated the doors with glue, we proceed to the cut piece of vinyl or fabric, which we also coat with glue on the back side, and set aside for 10-15 minutes.
After this time, we proceed directly to gluing the upholstery to the door cards. Vinyl stretches well, filling door “cavities”, but for this it needs to be heated with a hair dryer and smoothed over each cavity and bulge with your hands, preferably with gloves. The edges need to be carefully folded inside out and trimmed.
We subject the remaining doors to the same procedure. In addition, it is advisable to paste the same material over other parts of the interior so that it is in the same style.
These include door handle inlays, the glove compartment lid (if you want to highlight it), triangles at the mirrors, and the top cover of the steering casing. In places of various fastenings, you need to cut small holes using a stationery knife.
When reinstalling, do not forget to replace damaged pistons.
Installation of a ready-made kit
Re-upholstering the cladding yourself does not always help save time or money. If you don’t have time to do this yourself, then you can use ready-made cladding.
The set of door elements Lux 2 from AvtoVAZ has additional sound insulation, a set of standard fasteners, mesh for speakers and screws. Installing a finished panel takes up to 20 minutes for an inexperienced driver. When choosing a casing, choose original replicas; if the set contains only four panels, then the speaker grids, caps and screws must be purchased separately.
The lower part of the door trim needs to be screwed in only with long screws; if the standard kit offers short ones, then you need to change the screws yourself.
Installation of Lux 2 cladding in steps:
- Remove the old card.
- Attach a new panel, check the gaps and the alignment of the fastener locations.
- If the car is equipped with a mechanical window lift, then the panel needs to be modified. Lux 2 does not have a hole for the handle of a mechanical lift.
- Secure the trim to the clips.
- Tighten all the bolts and secure the outer trim panels.
Cost and types of finished skins
At a specialized service station, the cost of reupholstering a door trim starts from 3,000 rubles. excluding the cost of the door card. Depending on the model, in 2022 the following prices for ready-made kits for the VAZ 2110 will remain:
- factory replicas from AvtoVAZ and KAMAZ - from 2300 rubles;
- Luxury cladding panels – from RUB 3,200;
- door cards Lux 2 for 16.8 cm speaker – 3500 RUR;
- plastic trim linings - from 300 rubles. thing.
Clips and nets for speakers must be purchased separately.
Manufacturing stages
- Selection of the configuration and location of the speakers, selection of materials for the manufacture of the door structure.
- Removing doors and disassembling card trim.
- Making the base according to the template, installation and fixation.
- Covering the base with fiberglass, fastening the fabric.
- Sealing joints with polyester resin.
- Installation and connection of car audio speakers.
- Painting or reupholstering doors with leather to match a loud front.
- Door installation.
Would you like to know how much it costs to produce exclusive car door cards for powerful car audio? The final cost depends on the card configuration (straight or complex), car brand, number of speakers and material. But in any case, at StyleGarage you are guaranteed reasonable prices for services and high quality of the final result - excellent car audio for demanding music lovers!