How to remove the door trim on a VAZ 2114 and 2115
Removing the trim on Lada Samara cars, such as the VAZ 2114 and 2115, is a fairly common task for many car owners, and they have to do this for completely different reasons, the main ones of which are given below:
- When soundproofing doors from the inside
- To repair or replace glass, lifts, or door opening and closing mechanisms
- For installing an acoustic system that does not fit in standard places on the casing
So, to remove the casing yourself, you will need a minimum of tools, namely:
- Flat and Phillips Blade Screwdriver
- Sharp and thin knife
How can you quickly open a VAZ-2114 without a key?
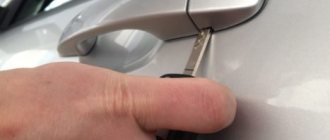
First of all, there will be significant expenses for the purchase and installation of new auto glass, and secondly, using a car without glass, especially in winter, will only cause discomfort. In this regard, car owners are asking themselves: how can they get inside the 2114th VAZ model on their own without using a key, and without damaging the car itself?
In fact, there are quite a few solutions for opening the VAZ-2114 door without a key. To do this, you need to have standard tools on hand, and even a ruler, rope, tennis ball or wire. In each case, it is worth considering the car make and lock model. Mostly the device is almost identical, with the exception of some types of window lifters and nuances. It is no secret that domestic cars, which have a simple security system and door lock design, are easier to open. It is quite possible to deal with the problem in a short time.
The procedure for removing and installing the front door trim on the VAZ 2114 and 2115
First, open the car door and use a Phillips screwdriver to unscrew the three screws securing the lower podium (pocket).
After this, carefully move it down and disconnect it from the upholstery body, as shown in the photo below.
We turn it over with the outer side facing us and see the plug for connecting to the power window control buttons.
Using a thin screwdriver or the sharp edge of a knife, press the latch through a special hole and pull the block, thereby disconnecting it.
The result of the work performed is shown below.
Now unscrew the screws securing the front speakers, if they are installed on your car.
We take it aside and disconnect the power wires.
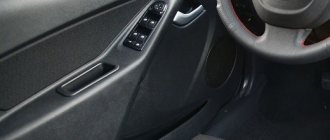
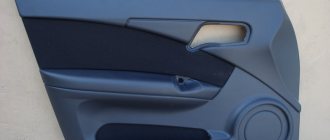
Now use a screwdriver or hand force to pry up the inner lining of the door handle:
Having turned it almost 360 degrees, we remove it completely.
Now we need a sharp knife. With its help, we adjust the door handle, as shown in the photo below.
We take it out and unscrew the two fastening screws under it.
Then you can remove it, since it is not attached to anything else.
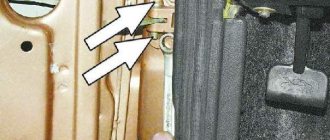
Now unscrew the top cap from the rod that locks the door lock and remove it:
Carefully, starting from the bottom corner, we begin to pry the door trim of the VAZ 2114-2115, and carefully try to tear it off the clips on which it is attached to the base of the door. You should not make sudden movements, so as not to damage the mounting points.
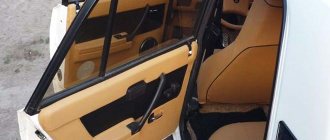
Carefully moving the trim to the side along the entire perimeter, we remove it, having previously disengaged the door lock rod from above, I think that everyone understood what we were talking about.
Now you can begin the work that was planned, be it repairing power windows, replacing glass, locks, or just simply replacing the trim with a new one. Regarding the price of new upholstery, it is worth saying that a set of new ones will cost from 3,500 to 5,000 rubles, depending on the type and manufacturer. Installation occurs in reverse order.
Replacing the leash
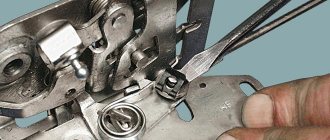
The leash, which the key must push during operation, can also fail due to frost or due to strong pressure, since it is based on the same silumin. Due to the failure of this element, it will be more difficult to open the door, and ultimately the lock will simply jam. The leash is changed according to the same pattern that was previously described.
If, during inspection, the car owner discovers that the driver's door does not open from the outside due to the disconnection of the rod from the lock, then there is no need to buy additional elements. And the breakdown is repaired in the following sequence:
- the door must be opened, carefully remove the inner lining of the door handle;
- fasteners are unscrewed using a screwdriver;
- the window lifter handle is removed;
- the fasteners securing the door trim are removed;
- use a screwdriver to unscrew the button that activates the lock;
- the cladding is completely removed;
- the handle pull wire is disconnected from the lock;
- the fasteners securing the handle to the car door are unscrewed;
- Through the opening that appears in the door, the handle is carefully removed, and the traction wires are installed in a permanent place.
Reassembly must be done in reverse order.
Sometimes it happens that the front or back door is jammed both from the outside and from the inside. In this case, to fix the breakdown, car owners will need to remove or move the outer casing to such a distance that they can place their hand in the resulting space and press the lever. Thus, the door will open, therefore, it will be possible to identify the cause of the breakdown and begin to eliminate it.
As you can understand from this article, finding out the reason why the door to a VAZ-2114 does not open from the outside is quite simple, and every car enthusiast can carry out repairs, following the recommendations of experts. But if difficulties still arise during the work, it is advisable to watch the training video.
- How to open a Lada Vesta without a key
- The car slammed, the keys are inside, what should I do?
- How to open Logan without a key video
- Lock VAZ 2109 open the door
How to disassemble the door of a VAZ 2114 and remove the trim? Do-it-yourself front and back – EASY
Since VAZ cars are very popular in our country, I often receive questions from motorists regarding maintenance. Especially from owners of 2114, 2115 and sometimes 2113! For some reason, young people choose these particular options. And often very often, owners are interested in the following question - how to disassemble a door or remove the trim? For example, install acoustics, repair a window regulator, or simply glue it to improve sound insulation. Since I also had a VAZ 2114, and also disassembled the front and rear doors, today I want to “throw out” a small instruction that will help you in this matter...
THE CONTENT OF THE ARTICLE
I will try to answer all the questions at once, that is, removing both the front and rear door trims. In fact, there is nothing complicated here, the main thing is to strictly follow all the instructions.
Characteristics of VAZ-2114 luxury
Like the base model, the VAZ 2114 Lux has the following characteristics:
- dimensions – 4122 mm (length)/1650 mm (width)/1402 mm (height);
- weight – 970 kg, payload – 425 kg;
- wheelbase – 2460 mm (front track – 1400 mm, rear track – 1370 mm);
- ground clearance - about 160 mm;
- gas tank volume – 43 liters;
- engine - depending on the date of manufacture: 1.6 liters, eight- or sixteen-valve. The first VAZ-2114 models were equipped with an eight-valve injection engine from the VAZ-2109.
A characteristic feature of both the “basic” model and the VAZ 2114 full luxury is its excellent aerodynamic performance.
The modified braking system allows for shorter braking distances. A spring suspension with an improved shock-absorbing system ensures vehicle stability and provides good grip on the road surface even under adverse conditions.
Disassembling the front door
1) First, we need to remove the main handle with which the door closes. We press out the decorative trim with a screwdriver, but be careful not to damage it. Next, unscrew the bolts, there are two of them, and remove the handle.
2) Then we remove the decorative trim of the unlocking handle, you know that kind of black plastic, we also pick it up with a screwdriver and pull it out, there are two latches there, be careful.
3) Then you need to remove the lower shelf, in which the window lift buttons are installed, there are two or three bolts there. The shelf comes out together with the power window cable, disconnect them and remove them.
4) Next, as a rule, comes the speaker, it is fastened with 2 - 4 bolts, to be honest, I have seen only one. We unscrew, there are cross-shaped bolts from the factory. Let's remove it.
5) In the upper part, unscrew the locking “latch”; it simply unscrews like a bolt.
6) Everything is removed, now we need to detach the upholstery itself, this is a little more complicated. You can pull the corners, or you can pick it up with a screwdriver and pull it towards you - the main thing is not to break it, we carefully try to separate it. If some rivets are broken (and this will be 100%), don’t worry, we bought new ones
At this point the “analysis” is completed, as you can see, there is nothing complicated and it is also considered that the front part is complex. Let's watch the video.
Everything is much easier at the back.
Product delivery options
Note! Below are the shipping methods available specifically for this product. Payment options may vary depending on the delivery method.
Detailed information can be found on the “Delivery and Payment” page.
Parcel by Russian Post
Available payment methods:
- Cash on delivery (payment upon receipt)
- Using cards Sberbank, VTB, Post Bank, Tinkoff
- Yandex money
- QIWI
- ROBOKASSA
Shipping throughout Russia. Delivery time is from 5 to 12 days.
Parcel by Russian Post 1st class
Available payment methods:
- Cash on delivery (payment upon receipt)
- Using cards Sberbank, VTB, Post Bank, Tinkoff
- Yandex money
- QIWI
- ROBOKASSA
Shipping throughout Russia. Delivery time is from 2 to 5 days. More expensive than regular delivery by Russian Post, approximately 50%. Parcel weight up to 2.5 kg
Express Parcel EMS
Available payment methods:
- Cash on delivery (payment upon receipt)
- Using cards Sberbank, VTB, Post Bank, Tinkoff
- Yandex money
- QIWI
- ROBOKASSA
Shipping throughout Russia. Delivery time is from 3 to 7 days. More expensive than regular delivery by Russian Post, approximately 100%.
Transport companies
Available payment methods:
- Using cards Sberbank, VTB, Post Bank, Tinkoff
- Yandex money
- QIWI
- ROBOKASSA
Delivery is possible to any locality where there is a representative office of the transport company. Delivery time is from 2 to 10 days. Sending large parcels is approximately 50% more profitable than by Russian Post.
Courier delivery in Togliatti
Available payment methods:
- Cash upon receipt
- Using cards Sberbank, VTB, Post Bank, Tinkoff
- Yandex money
- QIWI
- ROBOKASSA
Delivery time from 1 to 12 hours.
Pickup from our warehouse
Available payment methods:
- Cash upon receipt
- Credit, installments
- Using cards Sberbank, VTB, Post Bank, Tinkoff
- Yandex money
- QIWI
- ROBOKASSA
Pickup times must coincide with store opening hours.
When buying new door upholstery (this product is also called “door cards”), many buyers forget about a very small but significant additional purchase that must be made at the same time - these are plastic clips that hold the door cards in most modern cars. Fortunately or unfortunately, these clips on which the upholstery is attached, in particular for VAZ cars, are disposable. More precisely, they can be used several times, but only if the installer shows remarkable care when dismantling old cards, and this requires serious experience in such work.
To buy new door cards for VAZ 2110-12 or VAZ 2113-15 cars, the buyer will most likely decide to change them himself, because in general there is nothing complicated in this operation. That’s why we recommend immediately buying plastic clips for installing door cards on VAZ cars.
We call these elements “hedgehogs” for the door trims of VAZ 2108-15, 2110-12. These elements are also sometimes called plastic clips, cloves, or mushrooms. The hedgehogs presented on this page are reinforced, they are made of more elastic plastic than the original factory ones, which means they will not break during and after installation, will better hold the door trim (which means the latter will make less noise), and can also be reused if necessary remove and reinstall door trims.
The hedgehogs themselves are a system of plastic nails together with plastic dowels. Hedgehogs are supplied in a set of forty pieces, which is just enough for four doors.
Another nice feature of this set of red and white plastic clips is their price, which we hope will pleasantly surprise you.
A little advice from me
Guys, if they were just disassembling it about repairing a window regulator or installing speakers. My advice to you is that you can improve the design a little, namely, reduce its airflow. I advise you to read this article.
If you are not ready for such insulation, then you should apply ordinary thick cellophane to the metal, 0.3 mm is enough. We directly cut out the door according to the stencil and glue it to the metal (you can use double tape), after making holes for the handles and bolts. I have seen this on many foreign cars, they have it as a must!
What does this give us:
1) The door will not blow out as quickly during the cold period, which will give us a little more heat. The interior will warm up faster.
2) There will still be fewer crickets, because this layer will not allow plastic and metal to interact directly.
Personally tested on my former VAZ 2114, the interior is really warmer in winter.
I’ll finish here, I think it was useful for you, read our AUTOBLOG.
(
3 votes, average: 4.33 out of 5)
Selecting the material
There is now quite a large selection of materials suitable for the purpose in question. Therefore, choosing the one that suits you best will be quite simple.
Most often used:
Leatherette has a low price, but does not last long. Often cracks.
Genuine leather has gained the reputation of a reliable and durable material. Its only drawback is the high price. It is very convenient to use, and the results are always excellent.
Alcantara has a pleasant appearance and high strength. It is not difficult to care for her. Externally it resembles suede. The color palette allows you to satisfy the most whimsical taste.
Velor, as they say, looks rich on car doors, but wears out very quickly on seats. It needs regular cleaning, as due to its structure, literally everything sticks to it.
Flock looks very similar to velor, but is more practical and easy to clean. He is not afraid of water, he is not afraid of the cold.
Carpet, in fact, is a type of carpet. The difference is that it is softer and more pleasant to the touch. Wear-resistant, ideal stretch. Inexpensive.
How to Remove the Door Trim of a VAZ 2114 Video
Basics of assembly and disassembly of entrance doors VAZ 2113-2114-2115
- Energy window entrance door
- 1 - window handle
- 2 - facing
- 3 - socket
- 4 - gasket
- 5 - window lift mechanism
- 6 - cable sheath
- 7 - roller
- 8 - glass
- 9 - sealant
- 10 - outer seal
- 11 - internal sealant
- 12 - clip
- 13 - circuit board lowering the glass
- 14 - cable
Press out socket 3 and trim window handle 1 until it comes out completely. Remove the handle and trim.
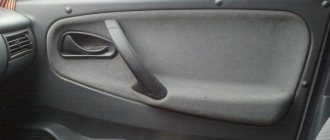
- Interior view of the front door
- 1 - button to disable the lock
- 2 - door trim
- 3 — armrest handle
- 4 — internal door handle
- 5 - outside rear view mirror
- 6 — door mounting bolts
- 7 - door opener
- 8 — power window switch
- 9 — pocket for door trim
- 10 - chop
- 11 - external door lock
After unscrewing the screws, remove the locomotive handle 3 and the door trim pocket. Using a screwdriver, remove the interior door handle trim 4. Unscrew the release button 1.
Remove the rear view mirror 5, the rear view regulator, the inner trim and remove the mirror by unscrewing the mounting screws.
How to remove the door trim of a VAZ 2114 rollers.
When replacement is necessary
The VAZ 2114 door card consists of iron, and the element is covered with fabric on top to give the body part an attractive appearance. Replacement of upholstery is provided if:
- the material has ruptured, it could be a hole from a knife or a burn through a cigarette;
- abrasions were found;
- there was a rupture at the base of the door;
- the inner gasket cracked and the outer casing ruptured;
- There was a deformation of the body part.
When deformed, it becomes difficult to close the door. In this case, you can modernize the interior and install homemade cards, choose fabric, decide on the design and read the instructions for replacing the fabric.
Purpose of the cladding
To understand how to remove the door trim of a VAZ 2114, you need to find out the purpose of this automobile fragment. The fabric insert enhances the appearance of the interior. If stains, mechanical damage or abrasions appear on it, you will need to disassemble the inside of the door, remove the panel, and attach a new lining. Thanks to this element:
- the interior becomes more attractive;
- additional sound insulation is created;
- a speaker is installed in the facing fragment;
- electrical wiring and fasteners are hidden;
- The corners of the closed plastic panel and iron parts are softened.
The canvas is removed for a number of reasons: increasing sound insulation, installing speakers, deformation, replacing material. There are many options for cladding on the market, but drivers prefer to buy special automotive fabric.
Materials for upholstery
On a VAZ 2114 euro, the door trim is made from various materials. Choose fabric based on price, quality and ease of use. For example, a knitted piece is easier to secure than a silk piece, but velvet looks more impressive. Eco-leather and Alcantra are durable, while leatherette and carpet provide a combination of price and quality. Velvet flocking is also popular.
Main types of fabric, their advantages and disadvantages:
- Leather – luxury upholstery. It is resistant to moisture and temperature changes. Traces of chemical contaminants are easily removed from leather.
- Eco-leather and leatherette are durable and wear-resistant materials. The technical characteristics of this fabric are similar to natural leather, but the price is lower. There is only one drawback - the fabric requires special care. Microcracks will appear on the canvas if you use abrasives or heat the leatherette during cleaning.
- Alcantra is a modern material that consists of ultra-fine fibers. This coating will not deteriorate from moisture, will not stretch, or shrink even after a long period of use.
- Carpet is made from artificial fibers and is considered a traditional automotive fabric. It repels dust, is resistant to fungal compounds, does not fade, and does not stretch. Convenient for re-tying. Provides heat and sound insulation.
- Velvet - gives the interior a noble look, is wear-resistant and durable. This upholstery will last for many years.
- Vinyl or leatherette is the most durable and durable option; it will make the skin durable. These types of fabrics withstand climatic changes and do not deteriorate due to treatment with detergents. However, when used for covering leatherette, you will need to install an additional layer of insulation.
Removing the door trim
Dismantling the door structure of the VAZ 2114 and removing the front door will require a set of equipment. To gain access to the panel, which is covered with material, the handle is unscrewed, the electrical wiring is disconnected, the speakers are removed and the clips are removed. Required tool:
You should take care of the place where the work will take place. It is recommended that this be an enclosed room, without drafts and with good lighting. Dismantling instructions:
- The plugs under which the connecting bolts are located are removed. The handle secured with two screws is unscrewed.
- The bracket leading to the window regulator is removed.
- The clips holding the panel come off. You will need to pull it towards you a little, but do not pull it out.
- The electrical wiring is disconnected: from the speakers and power windows. If it is not the rear door that needs to be dismantled, then the side view mirror wiring is disconnected.
- The decorative item with the covering is removed.
It is easier to remove the clips with a knife, but it is worth wrapping the blade with a rag so as not to accidentally scratch individual body parts. After this, it becomes possible to detach the fabric from the panel and replace the fabric.
Causes of problems opening the door
If incorrect operation of the VAZ 2115 design is noticed and the rear door does not open from the outside, then the reason lies in the locking mechanism or poor adjustment of the door fragment. The following factors indicate the need for repairs:
- the door slams loudly when closing;
- an unpleasant creak appeared;
- there is a rebound from the car rim;
- the door leaf has shifted;
- an increased gap appeared between the body and the door rim;
- subsidence, sagging, movement of the door pillar to the side;
- when closing there is a sharp kickback because the backlash is set incorrectly;
- the door closes only after a strong push;
- the lock is broken or blocked, the handle (external, internal) does not work;
- There was a crackling noise in the door panel while the vehicle was moving.
Special attention is required to the gaps, hinges, internal filling of the door, lock and handle. The exterior of the vehicle is inspected in a closed and open state. It is also determined whether there is any distortion or other changes in the body shape. The doors should be at the same level, the diameter of the gaps should be no more than 1–2 cm. Having examined the condition of the hinges, a search for mechanical damage is carried out, the functionality of the opening mechanism and the operation of the lock cylinder are checked.
Preparing a new canvas
Usually the skin is removed if the panel is deformed or if there is a desire to replace the panel. If the car has been in an accident, the panel part can be replaced with a piece of plywood. The main thing is to take accurate measurements and cut to the exact shape. The same goes for the material. It is purchased in advance, marked and cut out. Its total size is equal to the diameter of the panel, only 2-3 cm is left at the edges for hemming. In addition to the basic set of tools you will need:
- To install new sheathing, you will need an adhesive so that the material fits tightly onto the main part.
- For internal fastening, you need a construction stapler with staples or hardware. In the latter case, you still need a drill to drill holes.
- Additional clips are purchased in advance. When disassembling the door, these fasteners periodically break.
Drivers are offered a variety of materials: leather, substitute, leatherette, auto fabric, Alcantra, carpet. Any of them is suitable for covering. After the old cladding has been separated from the panel and a new piece of fabric has been prepared, all that remains is to secure the material. Stages:
- The plywood is coated with glue.
- The fabric is stretched.
- The folds are straightened out.
- Holes are created for self-tapping screws or the canvas is fixed around the perimeter with a stapler.
- A hole is cut for the speaker.
It is worth waiting a few hours so that the glue can dry and only then perform reassembly.
Remove the back cover
There is no point in repeating the main points; they are almost identical.
See:
In addition, the handle is disassembled and the cover is removed, the top fixing “bolt”. It's just not here. shelves and speakers.
Since there is no power window, that is. there is no gasket that needs to be disconnected. But here there is a regular window handle, as people call it. "oars" or disk on "muscle power". To take it apart, you need to twist it a little using a screwdriver. pull out the lower locking ring. After this, the pen will simply go away by itself.
We repeat the procedure with both the upholstery and the front door, only pulling it slightly. We remember the rivets.
Now a short video.
Something else I want to point out if you read the instructions. It is then recommended to completely change the rivets every time the upholstery is removed. they just lose their characteristics, the antennas fall off, unless I change the memory of 8 pieces on each skin. This threatens this. that on bumpy, rough roads there will be a rumble.
Sheathing installation
You need to assemble the cladding along with the other parts in the same sequence as it was disassembled. After the fragment has completely dried, you must:
- Insert the column into the hole and mount it into the iron frame of the door.
- Connect the electronics.
- Secure the lining with clips to the card.
- Secure the handle with two bolts.
- Replace the plug.
If, before dismantling work begins, contamination is found inside the structure, it is cleaned out. At the same time, it’s worth checking the condition of the wires and tightening the window lift nuts to prevent the door from being disassembled in the near future.
Sheathing process
After removing the old material, you can begin to install the new one.
The metal surface must be cleaned of traces of corrosion. Carefully remove any debris that has accumulated inside and repair any damage found. Since the upholstery has been removed, nothing prevents you from carrying out preventive maintenance along the way.
To improve sound insulation, foil foam rubber is installed inside with glue. This, among other things, will ensure better heat retention in winter.
Using a pattern, which is easy to download on the Internet, or, at worst, old sheathing, new elements are cut out from previously selected material. In the latter case, it is important not to forget to leave a few centimeters of margin around the perimeter in order to be able to tuck it inside.
A hole is cut in the workpiece for the handle. It should be slightly less than necessary. This way, when it's put in place, it will pull some of the material in and the edges will be hidden from view.
Glue is applied to the inside of the cut fabric. Which composition to use depends on the material you choose.
The most difficult thing is with the armrest cover. Here you need to apply the fabric carefully and very carefully. All irregularities must be stretched and folds straightened. It is also unacceptable to leave air bubbles. It is better to choose glue that dries for a long time. This will allow you to correct defects on the new upholstery if necessary.
It will be possible to fix the finished elements only after the fixing composition has completely dried. Assembly is carried out in reverse order.
To better imagine the whole process, you should watch this video:
Removing the front door trim
Plastic spikes or “herringbones” for fastening may break during the process of removing the skin. We purchase in advance a quantity sufficient for the update. It is better to buy double white-orange or transparent clips.
- Open the door and remove the 3 screws securing the podium. The screws are unscrewed with a Phillips screwdriver. The podium carefully turns down and detaches from the body.
- We turn the podium over with its back side facing us and find the plug from the power window control mechanism.
- Using a knife with a thin blade or a flat screwdriver, press the latch through the special hole and, pulling the block, remove it.
- Use a Phillips screwdriver to remove the screws from the speaker mounts.
- Remove the column and disconnect the power wires.
- Use a screwdriver to pry off the outer trim of the door handle.
- Turn the cover 180 degrees and remove it completely.
- Using a sharp knife, lift the door handle trim. Remove the cover and unscrew the 2 screws under it.
- Remove the door handle.
- Unscrew the cap of the door locking mechanism (lock) and remove it.
- Remove the mirror control lever.
- Starting from the lower corners of the trim, carefully pry it up with a knife and remove it from the clips securing it to the door.
Do not remove the casing with jerks or sudden movements. The sockets that attach the trim to the door can be damaged.
- We remove the wires from the locking mechanism from under the top of the casing. We remove the door trim of the VAZ 2114, evenly moving it away from the door.
- After removing the trim, you can replace the glass, the trim itself, repair window regulators, install acoustics, etc.
If you are planning to replace the trim, before purchasing it, compare the dimensions of the trim installed in your car with the new one in the store. The location and diameter of the holes for the handle and for fastening may not be the same.
Installation of the casing occurs in the reverse order.
Dismantling
Soundproofing the floor of VAZ 2113, 2114, 2115
So, to change the door trim, first of all you will need to dismantle the door components and get rid of the old trim material. Basically, all you need to get started is a set of screwdrivers and a good mood.
Removing the VAZ door trim
- First remove the podium. To do this, there are three mounting bolts under the podium, which can be unscrewed with a simple Phillips screwdriver.
- Remove the podium carefully, take your time. Otherwise, there is a risk of damaging the wiring from the power windows.
- Disconnect the connector with wires from your power windows.
- Now you need to remove the door handles. Pry off the covers with a flat-head screwdriver. Under them you will find mounting bolts. They are unscrewed with the same screwdriver, after which the handles are easily removed.
- The next step is removing the door opening mechanism trim. To do this, you need to carefully pry off the cladding using a flat-head screwdriver and remove the element.
- There are locking mechanisms on top of the doors. Plastic pins. They have a hole where a Phillips screwdriver fits perfectly. The stoppers are removed by simply unscrewing them with a screwdriver.
- There are probably speakers on the front doors. To remove them, simply unscrew the mounting bolts. If these are not standard speakers, the dismantling procedure may be slightly different.
- Carefully remove the speakers from the casing and disconnect the wiring. Do not pull anything sharply until you are sure that all wiring is disconnected.
- Remove the plastic lever that adjusts the side mirrors and get rid of the decorative moldings.
- Now you can remove the casing itself. It is held in place by plastic pistons, which are inserted directly into the metal part of the doors.
- Using a flat-head screwdriver, pry up the trim, smoothly detaching the material from the surface.
- Don't be afraid to break the caps as they are consumables. New ones will cost a small amount of money.
Dismantling is in full swing. Each door will take you about 30 minutes, maybe more. It all depends on the skill and level of preparation.
Sheathing
The doors have been stripped of everything unnecessary, so you can start covering them.
Door trim for VAZ 2114,2115 “Success”.
Clean the surfaces, get rid of traces of rust, debris, and damage. Once you have disassembled the doors, it would be a good idea to check the condition of the metal and carry out a number of preventive maintenance works; If you want to increase the soundproofing properties of the door, you can glue foam rubber under the new cladding material; Cut out the new trim pieces. To do this, you can use a pattern or simply attach the material to the door cards and cut out the necessary elements; Do not forget to provide allowances around the perimeter of the sheathing material so that it can be bent; Cut holes in the material for handles. Leave a little more so that when installing the handles, they will pull the material along with them, and you will not have any traces of cutting on the outside; Apply glue to the base of the sheathing material
The choice of adhesive largely depends on the type of sheathing you are using; In the case of the VAZ 2114, special attention is paid to the armrest, where careful and thorough tension is required; Straighten out any irregularities and make sure there are no wrinkles. To do this, it is better to use glue that does not dry instantly. This will give you the opportunity to correct unevenness; Perform the procedure for reassembling the door elements when the glue is completely dry
This will give you the opportunity to correct unevenness; Perform the procedure for reassembling the door elements when the glue is completely dry.
Replacement example
The work is completed. There is nothing particularly complicated about door trim. The only most problematic parts are the door disassembly stage. But if you have at least a little experience, you can easily cope with the task.
Loading …
How to properly remove the door trim on a Granta fret
Removing the rear door trim
The sequence of actions for dismantling, or how to remove the rear door trim on a VAZ 2114 and mount it back.
- Using a flat-head screwdriver, press out the decorative molding of the door handle and remove it.
- Remove the door handle.
- Using a flat-head screwdriver, press and remove the door handle trim.
- After unscrewing the fastening screws, remove the inner part of the handle.
- Using a flat-head screwdriver, remove the door lock handle trim.
- Unscrew the cap of the door locking mechanism (lock) and remove it.
- Use a flat-head screwdriver to disconnect the 10 door trim fastening studs.
- Carefully remove the trim, moving it evenly away from the door.
Installation of the casing occurs in the reverse order.
After removing the trim, it is recommended to carry out anti-corrosion treatment and check the condition of the internal cavities of the door.
If the door does not close, after removing the trim, you need to lubricate the rod of the central locking electric drive with silicone spray.
Sometimes you need to remove the trim from a door when it is jammed. In this case, space is made in the cabin for trim parts and work is carried out from the inside.
To improve sound and heat insulation, foil foam rubber is installed inside the casing. The pattern is made according to the pattern of the old casing. The material is cut with a margin of a few centimeters so that it can be folded. A hole is cut out for the handle. It should be slightly smaller in size than the handle itself. Insulation adhesive is selected depending on the type of material.
Sometimes, after removing the trim, decorative inserts are replaced. Typically, leatherette, Alcantara, carlet and tapestry fabrics are used for replacement.
Information on how to remove a VAZ 2114 door or door trim is required not only to change decorative panels or install sound insulation, but also to replace a power window or glass.
Material selection
The first thing you need to start with is the choice of sheathing material. The current range is quite wide, which allows each car owner to choose the ideal option in accordance with their wishes, requirements and financial capabilities.
The most attractive options are:
- Genuine Leather;
- Faux leather;
- Alcantara;
- Velours;
- Flock;
- Carpet.
For more information about the nuances of these materials for creating door trim, see the table.
Material
Peculiarities
Genuine Leather
This is a strong, reliable and durable material, the only significant drawback of which is its high cost. It's not easy to work with, but the end result is a stunning finish. A true classic that will never go out of style
Leatherette
Noticeably cheaper compared to genuine leather, but the service life is not as long. In just a year, leatherette may become covered with miniature cracks in the form of cobwebs.
Door cards for VAZ 2114
Alcantara
Many call this material ideal for the fourteenth model. It has an attractive appearance, similar to suede, but has increased durability and practicality. Easy to care for, easy to install and comes in a wide range of colors. Alcantara has no disadvantages as such
Velours
Well suited for door trim, as opposed to seats. The material is pleasant to the touch and beautiful in appearance, but with constant contact, abrasions form. The peculiarity of the structure will require you to frequently clean the fabric, because velor collects a large amount of dust
Flock
It feels like velor to the touch, but unlike it, it is much easier to clean, does not get wet and is not afraid of even sudden temperature changes.
Carpet
Almost carpet, but softer and more pleasant. The material is easy to work with, costs little, does not wear out in a short period of time and stretches well
For the VAZ 2114 this is especially true, since when replacing the trim it is important to carefully repeat all the bends of the doors
Dismantling and subsequent installation of door trim in Kalina-2
The choice depends on your goals for refining the car interior. Thus, flock is suitable for a sporty style, leather is for class, and velor is for sophisticated ideas.
Re-upholstery of VAZ 2114 door cards
Replacing the window regulator
To replace the window regulator, you need an extension, a wrench and a 10 mm socket.
Having freed the front door from the trim, remove the 2 bolts securing the glass to the bar. Usually they are tightened tightly, so it is more convenient to use the head as a lever.
Remove three nuts securing the electric motor, one nut under the glass, two in the center and one nut at the bottom of the door.
After removing all the nuts, disconnect the power plug from the electric motor.
The window regulator is removed from the studs and taken out of the cavity into the technological hole in the center of the door. Installing the window regulator occurs in the reverse order.
After removing the structure, the electric motor is first checked. If it is faulty, it is replaced. If the cause of the breakdown is not obvious, replace the window regulator.
Stage 5. Putty, primer and painting
Here we are already approaching the finish line. We take fiberglass putty and a rubber spatula and apply a small layer to the surface of the card. Once dry, I used a screwdriver attachment with sanding discs. I took 3 types of sandpaper, 100,400 and 1000.
After drying, you can prime them.
I took regular primer in cans and a spray gun. The only difference is the painting time.
After the primer came black paint as a base and white splashes from the brush.
And here is the final result. Very satisfied. They turned out quite tough and not too heavy.
Material:
- Glass mat - 2 meters for 275 rubles.
- Lycra-1 linear meter for 500 rubles.
- Resin-3 kg for 310 rub.
- Rings - 4 pairs for 250 and 1 pair for 170 rubles.
- Putty-500 g for 690 rub.
Sources
Glass replacement
It is better to buy glass and a glass holder as a set for replacement.
To replace, you need an extension, a wrench, an 8 and 10 mm socket and an assistant.
The side glass is blocked with a screwdriver to prevent it from falling out. The door trim is removed. A felt-tip pen marks the places where the glass frame is attached to the door on the frame and on the door. The bolts securing the glass frame to the window regulator are turned out.
The window regulator bar must be fully raised. The cable on the roller from the bottom of the glass is dismantled. Then the seals (velvet covers) are carefully removed.
Hold the glass during this time so that it does not fall out. After removing the seals, the glass is lowered down about 10 cm, tilted to the side and removed from the groove.
The new glass is installed in the reverse order. Apply WD-40 or a similar lubricant to the glass frame, insert the glass and leave to dry. After the grease has dried, the glass is installed in the door. New glass is installed in the seals.
If the seals have become unusable, new ones are cut out of rubber, while the old ones are used as patterns.
The glass with seals is inserted into the groove, aligned and lowered into the stopper. The window lifter handle is lowered to its lowest position. The glass is fixed with bolts and the cable is installed in its original place.
The operation of the window regulator is checked and, if necessary, the cable tension and the position of the seals are changed.
Main stages
Plastic is considered a wear-resistant coating. Rubber is characterized by high noise insulation and rapid wear. The device is adjusted after treating the main elements with silicone grease. Experts recommend using a composition that retains its elasticity and sound insulation characteristics at low ambient temperatures.
In auto stores you can buy a simplified version of a silent lock. To install the mechanism, you will need to open and lock the door. Then unscrew the bolts that secure the lock. The impact driver is applied to the top bolt. They deliver light blows. If necessary, this procedure is repeated.
Auto mechanics prohibit simultaneous unscrewing of 2 mounting bolts. Otherwise, the inner lock will fall. In this situation, you will need to open the door and remove the top and bottom bolts. Then turn the outer lock body. After dismantling the case, a new lock is installed. The fasteners are screwed in one by one. The bare pin of the latch is replaced with a silent analogue. It will take 20 minutes to install 4 door locks. Then the VAZ doors are glued using the method described above. This work is done by two people.
1. Remove the door trim. How to remove the door trim on a VAZ 2114, 2115? 2. Apply the podium to the door trim. (Fig. 1) 3. From the inside, through the door trim, we fasten the podium with two galvanized screws 4.2×16. (Fig. 2) 4. We cut through the door trim for the speaker (for VAZ 2114, 2115 podiums, we cut through the door trim to connect the wires to the power window button). (Fig. 3) 5. Secure the podium around the entire perimeter with 4.2×16 self-tapping screws. (Fig. 4) 6. We check the “hedgehogs” of the fastening of the casing - we replace the bad ones. 7. For VAZ 2114, 2115 podiums, we install and connect power window buttons. We carefully cut through the skin, leaving allowances along the edges! (Fig. 5) 8. Install the trim back on the door. (Fig. 6) 9. Through the petals in the podium (in the hole for the speaker), we screw two 3.5×41 screws through the casing into the iron. This allows the podium and trim to be firmly secured to the door. (Fig. 7) 10. From below, under the podium pocket, trying to ensure that the heads of the screws are not visible and do not touch the podium, we screw the trim to the door - into the iron with two 3.5x25 self-tapping screws. (Fig. 8) 11. Connect the speaker. (Fig. 9) 12. Install the speaker and its grid.
Good day to all! I think I said it, but I’ll repeat it... At the beginning of May, I purchased door trims from 2114. I was tired of the creaks of door trims on 2109, so the first thing after purchasing the trims was to look for the so-called “pistons” from Gazelle. To my surprise, I searched for a long time, and in the end I found it, of course! I took with a reserve: 30 pcs. piston from Gazelle (set: piston, self-tapping screw, plug) - 16 rubles * 30 = 480 rubles 30 pcs. clip shelf s/o 2108 - 5 rubles * 30 = 150 rubles
Everyone knows that Russian cars are a rattle, and a dozen are no exception. Some try to somehow deal with the creaking and rattling in the cabin, and some turn up the music louder and do not pay attention to all this. If you belong to the first category of people, then this article may be useful to you.