Denoising
the center console and (Beard treatment).
First you need to remove your beard, read how to do it. After we have removed the beard, we take it to the operating table, moving the air flow direction control to the middle position, shake the entire beard and enjoy the strumming, creaking sounds. To avoid getting hurt or tearing off the torpedo, we cover the mustache with madeline and fill it with hot glue.
There are three most important sources of unpleasant sound in a beard:
1. Nozzle deflectors. 2. Plastic rod for air direction damper. 3. Plexiglas with a sticker showing the temperature, air direction, and heater fan speed.
Unscrew the four white screws with washers and remove the nozzle. After this, the nozzle will be in your hands, access to the deflectors is open. Using a flat screwdriver, pry the deflector from the conical side and remove it.
Let me warn you right away, you won’t be able to remove the deflectors without removing the air duct.
On one deflector, I discovered that two hook-shaped whiskers holding the axes of the partitions were broken; they dangled freely and made an itchy sound when vibrating. The second deflector turned out to be normal and behaved quietly.
After an unsuccessful attempt to repair the hooks, at a car plastic store, I bought a new nozzle assembly for 283 rubles; I did not find deflectors for sale separately. (in developing). who treated them, send photos and text.
If you pull both deflectors out of the central nozzle and hold the regulator in the middle position with your fingers and shake it thoroughly, you can hear a dull rumbling sound, the sources of which are the damper itself and its thrust.
The damper has horizontal axial play, which can be eliminated by placing washers made of soft elastic material on the axles. I put the silicone pad of the CD-ROM laser carriage cut in half.
Also, cut rings from a white hose from vacuum ignition timing (distributor - carber) are excellent.
Next, to get to the draft, you need to disassemble the air duct itself. Unscrew the 5 screws marked with arrows.
After disassembly, we see that the rod dangles freely and, accordingly, rattles from vibrations.
In order to calm the craving, you need to stick four layers (chosen according to the circumstances) of the same madeline under it, and do the same with your other half to make a kind of sandwich.
Having installed everything in place, we assemble the air duct nozzle and check that the breakpoints should disappear.
Plexiglass with a sticker makes a cracking sound. The reason is that the radio in the mounting sleeve dangles up and down when driving on uneven roads. The plastic of the beard is deformed and thereby causes the plexiglass to rub against the plastic. We dismantle the black oval cover with plexiglass by unscrewing 4 black screws, then unscrewing 4 white screws and pull out the plexiglass itself from the cover. To get rid of cracking, you need to glue its ends with thin strips of madeline at the points of contact.
Then, we install the plexiglass in its place in the black trim; the madeline should not stick out from the front side.
Then glue the edge of the beard seat with a thin strip of madeline. Madeline should not be visible from the front side.
After gluing, we install it in its place, I immediately replaced the black screws with galvanized ones, because the original ones turned out to be a little short and did not allow the madeleine to be properly tightened.
The source of the crackling sound is the rubbing of the handles against the ends of the sticker glued to the plexiglass. This is how it is checked. We take the handle, insert it into its place and rub it against the ends of the sticker with a back-and-forth motion and hear an unpleasant sound. You can correct the situation in this simple way. You just need to bend the ends of the sticker inward.
Alternative radio menu (mms) Lada Granta
What is the difference:
- The previously used NK has been fixed - unnecessary lines from the registry have been removed, due to which bluetooth and radio did not work correctly in the standard shell.
- Added a convenient on-screen keyboard and call it from some programs.
- Ability to configure a 3G modem. You can create a connection directly from the menu, bypassing the desktop and Explorer.
- Added the ability to surf the Internet using the Opera browser.
- Added the ability to configure the GPS receiver.
- Other functions depend on the version of the alternative menu.
What is the difference:
- The previously used NK has been fixed - unnecessary lines from the registry have been removed, due to which bluetooth and radio did not work correctly in the standard shell.
- Added a convenient on-screen keyboard and call it from some programs.
- Added the ability to configure a 3G modem and create a connection directly from the menu, bypassing the desktop and Explorer.
- Added Opera browser with automatic connection to the Internet.
- Added the ability to configure the GPS receiver.
You will need an SD card up to 4GB formatted in FAT. In the future, it will be possible to use a card in exFAT format.
Attention!
| The author is not responsible for all your actions. In addition, flashing the MMC leads to loss of warranty. |
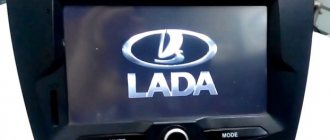
Procedure: 1. Copy the firmware to an SD card (up to 4GB in FAT).2. Copy files from the “FirmWare” folder to the root of the memory card.3. Remove the flash drive from the USB port.4. Insert the SD card into the radio.5. Reboot the GU by long (about 15 seconds) pressing the power button (for Lada Kalina 2) or the volume button (for Lada Granta).6. A flashing will occur (4 status bars will run through) and the radio will reboot itself into the desktop.
7. Without rebooting the radio, press the “Recalibrate” button and calibrate the screen. At the end, during the countdown, click on the screen.8. Reboot the radio with the memory card inserted. The new menu will load.
If, after flashing the radio, the download freezes at the “Lada” logo, then most likely there is a problem with the SD card. Try formatting the memory card to other file systems (FAT32/exFAT/FAT) and flashing it again. You can also try using other SD cards, 4GB or 2GB in size.
How to return to the standard menu of the Kalina 2/Grant radio:
- Click on the “Media” icon in the alternative menu.
- Reboot the radio, first remove the SD card.
Nothing changes in the standard shell, everything remains the same.
Removing the front seat of a Lada Kalina - do-it-yourself vase repair
If you have problems or damage to the front seats on your car, then to repair them you first need to remove them.
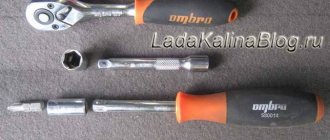
This procedure is quite simple on Lada Kalina, you just need to have a key with a special TORX-E11 head.
If you have such a head, then removing the seats will not be difficult for you. First you need to unscrew the two front bolts, moving the seat on the skids all the way back.
This is what it looks like when we freed the front part:
Now you need to move the seat the other way around - all the way forward to gain access to the rear:
Using the same key, we release this side, unscrewing the bolts, and everything is now ready - the front seats are ready for removal. You can safely lift it up and take it out of the cabin; surprisingly, it is very light.
And be careful not to lose the washers, otherwise it will constantly unscrew without them. The passenger car can be removed in exactly the same way; there are absolutely no differences.
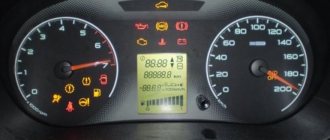
Let us remind you that the previous article on our website was about on-board computer error codes. I recommend adding it to your bookmarks.
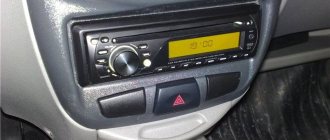
Radio capabilities
On the right side of the radio there is a USB connector, which is designed to connect:
- USB Flash card (USB 2.0 and 3.0 up to 64 GB);
- USB Flash player with a memory capacity of at least 1024 MB;
- USB HDD with FAT32 file system;
- Mobile phone (only in charging mode).
On the left side of the radio there is a slot for SD cards. SD Memory Card Slot: Supports SD, SDHC cards of size 32 X 24 X 2.1 mm. SDHC up to 32 GB, SD up to 32 GB.
The file allocation table (FAT) of the connected device must be FAT16 (< 2 GB) or FAT32 (> 2 GB). The maximum number of primary partitions should be no more than 4. It is advisable that the directory tree of the connected device have no more than eight levels. There should be no more than 1000 files in one directory.
While playing files, the display shows all the necessary information about the track. The playback source is selected using the AUDIO button on the left side of the radio. The radio has equalizer presets (JAZZ, POP, CLASSICAL, VOCAL and USER). The range of timbre adjustments for bass, treble, balance, front/rear balance is from “-7” to “7” units.
The radio has Bluetooth and Handsfree functions. You can connect your phone by long pressing the handset button. When pairing on the phone, the inscription “MMC12” should appear in the list of found devices, the default password is “0000”. After successful connection, the BT icon will appear on the display of the radio.
There is no phone book on the Kalina 2 and Grant radio, but it is possible to save up to 6 numbers in the radio’s memory. The audio system also remembers the last outgoing and incoming calls. The manufacturer does not guarantee operation of a phone in Handsfree mode that uses two or more SIM cards.
The radio allows you to listen to audio files from your mobile phone. To do this, you need to connect your phone to the radio via Bluetooth and launch the player on your phone. The manufacturer states that certain cell phone models may not work correctly with this radio, but this is not a sign of a malfunction.
The Kalina 2 and Granta radio has its own battery, which allows you to save user settings after disconnecting the battery for 10 days.
Removing the rear seats of a viburnum
- Lift the rear seat cushion by the strap, unscrew one nut securing each hinge to the floor with a 10mm socket.
- Remove Kalina's sofa cushion.
- Unscrew the 2 nuts securing the backrest brackets to the floor on the left and right sides using a 13mm socket.
- Fold the backrest, unscrew the 2 bolts securing the backrest brackets on the left and right sides.
- Remove the back of the sofa.
Installation of the left side of the backrest and seat cushion of the Kalina is carried out in the reverse order.
Dismantling the console containing the stove control unit
As you know, some trim levels of the Kalina-2 car do not have climate control. Here the driver can only control the operation of the stove. The stove control panel is held in place by 4 clips. In general, the mount used here is the same as in versions with climate control, but you won’t be able to remove the control unit panel unless you first remove the three control knobs.
Let's say we managed to dismantle the stove control unit panel. Then, all that remains is to remove the top flap, which is adjacent to the air ducts. This part itself needs to be pulled towards you from below, but first you need to unscrew two screws (they are circled in the figure).
Any device of standard size 1 DIN can be installed in the compartment intended for the radio. You don't need to dismantle anything to do this. It is difficult to imagine a situation in which it is really necessary to remove the center console panels, if we consider the “Normal” or “Standard” equipment.
on MMC 2190 with Grants-Lux. As was already written on the drive, the most difficult thing was to remove the climate panel... it didn’t want to come off the latches. But still, I managed to first snap it off with a plastic card from below, and then it all gave up)) The main thing here Don't rush, or you'll scratch the panel!
Well, then it’s a matter of technique. We unscrew a couple of screws on the air duct trim, carefully remove the panel itself, then the four screws of the radio and.
.Stop! I almost forgot about the antenna! We are looking for the antenna plug; I found it right under the glove compartment.
Then loosen the wire and carefully pull the radio towards you,
then we snap off a couple of connectors and voila!
Now we take our MMC from Granta, stretch the antenna to our plug under the glove compartment, immediately pull the USB connector into place, only in the reverse order. We insert it into its original place in the glove compartment
and pull to MMS. We snap the speaker and power connectors into place. We connect the MMC to the CAN bus. Since I’m going to install a rear view camera a little later, I immediately connected the adapter with a tulip to the rear view camera. It’s worth getting a little distracted here... Since I didn’t have connectors for connecting a camera and a CAN bus, and ordering it would take a long time, it’s expensive and I’m too lazy... I did it , as advised here on the drive, (many thanks to whoever came up with this!) took the connectors from the computer’s power supply, cut off the wires with the necessary contacts, after first removing the contacts themselves from the connectors.
I put heat shrink on the contacts for insulation and carefully inserted it into the MMC connector on the required contacts. I soldered a tulip for the video camera to the opposite end (I pulled it under the glove compartment so as not to remove the MMC again later). I did not connect the camera control, the Crosses already have a signal on the connector power supply when reverse gear is engaged. Next, we put our MMC in place.
New Lada: