I fiddled with it for a week while I was changing it. The service center scared me that my lever was bent and the bushing on the beam came off after a collision with something, they said the beam needed to be changed and the left lever, everything together with the replacement cost 38,500 rubles. So I decided to dig it myself. So I climbed in, took everything apart, measured everything with a caliper, everything turned out fine. One day I did one side at a buddy's garage. Well, the other one is on a lift in another garage. Once I assembled it, I went to look at the technological holes through which the beam is attached, and everything turned out to be OK. After I assembled everything, I measured the distances from them to the levers using a factory tape measure, and everything turned out to be even. On the left side where the washers were welded, a bolt was bent. I bought a new one, installed it and now it’s such a beauty. Surprisingly, everything was easy to figure out. I was preparing for the worst, that I would have to heat it and saw it with a grinder.
You can remove the lower arm without disassembling everything else.
-Let's jack up the car, -Remove the crankcase protection and check with a knob whether the axles of the levers rotate. -Remove the wheel. -Tighten the spring with zip ties so that it doesn’t shoot. -Place a log under the lever, lower the car with the lever onto the log. -Loosen the long bolt on which the lever is held by unscrewing the nut. -Unscrew the stabilizer bracket; if the studs break, drill holes for the bolts. -Unscrew the 3 bolts of the lower ball joint, pull it off the lower arm and place it on top of the lower arm fork. -Let's jack up the car again. -Carefully move the lower arm down and pull out the spring.
Half the job is done.
To press out the old silents, I used a regular VAZ puller and a long wrench. The old silents came out well, but one of the new ones went skewed and didn’t go all the way. I had to throw it away and buy a set of other silents and repress it. Now I have AMT bushings on one side and DAAZ on the other) Well, the dimensions are the same, the tires just may be different. Well, that's not the point. We assemble everything in reverse order. When assembling, the silent blocks need to be tightened to the end only when the suspension is under load. After assembly, lower the car onto the logs with both levers and only then tighten it. There is no need to twist it all the way. After some time, the suspension will sit down and then tighten it a little more.
About the adjusting washers.
We use washers to adjust the forward and backward displacement of the lower arm relative to the body. You can move the wheels closer to the rear axle by 1-2 cm, or you can move them further. When assembling, take a caliper and a tape measure and measure so that it doesn’t turn out that one wheel is further than the second. Using thin washers you can adjust the lever down to 0.05mm, but this is up to your discretion. You can only use regular 0.25mm, sold at any hardware store.
Rubber-metal hinges of the front suspension have a service life of no more than 80-100 thousand km. Depending on operating conditions, the lifespan before replacing silent blocks on Niva 2121 and Urban is reduced significantly. Diagnosis should be made for the following symptoms:
- Loss of straightness of movement, the car “moving” to the side at a constant speed or braking; Spontaneous changes in wheel alignment angles, uneven tire wear; The presence of booming sounds, rattling when working out irregularities; Body rocking VAZ 21214; The appearance of cracks, scuffs, and tears in rubber and metal structural elements.
Lack of timely attention to the problem leads to damage to adjacent suspension parts, deterioration of controllability and driving safety.
How to change the upper silent blocks of a lever on a Niva
To replace the silent blocks of the upper arm we will need:
- 22mm socket wrench.
- Hammer.
- Penetrating lubricant WD-40.
- Puller for silent blocks or hydraulic press.
- A set of new upper arm silent blocks.
Puller for silent blocks
Perhaps, in difficult cases, a gas burner will come in handy. If there is one, you don’t have to think too much about how to press the silent block out of the lever, but simply burn out the rubber and knock out the remains of the silent block from the seats. If you have all this, you can start working.
- We park the car on a level surface, tighten the handbrake and jack up the front end.
- We install a stand under the lower arm, lower the car onto the stand to unload the upper arm. This is a must!
- We remove the wheel and clean the nuts securing the silent blocks from dirt, and also clean and lubricate the nuts securing the upper arm axle with penetrating grease.
- We unscrew the three nuts securing the upper ball joint and at the same time check the condition of its boot. Raise the lever on the axle.
- Without forgetting about the adjusting washers and without losing them, we remove the entire lever assembly.
- Using a 22 wrench, unscrew the nuts securing the silent blocks and thrust washers.
- We tighten all the nuts only after the suspension is loaded, that is, with the car lowered onto a stand under the lower control arm. After replacing the silent blocks, it is advisable to check the camber/toe of the front wheels.
Replacing the upper silent blocks
If the technical inspection confirms that the part is faulty, it must be replaced. Replacing the upper silent blocks on a Niva is a roughly similar operation on the rear suspension of an SUV and on the front. Let's look at this process using the example of how to replace these vibration isolators on the front upper arm. The algorithm of actions is as follows:
First of all, you should unscrew the wheel from the required side. Then dismantle the upper ball joint by unscrewing its fastening nuts. Afterwards, the process of dismantling the lever itself occurs, which is carried out by unscrewing the nuts of the bolts securing it. After dismantling the lever, using a special puller or a hammer with a small chisel, the old silent block is knocked out of its seat
The procedure of burning out the silent block is very popular, but this negatively affects the condition of the levers themselves, since the metal softens and loses its factory reliability. Next, it is important to clean the groove for the silent block from dirt, and then lubricate it with a thin layer of some kind of lubricant. Now you can “fit” the new part into the groove. It can also be lightly lubricated before planting. Replacement completed
The last step in the work will be to reassemble the suspension in the reverse order, but without tightening the nuts and bolts at the mounting points. It is important to do tightening with the machine standing.
When to change the upper arm silent blocks
The service life of the upper silent blocks of the front suspension on the Niva is quite high. However, signs of wear may appear already after a mileage of 70-80 thousand km, or even earlier if the car is operated on a dirt road. The first sign of a worn silent block is a creaking and knocking sound when driving over uneven surfaces.
In the most advanced cases, a worn silent block will affect the car's handling and ability to keep a straight line; increased uneven tire wear and yaw along the road in a straight line are possible. The easiest way to determine the condition of the silent block is visually - there should be no cracks or chips on the surface of the rubber, and there should be no delamination or play.
Consequences of untimely replacement
You should not hesitate to replace silent blocks, because the safety and comfort of using the vehicle is noticeably reduced. With significant wear, the car will begin to move to the side, steer itself, and tire wear will accelerate.
Also, if silent blocks are not securely attached, they can lead to destruction of the hinge mounting locations and deformation in the suspension. This will increase the cost of repairs, since you will additionally have to buy and install the front suspension arm assembly, which will be several times more expensive than replacing silent blocks.
Broken suspension arm
In practice, even the most expensive silent blocks containing the best rubber will not be able to withstand more than one hundred thousand kilometers. The rubber moves away from the metal cage and turns. This can disrupt the geometry of the body, cause unpredictable skidding, and reduce ground clearance. The driver may feel the impact of the suspension on uneven roads. A sharp decrease in controllability is the most dangerous consequence of untimely replacement of the silent block.
Which silent block is better for Niva?
There are two dozen different silent blocks on sale, ranging from factory VAZ ones to polyurethane ones of various hardnesses. It is not advisable to install polyurethane silent blocks that are too hard - all the vibration will be on the body, and in cold weather a squeak is guaranteed.
- BRT, Balakovo, article 2121-2904040 and 21210-2904040, price about $9;
SEVI, Kedr, BZAK (Belebey) at about the same price and about the same quality, the price per set is about 12 dollars;
The quality and characteristics of polyurethane silent blocks strongly depend on the rigidity of the material, so they must be installed with the expectation that vibrations on the steering wheel and body will be inevitable, and the service life is unpredictable. According to the owners' reviews, the best option for the Niva is VAZ rubber silent blocks, which have proven themselves well over many years of operation.
Which silent blocks to choose for replacement
For Chevrolet Niva, silent blocks with rubber or polyurethane inserts are produced. Car enthusiasts often choose more modern material, but do not take into account its disadvantages:
- the material quickly collapses under torsional loads;
- high cost of a set of parts;
- When used at temperatures below -20 °C, they often tear and lose elasticity.
Polyurethane inserts work best on new parts; you should not buy them for cars manufactured before 2008. It is worth deciding on silent blocks made of polyurethane for the following reasons:
- slow wear of the part;
- resistance to heat;
- preservation of properties under the influence of chemicals and motor oil.
If you want to change the upper silent blocks, then the best choice would be the Mitsubishi MB633820 part, which are resistant to low temperatures and create comfort when moving. It is best to replace the lower units with classic ones made of rubber, designed specifically for the Chevrolet Niva.
Silent blocks and bushings Lada Niva 4x4
Polyurethane kit for the rear suspension of Lada 4x4, Chevrolet Niva
Polyurethane kit for front suspension Lada Niva 4x4
SEVI Extreme thrust bushings for VAZ 2101-2107, Lada Niva 4x4, Chevrolet Niva
Rear shock absorber bushings (donuts) for VAZ 2101-2115, Lada Priora, Kalina, Niva 4x4, Chevrolet Niva
Upper arm silent blocks Lada 4x4, Chevrolet Niva
Set of silent blocks and bushings red polyurethane cs20 drive for Lada Niva 2121
Set of silent blocks and bushings red polyurethane cs20 drive for Lada Niva 21214, Chevrolet Niva
Central stabilizer bar bushings for Lada Niva 4x4
Sevi expert transverse stabilizer cushions for Lada Niva 4x4
Rear shock absorber cushions cs20 comfort for VAZ 2101-2115, Lada Kalina, Priora, Granta, Niva 2121, Chevrolet Niva
Fox shock absorber upper cushions for VAZ 2101-2115, Lada Kalina, Kalina 2, Priora, Granta, Niva 2121, Chevrolet Niva, Datsun
Silent blocks of the lower and upper lever SEVI Extreme for Lada Niva 4x4
SEVI Expert front suspension arm silent blocks for Lada Niva 4x4
Stabilizer bar end bushings for Lada Niva 4x4
Silent blocks of the lower arm Lada Niva 2121, 21213, Chevrolet Niva before restyling
Set of reaction rod bushings yellow polyurethane cs20 comfort for VAZ 2101-2107, Lada Niva 2121, Chevrolet Niva
Hinges and cushions of the front shock absorber sevi extreme for VAZ 2101-2107, Lada Niva 4x4, Chevrolet Niva
Front suspension arm joints sevi expert for Lada Niva 4x4, Chevrolet Niva
Silent blocks of the lower arms of the SEVI Expert front suspension for Lada 4x4, Chevrolet Niva
Front shock absorber silent block for VAZ 2101-2107, Lada Niva 4x4
Small thrust bushings for VAZ 2101-2107, Lada 4x4, Chevrolet Niva
Central stabilizer bar bushings ss20 for Lada Niva 4x4
Lower arm silent block ss20 yellow for Lada Niva 4x4 (4 pcs)
Shock absorber mounting pads sevi expert for VAZ 2101-2115, Lada Kalina, Kalina 2, Priora, Granta, Niva 4x4, Chevrolet Niva
Large torque bushings for VAZ 2101-2107, Lada 4x4, Chevrolet Niva
Front suspension arm joints 4 4 “BZAK” for Lada 4x4 (Niva)
Rear shock absorber bushings yellow polyurethane cs20 comfort for VAZ 2101-2107, Lada Niva 2121, Chevrolet Niva
Transverse stabilizer cushions red polyurethane cs20 drive for Lada Niva 2121
Silent blocks of the lower arm Lada Niva 21214, Urban, Chevrolet Niva after restyling
Rear shock absorber bushings red polyurethane cs20 drive for VAZ 2101-2107, Lada Niva 2121, Chevrolet Niva
Silent blocks of front suspension arms yellow polyurethane cs20 comfort for Lada Niva 2121
Rear shock absorber bushing kit Forward Auto parts for VAZ 2101-2107, Lada Niva 4x4
Front stabilizer bar cushion, central BRT for Lada Niva 4x4
Sealing ring for the rear suspension shock absorber reservoir on VAZ 2108-21099, 2110-2112, 2113-2115, Lada Niva 4x4
Set of reaction rod bushings red polyurethane cs20 comfort for VAZ 2101-2107, Lada Niva 2121, Chevrolet Niva
Set of sevi expert jet rod bushings for VAZ 2101-2107, Lada Niva 4x4
Front shock absorber silent block ss20 for VAZ 2101-2107, Lada Niva 2121, Chevrolet Niva
Silent blocks of suspension arms Lada-Image for Lada Niva 4x4
Hinge of the lower arm of the front suspension for Lada Niva 4x4 3D. Urban
Front stabilizer bar cushion (side) for Lada Niva 4x4
Repair kit for lower front suspension arm hinge for Lada Niva 21214, 2131
Transverse stabilizer cushions yellow polyurethane cs20 comfort for Lada Niva 2121
Sevi extreme crossbar joint for VAZ 2101-2107, Lada Niva 4x4, Chevrolet Niva
Hinges of the lower arm of the front suspension sevi expert for Lada Niva 4x4, Chevrolet Niva
Lower longitudinal bar joint BRT for Lada Niva 4x4 Urban
BRT crossbar joint for Lada Niva 4x4 Urban
Silent blocks of the lower arm Balakovo for Lada Niva 4x4
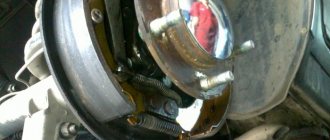
Replacing silent blocks of Niva lower arms
In the front suspension, when starting off, clicks were periodically heard; the fault turned out to be the silent blocks of the lower arms. During a detailed inspection, I discovered that they were destroyed; on the right side, the inner part peeled off and flew out, because of this, the lever could move forward and backward, which was what produced the clicks.
To replace, you need a pit wrench for 24,19,13, a jack, a hammer, a silent block presser, wooden blocks, gloves, wd-40, a chisel, silent sides, 2 assembled axles.
We take off the wheel nuts, jack it up, and unscrew the wheel. We jack up the lever, unscrew the shock absorber, the lower ball joint, and the mounts of the lateral stability arm.
Gradually lower the lever, pull out the spring, unscrew the lever axis, knock out the axis, do not lose the adjusting washers, remember where they were, they are responsible for the camber, when reassembling, put them in place, remove the lever.
We knock out the old silent blocks, press in new ones, I pressed the first one in with a special filler, but it’s not very convenient, I hammered the next three with a hammer through the spacer from the bearing and parts from the silent block presser.
We screw everything in the reverse order, silent blocks, shock absorber for mounting the transverse stability, tighten it when the car is on its wheels.
It took about 4 hours to replace both sides. On the right side, the soured silent block had to be cut with a hacksaw. The bolts of the transverse stability clamp broke off when unscrewing, fortunately I took a jar of bolts and nuts with me in reserve.
old style silent blocks
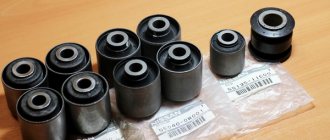
The topic of the article is silent blocks in the field. What is this anyway? This is a rubber-metal hinge, or a polymer-metal (polyurethane) hinge, which works in torsion. There is an internal metal bushing that is tightly clamped onto the axle, there is an outer bushing that is pressed into the lever and an elastic elastomer between these bushings. In relation to our car: these are the front lower and upper control arms, as well as a set of rear linkages. Other “rubber bands”, from the point of view of classical mechanics, are not silent blocks.
Purpose and design of the product
The main purpose of a silent block or, in simple words, a rubber-metal hinge is to connect suspension parts and dampen oscillatory movements due to the rubber filling inside the product. A truly useful product that has the simplest design. It is a silent block, a metal double bushing with rubber or polyurethane filling inside. This filling plays the main role of damping vibrations and vibrations. The photo below shows silent blocks.
These parts are installed mainly in the front suspension of the Niva Chevrolet vehicle. With their help, the connection between the front suspension arms and the anti-roll bar is ensured. A similar connection is provided in the vehicle's rear suspension, gearbox and engine.
Silent blocks on the field, problem
Two questions arise. The first is associated, as usual, with quality. The second and third with the design feature and material.
- There are quite a lot of manufacturers of old-style silent blocks, but literally two of them produce decent quality. These are Balakovo residents, under the Tadem brand and Dimitrovgrad (in AvtoVAZ branded boxes). As I have already said in many articles, our rubber components (in Russia) are of very poor quality. This applies to cuffs, hoses, hinges, boots, seals. And on top of everything else, our endless geography. In the South it is 40, in the North it is -40. The most complaints about tires and SBL are in the northern regions of our country. The average period without rubber destruction (that is, before cracks appear) is 1-2 years. Of course, our people don’t give up, and roll out the suspension to the point where they can no longer hold the car on the width of the road, but that’s another question.
- The silent blocks on the field were not “drawn from scratch” as expected, but were adapted. That is, the SBL from the “penny” is slightly strengthened and modified. This didn't lead to anything good. The fact is that the rubber hinge moves layer by layer, and the layers do not immediately move by the entire given angle, but relative to each other. I'll try to explain with a everyday example. Everyone imagines a Napoleon cake, made from a pile of cake layers with filling placed between them. Let's turn on our imagination again, and dedicate what we saw to Picasso and Salvador Dali))) Napoleon cake lying not on the table, but wrapped around a large diameter pipe. The thicker our cake, the less movement each layer (crust) will have relative to each other. And if this is a “diet cake” and there are only two or three layers, our structure will fall apart very quickly. This is what happens with our “low-layer” silent blocks.
- Polyurethane is very good, like a modern material. But he has a peculiarity. It works very well for compression, but not very well for high torsion angles, with a small amount of “meat”. That is why SBL made of polyurethane, in this design, DO NOT GO FOR LONG TIME AT ALL. I won’t list the manufacturers whose products were installed, just take my word for it. The specificity of the loads is such that most often the polyurethane falls off from one of the bushings. And the SBL begins to work not as a hinge, but simply as a bushing. In addition, polyurethane is afraid of heat and in order for it to survive at least somehow, for the right side you have to install all sorts of different thermal screens that protect the exhaust pipe from heat. Rubber SBLs do not need this.
How to remove the lower arm bolt on a VAZ 2121 Niva?
When disassembling the front suspension of a VAZ 2121 and its modifications, many car enthusiasts are faced with the question of how to remove the bolt of the Niva lower arm. The fact is that this bolt is the axis on which the lever rests and turns. Therefore, when repairing the chassis, this unit cannot be bypassed; the bolt still has to be removed. Sometimes solving a problem can be quite complex and time-consuming, which is something that motorists who service their Niva themselves would do well to know.
What we put
We tried many options from different manufacturers. Both with rubber and polyurethane. We settled on the regular supplier of AvtoTAZ, PJSC Balakovorezinotekhnika, brand TADEM. Be very careful, because as we understand, from our practice, in the glorious city of Balakovo, there are a lot of companies related to rubber, hoses and cuffs. All of them have “Balakovo” and “rubber” in their names, and whatever you want. And what is sold in markets and stores is quite honestly called “Balakovo silent blocks”, after the fact of their birth. But the quality leaves much to be desired. In my native St. Petersburg, in a wholesale office selling “palenki”, “Chinese Balakovo silent blocks” pendants are available at a very ridiculous price. When SBL “Tadem” is not available, you can supply Dimitrovgrad ones. Usually they are in the blue and white Lada-Image boxes. We haven’t come across anything of decent quality and durability from other manufacturers.
How to remove silent blocks if problems arise?
There are often situations when the silent block, despite efforts, does not give in. In addition to the universal lubricant WD-40 and kerosene, a hacksaw or a torch (blowtorch) will help you change the element. In the first case, try to cut the rubber element without touching the lever, then remove the fragments with a screwdriver or other suitable tools. In the second, heat the polymer until it burns out, then knock out the clip with a sledgehammer and a screwdriver.
Installation features.
At this stage, the main part of the magic created by the Papuan service happens. In the fairy tale, the toad turned into a princess, but here it’s the other way around. Transformation of the princess into a toad, vile and disgusting.
- The suspension silent blocks must be tightened while the vehicle is standing on the ground. Or put the car on the ground, measure the distance from the wheel to a point on the wing. Raise the machine on the lift again and tighten the SBL to this distance. If you see that your suspension silent blocks are being tightened on a lift without measuring them, run away from there. The resource of any SBL of the best quality will in this case amount to several hundred kilometers.
- AvtoVAZ provides a very specific tightening force for the lower axle nut. Moreover, in the Fiat service manual, it is written separately that this must be done with a torque wrench. The tightening force was specified as 17-18 kg. More modern manuals indicate a more democratic force of 105-170 Newtons, or 10-17 kg. To ensure this force, you need a meter-long wrench. Therefore, when a locksmith has two wrenches or, even more fun, a ratchet in his hands, then.....look for another service.
Instructions for installing new silent blocks
Replacement of parts on a Chevrolet Niva is carried out for the right and left levers according to the same instructions.
- Raise the car using a jack. Remove the wheel.
- Place a support under the lower arm.
- Using a jack, raise the lower arm or, conversely, lower the car slightly to increase the load on the suspension. It is best to use a second jack to fully compress the spring. This way you will achieve this effect faster.
- Install the tie down spring and then lower the second jack to relieve stress on the anti-roll bar.
- Release the lever from the stabilizer clamp.
- Remove the shock absorber mounting bolt from the eye, having first unscrewed it.
- Remove the three nuts that secure the ball joint to the arm.
- Remove the second jack and remove the spring. Unscrew the lower arm axle nut and use a spacer to knock out the axle.
- Remove the lever. Pay attention to the location of the front suspension axle shims. Try to remember their number so that there are no problems when reassembling.
- Remove the nuts from the upper arm axis. Remove them along with the washers.
- Using a puller, press the old parts out of the lever lugs. If this cannot be done with a tool, then you need to use a blowtorch or gas torch. Clean the seat.
- Install new silent blocks and press them with the same tool. Before this, it is advisable to coat the lever and bushing with graphite lubricant, Litol or Movil.
Now you need to install the lever in place, making sure to place the shims correctly. Before you install this part, you can change the silent blocks on the upper arm. This operation is carried out according to simpler instructions:
- Tie the front hub together with the caliper to the body so as not to break the brake hose during the work.
- Remove the upper arm by unscrewing the bolts securing the axle and arm to the ball joint.
The rest of the work follows the same principles as when installing parts on the lower arm. First, the worn bushing is removed with a puller, and then a new one is installed in its place. Don't forget to clean the seat of the upper assembly and treat it with lubricant. After installing this part of the suspension, carry out final assembly.
The final tightening of the silent blocks should only be carried out with the machine standing on the ground. The Niva manufacturer recommends tightening the lower axle nut with a force of 100-170 N. After replacing the components on both sides, it is recommended to have a wheel alignment performed at a service station. This will help increase the life of the suspension and tires.
Confusion
Back in 2008, the Niva family was restyled. The lower axles have been changed in thickness from 16mm to 18mm. Accordingly, different silent blocks are placed on the field. That is, silent blocks and axles of the old and new type. Among the people, the name thin and thick has taken root. They are NOT interchangeable. Silent blocks are not different for Niva or Shniva, it all depends only on the year of manufacture of the car. The year of transition is 2008. The upper silent blocks are the same on all cars of all years.
Diagnostics of wear of silent blocks
This, by constantly checking the condition of the silent blocks of the VAZ 2121 suspension, it is natural to track the moment when they need to be changed. It is much better to carry out such procedures, but it happens that there is no such ability, so assessing the behavior of the car when driving will come to the rescue. Not everyone knows, but the way a car moves can say a lot about its technical condition. More precisely, when silent blocks wear out on a Niva, the following features of the car’s behavior when driving appear:
The Auto_Repair channel helps you fix car problems with your own hands
.
- The VAZ 2121 became sluggish to drive;
- the SUV began to be pulled to the side by an unknown “force”, while the driver did not turn the steering wheel (this is especially noticeable at high speeds);
- a “thud” sound appeared from under the car.
KEY-DOP
Such troubles, of course, may well signal problems in other suspension components, but when silent blocks wear out, these are the main symptoms that are strictly prohibited from being ignored.
To finally make sure that vibration isolators are the culprits of the problems, carry out a technical inspection of the Niva’s suspension on a lift or in a pit. Any externally manifested defect (scratches, cracks, scuffs) indicates the need to replace the silent block, or better yet all of them at once, even if they are in acceptable condition. Replacing Chevrolet
Niva or regular Niva - the operation is not so complicated, so having basic repair skills, you can do it
yourself
quite simply.
Important Note
Otherwise, silent blocks will last no more than a thousand kilometers. In addition, there is a torque rating for the lower axle nut. For Niva Chevrolet it is 100–170 N. This is quite a large force and without a long lever it will not be possible to tighten the nut correctly. Good luck with the replacement and as smooth roads as possible!
Replacement
To carry out the work you will need a garage with a pit, as well as a standard set of tools.
Required tools and materials
First of all, you need to stock up on new silent blocks. It is also recommended to buy bolts and nuts for securing the arms so as not to use old ones.
Materials and tools you will need:
- WD-40 product;
- ½" and 1/4" collars;
- open-end wrenches and heads from 13 to 24;
- strong wrench and pipe to increase torque;
- bottle type jack;
- puller;
- chisel;
- hammer.
Why is the node disassembled?
There are several objective reasons why it is necessary to disassemble the entire front suspension and remove the lower arms. They are associated with the following circumstances:
- most often the unit is disassembled to replace the rubber-metal articulated bushings - silent blocks;
- the lower arm needs to be replaced due to its damage or breakage;
- It is necessary to remove the front beam to replace it or carry out other repair work.
The problem is that on about 50% of Niva cars, the bolt, which is the axis of the lower arm, does not want to voluntarily leave the front beam bushing. In other words, the axle becomes so sour that it is not only impossible to pull it out, but even to turn it. Moreover, on Nivas produced back in the Soviet era, this problem does not exist.
This raises another reason why it is very advisable to disassemble the lower part of the suspension in the first year of operation of the machine - prevention.
Before the axis of the lower arm has time to firmly stick to the bushing, it must be removed, cleaned and lubricated with graphite lubricant. This will save you from many problems in the future, since dismantling a stuck bolt will take a huge amount of time at the most inopportune moment.
Video process of installing silent blocks
Video possible cause of a burst bushing
1200 rub. for the photo report
To change the silent blocks of the lever, the first thing you need to do is remove this lever , so the task will not be easy and will take a lot of time, and if you are going to change the lower levers, then there will be even more work, because then you will also need to remove the spring. Fortunately, in our case it is enough to unscrew the nuts of the upper ball and the nuts of the bolts securing the Niva arm itself. All that remains is to knock out or press out the silent blocks by holding the lever in a vice and beating it fairly with a hammer.
Many owners burn off rubber silent blocks from the Niva suspension arms using a lamp, which does not have a very good effect on the arms themselves, because after heating the metal becomes softer. The silent blocks are pressed back into the lever using a good vice through the head at “22”, having previously lubricated the holder with graphite lubricant. So if you have never changed the silent blocks in the levers of a VAZ 2121 before, you will have to work hard, but an experienced master can change all eight silent blocks of the front suspension on a Niva in 2-3 hours.
Pre-disassembly procedure
To get to the axle, remove it and change the silent blocks, you need to prepare the tools:
- jack with wheel wrench;
- open-end and ring wrenches of standard sizes;
- set of heads and knobs;
- To dismantle rubber-metal hinges, it is advisable to have a puller;
- powerful hammer;
- mount;
- other locksmith tools.
It is not necessary to carry out work on removing the lower arm axis from an inspection hole or on a lift; an open, flat area is sufficient. But some operations are more convenient to perform from a ditch, so its presence is desirable. It is better to wear cloth gloves on your hands so as not to bruise your fingers. Having secured the car in place using wheel chocks under the rear wheels, you can begin disassembly, which is carried out in the following sequence:
- Raise the car on a jack, unscrew and remove the front wheel. Place a block under the lower lever and lower the car onto it.
- Unscrew the 3 lower ball joint fasteners and separate the hub assembly from the arm.
- Unscrew the 2 nuts of the bracket that holds the end of the anti-roll bar to the side of the arm. Use a spatula to remove it from the studs.
- Disconnect the shock absorber from the spring support pad by unscrewing its lower mount. Raise the car with a jack and remove the spring. There is no need to remove the support pad from the lever, unless it is in the way.
- While holding the head of the long bolt that holds the lower arm, unscrew the nut on the other side and remove it along with the washer.
- Using a hammer and a round brass socket, carefully knock the axle out of the bushing. There are several adjusting washers inserted between it and the lever; when knocked out, they will fall out. You can't lose pucks.
The adjusting washers located between the lever and the front beam bushing are installed on the Niva 2121 at the factory. During assembly, they must be returned to their place in the same quantity. Once disassembly is complete, you can begin replacing the silent blocks using a puller. If this is not available, the old rubber-metal bushings are knocked out in a vice, and new ones are carefully pressed into their place using an extension from a piece of pipe.
When assembling the unit, it is very important to treat the entire surface of the lower arm axis with graphite lubricant.
This will save you from suffering and wasting a lot of time during the next disassembly if the bolt becomes tightly stuck.
There is no Chevrolet Niva V6, but I would like it. › Logbook › Replacing silent blocks of lower arms
You can remove the lower arm without disassembling everything else.
-Let's jack up the car, -Remove the crankcase protection and check with a knob whether the axles of the levers rotate. -Remove the wheel. -Tighten the spring with zip ties so that it doesn’t shoot. -Place a log under the lever, lower the car with the lever onto the log. -Loosen the long bolt on which the lever is held by unscrewing the nut. -Unscrew the stabilizer bracket; if the studs break, drill holes for the bolts. -Unscrew the 3 bolts of the lower ball joint, pull it off the lower arm and place it on top of the lower arm fork. -Let's jack up the car again. -Carefully move the lower arm down and pull out the spring.
Half the job is done.
To press out the old silents, I used a regular VAZ puller and a long wrench. The old silents came out well, but one of the new ones went skewed and didn’t go all the way. I had to throw it away and buy a set of other silents and repress it. Now I have AMT bushings on one side and DAAZ on the other) Well, the dimensions are the same, the tires just may be different. Well, that's not the point. We assemble everything in reverse order. When assembling, the silent blocks need to be tightened to the end only when the suspension is under load. After assembly, lower the car onto the logs with both levers and only then tighten it. There is no need to twist it all the way. After some time, the suspension will sit down and then tighten it a little more.
About the adjusting washers.
We use washers to adjust the forward and backward displacement of the lower arm relative to the body. You can move the wheels closer to the rear axle by 1-2 cm, or you can move them further. When assembling, take a caliper and a tape measure and measure so that it doesn’t turn out that one wheel is further than the second. Using thin washers you can adjust the lever down to 0.05mm, but this is up to your discretion. You can only use regular 0.25mm, sold at any hardware store.
| 15 messages on previous page |
Old and new silent blocks for Niva Chevrolet
The topic of the article is silent blocks in the field. What is this anyway? This is a rubber-metal hinge, or a polymer-metal (polyurethane) hinge, which works in torsion. There is an internal metal bushing that is tightly clamped onto the axle, there is an outer bushing that is pressed into the lever and an elastic elastomer between these bushings.
Upper arm and silent blocks.
Rubber-metal articulated bushings (silent blocks) on all Nivas until 2008 had a different design from the modern one, and the design and dimensions changed only for the lower front ones.
Broken silent blocks of the old design
The service life of silent blocks of the old design ranged from two to three years, depending on the intensity of use and climatic conditions.
After 2008
On the new parts, the diameter of the inner sleeve increased by 2 mm, and the outer diameter by 7 mm, which could not but affect the service life. Old bushings turned out well from Balakovo and Dimitrovgrad silent blocks, they were packed in branded VAZ packaging. The quality of other manufacturers is poor.
New bushings are supplied to the conveyor. And about the new articles: the upper silent blocks, interchangeable with the old ones, received the number 2101-2904040, the new lower, reinforced ones - 2121 2904040.
Polyurethane silent block.
Not so long ago, polyurethane bushings, dampers and silent blocks became popular. The thing is good and useful, but you shouldn’t take polyurethane unconditionally enthusiastically and here’s the thing.
Classic regular silent block
For example, shock absorber bushings made from it are quite durable. But the silent block mainly works to twist, and the articulation of the SUV’s suspension implies large angles of rotation of the levers. And rubber parts cope better with this; on off-road they work smoother and longer.
How to install a new silent block
Required Tools
Now you can’t do without special “equipment”. The fact is that such a part fits very tightly in its seat, and it will not be possible to hammer it in with a hammer. Therefore, the very first tool you need is a puller. You can buy it at any relevant store or make it yourself. To do this, you should find the following “ingredients” in your garage:
- M20 bolt (the longer the better) with a full-length thread and a nut.
- Metal washers of various diameters.
- A piece of pipe with thick walls (100 mm), its diameter will depend on the size of the lever eye.
You will also need other tools:
- keys (even a whole set);
- new parts;
- jack, vice (if any will be useful);
- mount.
You may also need a sledgehammer, and more than one, but you should use them carefully, maintaining precision.
Replacement process
If the silent block of the lever is to be replaced, then it will not be possible to perform the work without removing it. It is necessary to first dismantle the unit and only then begin the replacement process.
The first step is to remove the worn part from the lever. How this can be done was written above. Now you need to press in a new silent block. For this purpose, you can use the same technique that was described above to remove the silent block using a bolt, washer, nut and pipe.
Almost every garage has a vice, and this is also suitable “equipment” for removing and pressing silent blocks using spacers.
Whatever method of “packaging” the silent block is chosen, before installing a new part, the seat should be cleaned of rust and remnants of a worn part. After this, the “socket” must be lubricated with soapy water to facilitate installation. It is undesirable to use oil, grease and other petroleum products for this purpose, especially in relation to products with rubber filling. You can also make a small chamfer on the end part of the silent block on the rubber. The main thing is not to cut off too much.
What to do when a part is stuck?
The first signs of trouble can be detected early. To do this, unscrew the axle mounting nut with a 24 mm wrench, and then use a socket with a wrench to try to turn the bolt. If this cannot be done even with the elongated lever of the crank, then get ready for a lot of work - the axle is clearly stuck. In some, especially advanced cases, a stuck bolt does not even allow the spring to be released and pulled out.
There are several ways to solve the problem, but none of them are easy and will require from 1 to 5 hours depending on the degree of souring of the axle. Experienced owners of Niva 2121 practice the following method of dismantling the part:
- Using an angle grinder, cut off the axle on both sides to free the lower arm and remove it.
- Use a gas torch or blowtorch to heat up the part of the front beam with the bushing.
- Try to move the axle with strong blows of a hammer. If this was possible, but the end of the cut bolt was flattened, then you need to trim it again and knock out the part completely.
- If the bolt does not move, it is necessary to repeat the heating and cooling cycles several times. You can weld a crowbar to the cut-off part of the axle, with which you can try to turn it while warming up.
The described procedure usually takes 1-2 hours. If after this time you have not been able to move or rotate the steel rod, you need to move on to drastic methods:
- drilling a bolt from the sleeve with a hand drill;
- complete disassembly of the chassis and removal of the front beam.
The dismantled beam must be taken to the nearest car service center, where the rod will be pressed out with a press or drilled out on a machine.
Didn't find the information you are looking for? on our
forum
.
If you find an error, please highlight a piece of text and press Ctrl Enter.
If you find an error, please highlight a piece of text and press Ctrl Enter.
Didn't find the information you are looking for? on our forum.
DIY hydraulic press assembly
If you decide to assemble a homemade press with your own hands, necessary for pressing silent blocks and bearings, you will need certain materials and tools.
Therefore, start by selecting the required components. Without them, it will be impossible to assemble a homemade press. You will need:
- Welding device with electrodes;
- Hacksaw for metal processing;
- Bulgarian;
- Hydraulic jack with suitable power parameters;
- Tension springs (springs from car seats or doors work well);
- Bridge mushroom with shifted splines (in case the jack is located at the bottom);
- Channels;
- Metal pipe with a square or rectangular cross-section;
- Metal corner;
- Steel sheet;
- Steel strip;
- A piece of pipe for the rod head.
You select the dimensions of the parts according to the selected drawings, or select them for your specific designed hydraulic press.
When everything is ready, you can start working with your own hands.
- Cut metal blanks according to the drawings.
- Make the necessary holes on the metal parts if the drawings provide for their presence. Drilling on an already assembled structure will be problematic.
- Weld all metal components that require the use of a welding machine. Handle the seams carefully as the hydraulic press will be subject to heavy loads. Your task is to make a U-shaped structure that is securely welded to the base.
- Next comes the movable table. To make it, use a pipe or channel. The pipe should have a length that is less than the intermediate distance between the two posts. Then another piece of pipe is welded, necessary for the hydraulic jack rod. Metal strips can act as guides. Their length should correspond to the width of the bed. The pipe should be placed between the posts. Guide strips are attached to the sides. Secure the structure with reliable bolts and nuts.
- To make an adjustable homemade removable press stop, proceed in the same way. But only make holes on the metal strips opposite the racks. This will allow you to fix the element at the desired height.
- According to the drawings, install the springs and use them to pull the movable work table.
- Place the jack in place. The structure is ready.
The advantage of such a hydraulic press for pressing is that, if necessary, the hydraulic jack can be easily removed and used independently. Using a self-assembled press, you can easily cope with replacing silent blocks and more.
Tool:
- Jack or ditch lift
- Open-end wrench 19 mm
- Open-end wrench 24 mm
- Straight box spanner 17 mm – 2 pcs.
- Straight box spanner 19 mm – 2 pcs.
- Curved box spanner 24 mm
- Ball joint puller
- Driver for socket attachment
- Torx wrench attachment E12
- Wheel chock (shoe) – 2 pcs.
- Punch
- Large hammer
- Bench vice
- Chisel
Parts and consumables:
- Silent block of the front suspension arm – 4 pcs.
- Soap solution
Notes:
Remove the lever from the car to replace it or replace the silent blocks of the lever. The work to remove the left and right front suspension arms is similar. Carry out the work on an inspection ditch or overpass.
Removing the front suspension arm
Replacing the lower silent blocks
Rubber-metal hinges of the front suspension have a service life of no more than 80-100 thousand km. Depending on operating conditions, the lifespan before replacing silent blocks on Niva 2121 and Urban is reduced significantly. Diagnosis should be made for the following symptoms:
- Loss of straightness of movement, the car “moving” to the side at a constant speed or braking; Spontaneous changes in wheel alignment angles, uneven tire wear; The presence of booming sounds, rattling when working out irregularities; Body rocking VAZ 21214; The appearance of cracks, scuffs, and tears in rubber and metal structural elements.
Lack of timely attention to the problem leads to damage to adjacent suspension parts, deterioration of controllability and driving safety.
Unscrew the wheel bolts, remove the wheel, having first installed a reliable support.
This is what a spare part looks like, not suitable for further use.
Loosen the bolted connection of the upper ball joint (3 pcs), and then move the part up. Attention, an insufficiently unloaded element can cause injury.
Remove the upper arm assembly using 2 19mm wrenches. If soured, use WD-40.
Place the element in a vice, unscrew the 22 mm nuts from the ends, and remove the thrust washer.
Armed with a puller, press out the silent block.
In the absence of a specialized device, it is permissible to use a chisel. In this case, use a hammer to pry up the edges and remove the hinges.
To install a new part, a puller and a spacer or a tool head are required. When you first set up tools, secure one of the silent blocks in the eyelet.
Secure the lever, insert the complete axle, and secure the installed rubber-metal hinge with a nut. Install the remaining silent block in its place, as well as a 160 mm piece of tube (mandrel) between them.
Place the puller cup against the free end.
Tighten the nuts until the elements are completely installed in their original position.
In the second case, placing the eye on the support, hammer the silent block with a pipe of a suitable size or a tool head.
The second stage using improvised means.
After installing the part on the car, lower the car so as to fully load the structure. Tighten the nuts completely.
In addition to hanging the car, removing the wheel, disconnecting it from the lower ball joint, remove the shock absorber from the lower mounting to the spring cup.
Disconnect the stabilizer clip from the link.
Lower the lever and pull out the spring.
After securing the lever axis with a 19 mm wrench, unscrew the 24 mm nut and remove the washer.
Carefully knock out the axle using a metal rod.
Remove the thrust washers.
Remove the lower arm; do not remove the spring cup.
Using a puller or a heavy hammer, press out the silent block.
Replacing the silent blocks of the front and rear levers with new ones is carried out in a similar manner to the disassembly process. For pressing, use a puller or tool head.
Perform final tightening and adjustment with the machine on its wheels. At the end of the process, do not forget to visit the stand to adjust the wheel alignment parameters.
How to properly replace the silent block
When replacing a faulty structural element, certain tools will be required:
- a wrench for removing the suspension arm and beam;
- special press;
- silent block remover.
After installing and fixing the vehicle on the lift, disassembly of the elements is ensured. The silent block of the rear beam is changed according to the following algorithm:
- remove the beam suspension;
- unfasten the handbrake cable;
- release the mounting bracket for the brake system hoses located on the brackets;
- remove the old silent block of the beam using a puller;
- clean the installation site from dust and other contaminants;
- apply graphite lubricant to the installation site;
- ensure the installation of a new part, fixing it without gaps using a hydraulic press or pneumatic tool. Sometimes a sledgehammer is used, but it is better to avoid this so as not to deform the part. The pressing procedure is the most difficult part of the work;
- elements removed for installation are installed back, observing the sequence;
- After the work, it is imperative to restore the wheel camber and toe angles.
Replacement of the front beam silent block is ensured in compliance with the same principles.
If a structural element is bolted down rather than pressed in, its dismantling is ensured by unscrewing
When carrying out installation, you must pay attention to the position of the part, because placing it arbitrarily is unacceptable. If the element has partitions, it functions in two positions
If you ignore the regulatory rules, the load will be distributed unevenly and the silent block will quickly fail.
First and most importantly, the silent block must be tightened when the car is on a flat surface, that is, when it is lowered from the lift. This is due to the fact that when the vehicle is located on a hill, it is almost impossible to tighten the bolts and nuts in the correct position. The parts will be in the wrong position. After the machine is lowered, the rubber bushing will twist as in the loaded position. Accordingly, it will always be in working condition, even without loads. Such an error during replacement is dangerous due to premature wear of the consumable. Only this tightening method is the most correct.
Silent blocks only need to be replaced as an assembly, because this element is non-separable. But sometimes this part is already included in expensive suspension units from the very beginning, so when the silent block wears out, the entire structure must be changed.
The video shows a simple way to replace silent blocks in a car, which does not require special equipment and is accessible to every car owner.
Which silent block is better for Niva?
The larger lower joints will not fit the front suspension arms and axles of vehicles built before 2008. Therefore, you can only choose the type of insert - classic (rubber) or new (polyurethane).
The use of polyurethane hinges has the following positive aspects:
- polyurethane wears off more slowly;
- the material does not dry out when heated;
- the polymer does not lose its properties under the influence of motor oil and other aggressive chemicals.
There are two dozen different silent blocks on sale, ranging from factory VAZ ones to polyurethane ones of various hardnesses. It is not advisable to install polyurethane silent blocks that are too hard - all the vibration will be on the body, and in cold weather a squeak is guaranteed.
Video “Pressing in silent blocks”
The recording shows one of the ways to replace silent blocks when there is no press at hand.
So, after diagnosing the suspension at OD, I had to replace the rear silent block of the front suspension arm.
In my case, the silent block is pressed into an aluminum part, and to replace it we will need to dismantle this part, press out the old silent block from it, and press in a new one.
We start the work by hanging the car on a jack, just in case, so as not to die under the weight of the iron friend in the event of an emergency, we put something under the wheel.
Having previously lubricated the bolts with WD-40, unscrew them (3 pieces on each side).
Then, slightly prying the lever with a pry bar, pull it down and simply remove the part with the silent block from the lever with your hands.
For pressing/pressing we will use a garage vice.
To exit the silent block, it is necessary to provide free space behind the part; to do this, we place pieces of plywood on the back of the part; in front, to push out the silent block, we use a 32 head from the kit.
New and old silent block.
We press the new silent block into the aluminum part, and also put plywood on it so that the parts are not crushed by the vice.
Next, having lubricated the hole in the silent block with liquid soap, we put it on the lever and fasten it with new bolts with a tightening torque of 50 Nm on the smaller bolts and 70 Nm on the larger ones.
We do the same on the other side.
Silent blocks on the field, problem
There are often situations when the silent block, despite efforts, does not give in. In addition to the universal lubricant WD-40 and kerosene, a hacksaw or a torch (blowtorch) will help you change the element. In the first case, try to cut the rubber element without touching the lever, then remove the fragments with a screwdriver or other suitable tools. In the second, heat the polymer until it burns out, then knock out the clip with a sledgehammer and a screwdriver.
Two questions arise. The first is associated, as usual, with quality. The second and third with the design feature and material.
- There are quite a lot of manufacturers of old-style silent blocks, but literally two of them produce decent quality. These are Balakovo residents, under the Tadem brand and Dimitrovgrad (in AvtoVAZ branded boxes). As I have already said in many articles, our rubber components (in Russia) are of very poor quality. This applies to cuffs, hoses, hinges, boots, seals. And on top of everything else, our endless geography. In the South it is 40, in the North it is -40. The most complaints about tires and SBL are in the northern regions of our country. The average period without rubber destruction (that is, before cracks appear) is 1-2 years. Of course, our people don’t give up, and roll out the suspension to the point where they can no longer hold the car on the width of the road, but that’s another question.
- The silent blocks on the field were not “drawn from scratch” as expected, but were adapted. That is, the SBL from the “penny” is slightly strengthened and modified. This didn't lead to anything good. The fact is that the rubber hinge moves layer by layer, and the layers do not immediately move by the entire given angle, but relative to each other. I'll try to explain with a everyday example. Everyone imagines a Napoleon cake, made from a pile of cake layers with filling placed between them. Let's turn on our imagination again, and dedicate what we saw to Picasso and Salvador Dali))) Napoleon cake lying not on the table, but wrapped around a large diameter pipe. The thicker our cake, the less movement each layer (crust) will have relative to each other. And if this is a “diet cake” and there are only two or three layers, our structure will fall apart very quickly. This is what happens with our “low-layer” silent blocks.
- Polyurethane is very good, like a modern material. But he has a peculiarity. It works very well for compression, but not very well for high torsion angles, with a small amount of “meat”. That is why SBL made of polyurethane, in this design, DO NOT GO FOR LONG TIME AT ALL. I won’t list the manufacturers whose products were installed, just take my word for it. The specificity of the loads is such that most often the polyurethane falls off from one of the bushings. And the SBL begins to work not as a hinge, but simply as a bushing. In addition, polyurethane is afraid of heat and in order for it to survive at least somehow, for the right side you have to install all sorts of different thermal screens that protect the exhaust pipe from heat. Rubber SBLs do not need this.
Press diagram
Drawing of a homemade silent block press
Before purchasing a hydraulic jack itself to make a press for pressing in various silent blocks or bearings, select a suitable device design.
There are two great options for a hydraulic press:
- The hydraulic jack is mounted on the base of the working bed of the press and presses upward;
- The jack is installed on top of the bed. The device creates pressure, but in this case downward.
Most home craftsmen prefer the first version of the press. The second type of scheme is relevant for some plumbing work.
Please be aware that some hydraulic jacks are sometimes not designed to be installed upside down. Therefore, before choosing, make sure of this.
Press design features
The hydraulic press has several important design features that are taken into account during the creation of the drawing and directly during assembly of the device.
- Press stand. It is a frame inside which a hydraulic jack will apply pressure to the parts. Therefore, increased strength requirements are imposed on the frame. The frame must have a margin of safety so that the jack rod can effectively put pressure on the part, but not deform the frame. The bed additionally serves to create stability for your structure. It is better that the bed has the shape of a platform.
- The height of the hydraulic machine directly depends on the size of the hydraulic jack used, the required parameter of the free stroke of the rod and the height of the silent blocks. Don't forget to take into account the thickness of the table. According to the first diagram mentioned above, the force of the jack rod is transmitted to the part through a work table with a movable structure. It installs on top of the hydraulic jack on the bed. It moves up and down. The work surface is supported by guides installed on the sides.
- On both sides of the press hydraulic jack there are tension springs of sufficient power. One eye clings to the base of the frame, and the other to the movable work table. The function of the springs is to compress the jack to its initial position when the rod is not extended.
- If we consider the second diagram of the press, then the stop of the silent blocks being processed is the base of the frame. The jack is fixed on the working movable table of the machine, which is suspended on the frame using tension springs.
- In the two proposed press designs, a socket is made under the rod head. It needs to be made at the interface nodes. In the case of the first scheme, from below the table, and in the second scheme, from above the frame. For these purposes, you can use a section of a metal pipe. The main thing is that the element has the required diameter.
How to change the upper silent blocks of a lever on a Niva
The silent blocks of the front suspension of a VAZ 2121 or Chevrolet Niva are able to withstand any abuse over a period of 80-100 thousand kilometers. If the operation is mainly asphalt, even more. Today we will replace the silent blocks of the upper arm on the Niva (2121, 21214, 21213, 2123) and choose the best one in terms of quality.
The service life of the upper silent blocks of the front suspension on the Niva is quite high. However, signs of wear may appear already after a mileage of 70-80 thousand km, or even earlier if the car is operated on a dirt road. The first sign of a worn silent block is a creaking and knocking sound when driving over uneven surfaces.
In the most advanced cases, a worn silent block will affect the car's handling and ability to keep a straight line; increased uneven tire wear and yaw along the road in a straight line are possible. The easiest way to determine the condition of the silent block is visually - there should be no cracks or chips on the surface of the rubber, and there should be no delamination or play.
Purpose of silent blocks and their technical characteristics
Nissan Qashqai2 Front-wheel drive, manual Logbook Replacing subframe silent blocks.
Continued Most car owners know that there are parts such as silent blocks in their cars, but they don’t know why they are needed. Silent blocks are vibration-isolating spare parts that are often used in virtually every car, especially in suspension components. What is a vibration isolator consists of two iron plates and their rubber, otherwise called an elastomer.
Good vibration isolation parameters can be achieved through the use of vulcanized processing of parts during production. You can get a vibration isolator where the friction between the metal and the elastomer is reduced to a minimum. This structure perfectly dampens external vibration that occurs during driving.
Silent blocks completely dampen circular, torsional and axial vibrations, which is of fundamental importance when operating jeeps like Niva. By connecting suspension units, such a vibration isolator extends the service life of parts for a long time. Therefore, it is important to monitor their condition and change it when it’s time. Otherwise, instead of a “penny” repair, it’s natural to spend money on buying new levers, for example.
KEY-DOP
Silent blocks are created from a wide range of materials; as annoying as it may sound, the most resistant ones are rubber. Therefore, it is better to install them specifically. As for the service life of such a vibration isolator, on paper it is about 100 thousand kilometers, but in practice this figure decreases quite significantly. The consequence of this is the poor quality of roads in our country and in the CIS countries. A good period between checks of silent blocks is 20-25 thousand kilometers, and replacement - 50-80 thousand kilometers (what is the duration of the project, how is your Niva
).
Silent blocks and bushings Lada Niva 4x4
Polyurethane kit for the rear suspension of Lada 4x4, Chevrolet Niva
Polyurethane kit for front suspension Lada Niva 4x4
SEVI Extreme thrust bushings for VAZ 2101-2107, Lada Niva 4x4, Chevrolet Niva
Rear shock absorber bushings (donuts) for VAZ 2101-2115, Lada Priora, Kalina, Niva 4x4, Chevrolet Niva
Upper arm silent blocks Lada 4x4, Chevrolet Niva
Set of silent blocks and bushings red polyurethane cs20 drive for Lada Niva 2121
Set of silent blocks and bushings red polyurethane cs20 drive for Lada Niva 21214, Chevrolet Niva
Central stabilizer bar bushings for Lada Niva 4x4
Sevi expert transverse stabilizer cushions for Lada Niva 4x4
Rear shock absorber cushions cs20 comfort for VAZ 2101-2115, Lada Kalina, Priora, Granta, Niva 2121, Chevrolet Niva
Fox shock absorber upper cushions for VAZ 2101-2115, Lada Kalina, Kalina 2, Priora, Granta, Niva 2121, Chevrolet Niva, Datsun
Silent blocks of the lower and upper lever SEVI Extreme for Lada Niva 4x4
SEVI Expert front suspension arm silent blocks for Lada Niva 4x4
Stabilizer bar end bushings for Lada Niva 4x4
Silent blocks of the lower arm Lada Niva 2121, 21213, Chevrolet Niva before restyling
Set of reaction rod bushings yellow polyurethane cs20 comfort for VAZ 2101-2107, Lada Niva 2121, Chevrolet Niva
Hinges and cushions of the front shock absorber sevi extreme for VAZ 2101-2107, Lada Niva 4x4, Chevrolet Niva
Front suspension arm joints sevi expert for Lada Niva 4x4, Chevrolet Niva
Silent blocks of the lower arms of the SEVI Expert front suspension for Lada 4x4, Chevrolet Niva
Front shock absorber silent block for VAZ 2101-2107, Lada Niva 4x4
Small thrust bushings for VAZ 2101-2107, Lada 4x4, Chevrolet Niva
Central stabilizer bar bushings ss20 for Lada Niva 4x4
Lower arm silent block ss20 yellow for Lada Niva 4x4 (4 pcs)
Shock absorber mounting pads sevi expert for VAZ 2101-2115, Lada Kalina, Kalina 2, Priora, Granta, Niva 4x4, Chevrolet Niva
Large torque bushings for VAZ 2101-2107, Lada 4x4, Chevrolet Niva
Front suspension arm joints 4 4 “BZAK” for Lada 4x4 (Niva)
Rear shock absorber bushings yellow polyurethane cs20 comfort for VAZ 2101-2107, Lada Niva 2121, Chevrolet Niva
Transverse stabilizer cushions red polyurethane cs20 drive for Lada Niva 2121
Silent blocks of the lower arm Lada Niva 21214, Urban, Chevrolet Niva after restyling
Rear shock absorber bushings red polyurethane cs20 drive for VAZ 2101-2107, Lada Niva 2121, Chevrolet Niva
Silent blocks of front suspension arms yellow polyurethane cs20 comfort for Lada Niva 2121
Rear shock absorber bushing kit Forward Auto parts for VAZ 2101-2107, Lada Niva 4x4
Front stabilizer bar cushion, central BRT for Lada Niva 4x4
Sealing ring for the rear suspension shock absorber reservoir on VAZ 2108-21099, 2110-2112, 2113-2115, Lada Niva 4x4
Set of reaction rod bushings red polyurethane cs20 comfort for VAZ 2101-2107, Lada Niva 2121, Chevrolet Niva
Set of sevi expert jet rod bushings for VAZ 2101-2107, Lada Niva 4x4
Front shock absorber silent block ss20 for VAZ 2101-2107, Lada Niva 2121, Chevrolet Niva
Silent blocks of suspension arms Lada-Image for Lada Niva 4x4
Hinge of the lower arm of the front suspension for Lada Niva 4x4 3D. Urban
Front stabilizer bar cushion (side) for Lada Niva 4x4
Repair kit for lower front suspension arm hinge for Lada Niva 21214, 2131
Transverse stabilizer cushions yellow polyurethane cs20 comfort for Lada Niva 2121
Sevi extreme crossbar joint for VAZ 2101-2107, Lada Niva 4x4, Chevrolet Niva
Hinges of the lower arm of the front suspension sevi expert for Lada Niva 4x4, Chevrolet Niva
Lower longitudinal bar joint BRT for Lada Niva 4x4 Urban
BRT crossbar joint for Lada Niva 4x4 Urban
Silent blocks of the lower arm Balakovo for Lada Niva 4x4
Read news about the new Niva
- The modernized Lada Niva Legend (4x4) 2021 was shown on the Internet
- Lada 4×4 Bronto - sales stopped, new details » Lada.Online - all the most interesting and useful about LADA cars
- Description of the instrument panel Lada 4×4 (VAZ 2121, 2131) » Lada.Online - all the most interesting and useful about LADA cars
- Chevrolet Niva gasoline consumption per 100 km
- Buy LADA (VAZ) 2131 (4×4) 2022 in Rostov-on-Don, low price for Lada 2131 (4×4) 2022 on the Avto.ru website
- Fuses Niva 21214 injector «
- The new large Lada 4×4 Niva “Bigster” 2021-2022 based on the Dacia Bigster was shown for the first time. The SUV has changed beyond recognition
- New Niva Chevrolet Lux 2022 - review of GLC equipment
Replacing silent blocks of levers - Arkhangelsk club of owners and lovers of the Chevrolet Niva car
Niva - replacing the silent blocks of the upper arm
If the Niva or Shniva is used as a city crossover, the worst test of which is getting out of a snowdrift in the yard, you can safely install polyurethane. But the silent block mainly works to twist; the articulation of the SUV's suspension implies large angles of rotation of the levers.
Up. Chevrolet Niva › Logbook › Replacing the Lower Silent Blocks. My father-in-law taught me. On the first field of the day...
The quality of other manufacturers is poor. In particular, the lower axles of the levers, levers and lower silent blocks were structurally changed.
After some time, the suspension will sit down and then tighten it a little more. To prevent you from falling for a Chinese counterfeit, we publish here a link to the official website of Autoscanner. Pressing out the old silent blocks of the front levers of the Niva Chevrolet The Niva Chevrolet car is installed on an inspection pit for ease of work.
Lada 4×4 3D › Logbook › Replacement of silent blocks of front arms 21214m. Replacement of drives.
The issue of replacing the silent blocks of the front levers has been brewing for a long time, the camber of the wheels is very positive and can no longer be adjusted with washers...
The rubber bands on the upper arms are silent blocks on the lower arms of the Classic.
But the lower ones are already 21214.
The classic rubber bands have worn out a lot, but they have also lasted more than 100 thousand.
Neither brute force nor pullers helped remove the lever bushings; we had to burn them out.
Installing the upper axle is a little more difficult than the lower one; the most difficult thing is to buy washers of the required diameter the first time.
At least one inner washer must have a smaller diameter than the outer diameter of the silent block bushing. Unfortunately, most auto shops don’t know about this, and where they do, they don’t have them.
The bushings were partially driven in and partially retracted using a special device. There is nothing complicated about this.
There were no problems with the lower arms either, everything was unscrewed, removed and sorted out.
But again I couldn’t buy washers.
In PZh they offered me 4 locksmith washers with an internal diameter of m18 - m20 with a sticker 21214. This looks doubtful. As it turned out later, the factory installed exactly the same ones, no secret technologies!
Yes, washers from 21 and 213 will not fit there, the axle itself has a different format, looks like a bolt and has a thread diameter of M18 and the nut is installed there from the Oka hub.
Source