Basic functions and capabilities of the head unit
- Playing music files, radio;
- the ability to connect third-party accessories to play songs via AUX, SD card, other file drives, USB;
- displaying the current time and date on the display, both in active and inactive states;
- Hands Free option allows you to talk on the phone without being distracted from the controls;
- ability to connect third-party gadgets, functional equipment: rear view camera, tablet, navigation system.
Budget versions of MMC do not have a display, so interested car enthusiasts additionally purchase accessories for listening to music. The MMC is located in the center of the torpedo, harmoniously integrated into the overall design.
What can a tuner do?
The radio receiver has several operating modes:
- Radio mode. Tuning radio stations can be done both manually and automatically.
- Audio mode. With this setup, you can listen to music tracks from an SD memory card, a regular flash drive, or take music from a mobile device via Bluetooth wireless connection.
- Listening to music from an external source. In this case, the “AUX” socket comes into play, through which the signal source is connected. You can connect the output from a phone, tablet computer or flash player. Music through the Aux jack does not lose sound quality, unlike Bluetooth.
- Speakerphone. This mode uses Bluetooth wireless communication, which is convenient because there is no need to connect wires.
Setting the sound equalizer and other audio parameters on Vesta is done by pressing button No. 7 while in the main menu:
- Changing the settings of the Vesta head unit occurs by rotating knob No. 7: equalizer, low frequencies, high frequencies, balance, front and rear speakers, adjusting the tone and exiting the settings.
- Equalizer of factory settings: jazz, pop, classical, vocals, individual settings.
Settings for the standard radio system on Vesta are carried out by pressing handle No. 7, provided you are in the main menu:
- Clock mode – time format.
- Setting minutes and hours.
- Time adjustment via a special channel.
- Switching to another radio frequency.
- Search for stations by program type.
- Turn on regional stations.
- Medium wave range.
- Phone connection.
- Turns the beep sound on or off when pressing buttons.
- Noise reduction function - for listening to the radio.
- Reset.
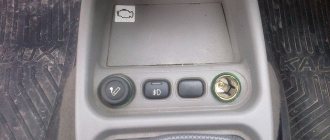
OEM radio controls
In the left corner there is a function key for activating/deactivating the radio. To the right there is a built-in microphone for conversations via Hands Free, and there is also a reset button to factory settings.
To the right is a monochrome display that displays basic information about tracks and radio frequencies.
Below is a slot for a storage card. It is mainly used for inserting a card and flashing the module, but if necessary, it can be used to read music tracks.
Below the perimeter there are preset buttons:
- MUTE – mute sound;
- Key to accept and reject calls (red and green);
- SCAN - multifunctional key for surfing the navigation menu;
- RADIO and AUDIO for switching playback modes from storage media;
- In the center of the structure there is a washer - a regulator for selecting functions, listing, changing the volume;
- At the very bottom there is a block with mechanical keys (6 in total) for quickly jumping to saved radio stations.
Related link:
Adjusting the windshield washer nozzles of Lada Vesta.
Vesta's standard MMS
All versions of Vesta, with the exception of the basic one, have MMS installed. The minimum configuration of the car is equipped only with an audio system. The main functions of the MMC are playing audio files from removable media, receiving radio signals, navigation, parking assistance with video playback from the rear view camera.
- processor CSR S3681 B036BK K609B CPU SiRFatlas VI 800mhz Cortex A9;
- RAM Micron D9PSK 2X 256MB DDR3-1600 Clock Rate 800 MHz MT41K128M16JT-125 IT:K;
- internal memory 2 GB Micron NQ283 NAND FLASH 2gb MT29F2G08ABAEAH4-IT;
- internal memory 8 GB SDMMC 8GB SAMSUNG KLM8G1WEMB-B031;
- bluetooth CSR 8311 Bluetooth v4.1 BlueCore CSR8311 QFN Automotive;
- WI FI CSR 6030 Wi-Fi IEEE 802.11b/g and n;
- digital video decoder AKM8859 DIGITAL VIDEO DECODER PAL/SECAM/NTNC AK8859VN;
- audio AK7757VQ Audio DSP with 24bit 3ch ADC + 4ch DAC + MIC Amp;
- power controller MPS MP4570 Automotive Power Systems;
- TPS65150 Low Input Voltage, Compact LCD Bias IC With VCOM Buffer;
- TJA1042 high-speed CAN transceiver;
- CAN and K-Line controller Freescale S9S12G96F0CLF;
- controller Fujitsu 32-bit ARMTM CortexTM-M3 based Microcontroller.
The following elements are used to manage and play files:
- seven-inch touch screen;
- “Mode” key – select modes;
- “MUTE” – mutes all sounds;
- Volume control – pressing once turns the device on or off;
- microphone for the ability to talk on the phone without hands - Handsfree;
- “Reset” – button to reboot the device;
- slot for reading a removable SD card;
- connector for reading information from removable USB media and connecting various gadgets;
- AUX connector for connecting headphones or external audio devices.
Additional control
In addition to the buttons near the touch screen, MMS functions on the Lada Vesta are controlled using duplicate buttons located on the steering wheel:
- volume control;
- selection of file and radio playback modes;
- turning off all sounds;
- button for navigating through folders and tracks on removable media; in another mode, the buttons are responsible for accepting/ending an incoming call.
Photo 2 (Additional controls on the steering wheel)
Such equipment first appeared on AvtoVAZ cars. Previously, a standard audio system and MMC without duplication on the steering wheel were offered. Thanks to this, Vesta can compete with budget foreign cars of the same class in approximately the same price segment.
Key Features
The system combines several different devices that should be in every modern car. The main one is the audio system, consisting of a 7-inch touch screen. Its peculiarity is its resistive base and the need to press with a stylus or other similar object. The input method is not the most progressive, but in weather conditions with sudden temperature changes, the resistive screen works without failure. The sound is reproduced through six speakers to create surround sound.
The system recognizes most SD and USB drives, but with a limitation - the media should not contain more than 1024 files and 256 folders. The flash drive must be formatted to FAT 16 or 32 with a maximum number of partitions - 4. Cards supported by MMC Lada Vesta:
- SDHC no more than 32 gigabytes;
- SD no more than 4 gigabytes;
- USB 2.0 and 3.0 no more than 64 GB.
The user is warned by the instructions that the download speed depends on the number of files on the drive. The optimal solution would be a medium that contains only audio and video files.
Files supported by MMC:
- WMA audio codec, bitrate no more than 128 kbps, sampling 44100 Hz;
- video codec WMV3 with a frame rate of 25, bitrate 750 kbps.
Before use, it is recommended to convert all files to the required parameters. For these purposes, the manufacturer recommends the free Freemake Video Converter program. When playing back, keep in mind that the files will be played in the order they were recorded.
Lada Vesta head unit: price, articles
It often happens that the standard radio tape recorder breaks down and is unstable. When choosing and buying a new one, the owner has difficulty, since he does not know the catalog article.
| Name / catalog article | Price in rubles |
| Original MMS from LADA8450007949 | 33000 |
| Original MMS from ITELMA8450007949 | 14000 |
| Chinese models (AD-UNI707) | From 13000 |
| *prices are as of 04/04/2019 | |
Both modifications of the radio presented are absolutely identical, the difference in price is due to the manufacturer and trade markup.
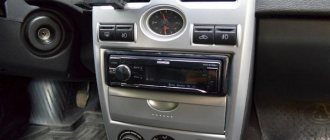
Replacing the original radio
Many car enthusiasts “for various reasons. Purchasing and installing a new one is not difficult, the main thing is to choose the brand and manufacturer of the gadget.
There are many brands on sale, including Chinese ones. Choice from the cheapest to the most expensive, depending on the budget of the car owner:
- Multimedia center DVM 2117 iQ with Navitel software, price 32 – 34 thousand rubles;
- Chinese version of MMC for Lada Vesta (AD-UNI707) priced from 13,000 rubles.
There is already an article on the website about how to install an MMC radio on a Lada Vesta; in short, it looks like this:
- Remove the plastic frame.
- Remove four screws.
- Remove the standard MMC.
- Connect the blocks with wires.
- Fix the new radio (type 2-DIMM).
Installation of an audio system in the rear doors
Installation of speakers in the rear doors of Lada Vesta is carried out according to a similar algorithm. The hole for the speaker is the same size as in the front doors.
When installing the casing, the algorithm is as follows:
- Remove the window regulator handle if it has a mechanical drive.
- Remove the door handle trim to gain access to the two screws.
- Unscrew the screws, unclip the rivets and remove the door card.
First of all, it is necessary to remove all the insulating material from the seats where the speakers will be located. When replacing standard speakers, it is necessary to disconnect the ground, remove the trim and baffles. Carefully pull the speaker system towards you and disconnect all wires.
When installing speakers measuring 16 cm or smaller, wood spacers are sufficient and there is no need to cut metal.
Mandatory for those who have Vesta under warranty
Important ! When installing, please note that the plug is not standard, but from Renault Nissan. In order not to lose the possibility of warranty service, you must purchase an adapter type CT55-17 or ZRS-AG-22.. Assembly of all equipment after installation is carried out in the reverse order
The casing is securely fixed and the process is considered complete.
Reassembly of all equipment after installation is carried out in the reverse order. The casing is securely fixed and the process is considered complete.
For the Lada Vesta car, not all trim levels have standard acoustics. But audio training is everywhere . Therefore, it is easy to install speakers with your own hands on both the front and rear doors at the owner’s request.
To ensure high-quality sound, you should not forget about the spacer and make sure that the speaker fits comfortably into the depth of the door, where there is a seat for it. It is better to select a size no larger than 16 cm in diameter, then there will be no problems during installation.
Connecting an audio device MMC Lada Vesta
If you plan to connect a factory radio, then you should not have any problems or difficulties.
Related link:
Replacing the clutch on a Lada Vesta with manual transmission and AMT.
Key points that require attention and double-checking:
- ISO 1: Power cables.
- ISO 2: wiring for two (four) speakers, connecting a subwoofer to the MMC.
- USB 3: output to digital storage devices.
- "Antenna 4": to connect an antenna.
The radio does not work on the Lada Vesta
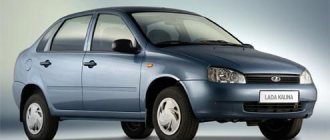
The flagship of the domestic automobile industry, the Lada Vesta, is in no way inferior to foreign cars in its class in appearance and internal equipment. But this is only in appearance, and during operation, many owners encounter certain minor problems. One of them is a non-working car radio. This will be discussed in this article.
GPS navigation connection diagram
There is no need to additionally purchase a GPS antenna for the Lada Vesta, since it is already included in the standard package by default (cat. article 8450008475).
This decision on the globalization of satellite communications was made by the Government of the Russian Federation in 2014. On the Lada Vesta “Lux” modification, data is supplied to the MMC via the CAN bus. After installing the radio, you need to connect the cable to the mini-ISO connector according to the diagram (to C17 - CANL, to C20 - CANH). Now the standard CityGID program finds satellites.
General provisions
Installing music is not a complicated process, but it is responsible. Before directly installing audio components in the Lada Vesta interior, you will need to understand what composition of elements constitutes audio preparation. Therefore, a logical question arises: what is included in audio training?
The “Classic” modification has all the required minimum , allowing you to seamlessly connect both the head unit and dynamic heads. We are talking about the presence of cable lines, with the help of which the designated components of the audio system are switched.
Note that the corners of the doors near the exterior mirrors in this version of the equipment do not have wiring for connecting tweeters.
Installing music involves removing the plastic plug. After removing it, we find connectors according to ISO and FAKRA standards. They allow you to connect the antenna unit. We also see the presence of “USB” and “AUX” connectors.
You can install a 1DIN format radio in the seat. The installation process itself is not capable of causing any difficulties for the owner. It involves the need to connect wires. Please note that in order to successfully install a radio that fits the “2DIN” format, you will need to perform a number of serious modifications to the panel.
Installation of loudspeakers in Lada Vesta is endowed with certain nuances.
Connecting a rear view camera
Lada Vesta MMC diagram:
To activate the camera, we use the standard connectors (green connector). Mini-ISO MMC:
- C7 – nutrition;
- C8—CAM─;
- C9 - CAM+.
If you followed the step-by-step instructions, the image from the camera will be displayed on the display.
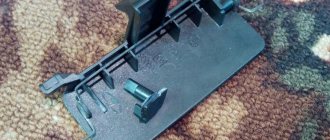
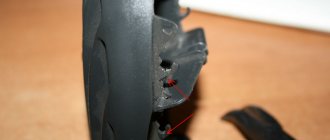
Dismantling
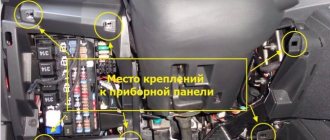
It's better to start with the side deflectors. On the driver's side, you first need to remove the plastic cover behind which is the fuse box. To do this, you first need to pull out the plastic clips and then remove the cover itself.
Next you need to move the fuse box to the side. It is secured with three screws, but unscrewing them right away is not very convenient. Before doing this, it is advisable to unscrew the screw with which the dashboard itself is screwed to the amplifier, and also unclip the wall (side) of the dashboard. This will make it much easier to access the three fuse block bolts.
Then you need to unscrew the 2 screws that actually secure the deflector. According to reviews from Vesta owners, it is very inconvenient to unscrew them and it is unlikely that you will be able to do this without a screwdriver with a universal joint.
As for the right deflector, it is removed using the same procedure. The only difference is that the glove box on the passenger side still needs to be removed.
After the bolts on both deflectors are unscrewed, all that remains is to remove them. The algorithm, again, is not the most convenient. The deflector itself must be simultaneously pressed a little inward and snapped off from the pipes, and then removed through the seats in the dashboard.
Regarding other components in the dashboard, in particular, elements near the radio, the easiest way to pry them off is with a thin knife wrapped in cloth or electrical tape. But you should work extremely carefully so as not to break the plastic clips.
The components in the door panels are removed in the same way. Of course, to be extra sure that nothing will break, it is recommended to remove the door cards and remove the inserts from them. However, this is quite labor-intensive and time-consuming, so most people prefer to do without such disassembly of the doors.
This completes the process of removing the air deflectors and other interior plastic of the Lada Vesta.
MMC malfunctions and methods for their elimination
Obviously, the standard radio is one of the first developments of the AvtoVAZ concern; there are defects and shortcomings. For example, the display does not load the “LADA” logo:
- We remove the digital storage medium from the connector.
- Disconnect the power terminal from the battery for 10 seconds.
- On the laptop, format the SD card in FAT 32 format, create an empty file “explorer.txt” in the root directory.
- We connect the battery terminals and restart the audio system.
If this method does not help, then problems with the software code of the electronic control unit are obvious. You need to reflash your digital gadget.
Related link:
Vesta SW – is it worth paying extra for the Cross console?
The second, no less common malfunction is “cannot find satellites.”
The solution to the problem is quite simple:
- Remove the power terminals from the battery.
- Reset the device to factory settings.
- We restart the gadget again.
Note to the driver!
To reset to factory settings, you must hold the “Power” button for 15 seconds.
↑ Radio with touch screen
The old radio, if desired, can always be replaced with a new, more modern model. The instructions state that this multimedia from Lada Vesta is equipped with a special touch screen that is not afraid of temperature changes and responds to the slightest touch.
In addition, a special multimedia Lada Vesta is installed on the steering wheel, which allows you to control the radio without being distracted from the road. Using special keys on the steering wheel, you can answer a call, end a call, turn up the music or, conversely, make it quieter. Moreover, you can press the keys even with gloves on!
What other functions are typical for this system? This:
- a radio system that allows you to memorize several radio stations at once;
- the ability to listen to audio, and this can be either using USB flash drives or playing from a phone, or from an external HDD via a USB channel;
- The multimedia also has a phone mode that allows you to talk hands-free via Bluetooth;
- you can install a navigation application on the radio and use it for Russian roads;
- If you connect a flash drive or SD card, you can not only listen to audio, but also watch videos with small pictures.
As you can see, the functionality of such a system is enormous, and, compared to a standard radio receiver, this device is many times more convenient.
The radio manufacturer warns that the more different folders and files there are on the media, the longer the files will take to load. In this case, it is recommended to use external media that contains only video files, pictures and audio files.
The manufacturer categorically does not recommend placing *.bin resolution files on the media. Such files can lead to loss of functionality and damage to the firmware.
At the same time, the audio player window is intuitive. All files are played on six speakers, and the sound is at a truly decent level. You can make adjustments using the equalizer.
The driver can also listen to music via his phone via Bluetooth. But, unfortunately, information about the melody being played is not displayed on the multimedia screen.
Reviews
| № | Positive |
| 1. | Sergey Ivanovich , 44 years old (otzovik.com): I use the standard radio, the quality is good, the functionality is sufficient. |
| 2. | Fedor Stepanovich , 40 years old (www.zr.ru): my comrades are all agitating me to install a 2-DIMM stereo system. I haven’t decided yet, because the price is steep, but the offer is good. |
| 3. | Vitaly , 22 years old (autobann.su): the quality of the standard MMC is not great, but it will last for several years, and then I’ll buy an imported one. |
| 4. | Daniil , 33 years old (lada-vesta.net): The factory stereo system is not bad, functional, no complaints. |
| 5. | Vitaly Semenovich , 43 years old (otzovik.com): for me, sound quality is not important, so MMS suits me, no comments. |
| 6. | Stepanovich , 44 years old (www.zr.ru): Three years have passed since the purchase of the car, all components are working properly, the condition is as if from the factory. |
| 7. | Vasilyevich , 20 years old (autobann.su): my positive review of domestic transport and assembly. A worthy car, a rival to many European brands. |
| 8. | Tolik , 43 years old (lada-vesta.net): I’m not a music lover, for me the quality and purity of sound are not particularly important. The phone is always on in the car. |
| 9. | Stepan Nikolaevich , 39 years old (otzovik.com): it has been working properly for two years, no special comments. |
| 10. | Konstantin , 43 years old (www.zr.ru): I’m happy with the purchase of the car, the interior is quiet, the acoustics are good. |
| 11. | Anton , 35 years old (autobann.su): after three years of operation, I can’t say anything bad about the MMC. |
| Negative | |
| 12. | Dmitry Viktorovich , 44 years old (www.zr.ru): constant problems with the firmware, glitches periodically. |
| 13. | Sasha , 37 years old (otzovik.com): in six months I’ve already been to a service station twice, with an electrician, changing relays and switches. |
| 14. | Nikolai Vasilyevich , 46 years old (autobann.su): replace the standard radio with an imported one, the sooner the better. |
Related link:
Replacing the low beam lamp on a Lada Vesta.
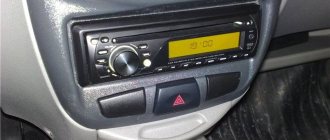
Description of the radio
| № | Control name |
| 1 | Power button |
| 2 | Microphone |
| 3 | Reboot, reset settings |
| 4 | Mute |
| 5 | Connecting a phone for conversation |
| 6 | Screen |
| 7 | Volume knob has multiple functions |
| 8 | Silence the phone ringer |
| 9 | Radio channel search button |
| 10 | Memory card slot |
| 11-21 | Radio wave buttons, with multiple functions |
Lada Vesta music on the standard radio is turned on in different ways:
- Quickly press button No. 1.
- Button No. 7 works in the same way.
Not everyone knows how to turn off the radio, but this is done in simple ways:
- Button No. 1 – short press.
- When you turn off the engine, Vesta's music will turn off automatically.
The radio has a built-in backup power supply; the battery retains music, sound and station settings in the event of a car battery disconnection. Settings are saved for up to 10 days.