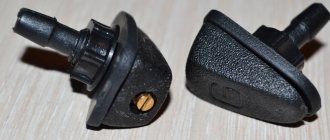
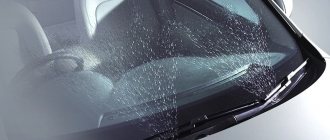
By default, production Lada Vesta models are equipped with jet washer nozzles. These are the most budget modifications. The small irrigation area is one of the main disadvantages.
Many car enthusiasts practice installing fan-type washer nozzles. Let's look at how to do this with your own hands and what is needed for this using the Lada Vesta as an example.
Algorithm for replacing injectors:
- Squeeze the parking brake.
- We turn off the engine.
- Open the hood.
- We snap off the eight clips.
- We remove the casing and rubber tubes.
- We remove the sprinklers.
- We insert new ones and assemble the structure in reverse order.
Let's warm up
Fan nozzle models are in many ways superior to their jet counterparts, but still have some disadvantages that appear during long-term operation. The most unpleasant problem for most car enthusiasts is the mechanism’s ability to freeze at low temperatures.
You can avoid unnecessary expenses in another simple way. On the inside of the hood, where the injectors are installed, you need to cut out the insulation - a circle with a diameter of 20 cm. This will help warm the jets with the flow from the running engine. The method showed itself perfectly even in severe frosts. The main advantage of this modification is its simplicity and low cost.
System design - advice from the experts
By default, production Lada Vesta models are equipped with jet washer nozzles. These are the most budget modifications. The small irrigation area is one of the main disadvantages.
Many car enthusiasts practice installing fan-type washer nozzles. Let's look at how to do this with your own hands and what is needed for this using the Lada Vesta as an example.
Algorithm for replacing injectors:
- Squeeze the parking brake.
- We turn off the engine.
- Open the hood.
- We snap off the eight clips.
- We remove the casing and rubber tubes.
- We remove the sprinklers.
- We insert new ones and assemble the structure in reverse order.
Replacing injectors
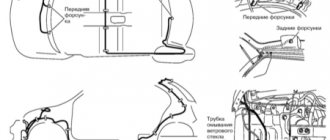
How to set up washer nozzles on Vesta:
- You need to lift the hood, then remove the insulation (lining on the inside) and the frill. The insulation is attached to special clips, the design of which allows for ease of dismantling and installation.
- Under the hood, find rubber tubes connected to the washer reservoir on one side and to the injectors on the other. Remove the old jets and put new ones in their place.
Any car enthusiast can handle replacing washer parts.
Installing fan nozzles will significantly improve the quality of windshield wiper cleaning. In addition, many drivers note that fan jets, in comparison with jet models, consume fluid more economically.
Review of Manufacturer Prices
| Name / catalog items | Price in rubles |
| Jet nozzles (30655605) | From 100 |
| New type sprayers (fan) 289308338R | From 120 – 150 |
| Renault Logan 7700846456, 289321198R | From 150 – 200 |
| Chevrolet Niva 00001-75046760 | From 170 |
| Ssang Yong 7845009010 | From 180 - 200 |
| Tank 8450008574 | From 1100 |
| Pump 8450008573 | From 300 |
| Pipe from pump 8450007341 | From 150 |
| Hex bolt 7703602209 | From 50 |
| Fastening clip 7703079631 | From 50 |
| Wire seal 21010372411800 | From 40 |
| Tube seal 11180520812400 | From 50 |
| *prices are indicated as of 04/06/2021 | |
Which injectors are best installed on the Vesta?
If you are not satisfied with the performance of standard spare parts, they can be replaced with analogues from other manufacturers. Instead of standard jet injectors, fan-type injectors (1.6 2022 and other models) or equipment for other cars are often installed on Vesta.
Most owners of Lada Vesta, Lada Cross and Grant prefer to install jets from Volvo (cost about 250 rubles), from the Korean manufacturer Sang Yong (number 7845009010 at a price of 120 rubles) or Toyota (catalog number 85381-AA042b).
Reviews
| № | Positive |
| 1. | Valery , 43 years old (www.otzovik.com): The sprinklers are working fine for the second year, no comments. |
| 2. | Kirill , 39 years old (www.zr.ru): after the purchase, he replaced the standard nozzles with new fan-type ones. The water supply is under pressure and washes all the glass. |
| 3. | Vitaly , 23 years old (www.autobann.su): comrades advised us to additionally install a return valve. Now you don’t have to wait long for the pump to pump fluid from the washer reservoir. |
| 4. | Georgy , 33 years old (www.lada-vesta.net): the car is in its third year, there were no major breakdowns, and minor ones were fixed on my own. |
| 5. | Vladlen , 41 years old (www.otzovik.com): sprayers work perfectly, even in winter on “anti-freeze”. |
| 6. | Dmitry , 43 years old (www.zr.ru): I can’t say anything bad, the car is good, there were no special problems with it. |
| 7. | Vitalievich , 25 years old (www.autobann.su): several times in two years I cleaned the jets myself, there were no more breakdowns. |
| 8. | Zheka , 33 years old (www.lada-vesta.net): after winter, the direction of the fluid jet from the injectors is consistently lost. It’s clear why this is happening. I quickly corrected it with a paper clip and moved on. |
| 9. | Konstantin Vladislavovich , 49 years old (www.otzovik.com): a good domestic car, no special comments. I comply with maintenance deadlines and buy original spare parts. |
| 10. | Leonidovich , 33 years old (www.zr.ru): comrades advised replacing the standard nozzles with new, fan-type ones. Initially I doubted the quality, but now I am 100% satisfied. |
| 11. | Vasily , 36 years old (www.autobann.su): I spend a lot of time driving, often use wipers and windshield washer. There are no comments or complaints. Additionally, I installed protection for the windshield washer nozzles. |
| Negative | |
| 12. | Ivan , 42 years old (www.zr.ru): the motor is weak, you need to wait a long time for the liquid to be pumped into the system. |
| 13. | Vitaly , 38 years old (www.otzovik.com): there is a constant outflow of water, you are waiting for the show to pump up the engine. In the second generation Renault Logan, the mechanism is implemented much better and more perfectly. |
| 14. | Ivan Vasilyevich , 47 years old (www.autobann.su): in two years of operation of the machine, I replaced the motor, rubber hoses, and one sprayer. The workmanship is very low. |
Related link:
Rear mudguards on Lada Vesta
Which washer nozzles are best to choose?
Instead of standard jets, a large number of fan injectors can be installed on Lada cars, here are some of them (the table is in the process of being filled out, leave feedback in the comments):
In addition to new injectors, it is recommended to perform one more modification - install a check valve.
It is worth noting that not only the quality of windshield washing, but also fluid consumption depends on the type of jets. Spraying too much will not allow you to spray the entire area of the glass at high speed (small splashes from the wind will only fall on the lower part of the windshield), and too much spray will quickly empty the washer reservoir. What washer nozzles do you recommend?
Where to buy: in our online store (category Windshield wipers).
Let us remind you that other modifications of Lada cars can be found in the corresponding categories (Priora, Granta, Kalina, Largus, Niva 4x4, Vesta or XRAY).
Keywords: Lada Vesta windshield wipers | windshield wipers for Lada Priora | windshield wipers Lada Kalina | windshield wipers Lada Largus | Lada Xray windshield wipers | 4x4 windshield wipers | windshield wipers for Lada Granta | Lada Largus glass | Lada Priora glass | Lada Vesta glass | Lada Kalina glass | Lada Granta glass | glass 4x4 | lada xray glass | Niva windshield wipers | Niva glass | universal article
How to remove the washer reservoir on a Lada Vesta
Required materials and tools:
- ratchet;
- set of heads;
- Torx T20;
- flat head screwdriver;
- knife or plastic spatula;
- new Lada Vesta washer pump as needed.
Step-by-step instruction:
- We provide priority safety measures: we secure the rear row of wheels with wheel chocks.
- We turn off the engine and open the hood.
Related link:
Thresholds on Lada Vesta
- Unscrew the washer reservoir cap.
- Remove the windshield blades one by one (key 14).
- Along the perimeter of the plastic frill, unscrew the screws and fasteners, and remove the frill, under which the tank is installed.
- Disconnect the terminals from the pump, unscrew the two retaining screws, and remove the pump.
- On the right side of the engine compartment, remove the washer reservoir from its regular place for maintenance and replacement with a new one.
- We assemble the structure in the reverse order of removing the tank.
The volume of the washer reservoir is 5 liters.
Principle of operation
The windshield wipers clean the windshield from raindrops, dust, midges, and other contaminants using the washer. The efficiency of the device depends on the serviceability and correct adjustment of the jets. For high-quality cleaning, the direction and intensity of spraying are important.
To choose the right washer nozzles for a Vesta or other car, you need to know the type of device:
- The simplest jet mechanism provides liquid supply to the surface to be washed through several channels. If the nozzle becomes clogged or the channel is contaminated, the quality of liquid atomization will be significantly reduced. Certain areas will not be washed, which will worsen the result and negatively affect the comfort and safety of movement.
- The fan model creates a wide front of water spray. This ensures that the glass is quickly coated with small droplets.
The second method is more effective.
Cleaning
If the quality of liquid atomization has deteriorated significantly, and the adjustment does not help correct the situation, most likely the jets need to be cleaned of dirt. You can do this yourself.
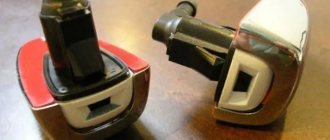
Fan washer nozzles for Vesta. Photo source: https://www.drive2.ru/l/521819973279023330/?m=521889242511573172
There are several ways to clean dirt from sprayers:
- Using a compressor. After removing the jet and washing it in soapy water, connect the nozzles to the compressor. Under strong air pressure, dirt will come out of the mechanism.
- Using a syringe. A less effective, but more affordable method, which also allows you to thoroughly clean the mechanism. Instead of a compressor, use a large-volume syringe filled with clean water. The dirt should come out of the jet along with the water.
- Mechanical method. You can clean the spray nozzles using a needle, pin or thin wire. The effectiveness of the method is low: it is used for significant contamination.
If such methods do not bring the expected result, and the injectors still do not provide the required pressure, it is better to remove the jets and buy new ones.
Common faults
Washer problems can be divided into two types: mechanical and electrical in origin. Among the first type of problems, the most common problems are:
- There is no pressure (the channels are clogged or the liquid level is insufficient).
- When using ordinary water in winter, crystallization and ice formation are possible. You need to start the car and let the engine compartment warm up. It is also advisable to replace the water with antifreeze windshield washer.
- Liquid does not flow to the nozzle. A mechanical break or disconnection of the hose has occurred.
- Poor fluid pressure can also be a result of blockage. The reason is most likely due to the use of unfiltered tap water.
Electrical faults:
- The fuse has failed.
- An open circuit between the washer control lever and the device itself.
- Pump fault.
Lada Vesta. FLUID LEVEL IN THE WINDSHIELD AND REAR WINDOW WASH RESERVOIR
Refilling: open the lid (Fig. 7), pour liquid to the visible level and close the lid. This reservoir provides fluid for the windshield and rear window washers.
There must always be windshield washer fluid in the windshield and rear window washer reservoirs; the fluid must be added through a hole covered with a lid.
Liquid to be filled: at ambient temperatures O C and below, use only non-freezing windshield washer fluid.
Use fluids approved by technical services.
Replacing windshield wiper blades
To replace windshield wiper blades, do the following:
— lift lever 1 (fig. windshield wiper from the windshield;
Rice. 8. Wiper blades
— turn brush 2 on the axis of rotation, positioning it approximately perpendicular to the lever, after first removing the fixation of the brush on the lever (by pressing the protrusion of the adapter between the brush and the lever), remove the brush from the lever.
Install the new brush in the reverse order. ATTENTION!
1. To ensure good visibility through the windshield, it is necessary to keep the wiper blades in perfect condition.
2. To avoid deformation of the brushes, it is necessary to regularly clean the windshield wiper blades with liquid from the washer fluid reservoir. If the glass and blades are heavily soiled, for example, with insect remains (adhered to the glass), road salt, or road surface elements, the outside of the glass and blades should be cleaned with a soft cloth and special detergents. After cleaning, rinse the glass and brushes with clean water.
Adjustment
To understand how the nozzles on the Vesta are adjusted, you need to understand the design of the device. The mechanism is housed in a plastic case. The basis is made up of nozzles through which liquid is supplied and sprayed onto the glass under pressure. The desired direction is given using a regular needle.
The process of setting up the Vesta washer nozzles comes down to the following: carefully place the needle inside the hole, adjust the angle of inclination, changing the direction of the jet. At the same time, it is important not to overdo it, without underestimating or significantly increasing the indicator.
Engine oil burner 1.8 l. Lada Vesta, X-ray (21179). Oil nozzles.
A very useful theory about the causes of oil burn on the Lada Vesta and X-ray 1.8 liter engine (21179).
The widespread occurrence of such a phenomenon as increased oil consumption on a 1.8 liter engine. (21179) has given rise to a huge number of theories about its causes, car owners are trying to deal with the problem, AvtoVAZ helps with modifications and work with spare parts suppliers, but at the moment, oil burn can only be treated by a major overhaul of the engine and the main reason is said to be poor processing of the block and incorrect selection pistons to the cylinder block.
Against the background of these problems, replacing oil nozzles seems like a mere trifle. What is the essence of the theory?
The 21179 engine is equipped with oil nozzles for piston cooling; this is a modern, worldwide trend, and it looks quite logical on a fairly modern domestic engine. During engine operation, the piston is the hottest part of the SG, if heat is removed from the cylinder walls by the coolant, then the piston has no forced cooling, it is impossible to supply coolant; for this purpose, machine oil was adapted to be supplied directly to the piston cavity through nozzles.
At the same time, if 5-10% of the heat was removed by oil mist, then the injectors can remove up to 50% of the heat obtained during combustion of the fuel mixture.
As a result of adding injectors, the piston temperature may decrease by 15-35*C. According to Internet theory, as a result of such a decrease in temperature, the piston does not expand to its design dimensions, and a gap remains between the piston and the cylinder, through which the oil enters the combustion chamber.
It is difficult to say how much such a decrease in temperature will affect the thermal deformation of the piston (when calculating for aluminum, it turns out 22.2 * 10-6 * 82 * 35 = 0.064 mm - which cannot be correct, due to too large values, thermal expansion the piston material is different), most likely it is about 0.01-0.02 mm. Can such an increase in the gap affect the increased consumption? Perhaps it can.
Oil injectors of the 21179 engine can affect oil consumption; how significant this effect will be can only be determined experimentally. Consumption, however, will be influenced by other factors, including the accuracy of manufacturing and selection of parts (if assembly is successful, there is no oil consumption even with existing injectors), the viscosity of the oil being poured (consumption will be lower if it is thick), the fuel used and operating modes. Therefore, the problem should be solved comprehensively and individually for each engine; the most effective way to eliminate oil leakage will still be a major overhaul of the ShPG; the selection of pistons for the cylinders will compensate for all shortcomings in oil distribution and cooling.
Link to video with an alternative oil nozzle for engine 21179:
Engine injector ramp (removal and installation)
For vehicles with engine 11189:
Place the car in the workplace and apply the parking brake.
For vehicles with engine 21129:
Place the car on a two-post lift and brake with the parking brake (electrohydraulic lift type P-3.2G with a lifting capacity of 3.2 tons).
For cars of all trim levels
Fold the rear seat cushion forward. Remove cover 1, Figure 7-2, of the fuel pump hatch.
Disconnect block 3, Figure 7-3, of the rear wiring harness from MEBN 1.
Start the engine and let it run at idle speed until it comes to a complete stop to relieve pressure in the fuel system, ensuring exhaust gases are removed (exhaust coil with fan type SERF/SP from SovPlym). Turn off the ignition.
Disconnect the ground wire terminal from the battery (spanner 10). Remove the intake module in accordance with the requirements of section 7.6 of this technical manual.
Press the spring clips and, moving along the axis of the fitting, disconnect the tip of tube 1, Figure 7-30, of the front fuel pipeline from the injector ramp 2.
Figure 7-30 – Front fuel pipe of engine 21129:
1 – front fuel pipe;
2 – injector ramp;
3 – bracket for fastening the fuel pipeline;
4 – cylinder head
For vehicles with engine 21129 additionally
disconnect bracket 3 and move the front fuel pipe to the side (using a flat-head screwdriver).
Disconnect the connectors of the harness 1, Figure 7-31, of the wires from the fuel injectors 2, cut the two clamps 3 ( for
cars with engine 21129
) fastening and move the harness to the side (technological knife).
Figure 7-31 – Engine injector wiring harness 21129:
1 – injector wiring harness; 2 – fuel injector;
3 – clamp for fastening the injector harness
Unscrew two bolts 1, Figure 7-17, remove ramp 2 with injector assembly (wrench 5 for internal hexagon).
Figure 7-32 – Injector ramp:
1 – injector ramp fastening bolt; 2 – injector ramp
Before installing ramp 2, Figure 7-32, lubricate the injector sealing rings with engine oil (motor oil in accordance with the current “Codifier of main and auxiliary materials used in the maintenance and repair of LADA vehicles” K 3100.25100.00018).
Install ramp 2 with injector assembly onto the engine. Screw in and tighten the bolts 1. The tightening torque of the bolts is 9...14 N.m (0.9...1.4 kgf.m) (wrench 5 for internal hexagon, nozzle for internal hexagon, torque wrench).
Attach the harness blocks 1, Figure 7-31, of the wires to the fuel injectors 2 and secure the harness with two new clamps 3 to the injector ramp ( for vehicles with engine 21129
).
Attach tube 1, Figure 7-30, of the front fuel line to the ramp fitting 2. When installing, attach the tip of the tube to the fitting until
click of the spring clip. After installation, check that the tube is securely fixed.
For vehicles with engine 21129:
Attach bracket 3 securing the fuel pipeline to the injector ramp.
Install the intake module assembly on the cylinder head in accordance with the requirements of section 7.6 of these operating instructions
Connect block 3, Figure 7-3, of the rear wiring harness to MEBN 1. Install cover 1, Figure 7-2, of the fuel pump hatch.
Lower the rear seat cushion.
Connect the earth wire terminal to the battery in accordance with the requirements of TI 3100.25100.20587.
Present the vehicle to the Quality Control Department. The quality control department checks the vehicle for compliance with the requirements of TU 017200-254-00232934 pp. 1.19.10, 1.19.14, 1.19.21.3 in the scope of work performed.
Video on the topic “Lada Vesta. Engine injector ramp (removal and installation)"
removing injectors on a Priora (Lada 2170, VAZ 2112) Vesta was replaced with a 1.8 fuel rail, replaced at the dealer, result How to remove and wash injectors on a sixteen valve VAZ 2110 engine. Cleaning the injector
Vesta 1.6 runs cold + check. Help.
Thank you all very much for the advice, I'll dig in. I will answer everyone in one post.
Car 2022 I haven’t gone deep yet, several different candles, coils here and there. Today is the last attempt, another spark plug, and swapped the coils. But during these days I changed it in different ways, in the morning one horseradish first cylinder. I bought the car two weeks ago, of course I didn’t notice such a jamb, as usual it came out later. I don’t want to go to the officials yet, the warranty has expired. Tomorrow morning I'll try, if the same thing happens again, I'll change the wiring harness, it doesn't help, I'll go deeper.
I don’t understand the fuel system so deeply, but I think so, you can swap the injectors and look at the reaction?
You can change the injectors. But I don’t know about Westies, but on Grants/Kalinas the engine is 21126/21127 (almost like the author’s), in order to pull out the fuel rail you have to remove the intake manifold, or do proctology by removing the air intakes, 1 injector and trying to pull out the ramp. Checking the suction is easier and faster.
Which wiring harness are you going to change and why? If there was a tourniquet, it would hurt when driving on the kidneys when you shake it, but when it’s cold. Yes, and by pulling the tourniquet, when the pain should go away, and when it doesn’t, it should start.
While the cold oak gasket was siphoning, the parts warmed up and pressed harder and flattened them. But it will degrade quickly with cold weather. Soon the traffic lights will be freezing and hot.
If you don’t want to do it yourself, go to a diagnostician (if you have an NSC, don’t go to the officials). Otherwise you will now start capitalizing on the engine.
We wash the fuel injectors: by washing and rolling
Fuel injectors are essentially solenoid valves that, when voltage is applied to them, open the path of fuel into the intake manifold. When there is no power, the shut-off needle lowers under the action of the return spring and closes the channel in the sprayer. Over time, deposits accumulate on the nozzle seat, causing the needle to lose mobility. As a result, the seal of the injectors is broken. A sign of such a malfunction is poor starting of the engine, even when warmed up: the fuel mixture turns out to be over-rich. In addition, contamination of the nozzle holes leads to disruption of the atomization and a decrease in the total amount of fuel supplied. Because of this, when you sharply press the gas, dips appear, the engine loses power, and begins to work unstably.
A radical solution to the problem is to replace the injectors. But there is a cheaper alternative - rinsing. For those who are not afraid to get under the hood, I will tell you how to do it yourself. No fancy tools or special skills are required. It is better to do the work outside or in a well-ventilated area.
We carry out the operation on an editorial Lada Granta car with an eight-valve engine and a mileage of 100,000 km. At this mileage, the injectors of most cars already need “wet cleaning”. You will need an aerosol can with a carburetor cleaner (its price is about 500 rubles). We also have to assemble a simple electrical circuit from a battery, a button from a household bell, and wires with female lugs 2.8 mm wide.
HOW ELSE CLEAN INJECTORS
- Flushing with a composition poured into the fuel tank
The cost of the drug is from 250 rubles
The instructions for the preparations promise that after washing, not only the injectors and the fuel system will become clean - soot will be removed from the valves and surfaces of the combustion chamber. There is only one question: where will he go? Obviously, into the exhaust system. And there the designers placed a catalytic converter and oxygen sensors. Soot particles and liquid combustion products will fall on the delicate ceramic honeycomb. And then - depending on your luck. Pieces of carbon deposits stuck to the surface of ceramic honeycombs are hotspots - the honeycombs can melt. The combustion products of a mixture of gasoline and liquid greatly increase the temperature of the exhaust gases, which is also dangerous for the catalytic converter.
- Flushing the fuel rail and injectors using a special unit at a service station
The cost of the service is from 2500 rubles
The equipment supplies solvents to the input of the fuel rail, which remove tar deposits from the injectors and dirt from the surfaces of the valves and combustion chamber. The concentration of cleaning components is much higher than when pouring the cleaner into the fuel tank. Consequently, the amount of substances entering the exhaust gas catalytic converter is also significantly greater. The consequences of this are described above.
- Cleaning injectors with ultrasound
The cost of the service is from 4000 rubles
The nozzles in the bath with the cleaning solution are exposed to ultrasound, which frees the surfaces from contamination. But first the injectors need to be removed. You can do this yourself or entrust all the work to the masters. The disadvantage of this method is the likelihood of complete failure of the nozzle.