04.03.2022 8 356 VAZ 2112
Author: Ivan Baranov
In order for the car to operate smoothly, it is necessary to monitor its technical condition. Using an on-board computer, diagnostics of VAZ 2112 and 2111 with an 8 and 16 valve engine can be done by yourself. The article describes diagnostic devices and provides instructions for its implementation.
[Hide]
How can you tell if your car is faulty?
There is a special lamp on the instrument panel with the inscription CHECK ENGINE. When you turn on the ignition, it lights up, and until you start the engine, a special program reads data from all systems and components of the car, thus transmitting data to the on-board computer to identify faults.
After you start the engine, the lamp should go out, but if it stays on for another 10 seconds, it means that some problems have been identified and error codes have been entered into the on-board computer programs. Communication with the controller is carried out using the diagnostic block.
CHECK ENGINE control signal on the instrument panel of a VAZ 2110
Diagnostics (reading errors) of VAZ-2112 using a standard instrument panel (VAZ 2110, 2111, 2112)
In our case, this is version 1. 1. When you press the button to reset the daily mileage, an error code will appear. To reset this error, you need to press and hold the button that resets the daily mileage. Until the error is reset to 0. To check that the errors have been reset, we repeat the procedure: enter the diagnostic mode of the VAZ 2110 instrument panel (while turning on the ignition, press and hold the button that resets the mileage); P press the mileage reset button three times and look at on-board screen.
It should show 0. We decided on this. But now we need to find out what kind of error we identified during the self-diagnosis of the instrument clusters. A table is presented to you for this purpose. If the number is different, for example, like ours, this means that there are several errors and the computer shows their sum: P 6 (2+4), 10 (2+8), 12 (4+8), 14 (2+4 +8). We have sorted out errors during self-diagnosis of instrument clusters on the VAZ 2110, but here you can see P (when the engine light comes on) for yourself.
Source
K Line 409 + Elm 327 USB Pro Kit
The kit presented to your attention will allow you to easily diagnose most cars.
The well-known K Line adapter on the original FTDI chip will allow you to diagnose VAG cars from 1988 to 2005, as well as domestic VAZ, GAZ and UAZ cars. You can learn more about the adapter here.
The ELM 327 USB Pro version adapter will allow you to diagnose most cars with a gasoline engine after 1998, as well as cars with a diesel engine after 2005. You can learn more about the capabilities of this adapter here.
The adapters complement each other perfectly and are suitable for beginning diagnosticians.
You can purchase this set of adapters in our store at an attractive price.
1090 RUR 1500 RUR
In stock: 461 pcs.
2022 version! Adapter for diagnostics of all models VAZ, GAZ, ZAZ, UAZ, IZH, VAG group cars (VW, AUDI, Seat, Skoda) up to 2004. and other old foreign cars
VAG adapter (K-Line adapter + program) version 2022! It is a device for transmitting data via the K-line of cars of the domestic manufacturer VAZ, GAZ, UAZ, ZAZ, IZH, Volga; and many old foreign cars produced before 2000.
The VAG Adapter also allows for full-function diagnostics of all VAG group cars (Audi, VW, Skoda, Seat) manufactured from 1990 to 2005. You can find out about possible compatibility in the “adapter selection” tab. A universal and reliable VAG adapter will allow you to independently perform diagnostics, reset errors, adapt the throttle valve, measure parameters of the engine, transmission, on-board computer and other components of your car. A clear interface of the diagnostic program working with the VAG Adapter and detailed diagnostic instructions will be available to any car enthusiast.
What is the difference between VAG adapters? Beware of fakes!
The main difference that can affect the price and functionality is the chip on which the adapter is made. Cheap adapter models use a chip with limited functionality - as a result, it may not read some car blocks. Our adapter is made on the original FTDI chip. Today it is considered the most functional - it reads 100% of the car blocks supported by the adapter. In addition, it has support for flashing many Russian models.
Beware of fakes! Diagnost7 is the only company in Russia that officially supplies adapters based on the original FTDI chip.
All drivers, programs and detailed instructions are included with the adapter. Place your order today and receive them!
The adapter includes more than 30 programs for different brands of cars. Here are examples of the programs that come with the kit:
This adapter can diagnose VAZ, GAZ, UAZ, ZAZ with an ANDROID phone and tablet
After the diagnostics charged 800 rubles for removing errors, I ordered an adapter. The kit included an adapter for ZAZ CHANCE (Sense) and an adapter for the phone (though for a micro USB, bought for 100 rubles on Taepsi). I installed the program and did not connect!! )) In the settings you need to specify the make of the car and immediately identified the errors. I threw it away, played around with it, and was satisfied, my friends told me. I didn’t order from Alika, there is no support there and the guys immediately answered all the questions by email.
Verdict: Everything is honest, it works, it eliminates errors, I recommend it, it fits most cars!
Algorithm for removing the old car dashboard in order to install a new one
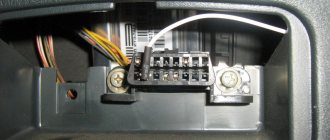
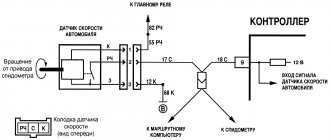
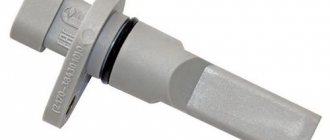
Diagnostic block VAZ 21102
- before you directly begin to remove the dashboard, it is necessary to study its structure diagram extremely carefully and in detail;
- so, first the negative terminal and the battery are disconnected;
- then, you should remove the decorative linings that contain the steering column;
- the steering signal plate itself should not be touched, it should be left in its original place;
- the left and right switch must be removed in such a way that their connection to each other is maintained;
- the steering column switches are connected to two wire ends, this connection must be interrupted by disconnecting;
- the headlight hydraulic corrector is equipped with a special control handle, which must also be removed using a slotted screwdriver;
- then you need to use a key set to “21” to unscrew the fastening nut of the headlight hydraulic corrector;
Features of computer diagnostics of a car
How is diagnostics carried out using all the equipment and software listed above? A detailed description of this procedure will help you answer this question:
- diagnostic software transmits a request to the car controller via the adapter;
- the controller, in turn, provides all the necessary information about the state of the main on-board systems of your car;
- the software analyzes the data and displays the result in the most readable form;
- Using information on the Internet, you decipher error codes obtained as a result of diagnostics and identify problems with certain components and mechanisms of the car.
Data is transferred to the computer via the ODB II protocol. It has a number of disadvantages, but the VAZ-2110 is quite suitable for diagnosing a car, since domestic cars are equipped with significantly less electronic equipment than modern imported equipment.
Compatibility of VAZ cars with ELM327
The OBD 2 standard, according to which the adapter operates, supports the service of all cars with an electronic injection control system. There are some differences in diagnosing certain types of ECUs, but the general maintenance methods remain the same.
In this section, the user can find accurate information about the compatibility of the ELM327 with the desired vehicle. The table lists the years of production, as well as models. Just select your VAZ type in the list and the system will automatically provide all the information on computer servicing.
Idling
Code 0505 indicates a malfunction of the idle air control. Moreover, 0505 is most often “issued” when the engine is started with the gas pedal pressed. This often affects drivers who switched from a carburetor VAZ 2110 to an injection one.
However, 0505 also occurs if the ignition module, spark plugs are faulty, there are broken wires, or the engine speed is not the one set by the XX regulator.
Idle speed control
If you notice popping noises in the muffler, this may also indicate displacement of the crankshaft ring gear. Code 0505 can be displayed either alone or with 0300 (missing cylinders).
Computer Diagnostics Guide
Just a few years ago, computer diagnostics could only be carried out in a car service center. Currently, VAZ self-diagnosis is available to any driver. To carry it out on a VAZ, you need a computer, tablet or laptop, and a diagnostic adapter.
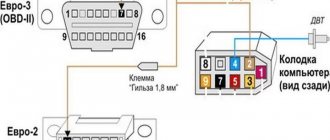
To connect the adapter, you must have a diagnostic connector (block). It is necessarily present in VAZ 2109 injector cars, as well as other models with an injection engine. K-Line VAGCOM adapters are directly connected to the electronic control unit via a 16-pin OBD-II diagnostic connector (block). Some models have a 12 pin connector, which is incompatible with the adapter. In this case, you need to purchase an additional adapter or a K-Line scanner with an OBD1 (GM12) housing.
The main thing when carrying out computer diagnostics is to correctly connect the scanner to the diagnostic connector of the car. This requires pinout of the block.
Connector pinout for VAZ, UAZ and GAZ
After connection, the main signals are read and information about the components and systems of the vehicle can be read. To read information, you need special software, which can be downloaded from Internet resources or is included with the adapter.
To check, you need to insert the adapter into the VAZ diagnostic connector. Basically, diagnostic connectors on VAZ cars are located under the dashboard.
But the location is different for different models:
- on VAZ 2109, 2108 with an injector - under the storage shelf;
- on VAZ 2115 - under the cigarette lighter;
- on Lada Priora - behind the glove compartment;
- on Lada Kalina - above the cigarette lighter;
- on VAZ 2110, 2111, 2112 - on the right side of the steering column.
Connector to the right of the steering column The check does not take much time. On one side, the adapter is connected to the car's ECU, on the other end of the wire there is a USB input, to which a personal computer or laptop is connected. The program supplied with the scanner is usually recorded on a CD. It installs on your computer without any problems.
The interface is Russified, so even an inexperienced user can perform the settings. The decoding of the codes can be found in the appendix to the diagnostic equipment. By deciphering the error codes, you can perform diagnostics yourself.
K-Line adapter allows:
- obtain sensor data in digital and graphical form;
- reads error codes stored in the controller and makes it possible to delete unnecessary information;
- adapt the operation of some mechanisms;
- encode control units with the ability to activate and disable a number of functions;
- set service intervals;
- check the operation of some components and systems.
Programs for diagnosing VAZ, Lada cars and their correct settings
This article will discuss ways to connect diagnostic scanners to the OBD2 and GM12 connectors of VAZ, Lada, and the following models: 2107, 2108, 2109, 21099, 2110, 2111, 2112, 2113, 2114, 2115, Granta, Priora, Vesta, X -ray, Kalina, Largus, Niva The work of the ELM327 OBDII and Master Kit BM9213 scanners with VAZ, Lada cars and diagnostic programs Torque, OpenDiag and their correct configuration will be considered. We’ll also look at connecting these scanners using the example from the videos.
.
Connecting a diagnostic scanner via GM12 and OBD2 connectors to VAZ, Lada cars
Let's start right away with where most novice diagnosticians of VAZ or Lada cars fail. For its injection cars, AvtoVAZ installed connectors for connecting GM12 type ECUs. The ELM327 scanner is designed to work with OBD2, so contacting the “brains” of the car by using this scanner to diagnose VAZ and Lada cars up to model 2114 will be a little problematic, but, in general, with certain “dances with a tambourine” it is quite possible (although cars with Bosch firmware 7.9.7 will be visible from 2011 without problems). But first of all, we will look at connecting a diagnostic scanner via the GM12 connector, which is connected to a car with a GM12 (OBD1) connector via USB.
Connecting the scanner to the GM12 connector of VAZ, Lada 2107, 2108, 2109, 21099, 2110, 2111, 2112, 2113
For diagnostics (as well as CHIP tuning, firmware) of injection engines of VAZ cars with a GM12 (OBD1) connector via the K-line, a scanner from Master Kit BM9213 and its upgraded version BM9213M are used.
User manual and pinout Master Kit VM9213
Operation Master Kit VM9213
- You can check the device using the Setup CE v1.7.exe utility https://masterkit.ru/zip/Setup CE v1.7.zip
- Apply 12V to the module, according to the connection diagram, the 5-24V power indicator should light up.
- Connect the device to the PC, the 5V power indicator should light up.
- The operating system should automatically install the driver. If this does not happen, download the driver https://www.ftdichip.com/Drivers/VCP.htm and install it manually using the generally accepted method. Please note that the latest drivers are available on the chip manufacturer’s website www.ftdichip.com/Drivers/VCP.htm
- Install the Setup CE program and run it. In the settings, select the device COM port assigned by the operating system.
- In the program menu Service - Settings, select the COM port issued by the operating system and click OK.
Other combinations
The errors described above are not the only ones. And in practice you can find a large number of different codes:
- P0101-P0103
these codes are associated with the fuel consumption sensor. Most often the device needs to be replaced; - P0116-P0118
- . There may be a problem with the wiring, so it is advisable to first check the power circuit to the sensor; - P0112-P0113
This code occurs when the sensor indicating the intake air temperature is faulty. Often occurs when there is a short circuit in the wiring; - A number of errors (P2122, P2138, P0222, P2123, P0223) indicate problems with accelerator position control;
- P0130-P0134
- the oxygen level sensor in the mixture should be replaced. Before doing this, check the condition of the wiring supplying power to this sensor; - P0201-P0204
- problems with injectors. Possible blockage or short circuit. Be sure to check the wires supplying power to them; - P0136-P0140
, such codes indicate a malfunction in the sensors that control the formation of the mixture in the injection system; - P0326-P0328
- failure of the detonation detecting device. Occasionally may appear when the engine control unit fails; - P0351-P0352, P2301, P2304 all these readings indicate incorrect operation of the ignition coils; usually with these errors the engine stalls;
- P0691-P0692
- failure of the first fan relay operating in the cooling system; - P0485
- erroneous voltage signal coming from the cooling fan; - P0693-P0694
, the second relay of the cooling system has failed. With such a breakdown, the antifreeze may boil and the engine overheats. To avoid a more complex breakdown, you need to fix the problem; - P0422
The converter has failed; the unit needs to be replaced; - P0560-P0563
- faulty voltage in the on-board network, the condition of the battery is checked; - P0627-P0629
- erroneous signal from the fuel pump sensor. If the engine starts, then the problem is in the sensor. A malfunction of the fuel pump itself makes it impossible to start the engine.
These are the most basic error codes. More detailed information can be found in the file that usually comes with the diagnostic program. All identified defects must be repaired. After which the errors are reset and a recheck is performed. Reset errors
. To reset the controller readings, disconnect it from the power supply. To do this, you need to turn off the engine by turning off the ignition. After which the positive terminal is removed from the battery, after 10-15 seconds it is put back in place. All errors have been cleared. You can start the engine and carry out control diagnostics.
Error codes
Error codes from the engine's electronic control unit can often identify faults in electrical circuits and basic systems. Diagnostics are usually carried out to identify faulty sensors.
Decoding the error code: 0102 Low signal level of the mass air flow sensor 0103 High level of the mass air flow sensor 0112 Low level of the intake air temperature sensor 0113 High level of the intake air temperature sensor 0115 Incorrect signal of the coolant temperature sensor 0116 Incorrect signal of the coolant temperature sensor 0117 Low coolant temperature sensor signal level 0118 Coolant temperature sensor signal high 0122 Throttle position sensor signal low 0123 Throttle position sensor signal high 0130 Oxygen sensor 1 signal incorrect 0131 Oxygen sensor 1 signal low 0132 Crankshaft sensor signal high 1 0133 Oxygen sensor 1 response slow 0134 Oxygen sensor 1 signal missing 0135 Oxygen sensor 1 heater fault 0136 Oxygen sensor 2 short to ground 0137 Oxygen sensor 2 signal low 0138 Oxygen sensor 2 signal high 0140 Oxygen sensor 2 open 0141 Oxygen sensor heater fault 2 0171 Mixture too lean 0172 Mixture too rich 0201 Injector control circuit open 1 0202 Injector control circuit open 2 0203 Injector control circuit open 3 0204 Injector control circuit 4 open 0261 Injector circuit short to ground 1 0264 Injector circuit short to ground 2 026 7 Short circuit to ground of injector circuit 3 0270 Short to ground of injector 4 circuit 0262 Short to +12V of injector 1 circuit 0265 Short to +12V of injector 2 circuit 0268 Short to +12V of injector 3 circuit 0271 Short to +12V of injector 4 circuit 0300 Many misfires 03 01 Misfire in cylinder 1 0302 Misfire in cylinder 2 0303 Misfire in cylinder 3 0304 Misfire in cylinder 4 0325 Open circuit of knock sensor 0327 Low signal level of knock sensor 0328 High level of knock sensor signal 0335 Incorrect signal from crankshaft position sensor 0336 Error in position sensor signal crankshaft 0340 Phase sensor error 0342 Low phase sensor signal 0343 High phase sensor signal 0422 Low converter efficiency 0443 Malfunction of the canister purge valve circuit 0444 Short or open circuit of the canister purge valve 0445 Short to ground of the canister purge valve 0480 Malfunction of the fan circuit a cooling 1 0500 Incorrect sensor signal speed 0501 Incorrect speed sensor signal 0503 Interruption of speed sensor signal 0505 Idle speed controller error 0506 Low idle speed 0507 High idle speed 0560 Incorrect on-board network voltage 0562 Low on-board network voltage 0563 High on-board network voltage 0601 ROM error 0603 Error External RAM 0604 Error Internal RAM 0607 Knock channel malfunction 1102 Oxygen sensor heater resistance low 1115 Oxygen sensor heater circuit faulty 1123 Idle rich 1124 Idle lean 1127 Part Load rich 1128 Part Load lean 1135 Sensor heater circuit oxygen 1 break, short circuit 1136 A rich mixture in small load 1137 Poor mixture in small load mode 1140 The measured load differs from calculating +12V 1425 Control circuit of the canister purge valve short circuit to ground 1426 Control circuit of the canister purge valve open 1500 Open circuit of the fuel pump relay control circuit 1501 Short circuit to ground of the fuel pump relay control circuit 1502 Short circuit to +12V of the fuel pump relay control circuit 1509 Overload of the idle speed regulator control circuit a 1513 Idle air control circuit short circuit to ground 1514 Idle air control circuit short circuit to +12V, open 1541 Fuel pump relay control circuit open 1570 Incorrect APS signal 1600 No connection with APS 1602 Loss of on-board power supply voltage to the ECU 1603 EEPROM error 1606 Yes rough road mark incorrect signal 1616 Rough road sensor low signal 1612 ECU reset error 1617 Rough road sensor high signal 1620 RFOM error 1621 RAM error 1622 EPROM error 1640 EEPROM Test error 1689 Incorrect error codes 0337 Crankshaft position sensor, short to ground 0338 Crankshaft position sensor, open circuit 0441 Air flow through the valve is incorrect 0481 Cooling fan circuit malfunction 2 0615 Starter relay circuit open 0616 Starter relay circuit short circuit to ground 0617 Starter relay circuit short circuit to +12V 1141 Oxygen sensor 1 heater malfunction after the neutralizer 230 Fuel pump relay circuit malfunction 26 3 Driver failure Injector 1 266 Injector Driver 2 Malfunction 269 Injector Driver 3 Malfunction 272 Injector Driver 4 Malfunction 650 CheckEngine Lamp Circuit Malfunction
Technical features of the VAZ-2111 8 valve injector and its engine
All modifications of the VAZ-2110 have a number of standard features that distinguish these cars from other vehicles of this type. Let's look at them:
- Engine location is front.
- The drive also falls on the front wheels.
- The body of the supporting structure is all-metal.
- Body type – station wagon.
- Four-cylinder, four-stroke, 8- or 16-valve gasoline engine.
- The power system is carburetor or with distributed fuel injection.
The VAZ-2111 engine is equipped with a power system that has distributed fuel injection, and it is controlled by one of the controllers - January, Bosh, GM.
But any similar design used on the VAZ-2111 must meet the following requirements:
- petrol;
- 4-stroke;
- 4-cylinder;
- in-line (transverse arrangement);
- 8-valve;
- The camshaft is located at the top.
This model is a modernized version of the VAZ-2110 engine, which is of the carburetor type. The modernization was carried out in order to smoothly transfer to another power system - injection. Thus, four cylinders are made of cast iron, and the connecting rods have a more massive lower part, which makes it possible to increase the service life to 250 thousand kilometers in real conditions, although the manufacturer assumes 150 thousand kilometers. By the way, when carrying out repair operations, the nominal diameter of a cast iron cylinder of 82 millimeters can be increased from 0.4 to 0.8 millimeters. But at the same time, one should take into account the maximum limit of its permissible wear - 0.15 mm per diameter. The crankshaft is also made of high strength cast iron. Special inserts are produced for it, intended for repair, which are specially reduced to 1 millimeter. On the VAZ-2111, the engine is included in the power unit, which also includes a clutch and gearbox. This unit is a unit of a single type that is mounted in the engine compartment using rubber-metal elastic supports.
Service
VAZ 2110 engines are serviced quite typically. Thus, scheduled maintenance is carried out within 10-15 thousand km. If the vehicle is operated on LPG, then maintenance must be reduced to 8-10 thousand km in order to preserve the engine and extend its service life.
When servicing, it is necessary to pour only high-quality oils into the VAZ 2110 engine. Thus, there are a number of lubricating fluids that must be poured into the engine. Do not forget about using a high-quality oil filter, which will also affect the service life. The power unit maintenance scheme is quite simple, and is provided by AvtoVAZ in the repair manuals.
The VAZ 2110 engine with 16 valves is quite unpretentious in the use of oil. So, both semi-synthetic and synthetic lubricant are ideal for him. Many car enthusiasts ask the question: how much oil should be poured into the engine? Almost all engines require 3.5 liters of oil.
What is needed to diagnose a VAZ-2110
So, to check your car for faults, identify injector failures and on-board computer errors, you will need the following:
- an adapter designed to connect the ECU (electronic control unit of a car) with a PC, as well as display all the results obtained on the display of a tablet, smartphone or laptop. When purchasing an adapter, you should definitely take into account all the features of the car, since these devices are not universal. For VAZ-2110 cars, the ELM327 model would be an excellent choice;
- a cable that allows the adapter to be connected to a personal computer and the vehicle’s diagnostic connector. Its length should be no more than 5 meters, so be sure to take this requirement into account when choosing equipment for diagnostics;
- laptop or tablet. Many experts strongly recommend using a portable laptop computer, which will provide you with complete freedom of action in the process of carrying out diagnostic work;
- software. Its most current version can be easily found on the website of the adapter manufacturer or on specialized websites dedicated to the diagnosis and repair of the VAZ-2110.
Why does the adapter refuse to connect to the car's ECU?
So, why doesn't ELM327 see the ECU? What should I do so that the device can connect and see the block? Today you can find many different adapters for testing a vehicle on sale. If you buy an ELM327 Bluetooth, most likely you are trying to connect a low-quality device. Or rather, you could have purchased an adapter with an outdated version of the software.
Car diagnostics using your phone
ELM327 Bluetooth devices with outdated firmware use a different Bluetooth module that allows you to interact with two of the available six protocols. Accordingly, you can synchronize the device with a smartphone, but when you try to connect the device to the control unit, it will inform you that there is no connection with the ECU.
So, for what reasons does the device refuse to connect to the block:
- The adapter itself is of poor quality. Problems can be with both the device’s firmware and its hardware. If the main microcircuit is inoperative, it will be impossible to diagnose the engine operation, as well as connect to the computer.
- Bad connection cable. The cable may be broken or inoperative itself.
- The wrong version of the software is installed on the device, as a result of which it will not be possible to achieve synchronization (the author of the video about testing the device is Rus Radarov).
Features of computer diagnostics of a car
How is diagnostics carried out using all the equipment and software listed above? A detailed description of this procedure will help you answer this question:
- diagnostic software transmits a request to the car controller via the adapter;
- the controller, in turn, provides all the necessary information about the state of the main on-board systems of your car;
- the software analyzes the data and displays the result in the most readable form;
- Using information on the Internet, you decipher error codes obtained as a result of diagnostics and identify problems with certain components and mechanisms of the car.
Data is transferred to the computer via the ODB II protocol. It has a number of disadvantages, but the VAZ-2110 is quite suitable for diagnosing a car, since domestic cars are equipped with significantly less electronic equipment than modern imported equipment.
Diagnostic modes, OBD protocols for VAZ cars
The OBD standard has five types of information exchange protocols:
- CAN type;
- KWP2000;
- ISO 9141 version 2;
- J1850 VPW and PWM.
The purpose of OBD is to harmonize the various electronic systems of the car and ensure the exchange of information between devices. The standard establishes a number of rules for the transmission of data packets. The exchange speed is individual for each protocol. The ELM327 adapter coordinates the ECU and external devices for reading information. The data is displayed to the user in an accessible form.
The fastest is the CAN bus. The latest Zhiguli models provide for the use of this standard. Other protocols on this family:
- ISO 9141;
- K, L lines;
- K, L lines (extended block 55 pins).
Note: the number of supported diagnostic and interrogation modes of on-board systems depends on the installed protocol. The owner needs to check the year of manufacture and model of the standard control unit before servicing. The more recent the ECU and its firmware, the wider the list of available scanning parameters.
Important:
Some ECUs do not support the full set of functions without the use of a dealer scanner.
Select the car model and year of manufacture to determine which diagnostic modes your car supports through the ELM327 adapter, as well as what protocol the OBD2 port is based on. The data is presented for the following VAZ models and their modifications: 2114, 2107, 2110, 2112, 2109, 2115, 2106, 2108 and others.
Note:
(1) — The numbers between brackets (x3) correspond to the number of vehicles of the same type
(2) - DIN horsepower (multiplied by 0.736 for kW power)
(3) - PID is only supported for the primary oxygen sensor (#1)
- Mode X Column: A vehicle showing 00000000 in a mode means that the corresponding PID is not active and that as a result the mode is maintained but does not respond to any requests. None of the vehicles described below support Mode 8.
- Energy column: fuel type, Die for diesel, Pet for gasoline, Hyb for hybrid
- The vehicles on this list are classified alphabetically by make, model, then in order of increasing horsepower.
This mode returns common values for some sensors, such as:
- engine speed;
- vehicle speed;
- engine temperature (air, coolant);
- information about oxygen sensors and air-fuel mixture.
This mode provides a freeze frame (or instantaneous) failure data. When the ECM detects a malfunction, it records sensor data at the specific point in time when the malfunction occurs.
This mode displays stored diagnostic trouble codes. These fault codes are standard for all car brands and are divided into 4 categories:
P0xxx: for standard transmission related faults (engine and transmission) C0xxx: for standard chassis faults B0xxx: for standard body faults U0xxx: for standard communication network faults
More detailed information and definitions of common trouble codes are available on the OBD Common Trouble Codes page.
This mode is used to clear stored trouble codes and turn off the engine malfunction indicator.
Note: There is generally no need to repair a problem that has not been diagnosed or corrected. The MIL will illuminate again during the next driving cycle.
This mode provides the results of self-diagnosis performed on the oxygen/lamda sensors. This mainly applies only to gasoline vehicles. For new ECUs using CAN, this mode is no longer used. Mode 6 replaces features that were available in Mode 5.
What is needed for work
If you decide to diagnose faults in your VAZ 2110 yourself, then you will need several basic things for this work.
| Device | Peculiarities |
| Adapter | This is a kind of microcircuit enclosed in a housing. It allows you to connect the “brains” of your car with a computer and display the relevant information on the screen of a laptop or tablet. |
| Cable | Used to connect the adapter to the car and computer. Usually comes with an adapter |
| Computer | When choosing a computer, rely on what you have - a desktop PC, a tablet, a laptop. A laptop computer is better, since connecting a car to a stationary PC is difficult. Cables longer than 5 m are not suitable for diagnostics, so keep this in mind when connecting to a PC |
| Software | The necessary software can be found on the Internet, or you can take the software provided with the adapter. There are no problems with finding software today. |
When choosing an adapter and cable, take into account the characteristics of your vehicle. Not all adapters are universal
For the VAZ 2110, an example of an excellent adapter is the ELM327. We'll talk about it later.
How it works?
Now let’s figure out how it all works together and how you can diagnose the car yourself.
- The diagnostic program sends signals via the COM port through the adapter to the vehicle controller.
- The controller sends information in response.
- The program processes the received data, producing the corresponding result on your computer screen.
- Data exchange is carried out according to the appropriate protocol. Depending on the car manufacturer, the protocol may be different and have its own characteristics.
- To simplify diagnostics, many manufacturers use the universal ODB II protocol. Its capabilities are limited and not adapted for all cars. It is ideal for the VAZ 2110 model, since the top ten does not have an increased amount of electronics, unlike more modern cars.
- In the case of the VAZ 2110, the program on the computer screen will display the result in the form of error codes. It is enough to open the material where we described the error codes for the VAZ 2110 to understand what kind of breakdown has occurred to your car. Next, appropriate actions are taken to eliminate them.
https://youtube.com/watch?v=2RWzbHFrppk
A significant advantage of diagnostics is the fact that after it you know exactly what kind of malfunction you are dealing with. You don't have to go through half the car to find the source of the problem.
Types of diagnostics
Computer diagnostics of a car can be divided into three main types, one of which is not directly related to the VAZ 2110.
- Checking the suspension. It must be carried out if the rubber begins to wear unevenly or if extraneous sounds are heard when moving. Diagnostics will allow you to determine the reasons for the drift of the rear and front axles, which you may notice when entering turns at speed.
- Engine check. The main share of diagnostic activities falls on power units. The computer and adapter will help you if the idle speed is unstable, the car is difficult to start, fuel consumption increases, power decreases, etc.
- Automatic transmission check. Since the VAZ 2110 is not equipped with an automatic transmission, there is no point in diagnosing it.
Connectors
You have decided to carry out diagnostics. But what and where to connect?
On the VAZ 2110, the connector for computer diagnostics (CD) is located at the bottom of the steering column to the right of the driver. The connector is called OBD. This information makes finding the right adapter much easier.
To carry out the test, you should perform the following sequence of operations:
- An adapter is inserted into the OBD connector near the steering column;
- The computer must already be turned on;
- When the block is connected to the adapter, you need to turn on the ignition. Without power, the program will not be able to work and read data;
- Next, we connect the program with which testing is carried out;
- If all elements are operational, the car’s electronics will be displayed on the computer monitor;
- Start checking.
Pinout
Since for testing we need a diagnostic block, that is, OBD, it would not be amiss to learn about the features of its pinout. This way you can easily figure out how to connect:
- Contact A - is responsible for connecting the ground;
- Contact B - required to connect L-Line. Please note that not all vehicles have this contact;
- Contact M - used to connect K-Line;
- Contact H - power supply +12V;
- Contact G - controls the operation of the fuel pump.
Frequently asked questions about car diagnostics of the VAZ 2112 via a computer or smartphone
Early brands of electronic control units only have a K-line for external adapters. For this reason, K-Line VAG is used for them. The device supports data exchange standards ISO 9141-1, 9141-2, 14230, KWP2000. The connection is made to the diagnostic connector of the machine. Allows you to read fault codes, analyze data, and clear the computer ROM.
VAZ 2121 engine models equipped with a CAN protocol have a service block of the OBD2 standard. A 16-pin port is used for switching. Data packets are exchanged over two lines: Kan-upper, Kan-low.
Suitable adapters and cables for diagnostics
| ECU | Programs | Tire | Suitable adapter/cable |
| Bosch M1.5.4 | AvtoVAZ NEW ICD 1.2.0.1 Stevaz ChipExplorer Lite 1.5 Diagnostic Tool v1.31.2 | K-Line | K-Line VAG COM |
| January 5.1.N | |||
| January 7.2 | |||
| Bosch M7.9.7 | KWP-D KWP2000 | ||
| Bosch MP7.0 | ICD 1.2 Chip tuning 1.25 | ||
| January 7.2+ (hardware revision) | Stevaz | CAN | ELM 327 * Scanmatik 2 DST-14T and others, adapted for ScanToolPro CAN buses * |
| M73 | ScanMaster v2.1 Rus OBDTool 1.2.60 | ||
| VS5.1 | CTuning v.2.6 | K-Line | K-Line VAG COM ELM 327 |
* For scanners based on ELM 327, chip revision 1.5 is recommended.
Suitable scanners for diagnosing a VAZ 2112 car
Full-fledged professional scanners differ from an adapter in that they have a built-in display and their own internal diagnostic program for reading ECM configurations.
DST-14T is an official dealer scanner recommended by AvtoVAZ. Suitable for the entire model range. The following multi-brand equipment is also used for these vehicles:
- DST-14T;
- Launch X431 PRO (With software module for VAZ);
- Autel MaxiDas DS708;
- U480 CAN;
- CREADER 6;
- Bosch KTS 340
- Other professional car scanners with OBD2 connectors.
Separately, it is worth noting DST-14T. This is an official dealer scanner recommended by the AVTOVAZ plant.
Attention:
As mentioned above, older models of the twelfth were equipped with diagnostic connectors with a 12-pin port. For such options, the classic K-Line VAG is suitable. Data packets are broadcast via K-Line.
The following programs are used to connect:
- Open Diag Free;
- ELM327 VAZ;
- Diagnostic Tool v1.3.1-1.3.6.
Error diagnosis and decoding
Electronic components are interrogated through the computer-service equipment-ECU chain. The diagnostic program collects information from different systems and, if there are problems, issues OBD codes.
During self-diagnosis of electronic components, the ECU queries the control authorities independently. The result is displayed in the form of codes on the display. If a component does not respond or its values do not match the calibration values, the ECM records an error in this location.
Error Diagnosis Methods
In 2022, errors on the VAZ 2110 on-board computer can be identified in two ways.
- Self-diagnosis. The method is feasible thanks to a special option in the on-board computer. The principle is that the system shows faults in the main circuits and mechanisms. The advantage is that there is no need for additional equipment or special programs - everything that is needed is already “hardwired” into the on-board computer. The disadvantages include the low accuracy of the readings.
- With the help of auxiliary equipment. This type of procedure is characterized by high accuracy of the read data. Thanks to a third-party analyzer, you can find out exactly where the breakdown occurred, which simplifies the repair process. An obvious disadvantage is the need to connect a computer with a special program. Such equipment is present only in specialized service stations.
Self-diagnosis VAZ 2110: error codes
To enable self-diagnosis mode, the driver or technician will need to perform a certain sequence of actions.
- Turn off the engine ignition.
- Press the daily mileage reset button and, without releasing it, turn on the ignition. In this case, all digital cells should light up on the display.
- Click on any module control button twice.
- The device will display the error number.
If everything is done correctly, one of the following symbols will light up on the device:
- 2 – critical excess of the rated voltage of the on-board network, a short circuit of the main line or loaded components is possible;
- 3 – a similar error on the instrument panel of the VAZ 2110 indicates that the gasoline level sensor is damaged or there are problems in the sensor’s power supply; to check, you can replace the part with a new one and ring the circuit;
- 4 - error 4 VAZ 2110 indicates that the antifreeze temperature sensor is broken or its wiring is broken, the problem is resolved in the same way;
- 5 – the thermometer designed to measure the temperature outside is faulty;
- 6 – the engine is very overheated, you need to stop and wait for it to cool down, and there should be a sound signal (add antifreeze/water into the radiator);
- 7 – the lubricant pressure in the crankcase compartment of the engine is below the established norm, the losses must be urgently replenished;
- 8 – error 8 VAZ 2110, interpretation shows that the brake system is damaged, possibly a drop in the fluid level in the expansion tank or severe wear of the pads;
- 9 – the battery is completely discharged, the element needs to be charged or replaced with a new module;
- E – software failure of the on-board computer firmware; complete diagnostics with a scanner and qualified repairs in a workshop will help here.
Also, error 14 VAZ 2110 or another two-digit number will indicate the presence of two problems. Usually, with such a picture, the ciphers are summed up. For example, error 10 VAZ 2110 may indicate problems in circuits No. 4 and 6.
How to reset errors on a VAZ 2110
Typically, the procedure is carried out after repairing the unit for which the fault code is responsible. In this case, the symbol does not disappear - it must be forcibly reset. This is done quite simply. The user is required to enter the service mode (hold down the daily mileage button), then double-click on any control. After completing the manipulations, a code will appear on the display. To eliminate this, the daily mileage button is pressed for 3-4 seconds and the system is reset. The machine exits the dialog box automatically after 30 seconds of inactivity.
self-diagnosis VAZ 21124
All fuel-injected VAZ 2110, 2111 and 2112 cars have a function such as self-diagnosis of the instrument cluster and even detection of certain errors with codes displayed on the display. To start this function, you need to hold down the daily mileage reset button and turn on the car's ignition. So that you don’t have to think for a long time about what and how to do, I advise you to watch the detailed video review that I recorded for this topic. The video was made using the example of a VAZ 2112. As for deciphering errors, I will try to make a text description of them below to make it more clear and accessible to everyone.
If 0 remains, then there are no errors Error 8 undervoltage, less than 8 Volts For several faults at the same time, a P number may be issued, which will be the sum of the above codes, for example 6 (2+4), 10 (2+8), 12 (4+8) or 14 (2+4+8) To be frank, these fault codes are not particularly useful. If we compare it with the readings of special on-board computers, such as STAT, then there is, of course, tens of times more useful information and various data.
But we’ll talk about this sometime in future articles. Hello dear site visitors. The topic of this article will be diagnostics of the instrument cluster on the VAZ 2110, 2111, 2112. In order to start the self-diagnosis mode of instrument combinations, you must turn on the ignition while holding down the button that resets the daily mileage. How to understand that the mode has started?
Everything is very simple, the oil pressure lights, the battery icon, the fuel warning light and the Chek light will start to light up. In this case, all arrows begin to move from the initial position to the maximum, and this process is repeated. This way you can check the operation of all light bulbs, instruments, and arrows. Go ahead and press the button to reset the daily mileage. In this case, the arrows return to their initial position, and the firmware version will appear on the on-board computer screen.
How to independently diagnose a VAZ-2110
The last question that remains to be addressed in our article is the sequence of diagnostics of the VAZ-2110. It looks like this:
- connect the adapter to the ODB diagnostic connector, which is located under the steering column;
- turn on the tablet or laptop, on the screen of which the diagnostic results will be displayed;
- turn on the car ignition. To check the engine and suspension, as well as to display the necessary information on the display, a mandatory power supply to the on-board network of the machine is required;
- launch the software and get the results of diagnostic procedures;
- We decipher error codes and determine malfunctions of certain components and mechanisms of the car.
As you can see, there is nothing complicated in self-diagnosis of the VAZ-2110. You can easily navigate all its intricacies without having the appropriate knowledge and skills, you will be able to identify existing problems without contacting car services, and you will be able to significantly reduce the financial costs of servicing your car.
Instructions for diagnosing a VAZ 2112 via OBD connector with your own hands via a laptop or smartphone
Determine where the OBD connector is located
Determine which scanner is suitable for your car
The selection of a scanner (adapter) for the VAZ 2112 depends on the ECU model, as well as the needs of the diagnostician / car owner.
To select diagnostic equipment, use the calculator: “Selecting a scanner for the VAZ 2112”
Download the diagnostic program for the scanner
The diagnostic adapter requires software that can be installed on a laptop or smartphone/tablet. Auto scanners with their own software shell and display do not require software.
To select a program for the adapter, go to the section: “Programs”
Use the instructions and carry out diagnostics
When you purchase an adapter, instructions are included with the adapter. More detailed instructions on diagnostic car scanners and descriptions of their operation are posted in the section: “OBD2 car scanner reviews”
Identify errors and decipher them
Error codes and their interpretation are displayed in the scanner program interface. You can also study the complete database of errors for your car in the section: “OBD2 error codes for VAZ 2112”
Make repairs according to the error code
The unit is repaired according to the decoding of the error (problem) or contact a car service to eliminate a particular malfunction.
Check errors again
Scan Tool Pro - budget multiscanner for VAZ 2112
A good choice for a novice diagnostician
How to independently diagnose a VAZ-2110
The last question that remains to be addressed in our article is the sequence of diagnostics of the VAZ-2110. It looks like this:
- connect the adapter to the ODB diagnostic connector, which is located under the steering column;
- turn on the tablet or laptop, on the screen of which the diagnostic results will be displayed;
- turn on the car ignition. To check the engine and suspension, as well as to display the necessary information on the display, a mandatory power supply to the on-board network of the machine is required;
- launch the software and get the results of diagnostic procedures;
- We decipher error codes and determine malfunctions of certain components and mechanisms of the car.
As you can see, there is nothing complicated in self-diagnosis of the VAZ-2110. You can easily navigate all its intricacies without having the appropriate knowledge and skills, you will be able to identify existing problems without contacting car services, and you will be able to significantly reduce the financial costs of servicing your car.
Why is diagnostics needed?
Let's first figure out why we need to diagnose faults and whether this is required specifically for your car.
The main advantage of diagnostics is the ability to save money, time and modern nerves. If the car begins to behave inappropriately, some extraneous sounds appear, the stable operation of the engine is disrupted, then there are two options:
- To study all systems manually by dismantling and testing would waste a lot of time and nerves. The probability of finding the cause of the breakdown is far from 100%.
- Conduct computer diagnostics yourself by connecting a special adapter or cable to the computer. The program will scan the car and be able to issue the appropriate error codes. After studying our material with error codes, you can easily find the reason why the car began to behave abnormally.
Is it worth going to a service station?
The quality of diagnostics at a service station is often not much different from an independent check. Having an adapter and cable to connect the device allows you to deal with the problems of your own car without outside interference.
By contacting a service station, they can diagnose you with the same equipment, but they will only ask you for a decent amount of money. If you do not control the progress of the check yourself, technicians may claim to have found other errors that in reality do not exist.
The result of visiting a dubious service station for diagnostic purposes can be serious financial costs and a long absence of the car at your disposal.
Example of an adapter with cable
The only option when it is worth contacting a car service center is the lack of diagnostic equipment and the presence of good friends among car mechanics.
Instructions for setting up Torque Pro in Russian
Scan Tool Pro Scanner
Do not try to buy cheap Chinese adapters that Aliexpress offers. There is a huge chance that it will not work at all. Take it where there is a guarantee and the seller is responsible for his product.
The original Scan Tool Pro or Smart Scan Tool Pro device must have a microcontroller from Canadian manufacturers; what is sold in Russia and the CIS countries is mainly China. The Korean assembly works great (links to them in the text). The majority of devices have a cheaper version of the microcontroller and various firmware, and accordingly their cost is low. But I don't want to say that they won't work. They work quite well. You just have to choose the device that will work on your car, or maybe not.
Methods for diagnosing ECUs and errors on a VAZ 2110 via the OBD connector
Let's look at examples of options for analyzing the electronic systems of a given car.
Did the Check Engine light come on on a VAZ 2110?
Detailed article on the causes of Check Engine and how to clear the Check. If your Check Engine light comes on, read this article immediately. The material explains what a Check Engine is, what to do if it appears, and how to remove this error yourself.
Is the Check Engine light on?
TOP 15 reasons why the Check Engine light comes on and ways to solve the problem. Read the article to solve the Check Engine problem.
Using the dashboard (on-board computer):
In this mode, the block will independently request all elements and display the result on the display. To do this, you need to hold down the odometer reset key and turn on the ignition. The instrument needles will begin to move. After execution, codes indicating the fault will appear on the screen.
The second method is to short-circuit the contacts on the connector:
On the service block it is necessary to connect terminals A and B. Turn on the ignition. The Check Engine light will begin to flash. The number of flashes indicates an error code. The meanings are separated by pauses.
Car scanners or adapters.
For older models of on-board computers, a standard K-Line VAG adapter is used. Information packets are exchanged via a K-line. The device is connected to the service connector of the machine.
New ECU models are equipped with a CAN communication bus. Transmission is carried out in duplex mode or unidirectional. The diagnostic program interrogates control system components and displays messages in real time. Stored error codes can be analyzed and erased from ROM.
Reviews of diagnostic scanners for VAZ 2110
Read detailed articles on the review of car scanners, including those compatible with the VAZ 2110.
Reviews of OBD2 diagnostic car scanners
This section provides descriptions of diagnostic scanners and adapters. Before purchasing a scanner for your car, it is recommended that you read reviews of the most popular equipment models.
Firmware and chip tuning.
Firmware is performed to update the internal software of the control unit. For this purpose, you can use both serial and chip programs. They are marked with three parts of symbols. The first shows applicability:
• J4 - January-4,4.1; • J5 - January-5.1.X; • V5 - VS-5.1; • M1 - M1.5.4 (N); • M7 - MP7.0.
ELM327 for VAZ - compatibility, diagnostics and programs
ELM no April 04, 2022 Rating:
Reading time
Difficulty of the material:
The ELM327 diagnostic adapter is widely popular among motorists. It allows you to carry out a quick computer service of electronic modules and track the values of important parameters of the internal combustion engine in real time. The adapter is easy to use and does not require special skills from the owner. The device is actively used for diagnosing not only foreign brands, but also domestic cars.
The ease of working with ELM327 is obvious - just connect the device to the service connector and synchronize it with your computer. The information will be displayed on the display of your PC or smartphone.
Important:
Older models may be equipped with an OBD2 connector, but do not support available ISOs. Such blocks are diagnosed using separate tools.