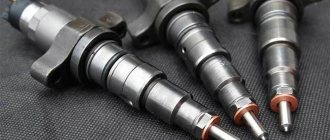
Injector VAZ-21093; 21099; 2110; 2111 (VAZ-injector-2111 engine) and VAZ-injector-21103; 2112 (engine injector VAZ-2112)
Carburetor engines often fail due to ignition failures (no spark in any of the cylinders). Less commonly, due to defects in the valve mechanism and cylinder-piston assembly (there is no compression in the cylinder). Engines with multiport injection sometimes triplane due to a malfunction of one of the fuel injectors.
In the article “Homeowner's Loss” (ZR, 2000, No. 7), we told you how to replace the fuel pump and filter. Now we will describe a simple way to measure pressure in the fuel rail, check and remove the pressure regulator and injectors with a rack.
The differences in the design of the fuel rails of the VAZ injector - engines 2111 and 2112 are small, but the dismantling procedure is noticeably different.
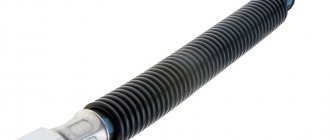
We check the pressure in the fuel rail with a regular pressure gauge (you can even use a tire pump).
We put a pipe onto the threaded fitting of the device and tighten it with a clamp. Any oil-gasoline-resistant hose with an internal diameter of 12 mm or a hose for supplying coolant to the throttle body will do - it is not resistant to gasoline, but will withstand several minutes of testing without consequences.
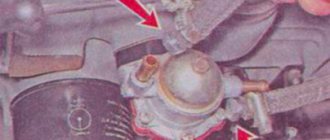
| Using the wheel valve cap, unscrew the coil from the fuel rail fitting on the 2112 engine (similar design to the wheel valve). |
Gradually releasing the pressure, remove the coil.
| For clarity, we will show this again on the disassembled ramp of the 2111 engine. |
Place the test tube onto the fitting and tighten the clamp.
| We start the engine and check the pressure - it should be in the range of 2.85-3.25 bar (engine 2112). | Remove the vacuum hose from the fuel pressure regulator (engine 2111). |
The pressure should increase by 0.2–0.7 bar. Otherwise, the fuel pressure regulator is faulty.
On a VAZ engine, the 2111 injector can be removed without disassembling the fuel rail. Because of this:
| unscrew the nut with “24... | . and remove the tube from the regulator. |
| Unscrew the two screws with a 5-key hex key. | .. lift the regulator with a screwdriver... |
| . and take it off. |
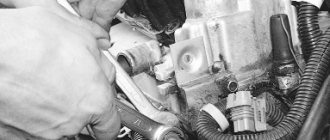
On a VAZ injector 2112 engine, you will first have to disassemble the fuel rail. To do this, remove the plastic casing from the engine, disconnect the gas cable and spark plug wires.
| Using the “13” head, unscrew the two nuts securing the throttle valve block and remove it. | We disconnect the tubes from the receiver, unscrew the two nuts with a “10... |
| ..and loosening the four clamps... | ... We pick up the phone. |
Attention! Close the intake manifold openings with plugs.
| Disconnect the crankcase ventilation hose. | Using a "10" wrench, unscrew the bolt that secures the probe guide tube and remove it. |
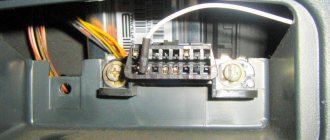
| Disconnect the fuel rail electrical connector. | Using two “17” keys, we disconnect the fuel line and return line (marking them). |
| Check the O-rings and replace faulty ones during assembly. | Unscrew the bracket securing the fuel pipes. |
| Using a 5" hex wrench, remove the two screws holding the fuel rail... | ... And remove it complete with injectors. |
| Using a 24mm wrench, unscrew the pipe nut and remove the pipe. | Unscrew the two screws securing the fuel pressure regulator using “5. |
| Slide the handset lock and remove the handset. | When shaking, pull out the fuel pressure regulator. |
On a VAZ engine with an injector 2111, it is easier to remove the fuel rail.
| Using two 17mm wrenches, unscrew the fuel line fittings. | Disconnect the electrical connector. |
Disconnect the bracket securing the fuel lines to the receiver.
| Using a 5-key hex wrench, remove the two screws securing the ramp. | By pulling the ramp along the axes of the nozzles, remove all four nozzles from their bodies. |
| We pull out the ramp with the injectors towards the left side of the car. |
You can check the injector (injector) winding with a tester. Its resistance should be 11-15 Ohms.
| After connecting the fuel lines to the rail, connect the electrical connector of the injector harness. Having placed the flasks under the injectors, turn on the engine with the starter. |
Fuel torches from the injectors must be of the same shape.
The amount of fuel supplied must also be the same, and to determine it more accurately, the engine must “run” for a sufficiently long time.
We check the quality of the fuel injector. To do this, disconnect the electrical connector from each injector and supply 12 V from the battery using two wires. Turn on the ignition.
| The injector nozzles should produce four jets of gasoline. |
If the electrical resistance of some injectors does not correspond to the norm, the flame of the sprayed fuel has a different shape from others, there are no four characteristic jets, the amount of fuel is clearly less than in others, then it is better to replace the injectors.
Remove the injector (injector) from the ramp in the same manner for 2111 and 2112 engines (shown for 2112).
| Use a screwdriver to move the lock... | . and take it off. |
| We remove the nozzle. |
Reassemble in the reverse order, paying special attention to the rubber sealing rings of the injectors and pipes. Scratches, cracks, tears are reasons for replacement.
Victor LELIKOV, Alexey REVIN. Technical Center "Tushino"
UKRAINE, Kharkov (tel. +3 8 0 67 575 21 50) 249444342
Many car enthusiasts have encountered problems with injection in the 16-valve VAZ-2112. Hence, this usually occurs due to contamination of the injector or rather the fuel atomization nozzles. Depending on how you drive and how the engine operates, they can atomize or "squirt" gasoline into the cylinders. But not many motorists know how to clean this element.
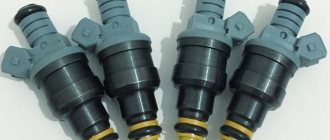
Injectors for VAZ 2110–2112 cars
Cars of the “tenth” family are equipped with various injection engines, each of which is designed to work with a specific model of injectors. Despite the fact that they have their own “names,” motorists usually use a “folk” classification based on color and thickness. For example: black thin ones.
This simplification usually works, but does not fully guarantee the compatibility of the injector with the engine. To avoid having to contact the chip tuner once again to correct the firmware of the electronic injection control unit, check the part number before purchasing.
Table: compatibility of injectors and engines of VAZ 2110–2112 cars
| Engine | Volume (l) | Number of valves | Controller (ECU) | Firmware | Injectors | |
| Siemens | Bosch | |||||
| VAZ-2111 | 1,5 | 8 | M1.5.4 | January-5.1 | VAZ6238 (thick gray) | 0 280 150 996 (turquoise thick) |
| VAZ-2111 | 1,5 | 8 | M7.9.7 | January-7.2 | VAZ6393 (beige thick) | 0 280 158 502 (black thin) |
| VAZ-21114 | 1,6 | 8 | M7.9.7 | January-7.2 | VAZ20734 (orange thin) VAZ20734 (yellow thick) | 0 280 158 017 (black thin) |
| VAZ-2112 | 1,5 | 16 | M1.5.4 | January-5.1 | VAZ6238 (thick gray) | 0 280 150 996 (turquoise thick) |
| VAZ-21124 | 1,6 | 16 | M7.9.7 | January-7.2 | VAZ20735 (blue thin) VAZ20735 (pink thick) | 0 280 158 022 (black thin) |
conclusions
As practice shows, cleaning the injectors (nozzles) of the 16-valve VAZ-2112 engine should be done in a car workshop on a special stand. If after cleaning they do not function normally, they must be replaced. Also, at the first sign of injector malfunction, it is worth cleaning them to avoid carbon deposits and other engine malfunctions.
The injector is an important element of the fuel injection system. The nature of the vehicle's movement, engine power and response, and environmental parameters depend on the operation of the part. How to repair them and, if necessary, replace them on VAZ 2110-2112 cars?
Differences between injectors for eight and sixteen valve engines
Among some motorists there is an opinion that the injectors for the “ten” differ depending on the number of engine valves. Others believe that the determining factor is the volume of the cylinders.
Clogged injectors can cause the car to jerk when driving.
In reality, neither one nor the other is wrong. The parts must match the engine design, model and firmware of the electronic control unit.
When replacing, it is best to install the same ones that were installed previously. Otherwise, there may be difficulties with startup and operation in transient conditions. To eliminate the shortcomings, you will have to adjust the firmware, which is almost impossible in a garage environment.
In-cylinder fuel injection has been known since the very dawn of the automobile industry. In the early 1890s, the German Rudolf Diesel and the Englishman Herbert Ackroyd-Stewart secured the rights to their own designs for an internal combustion engine running on fuel oil.
Signs of broken or dirty injectors
Diagnosing the operation of a car engine is a rather complex process, as it requires accuracy. It often happens that with the same symptoms, the causes of the malfunction can be completely different.
For example, increased fuel consumption and poor engine starting can be caused by both dirty, broken injectors and bad spark plugs. Therefore, it is better to once again make sure that the diagnosis is correct.
The most common symptoms of faulty fuel injectors are the following:
Fuel consumption jump
A significant increase in gasoline consumption during vehicle operation often indicates a clogged fuel injector. The quality of the air-fuel mixture formation process can be greatly affected even with minor contamination, since the injector nozzle has a very small diameter.
As a result, the efficiency of the power unit is significantly reduced. With such malfunctions, the injector nozzle cannot form a gasoline cloud of the required configuration.
As a result, a larger volume of gasoline burns inside the exhaust manifold. Because of this, the dynamic characteristics of the car are reduced, the load on the ignition coil, high-voltage wires, and spark plugs increases.
RPM drop
In cases where too much fuel is sprayed inside the cylinder, the engine speed is “flooded” with gasoline. Because of this, the dynamics of the car during acceleration are significantly reduced. In addition, with a constant load while the machine is moving, the engine speed will vary significantly. Normally, they should remain at a stable level.
Fuel leak
If the fuel injector housing is damaged, gasoline begins to leak out of it. As a result, the fuel simply does not reach the injector. Leakage often occurs through a defective device seal, which often cracks over time. When checking the injector, traces of leaks can be found on the nearest fuel rail.
Along with fuel leaks, a persistent smell of gasoline often appears. On the other hand, this situation occurs when a stuck injector is left open or damaged. Under such circumstances, it is important to find the real cause of the odor.
Problems with ignition and starting
If the injector nozzle is clogged, a sufficient amount of fuel does not flow into the cylinder, so the power unit will misfire while the car is moving. This will clearly manifest itself as a certain pause when pressing the accelerator pedal. If the proportions of the air-fuel mixture are violated, the power unit is susceptible to overheating.
When, despite the noise of the fuel pump, the car engine does not start, this indicates that the injector does not have a spark.
Frequent vibrations
Injector malfunctions lead to interruptions in the ignition process of the air-fuel mixture inside the cylinders. Therefore, while driving, the engine will vibrate and tremble. This occurs due to interruptions in the operation of one or more cylinders.
In some cases, this problem occurs due to clogged fuel lines or faulty ECU sensors.
Replacing injectors for VAZ 2110–2112 cars
Failure of injectors causes interruptions in the supply of fuel to the cylinders and a violation of the proportions of the combustible mixture. These consequences are reflected in the vehicle's movement pattern, ignition operation, fuel consumption, idle speed stability and CO content in the exhaust.
Table: malfunctions of injectors of injection engines
| Malfunction | Manifestation of malfunction | Method of identification and accompanying symptoms of malfunction |
| clogging (coking) of the spray nozzle |
| inspection and testing of the removed injector |
| valve depressurization (nozzle leaks) |
| exceeding the CO standard by 1–1.5% for each faulty part |
| valve stuck (valve closed) | engine "troits" | lack of response from a running motor when the power supply to the injector is turned off |
| unstable valve sticking |
|
|
To replace injectors you will need the following tool:
- open-end wrenches for 17 and 13,
- hex key 5,
- socket wrenches 10 and 13,
- Phillips screwdriver.
To get to these parts, you must remove the fuel rail. The dismantling sequence for eight and sixteen-valve engines is different.
Preventing problems with injectors
Cleaning injectors with dismantling or replacing them is a rather expensive procedure that significantly increases the car owner’s expenses. It is much easier to prevent such malfunctions than to try to repair the car and clean the injectors. First of all, the car owner will need to use high-quality fuel, refueling exclusively at proven gas stations. Visits to dubious gas stations, where they often sell low-quality fuel, should be avoided.
In specialized stores you can find high-quality auto chemicals and various fuel additives that clean the fuel system and remove possible contamination from the injector nozzles. Experts recommend carrying out such preventive work every 50 thousand mileage, which will allow car owners to eliminate any problems with injection, while avoiding the need for expensive and complex repairs. Also remember that by promptly contacting service at the first signs of a malfunction, you can clean the injectors without removing them from the car.
Let's sum it up
An increase in fuel consumption, problems with engine operation and a noticeable deterioration in car dynamics may indicate contamination of the car's injectors. In such a case, it is necessary to contact a service center as soon as possible and perform engine diagnostics, if necessary, clean the injectors or replace them. For preventive purposes, car owners should use only high-quality fuel, and once every 50 thousand mileage, fill the gas tank with special auto chemicals designed to eliminate such contaminants in the fuel system.
Removing the fuel rail of an eight-valve VAZ-2111 engine
- Disconnect the battery from the car body.
- Disconnect the vacuum line from the fuel pressure regulator.
- Loosen the gasoline supply and drain fittings and release the pressure. Unscrew the fuel lines and note their position.
Loosen the gasoline supply and drain fittings and release the pressure. Unscrew the fuel lines
- Disconnect the rack electrical connector.
Disconnect the rack electrical connector
- Unscrew and remove the bracket securing the supply and drain pipes.
- Unscrew the rack fasteners.
- Pull the rail and remove the injectors from their seating areas. Remove the rack.
Engineer Jonas Hesselman managed to combine ideas... In 1925, he released the first direct gasoline injection engine in the history of transport. It was a kind of hybrid engine that ran on anything that burned: gasoline, kerosene, diesel fuel, oil could serve as fuel for it...
Symptoms of a problem
If there are problems with the injectors, a small amount of fuel enters the cylinders. In some cases, powering the engine becomes completely impossible. There are several signs by which you can determine that the problem is in the injectors:
- Problems starting the engine. This is due to insufficient fuel entering the cylinders;
- The engine is unstable at idle and low speed;
- Significant reduction in power and failures in operation;
- Increased fuel consumption;
- The engine may trip.
Dismantling the fuel rail of the VAZ-2112 engine
- Disconnect the battery.
- Remove the engine protective shield.
- Disconnect the high-voltage wires from the spark plugs.
- Loosen the air and crankcase hose clamps. Remove the air hose assembly
- Disconnect the crankcase primary circuit ventilation hose from the throttle body
- Loosen the fastening, remove the damper cable from the bracket
- Unscrew the throttle assembly fasteners. Remove the assembly from the studs along with the hoses, move it to the side and secure with improvised means. Disconnect the electro-pneumatic valve hose from the receiver.
- Disconnect the vacuum booster hose.
- Unscrew the receiver mounts.
- Loosen the intake manifold clamps.
- Remove the receiver, close the manifold holes with rag plugs.
Disconnect the crankcase ventilation hose from the cylinder head cover.
- Unscrew the fastener and remove the oil level indicator guide tube.
- Disconnect the fuel rail electrical connector.
- Unscrew the fittings, disconnect the fuel supply and drain hoses. Remember their position.
- Unscrew the fastening, remove the bracket for the fuel supply and drain pipes.
- Unscrew the fastening screws with a hexagon.
- Remove the fuel rail assembly.
Diagnostics
Almost every car enthusiast can check the injectors on their own. Some work can be carried out without removing these parts from the engine. For a more detailed examination of the reasons, it is better to remove the problematic injector from the engine. Self-diagnosis should occur in the following order:
- The integrity of the wires supplying power to the injector is checked. To do this, you can measure the resistance on them;
- Find out which injector has the problem. They do this as follows: start the engine and take turns removing the wires from the injector terminals. If it works in this cylinder, then you can hear changes in the operation of the engine; a broken injector does not cause changes;
- Check the winding resistance. To do this, multimeter probes are connected to the terminals. For serviceable injectors, the resistance should be in the range of 11-16 ohms. If the indicator is higher, then the part must be replaced;
- For the next check, the fuel rail must be removed. Cups are placed under the injectors and the starter is turned for 10-15 seconds (longer operation can damage it). At the same time, observe the fuel spray cone. The amount of gasoline collected in the cups is also compared. This way you can definitely identify the faulty injector.
If after all the steps you have not decided on the cause of the malfunction. That is, the injectors are working properly. Pay attention to the gasket on it. If it is deformed or damaged, then it is likely that the problem is air leakage through it.
Removing parts
The injectors can be removed and replaced after the fuel rail has been removed.
Compress the retaining spring and disconnect the electrical connector for each injector.
- Slide and remove the parts lock on the fuel rail.
- While rocking, pull out the nozzle. Remove any parts that require replacement.
Install new injectors, fuel rail and other dismantled parts in the reverse order.
Do not use used injector rubbers; install new ones, first lubricating them with engine oil.
If necessary, replace the fuel pipe O-rings.
Spark Plug Inspection
If the spark plugs are wet, then gasoline flows. Dry? In this case, you need to check the signal at the harness connector of the mechanical liquid or gas atomizer (injector) with a probe (as shown in photo 6).
Did you do it, but the spark plugs are still dry? Then you will have to unscrew the screws securing the ramp and lift it under the intake manifold so that the injector nozzles can be seen. We turn on the ignition and turn the engine crankshaft with the starter. If there are no streams of fuel, you need to remove the injectors and most likely replace them with new ones. True, almost every serious service will recommend that you wash them.
If the price of a new set of injectors is slightly higher than flushing, then you should choose a replacement. Injectors also experience age-related problems. Also read:
Why is a lambda probe needed in a car?
Repair
Before removing the injectors from the dismantled rack, it is advisable to check their functionality. To check you will need:
- four identical containers,
- tester,
- wires.
Functionality check
- Connect the gasoline supply and drain hoses and the power connector to the rail with injectors.
- Place the rack over the measuring cups.
- Crank the engine with the starter.
- Evaluate the performance of the sprayers. The shape of the cloud should be approximately the same for all nozzles. The amount of fuel in the measuring containers should not differ much. Significant differences indicate contamination and changes in performance. Coked with resinous deposits and clogged, they require cleaning. A complete lack of fuel at the nozzle outlet indicates a valve malfunction and the need for replacement.
The shape of the cloud should be approximately the same for all nozzles
- Turn off the ignition. Disconnect the power connectors from the injectors.
- Measure the electrical resistance of the winding of each part. Its nominal value is 11–15 ohms. Deviations from the norm indicate the presence of hidden problems in the solenoid valve, which indirectly affect the shape of the torch and performance. It is advisable to replace such an injector.
- Turn on the ignition. Make sure the injector valves are tight. If a part is leaking, it should be replaced or at least try to wash it and check its functionality again.
- It is difficult to check the injector for unstable valve hanging, since this malfunction can occur quite rarely. To identify, connect the electrical connector of the injector with separate wires to the battery. Periodically turning the voltage on and off, watch the spray pattern. The shape and intensity of the torch of a working injector is the same every time; periodic changes occur when the valve does not open completely. If the background sometimes “accidentally” does not work, it must be replaced.
After the war, Germany received a ban on the development of injectors for aircraft engines. And engineers began adapting direct injection systems for passenger cars, discovering another important advantage compared to carburetors - efficiency.
in our VKontakte group
DIAGNOSE YOUR CAR YOURSELF!
The Electronic Engine Control Module (ECM) has injector control circuits for each cylinder, each of which controls a different injector. The injector turns on when the control circuit is shorted to ground by the ECM. The ECM monitors the current in each control circuit. The ECM senses and controls the voltage drop with a fixed resistor. Each control circuit is monitored to determine malfunction. If the voltage in the circuit differs from that set in the ECM, a diagnostic trouble code is set.
Conditions for the DTC to Occur
Conditions for setting the DTC.
There is an open circuit or short to ground in the injector circuit.
Action Taken When the DTC Sets
The malfunction indicator lamp lights up. The controller records the operating conditions at the time the fault is detected. This information is stored in a status record buffer and fault logs. An archive of diagnostic trouble codes is saved.
Conditions for Clearing DTC/Malfunction Indication
The malfunction indicator lamp turns off at the end of the subsequent test cycle, during which the diagnosis runs without failure. The historical DTC clears after 40 heat cycles without failure. The DTC can be cleared by a scan tool.
Diagnostic guidelines
An open or short to ground in the injector control circuit will cause this DTC to set. It also causes misfire due to a malfunctioning injector. An ignition diagnostic trouble code should also be set indicating the faulty injector. Too high or too low long-term and short-term fuel trim indicate a faulty injector. See “Checking Injector Balance” in this section to check for faulty injectors. The injector resistance measured at the ECM connection is slightly higher than that measured at the injector itself because it includes the harness resistance. The normal value is about 13.5 ohms.
Malfunctions of the injector (nozzles) occur on both diesel and gasoline engines. In the design of the power supply system of an injection engine, the nozzle is an element that is responsible for injecting a sprayed portion of fuel into the combustion chamber under a certain pressure.
Precise dosing, tightness and timely operation of the injection nozzle ensure stable and proper operation of the engine in all operating modes. If the injector “flows” (passes excess fuel at a time when its supply is not required), the efficiency of fuel atomization decreases (the shape of the torch is disrupted) and other injector malfunctions occur, then the engine begins to smoke gray or black smoke, loses power, consumes a lot of fuel and etc.
Read in this article
Replacement or flushing?
Some problems can be eliminated by cleaning and flushing. Others are “treated” only by replacement.
Table: problems with injectors
| Malfunction | Remedy |
| reduced performance | flushing, replacement if flushing fails |
| leakage | flushing, replacement if flushing fails |
| increased productivity | replacement |
| valve sticking | replacement |
| unstable valve sticking | flushing, replacement if flushing fails |
| overestimated or underestimated winding resistance | replacement |
In these cases, flushing is not a panacea. This method should be used taking into account the mileage and quality of service during operation.
During operation, the injector nozzles inevitably become coked and clogged with resinous deposits. The picture is aggravated by low-quality fuel, which can introduce additional pollutants.
For some time, fuel atomizers continue to operate without any visible changes, but sooner or later contaminants accumulate, changing the shape of the spray and reducing performance.
Injector life expectancy is limited even when using the cleanest fuel. Manufacturers recommend changing them every 100–120 thousand kilometers. Due to the fact that motorists use imperfect gasoline, and the one that can be bought at gas stations, the part has to be changed after 80-100 thousand km.
There is an opinion among motorists that “there is no need to interfere if everything works fine.” This opinion is justified, but only if the owner is ready to replace the nozzles with new ones approximately every 50 thousand kilometers.
The fact is that by getting rid of minor deposits as they accumulate, the owner extends the life of the consumable, since pollutants do not have time to cause irreparable damage.
Clogged injectors begin to interfere with normal operation after 30–50 thousand km.
Initially, negative processes manifest themselves only in increased fuel consumption. Owners do not always associate the increased “appetite” of the engine with injectors, since there are many reasons for this phenomenon.
In the range of 50–80 thousand km, pollution, having accumulated, can cause interruptions in engine operation, which is no longer undetectable. It becomes clear that “you have to get into the injectors,” but cleaning them at this stage may be useless. When a clogged part is used for a long time, the diameter of the nozzle often increases. Flushing will remove contaminants, but the original parameters will not be restored.
To extend the life of trouble-free operation and postpone replacement, you should regularly check the
pour injector cleaning fluid into the tank or use it in another way recommended by the manufacturer.
Motorists' opinions about the effectiveness and safety of injection chemicals are contradictory. Many people fear that flushing without removing it from the engine will clog the cylinders.
Indeed, if the car owner has not touched the injectors for a long time, it is impossible to do without removing the rack. The chemicals in the tank can cause harm instead of benefit. If you use cleaners regularly, without waiting for characteristic malfunctions to appear, there will be no harm to the engine from the chemicals.
Although injection chemistry has a beneficial effect on slightly dirty injectors, its use does not guarantee that the atomizers will comfortably “live” the entire period “allotted” to them by the manufacturer. You can unsuccessfully fill the tank with “left” gasoline at almost any gas station.
To minimize the accumulation of deposits, manufacturers recommend additional preventive flushing with special products every 30 thousand kilometers.
Table: advisability of flushing and replacement depending on mileage
| Mileage (thousand km) | Flushing | Replacement |
| up to 30 | preventive flushing with fuel additives every 3–5 thousand km | individual replacement of faulty parts |
| 30–80 | preventive flushing with a special agent every 30 thousand km | individual replacement |
| 80–120 | preventive flushing with a special agent every 30 thousand km | complete replacement of all injectors if at least one faulty one is detected |
How to clean injectors
Most often, the problem with the operation of injectors is their banal contamination. Therefore, to restore their functionality and return the injector to its nominal performance, it is enough to clean it. This can be done in two ways - without removing it from the engine (by adding a special cleaner to the fuel) and in the removed state (passing the cleaner through a separate nozzle or using ultrasound). The following methods are used for cleaning:
- mechanical;
- ultrasonic;
- using chemical compounds.
Flushing without removing from the engine
At the first sign of clogged injectors, repairs should not be put off for a long time, as delay only aggravates the situation. You can turn to professionals for help, but you can also wash it yourself.
To assemble a homemade device and wash them, you will need:
- flushing liquid - 1 l;
- plastic bottle with cap;
- fine fuel filter;
- rubber hose with a diameter of 12 mm - 1 m;
- clamp 12–14 mm - 2 pcs.;
- nipple assembly (fungus) - 2 pcs.;
- foot or electric pump with pressure gauge.
Washing sequence:
- Drill holes in the bottom and cap of the bottle and install nipples in them.
- Connect the bottle cap nipple and the fuel filter with a hose. Secure the connections with clamps.
- Start the engine, warm it up to 90–95 ° C.
- Turn off the engine. Relieve fuel pressure.
- Disconnect the gasoline supply hose from the injector rack. Instead, connect the filter outlet of a homemade flushing device to the fitting.
- Pour the rinsing liquid into the bottle. Screw on the lid.
- Connect the pump to the free nipple, bring the pressure inside the container to 3 kgf/cm².
- Start the engine with flushing fluid. Let it idle for 15 minutes. Maintain pressure in the container using a pump.
- Stop the engine, wait 15 minutes. Repeat the work and rest cycles until the flushing fluid runs out.
- After stopping the engine yourself, release excess pressure in the bottle using the nipple. Disconnect the flushing device. Connect the gasoline supply hose.
In a similar way, you can wash the fuel rail assembly removed from the engine without dismantling the injectors.
Cleaning the nozzle without removing it
In this case, cleaning can be carried out using several methods:
- Using special cleaning additives that are added to the fuel. They contain special cleaning agents that gently clean the injector openings.
- Cleaning using pressure. To do this, you need to accelerate the car to a speed of 110.130 km/h, and drive for 10.15 km (about 5.6 minutes) at high engine speeds. Due to the high load, natural cleaning will occur in the nozzles.
- Idling. This method is similar to the previous one. It is necessary to start the engine while the car is stationary and maintain the speed at 4.5 thousand for 3.4 minutes. This will also clean the injectors. However, the previous cleaning method is better because the load under its conditions is higher.
conclusions
Problems with the operation of the injectors are not a critical failure, but if they occur, we recommend that you do not delay checking and eliminating the malfunction. In most cases, repair work can be carried out independently using the methods described above. Timely checking and diagnostics of injectors will allow you to avoid problems with the operation of the machine. Prevention will cost you less than repair work on injectors or other engine components. We recommend that you clean the injectors every 30.35 thousand kilometers of your car, regardless of their condition.
Washing removed from the engine
To wash an injector removed from the engine, it is necessary to create increased pressure of the cleaning liquid at its inlet, and then periodically turn the solenoid valve on and off, simulating the operation of the car’s electronic control unit.
Increased pressure can be easily created by using carburetor cleaner in an aerosol can. In addition to this, you will need:
- DC voltage source 12 V,
- wires,
- non-latching button,
- terminals for connecting to the injector,
- disposable syringe 5 ml,
- cambric (plastic tube) for connecting the syringe and the spray can,
- container for collecting flushing liquid.
Washing procedure:
- Remove the plunger from the syringe. Connect the nozzle of the syringe and the nozzle of the aerosol can with a cambric. Secure the connection with wire or tape.
- Connect the nozzle to the power source via the button.
- Place the wide end of the syringe onto the inlet of the nozzle.
- Direct the outlet into a container to collect liquid.
- Press the aerosol can nozzle and fill the syringe with flushing fluid.
- Press the power button and open the nozzle.
- Repeat washing until you get an intense torch of an acceptable shape at the output.
- If necessary, flush the nozzle in the opposite direction in the same way, applying the flushing liquid not to the inlet, but to the outlet.
Ultrasonic cleaning
A modern way to clean an injector is to use ultrasound. Here you will need to remove the injectors from the engine and place them in an ultrasonic bath. Cleaning is carried out using micro-explosions of ultrasonic waves capable of reaching thousands of atmospheres (cavitation effect). At the bottom of the bath there is an ultrasonic generator. The nozzles are lowered into it and, due to cavitation, the maximum effect of peeling off blockages in the nozzle channels and sediments in the nozzle channels is achieved.
Thanks to the use of an ultrasonic bath, the surface of the nozzle and its internal working cavities are cleaned. Varnish and carbon deposits are also possible on the inner surface, since it is located in a working area of high pressure and high temperatures. The internal surface of the device is cleaned exclusively in the active cleaning mode. This mode assumes that the nozzles open and close while being in the working solution with the part that directly sprays the fuel - the spray hole, during ultrasonic cleaning.
Ultrasonic cleaning is considered more effective, since it can also be used to clean those nozzles that cannot be cleaned with flushing liquid. Flushing the injector using this method will cost a little more.
Ultrasonic cleaning steps:
- Removal and inspection of injectors.
- Installation on a stand.
- Initial test on the stand (spray, performance).
- Washing with a special solution in a gentle mode in an ultrasonic bath.
- Intermediate testing of devices on the stand (spray, productivity).
- Additional rinsing if necessary.
- Final test on the bench (spray, performance).
- Install new filters and O-rings if necessary.
- Installation of injectors in the engine.
Bench testing is an advantage of this method. It is recommended to use an ultrasonic bath after 100 thousand km or more often if engine diagnostics have shown the need for this. The main disadvantage of the method is its high cost and the need to resort to the help of specialists. Injectors may be damaged due to improper ultrasonic cleaning. Of course, first make sure that the interruptions in engine operation are due to dirty injectors.
Replacing O-rings
To prevent fuel leakage, do not reuse the O-rings of the injector and injector body. They are replaced with new ones every time they are removed for any reason.
To remove the old ring, just pry it up with a screwdriver. When installing new ones, do not use hard tools; install the seals by hand. Before installing the injector, lubricate the rubber bands with engine oil.
An injection engine is not at all complicated, as owners of carburetor cars sometimes believe. Injectors are reliable parts that require only a little attention. Show it, and the engine will thank you.
Step-by-step procedure for checking injectors
When nothing interferes with the operation of the dismantled ramp, we reconnect the power supply and gasoline supply pipes to it. Don't forget about the negative terminal of the battery.
- When everything is connected and ready for testing, we fix the ramp with the injectors so that four measuring containers of the same volume can be placed under them. This is necessary to ensure that the measurements are made as accurately as possible.
- Next, it is best to ask an assistant to sit in the driver’s seat, and if this is not possible, secure the ramp motionless and start the engine yourself.
- While the starter is “spinning” the engine, make sure that the injectors work in the same rhythm and the fuel is sprayed evenly. When carrying out such diagnostics, it is very clearly visible which of the four injectors is “snotty” or does not work at all.
It is noticeable how one of the injectors works differently than the other.
The check ends some time after the injectors are turned off.
The latter should be given special attention if any of the pads does not work at all, because damage to the wiring becomes the reason for this. If damage is present, then it is necessary to replace the nozzle with a new one (see “more about choosing nozzles”).
Procedure for checking injector power supply
- First of all, disconnect all the pads from the injectors.
- Then, we connect two wires to the pre-working block, the other end of which we bring to the “non-working” injector.
- Next, turn on the ignition and if the injector starts working, this means it is necessary to replace the non-working element of the electrical circuit - the block, and if not, then only the injector needs to be replaced.