The presence of an on-board computer on a car allows you to identify faults in a timely manner and take appropriate measures before the breakdown becomes serious and expensive to fix.
The main thing here is to be able to correctly read error codes when diagnosing a VAZ 2114. Not everyone understands what exactly the car is indicating when issuing certain designations. Therefore, today we will try to talk about the most common error codes and note what each of them means.
TYPES OF CONTROL UNITS VAZ 2114
The fourteenth is a car whose production lasted for 12 years. Throughout the entire production cycle, Avto-VAZ engineers were constantly improving the main characteristics of the VAZ 2114. The changes also affected the brains of the car. The VAZ 2114 can be equipped with 8 generations of electronic units from different manufacturers.
Let's figure out how to find out which ECU is on the VAZ 2114. To do this, you need to look at the device itself - the numbers of the model number are printed on its body, rewrite these numbers and compare them with the markings given in the tables of this article.
GM-09 AND JAN-4
The first generation of brains of the fourteenth were represented by blocks GM-09 and January-4. Such devices were installed from the very beginning of production of the VAZ 2114 to 2003.
The first units had a wide range of models; the VAZ 2114 electronic controller could be distinguished by the presence of a knock sensor operating on the resonant principle and compliance with the EURO-2 standard.
Today the cost of such a device ranges from 5 to 5.5 thousand rubles.
List of ECU models GM-09 and January-4 (in the figure-table):
List of ECU models GM-09 and January-4
JANUARY 5.1.Х, ITELMA 5.1, BOSCH M1.5.4
The next generation of brains is represented by January 5.1.x devices. (a similar device was also installed on the VAZ 2113 and VAZ 2115).
On VAZ 2114 produced after 2013, 3 variants of the January 5.1.x block can be installed, the difference between which lies in the method of gasoline injection: there are devices with phased, simultaneous and pair-parallel injection.
It is worth noting that this January model line is completely identical to the Itelma 5.1 and Bosch M1.5.4 devices.
List of models January 5.1.x and Itelma 5.1 (in the figure-table):
List of models January 5.1.x and Itelma 5
List of Bosch M1.5.4 models (pictured table):
List of Bosch M1.5 models
The most common model on the VAZ 2114 produced in 2003-2007 is January 5.1.1, which can now be bought for 7-8 thousand rubles; export cars were most often equipped with Bosch 2111 1411020, which costs similar money.
JANUARY 7.2 AND BOSCH M7.9.7
Which modification of January 7.2 is installed on the fourteenth depends on the displacement of the power unit. Bosch controllers were installed, as a rule, only on export car models that were required to comply with the Euro-3 environmental standard.
For 8-valve VAZ 2114 with a volume of 1.5 liters. The following controllers were installed (in the figure-table):
List of controllers for VAZ 2114 8 valves 1
On a VAZ 2114 with an engine capacity of 1.6 liters (in the fig. table):
List of controllers for VAZ 2114 8 valves 1.6 liters
The cost of a new January 7.2 varies between 7-8 thousand, a used one is about half as much, the same ECU 2111 1411020 81 can be purchased for 3-3.5 thousand rubles..
JANUARY 7.3
This controller is the latest modification of domestically produced control units installed on the VAZ 2114. It is this that is equipped with all 8-valve cars with a 1.6-liter engine produced after 2007.
This ECU was produced by Itelma and Avtel factories; depending on the modification, it could meet the environmental standard Euro-3 or Euro-4.
Compliance of the VAZ 2114 ECU with environmental standards
The new Itelma 11183 1411020 02 standard EURO-3 now costs about 8 thousand rubles.
Catalyst
If the car's mileage is less than 100 thousand kilometers, most likely it still has a catalyst. By this time, it may already become clogged and not perform its direct function. Inside the catalyst there are small honeycombs on which carbon deposits accumulate over time. As a result, the gases cannot leave the combustion chamber normally, and the engine “suffocates.”
What is the solution to this problem? It's simple: instead of a standard catalyst, a flame arrester or just a straight pipe is installed. Another, most cost-effective solution is to remove the ceramic core of the catalyst mechanically. Access is provided after opening the case with a grinder, after which the hole is welded. This will not harm the engine. The maximum that will change is the smell of exhaust gases and their toxicity. But since we do not yet control any environmental standards, owners of used VAZs and foreign cars are completely getting rid of catalysts. The cost of a new element is more than 20 thousand rubles, and they are almost out of stock.
Car diagnostics
The appearance of a lit “Check Engine” lamp on the instrument cluster signals the driver that a problem has arisen in the vehicle’s electrical system. You need to understand that checking the vehicle yourself and at a service station can give different results. Special equipment available to professionals will allow more accurate detection of faults.
Self-diagnosis
On a VAZ 2115, the owner can do independent diagnostics and find out what errors are stored in the memory of the engine control unit. The procedure is carried out by calling up fault codes on the dashboard or using a diagnostic adapter.
To carry out diagnostics on the electronic instrument panel, you must perform a certain sequence of actions:
- Sit in the driver's seat of the car, insert the key into the ignition and press the daily mileage reset button located on the instrument cluster.
- Turn the lock key to the ignition switch position.
- Release the key, starting the self-diagnosis process. Visually, this will look like turning on the backlight, all signal lamps, possible symbols on the LCD screens and testing the instruments (the arrows will move across the entire scale in both directions).
- Press the key again and release. The second press displays the software version of the instrument cluster on the screen located under the speedometer (inscription like Uer x. x).
- Press the key again, after which the errors in the memory will be displayed on the screen.
Instrument cluster VAZ 2115, the button is located on the right side of the speedometer
We recommend: VAZ 2114: what to do if the starter turns for a long time and does not start?
The driver can perform self-diagnosis on the electromechanical panel and the “January-4” control unit according to the following sequence:
- Turn off the ignition.
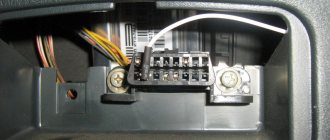
- Open the diagnostic connector cover located on the center console.
- Connect contact B to the negative terminal of the battery (to the body). Contact A, connected to the engine crankcase, is suitable for this.
- Turn on the ignition. The “Check Engine” lamp will flash code 12, which means the diagnosis has begun. The light signals are given as follows - a long flash, then a pause (about 2 seconds), two short flashes, a long pause (about 3 seconds). Signal 12 is sent three times. If there is no signal, the diagnostic system is inactive or faulty. After this, the Check Engine light will flash and list the errors in memory. Each code is repeated three times. If there are no errors in the memory, code 12 will continue to be transmitted.
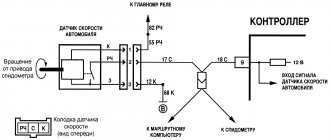
Electromechanical instrument cluster Pinout of diagnostic connector
To read controller errors, a special K-Line adapter is used, which is connected to the diagnostic connector using a connector. This connector is located on the center console behind a plastic plug (below the cigarette lighter and ashtray). The adapter has a cord with a USB connector at the end that connects to any laptop. A special program for reading and resetting errors must be installed on the device (OpenDiagFree version 1.4 or 1.6).
The procedure for reading errors is quite simple, you need to:
- Check the level of process fluids.
- Open the connector cover and turn on the ignition.
- Connect the adapter or scanner to the diagnostic socket.
- Launch the software on the laptop.
- View available errors in the program dialog box.
- Decrypt the codes using the program interface or decryption table.
- Eliminate the causes of malfunctions and re-diagnostics.
Instructions for performing diagnostics via a laptop with your own hands
For diagnostics you will need a laptop and a diagnostic adapter. The laptop can be of any power, it does not matter for diagnosis. The adapter is universal and suitable for all VAZ models (the author of the video is KV Avtoservis).
There may be a mismatch between the diagnostic pads. In this case, you can buy an adapter. A diagnostic program is supplied with the adapter, but the software can be downloaded from the Internet on specialized sites. They have the same set of functions, but may differ in unique features.
When connecting a laptop, the ignition must be turned off.
One end of the adapter is inserted into the DR, and the other directly into the USB port of the laptop. After connecting the adapter, turn on the ignition. At the next stage, we launch the program and begin diagnostic work. When the program starts, the computer connects to the electronic control unit.
The interface will depend on the downloaded program. These can be lists with indicators or graphs with values. Based on these readings, we can draw the first conclusions about the operation of the engine and the main systems of the car.
Diagnostic Tool Interface
When a list of detected errors is displayed, their decryption can be found in the test file, which is usually attached to the program. It deciphers all the errors that may appear during malfunctions.
Having deciphered the codes of detected errors, you should begin to eliminate them. First of all, it is worth checking the sensors, since the correctness of the readings and operation of the ECU depends on their serviceability. A sensor malfunction may cause the error to appear. For more accurate diagnostics, additional checks of machine components may be necessary. After fixing all the problems, be sure to run a test to make sure everything is working without errors.
Don't forget that all data is stored in the microcontroller's memory. Therefore, before a new check, they need to be reset.
To do this, turn off the ignition and turn off the diagnostic equipment. To reset data from the microcontroller, simply disconnect the negative terminal on the battery. Then the process is repeated: the laptop is connected and diagnostics are repeated. The process is repeated until all errors are eliminated.
What program is needed?
Most often, software that will need to be installed on your laptop is also sold along with the adapter. It should be borne in mind that the power of the computer does not matter. Old models can also be used for work. Diagnostics of the VAZ 2114 car is carried out taking into account the fact that all domestic cars have the same connectors installed. If you don’t have the software you need, you can easily find it online. There is nothing difficult about downloading the program; by the way, you can also find free software.
Attention! To carry out additional work, you will need devices such as a multimeter and a compressor.
How to do a self-diagnosis
If a fault check is done at a service station, a special device is connected to the on-board computer, which displays errors in a four-digit format. However, domestic manufacturers have provided another way to obtain information about the condition of the car - to do this, it is enough to run self-diagnosis. It’s easy to do it yourself if you follow the following instructions:
- Below the speedometer on the dashboard there is a dedicated odometer button.
- Press it and turn the ignition key to the first position.
- Immediately after turning the ignition key, release the button.
- After these actions, the instrument needles should begin to move.
- Press the button again and release immediately. If you did everything correctly, data about the firmware version of the on-board computer will appear on the speedometer.
- Press the button one last time and release it. After this action, fault codes should appear on the display.
Please note that during self-diagnosis, the on-board computer has a habit of adding the resulting combinations.
For example, car enthusiasts often look for information about failure number 10, which hides stacked errors 2 and 8.
Nuances of self-diagnosis
Indications for self-diagnosis and contacting specialized service stations will be different, error codes are also displayed differently. Therefore, today we will consider two options.
It is not at all necessary to use the on-board computer to diagnose problems with the car. Not all VAZ 2114 owners know about this method, so we will definitely tell you about it.
It consists of the following steps.
- Sit in the driver's seat and hold down the odometer button.
- Then turn the ignition key to the first position.
- Release the odometer button. After this, the arrows will start moving.
- Press the button again and turn it off. This will allow you to see which firmware version is used in your case.
- Press and release the button a third time. So you will see codes indicating the presence of certain errors in the operation of the car.
We recommend: Decoding and methods for eliminating error codes on Ford Focus
Since this is not specialized equipment, the codes will be presented in this case as two-digit designations, rather than four-digit ones.
Let's now look at the most popular errors that occur during such diagnostics and figure out what the code means. Even without an on-board computer, you can detect faults on the VAZ 2114 using the odometer codes.
We suggest you familiarize yourself with them in the table.
| Code | Description |
| 1 | Problems with the microprocessor |
| 2 | There are problems in the fuel level indicator sensor circuit in the tank. |
| 4 | The power supply voltage is too high |
| 8 | Voltage too low |
| 13 | There is no signal from the oxygen sensor |
| 14 | Coolant temperature sensor signal level is very high |
| 15 | Coolant temperature sensor signal level is very low |
| 16 | The voltage in the on-board network is too high |
| 17 | Very low voltage in the on-board network |
| 19 | The crankshaft position sensor is sending an incorrect signal. |
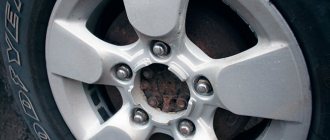
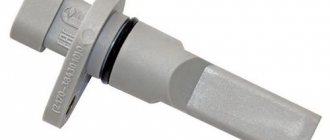
| 24 | Vehicle speed sensor is faulty |
| 41 | Phase sensor sends incorrect signals |
| 51 | Problems detected with the persistent storage device |
| 52 | Problems detected with the random access memory device |
| 53 | CO potentiometer does not work |
| 61 | Lambda probe sensor does not work |
It is important to take into account the fact that mistakes can add up. For example, if your car has faults indicated by codes 4 and 1, the odometer will show the number 5.
Plus, all fault codes will be stored in memory until you manually reset them. To do this, you need to disconnect the terminals from the battery while keeping the ignition on, wait a few seconds and connect it back. Don’t forget to do this, especially if you are going to go to a service station for diagnostics. They will find these errors and will eliminate them, although in fact you have already done everything yourself before. Pay extra money? No, it's not worth it.
Oxygen sensor
This is one of the most common reasons why the “check” light is on on the VAZ-2114. All Ladas of this model leave the factory with a catalyst. As a result, an oxygen sensor is needed for its proper operation. The ECU uses it to determine which ignition timing to set next, as well as the composition of the mixture.
If the sensor stops providing information or sends incorrect data, the ECU will take average values as a basis, and a “check” will light up on the instrument panel. What is the solution to this problem? Many people simply place a fake one. The best option is to install a mechanical blende. It screws into the standard hole and simulates the operation of a lambda probe. The ECU constantly receives the same, normal lambda value. Such a sensor will no longer be able to break, since it has a special coating.
PRINCIPLE OF OPERATION AND LOCATION OF THE DEVICE
The electronic engine control unit starts working when the ignition is activated; it continuously functions while driving, collecting information from various fourteenth sensors. The received information is analyzed by the processor and, based on the results of the analysis of the received data, the device controls the functional systems of the VAZ-2114.
The VAZ 2114 engine control unit receives information from the following fourteenth sensors:
- (sensor) speed of movement;
- Oxygen;
- Detonation;
- Fuel injection phases;
- Crankshaft position;
- Throttle position;
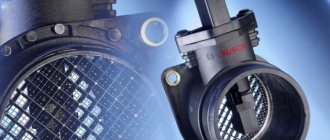
- Instant air flow;
- Liquid temperatures in the cooling system.
Based on the information received, the ECU on the VAZ 2114 controls the following systems and components of the vehicle:
- Adsorber;
- Ignition system;
- Injectors and fuel pump;
- Ventilation;
- Automatic diagnostic programs;
- Idle speed control unit.
The brains on the VAZ 2114 consist of 3 separate devices, each of which has an individual type of memory:
- Random access storage device - a RAM block is a system with short-term memory. RAM contains information about recent errors that the ECU detected in the fourteenth systems and various current vehicle parameters. The RAM memory is completely updated when the ignition is turned off.
- A programmable permanent storage device is the main memory unit; it stores the ECU firmware. The PROM contains information about the results of calibrations of the fourteenth systems, as well as the power unit control algorithm. The EPROM memory is permanent; it is stored when the ignition is turned off. With certain skills, the EPROM block can be reprogrammed, which will improve the power and dynamics of the VAZ 2114.
- An electrically reprogrammable storage device is the main functional purpose of the unit - protecting the machine. The EEPROM contains data from the fourteenth anti-theft system - passwords and their encoding. It will be possible to start the engine only after the EPROM and the immobilizer compare data with each other.
The VAZ 2114 ECU is hidden inside the dashboard, right under the dashboard. In order to get to the brains, you need to use a Phillips screwdriver to unscrew the fixing screws and remove the side panel of the dashboard from the passenger seat. There you will see a longitudinal plastic brain housing, which is inserted inside a stainless steel retainer.
To remove the control unit, you need to unscrew the fixing bolt and pull the lock towards you, after which the device can be freely removed (you must first completely de-energize the car by removing all terminals from the battery).
Video
The Garage channel, using the VAZ 2115 as an example, showed the procedure for checking a car using a computer; in the case of the 2114 model, this operation is performed identically.
Are you the proud owner of a VAZ-2114 car and are you going on a long trip? Then you just need to prepare the car for a long journey so that unforeseen situations do not take you by surprise.
What’s good about this car is that it has an on-board computer that will always warn you about a particular breakdown. However, many car owners are not familiar with even half of the numbered errors that the electronic control unit (ECU) produces. Also, do not forget that the VAZ-2114 is an injection engine, and this type of engine has its own nuances and coding, which we will now consider, because the ability to read the error code in a timely manner is guaranteed to protect you and your car from further major repairs of the engine and chassis parts.
Meaning and decoding of codes
During self-diagnosis of a VAZ 2115 with an injector, only numbers or flashes that code the error will be shown on the instrument panel. When reading trouble codes from an electromechanical instrument cluster, it is necessary to record the number of flashes and calculate error numbers from them. Their purposes can be deciphered using a special list. Most of these faults can be resolved independently by replacing failed sensors.
Self-diagnosis codes
When performing diagnostics, it is necessary to take into account that the number on the screen may indicate two summed errors. For example, 9 indicates the presence of two faults - numbered 1 and 8.
| Numeric combination | Decoding |
| 1 | ECU problem |
| 2 | Incorrect data from the fuel level sensor |
| 4 or 8 | Network power problems |
| 12 | Malfunction of the error lamp circuit in the instrument cluster |
| 13 | No signal from lambda probe |
| 14 or 15 | Incorrect data from temperature sensor |
| 16 or 17 | Problems with the network power supply, it is necessary to check for short circuits |
| 19 | Motor shaft position sensor error |
| 21 or 22 | Throttle sensor error |
| 23 or 25 | Incorrect operation of the intake air temperature sensor |
| 24 | Speed sensor faulty |
| 27 or 28 | No signal from lambda probe |
| 33 or 34 | No air flow data available |
| 35 | Idle speed control sensor is faulty |
| 42 | Ignition control circuit problem |
| 43 | Knock sensor failure |
| 44 or 45 | Violation of the composition of the mixture |
| 51 or 52 | ECU memory errors |
| 53 | Error in CO setting sensor (installed on cars without converter) |
| 54 | Octane corrector sensor (installed on cars without a converter) |
| 55 | Violation of the composition of the mixture |
| 61 | Failure of the lambda probe |
An example of error 14 appearing on the panel
We recommend: The engine does not develop power: what to do?
Table of decoding codes for flashes calculated during diagnostics.
| Error code | Flash combination | Decoding |
| 12 | Long-pause-two short | Diagnostic circuit malfunction |
| 14 | Long-pause-four short | Engine temperature sensor malfunction |
| 15 | Long-pause-five short | Likewise |
| 16 | Long-pause-six short | Abnormally high mains voltage |
| 17 | Long-pause-seven short | Abnormally low mains voltage |
| 19 | Long-pause-nine short | Crankshaft position sensor failure |
| 21 | Two long, pause, one short | Incorrect data from the throttle position sensor |
| 22 | Two long, pause, two short | Likewise |
| 24 | Two long, pause, four short | Problem with the speed sensor |
| 27 | Two long, pause, seven short | Lambda probe failure |
| 28 | Two long, pause, eight short | Likewise |
| 33 | Three long, pause, three short | Air flow meter needs to be checked |
| 34 | Three long, pause, four short | Likewise |
| 35 | Three long, pause, five short | Idle speed outside the tolerance range |
| 43 | Four long, pause, three short | No signal from knock sensor |
| 51 | Five long, pause, one short | Memory error in block |
| 52 | Five long, pause, two short | Error in controller |
| 53 | Five long, pause, three short | Memory error in block |
| 61 | Six long-pause-one short | No signal from the immobilizer |
The data obtained allows you to quickly find the faulty element and eliminate the cause of the error.
The video from the Garage channel shows diagnostics on a VAZ 2115 using a scanner and laptop.
Controller errors
The most common controller errors encountered during diagnostics are listed in the table.
| Program error number | Decoding |
| R 0030-0038, 0141 | Malfunction of the lambda probe heating system |
| R 0102 and 0103 | Incorrect signal from the air supply sensor |
| R 0112 and 0113 | Error in data from intake air temperature sensor |
| R 0115-0118 and 0217 | Problems detecting engine temperature or overheating |
| R 2122 and 2123, 0222 and 0223, and 2138 | Incorrect signal from the gas pedal and throttle position sensor |
| R 0171-0172 | Incorrect mixture parameters |
| R 0201-0204 | Faulty injectors (each cylinder has its own code) |
| R 0261-0272 | Problems with injector control |
| R 0130-0134 | Problems with the functioning of the lambda probe before the converter |
| R 0136-0140 | Problems with the functioning of the lambda probe after the converter |
| R 0300 | Multiple misfires |
| R 0301-0304 | Cylinder misfires |
| R 0326-0328 | Knock sensor failure |
| R 0351-0352, 2301 and 2304 | Monitoring the operation of ignition coils |
| R 0422 | Failure of the neutralizer |
| R 0691-0692 and 0693-0694 | Failure of the first and second cooling fan start relays |
| R 0560-0563 | Problems with power supply |
| R 0627-0629 | Indicates incorrect operation of the fuel pump control circuit |
| R 1602 | Malfunction in the engine parameters control controller |
Reset errors
After self-diagnosis, finding out the cause of the problem and correcting the breakdown, the errors can be reset.
To do this, go to the error viewing menu, press the odometer reset key and wait a few seconds. The number 0 will light up on the screen - the error has been reset. In this case, data about problems is stored in the unit’s memory and must be deleted. If left, the “Check Engine” light will light up in the instrument cluster. In addition, self-diagnosis may not read all electrical system errors; the error removal procedure will show whether a more detailed analysis of the vehicle’s electronics is needed.
To reset the error, do the following:
- Turn on the ignition.
- Open the hood and remove the negative terminal from the battery. Wait about a minute, connect the wire back and close the hood.
- Turn off the ignition.
- Turn on the ignition again and start the engine. The Check Engine light may come on briefly and then go off.
If the symbol remains illuminated, there is an ongoing problem with some sensor or wiring in the vehicle. It can only be found out using a special scanner. It is necessary to conduct additional diagnostics to determine the problem node. Then carry out repairs and clear any existing errors using a computer diagnostic program for the ECU.
Resetting errors on cars with an electromechanical instrument cluster is carried out by disconnecting the negative terminal of the battery from the on-board network for 10 seconds. The ignition must be turned off.
Pump
We are not talking about water, but about fuel. If it malfunctions, the car may behave strangely, and a “check” will also light up on the panel. Usually the cause is low blood pressure. The filter may be clogged. Both need to be examined. This is a coarse and fine filter. The first is a mesh near the pump, and the second is located separately from it and has its own housing.
It also happens that the pump itself burns out. This is especially true on cars with HBO. Some owners do not turn off the gas pump when switching to gas and, in addition, drive with an almost “dry” gas tank.
Removing the error from the device memory
This procedure is used in three cases:
- the occurrence of an error blocks the ability to operate the car (you need to get to the service station under your own power);
- a complete check of all components was carried out and no fault was found;
- The damaged part has been repaired or replaced.
To reset the on-board control system data, you must remove all terminals from the battery and then plug it back into the vehicle's power circuit. It will only take a few seconds to disconnect the battery. After this, the error record will be erased from the system memory. If you want to carry out this procedure for further operation of the vehicle, then remember that the trip should be short - to the nearest car service center.