The question is how to check oil pressure sensor (hereinafter referred to as DDM) is of interest to drivers who have encountered problems with the operation of the engine oil system, in particular when the oil light is on. You can check this unit using an electronic or dial multimeter, a test light or a working pressure gauge. The verification procedure is simple, and even a novice car enthusiast can do it. The following are detailed verification algorithms indicating the subtleties and nuances.
Types of DDM
Oil pressure sensors are divided into two types:
- Mechanical. They are used on cars that have become legends in the automotive industry, in particular, VAZ 2101, UAZ, Moskvich 401/407/412/, 2141 and others.
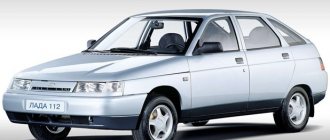
- Electronic. Installed on all modern cars, for example, domestic VAZ 2114, Kalina and other Lada models, as well as foreign cars.
Mechanical sensors
Mechanical sensors by design are divided into:
- Devices with two rods and a capillary tube.
- Devices with a rheostat.
The first ones consist of a body, a membrane, two rods, and a sealed tube.
As the pressure in the lubrication system increases, the membrane bends, putting pressure on the first rod, thereby increasing the pressure in the tube. The second rod takes this pressure and transmits it to the differential pressure gauge (located on the instrument panel).
The pressure increases - the arrow of the device deviates in a larger direction, falls - the arrow goes down to the left. The principle of operation is the same as that of a pressure gauge.
The mechanical oil pressure sensor with rheostat consists of:
- Cases.
- Membranes.
- Slider.
- Nichrome winding (resistor).
The device operates on the principle of a voltmeter. The rheostat and slider play a key role here.
The rheostat changes its resistance depending on where the slider is moved. The latter, in turn, shifts in one direction or another as the membrane bends or straightens.
When there is no pressure, the membrane is not deformed and the slider does not move, the current passes freely without encountering any resistance along its path.
As the pressure increases and the membrane deforms, the slider moves along the rheostat, thereby increasing the resistance in the circuit; accordingly, the current readings change, which is displayed on the device in the driver’s cabin.
All this is recorded by the ECU, to which the sensor is connected. It is programmed in such a way that only one period of current values is equal to the standard oil pressure. Exceeding this interval is equivalent to an incorrect value.
This is clearly visible on dial analog pressure gauges, which, in fact, are ordinary voltmeters.
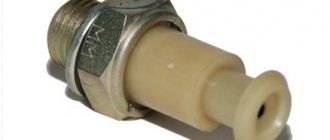
Electronic sensors
Electronic DDM is much simpler than its mechanical counterpart, so it is considered more reliable.
Essentially, this is an emergency sensor that does not show the pressure in the system, but only notifies the driver when it is within normal limits and when it is not.
It consists of:
- Cases.
- Membranes.
- Contacts
- Stock.
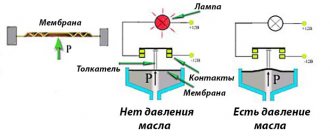
Principle of operation. When pressure is not applied to the sensor membrane, it is not deformed. The rod is in a position in which the circuit contacts are closed and current flows through them. At this moment, a lamp is lit in the cabin, which is monitored by the driver.
When the engine starts, the oil pressure in the system increases, the membrane bends, the rod moves, opening the circuit. The light goes out.
If after starting the engine the lamp does not go out within 1-2 seconds, you must immediately turn off the engine and do not start it until the cause of the malfunction is determined.
Read more here - what to do if the oil pressure light is on.
Based on the above, we can conclude that the basis for checking the oil pressure sensor on modern cars is measuring the resistor resistance with a multimeter and checking the DDM for opening and closing the circuit.
To do this, the multimeter is switched to resistance or continuity measurement mode. It depends on what type of sensor is being tested with or without a resistor.
But there are other verification methods, which we will discuss below.
Pointer operation
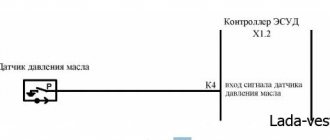
On many old cars operating in the countries of the former USSR, devices were installed with an indicator of a specific lubricant pressure in the channels of the power unit. This circuit is not connected to the indicator, although it also represents a series of elements connected in series:
- oil sensor with rheostat;
- pointer device - pressure indicator;
- egnition lock;
- power supply.
The key element of the circuit is a rheostat pressure meter . The sensor structure looks like this: inside the housing there is also a membrane with a pusher that moves the slider along the turns of a variable resistor - rheostat. How it works:
- When the ignition is on and the engine is not running, the resistance of the resistor is maximum, and the current in the electrical circuit is small. As a result, the needle of the electromagnetic indicator does not deviate from zero.
- After starting the power unit, the lubricant presses on the membrane, the pusher moves the slider several turns of the rheostat. The resistance of the element decreases, the current in the circuit increases and the arrow shows the pressure value at idle speed of the engine.
- In driving mode, the oil pressure moves the membrane and pusher as much as possible, and the resistance drops to a minimum. The arrow under the influence of current indicates the operating pressure.
The indicating device also uses a backlight, which is turned on together with the side lights.
The simultaneous operation of two systems - pointer and indicator - allows you to quickly identify a problem with one of the sensors. If the light suddenly comes on, but the arrow shows normal lubricant pressure, the driver can calmly go to the garage and figure out why the indicator is not working. A significant disadvantage of a sensor with a pointer is its large error, deviations reach 0.5–1 bar.
Sensor diagnostics
Electronic and mechanical oil pressure sensors are checked in different ways, so we will consider each of them separately.
But before you start checking, it is important to make sure that it is the DDM that is the root cause of the warning light that does not go out.
First, make sure that the oil is in good condition and that its level in the engine is within normal limits. Is the filter clogged because the fluid in the system was changed a long time ago? Make sure the pump is working properly.
IMPORTANT: check the wiring from the sensor to the ECU, the condition and integrity of the contacts.
Next, find and remove the sensor itself. This must be done with the engine turned off. Preferably cooled. On different cars the unit may be located in different places.
Power unit malfunctions
Often the LDM can turn on due to leakage of engine oil through leaky o-rings and gaskets, oil lines, pipes, etc.
The cause of the burning lamp may be clogged oil channels. First of all, this applies to foreign cars in which the engine oil channels are quite narrow. In such cars, it is necessary to use only high-quality fuel, as well as motor oils recommended by the automaker.
A worn cylinder-piston group can lead to a drop in oil pressure. In this case, adding lubricant is a short-term measure, since oil consumption due to waste will increase several times. In this situation, only engine overhaul will help.
Where is the sensor located
The most common places where it is found are near the oil filter, in the upper part of the engine near the camshaft block, or pump.
Let's look at specific models:
- VAZ 2108/09/099. Located on the top right side of the engine (when viewed in the direction of travel) next to the timing belt cover. There is only one wire coming from it. This arrangement is also typical for 8-valve engines on the VAZ 2110/11.
- VAZ 2110/11 16 valve engine. Located on the left side of the engine (when viewed in the direction of travel) on the driver's side on the camshaft block between the air filter, ignition module and oil filler neck.
- VAZ 2112, 16-valve engine. It is located on the top left side (look along the way). To find it you need to remove the air filter.
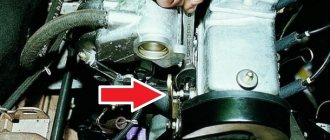
- VAZ 2114. Located on the right inner side of the engine on the cylinder head next to the timing belt. You can clearly see it from above
. To dismantle it, remove the protective cap, the terminal and turn it out with a 21 key. - Lada Kalina. Located on the right rear of the engine near the timing belt, one wire comes from it
. To get to it you need to remove the plastic cover of the cylinder block. - Lada Priora. Located on the left (when viewed along the way) on top of the cylinder block under the intake air manifold. To dismantle it, you must first remove the protective plastic cover of the engine, move the air manifold and unscrew it with a 21 mm socket wrench. It sits very tight.
- Lada Granta 8 and 16 valve engine. Located on the top right side of the engine near the timing belt cover
. To remove it, you can use a spark plug wrench or a 21 open-end wrench. - GAZ "Gazelle" (engine ZMZ-405). Located on the BC, top right. There is only one wire coming from it.
The most common wrench size for removing the sensor is 21. You can use a spark plug wrench. But it all depends on the specific brand of car.
After the pressure sensor has been removed, the seat is tightly covered with a clean rag so that dirt does not get there and oil does not leak out during possible engine operation.
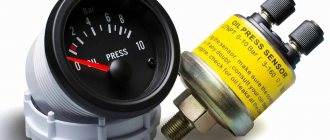
It would be a good idea to measure the oil pressure in the system at idle, medium and high speeds. To do this, use a pressure gauge, which is screwed in instead of the DDM. To take accurate readings, it is important to ensure a tight connection.
For each car model, the values may differ. These can be found in the instruction manual.
For example, for a VAZ 2112 there are 16 valves, the standard engine oil pressure is:
- at idle speed 2 BAR.
- at 5 thousand revolutions from 4.5 to 6.5 BAR.
If all the readings are normal and the light is constantly on, then the information does not reach the ECU or gets distorted. This may be due to the sensor, which needs to be checked.
Read on the topic - what to do if the oil pressure in the engine is lost.
How to check and replace an element
During long-term operation, the internal parts of the sensor wear out and periodically fail. The malfunction manifests itself in the form of false readings on the indicator scale or a constantly burning emergency lamp. Before drawing conclusions about power unit failures, it is highly advisable to check the functionality of the sensor.
If the indicator lights up when the engine is running and the arrow shows zero, it must be turned off immediately.
When the light comes on and goes out in a timely manner, and the needle does not deviate, you should check the serviceability of the oil sensor - the MM393A pressure meter. You will need a 19 mm open-end wrench and a pressure gauge with a scale of up to 10 Bar (1 MPa). A flexible pipe with a threaded tip M14 x 1.5 must be screwed to the pressure gauge.
Test pressure gauges are equipped with adapters for testing various engines
The verification procedure is as follows:
- Turn off the engine and let it cool to 50-60 °C so you don’t have to burn your hands while working.
- Disconnect the wires from the sensors and unscrew them with a 19 mm wrench along with the tee. Please note that during disassembly a small amount of oil may leak out of the unit.
- Screw the threaded part of the pipe into the hole and carefully tighten it. Start the engine and observe the pressure gauge readings.
- Oil pressure at idle is from 1 to 2 Bar; on worn engines it can drop to 0.5 Bar. The maximum reading at high speeds is 7 bar. If the sensor produces different values or is at zero, you need to buy and install a new spare part.
On the road, it is more difficult to check the VAZ 2106 oil sensor, since there is no pressure gauge at hand. To make sure there is lubricant in the engine channels, unscrew the element, disconnect the main ignition wire and rotate the crankshaft with the starter. If the pump is working properly, oil will splash out of the hole.
When the light signal does not light up at all, consider 3 options:
- the light bulb burned out;
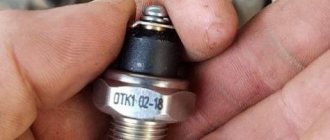
- broken wiring;
- The small sensor in the form of a hexagon has become unusable.
The first 2 versions can be easily checked by testing them with a tester or multimeter. The serviceability of the membrane element is tested as follows: turn on the ignition, remove the wire from the terminal and short it to vehicle ground. If the lamp lights up, feel free to change the sensor.
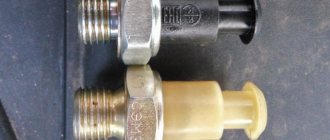
To remove the meter, you need to unscrew the fitting nut that presses the tee to the block
Replacement is done by unscrewing the large or small sensor with a wrench
It is important not to lose the bronze sealing washers, since they may not be included with the new part. Remove any leaks of engine lubricant from the hole with a rag.
Both meters cannot be repaired, only replaced. Their metal cases, capable of withstanding the oil pressure of a running engine, are hermetically sealed and cannot be disassembled. The second reason is the low price of VAZ 2106 spare parts, which makes such repairs pointless.
Checking the electric oil pressure sensor with a multimeter and a light bulb
The method is suitable for all modern Lada cars, in particular VAZ 2114, and foreign cars. Where there is only an emergency warning about low oil pressure.
In such cars, a sensor is installed that works on the principle of opening a circuit. The pressure is normal - the circuit is open, not normal - it is closed, the light is on.
To check with a light bulb you will need:
- The control itself is 12 V.
- An electric car pump or compressor, preferably with a pressure gauge. If they are not there, then use a regular foot pump.
- 12 Volt power supply. You can use a car battery or a computer power supply.
Connect the negative wire of the battery to the ground of the sensor, and the positive wire to a similar wire, but through the control. The light should light up. If not, then the sensor is faulty.
Start the pump or compressor and supply air to the sensor inlet. If the latter is working properly, then the light should go out.
Adjust the pressure using the pressure gauge; it should not exceed 1.5 atmospheres, otherwise the membrane may be damaged. Optimal limits are from 0.5 to 1.5.
When checking with a multimeter you will need:
- The device itself is switched to the “dialing” mode.
- Electric pump or other air blower.
Connect the multimeter to the sensor, minus to the body, plus to the center wire. The circuit will close and a signal should appear.
Turn on the pump and apply pressurized air to the sensor inlet. Monitor the pressure on the pressure gauge.
The circuit should open and the sound coming from the multimeter should disappear.
Checking two sensors
Two oil pressure sensors are not uncommon on modern cars. The first one performs a standard function, signaling the presence of working pressure immediately after starting the engine.
The range of its operation (opening the circuit) is 0.15…0.45 atmospheres. It is checked in the same way as we described above.
The second sensor monitors the upper limit of oil pressure when the engine is running. It notifies via light and sound alarms of low oil pressure at high engine speeds.
It works and is tested in the same way as the first sensor, except that:
- The air must be pumped with high pressure. It may be different for each brand of car, but as a rule, it is 1.8 atmospheres. For example, on a Volkswagen Golf with a 1.8 engine it is 2.0 - 2.5 BAR. Therefore, it will not be possible to perform a check here with a conventional hand pump. And the car compressor must be connected to the sensor very tightly.
- The circuit is not permanently closed, like the first sensor, but rather open. Therefore, when checking, the light (control) should not initially light up, but light up when air is supplied.
Functions of the car oil system
Previously, engine oil was used only to minimize wear on internal combustion engine parts, but in modern cars it performs a much wider range of tasks.
In addition to lubricating, engine oil removes heat from heating components and acts as a hydraulic fluid in the following components:
- in valves with hydraulic compensator;
- chain or timing belt tensioner;
- couplings and other mechanisms.
In modern car engines, motor oil is pumped into loaded components under pressure. The oil pump is responsible for creating this pressure. If the pressure is insufficient or too high, it is considered a failure.
With low oil pressure, the internal combustion engine wears out very quickly. If the pressure is too high, the seals are squeezed out, seals and gaskets leak, and lubricant penetrates into places where it should not be.
Insufficient pressure causes oil starvation of the engine, which also leads to premature wear of the power unit. This is often accompanied by malfunctions in the internal combustion engine hydraulic system. As a result, significant damage appears in the engine, the repair of which is expensive.
Oil starvation is a direct cause of premature exhaustion of engine life.
It is not uncommon for the hydraulic timing chain tensioner to break, which leads to an inevitable collision of valves and pistons. The damage resulting from this makes the engine beyond repair. And now the car owner is forced to purchase a new power unit, but can he afford these unexpected expenses?
Most motorists are aware of the negative consequences of low engine oil pressure. In this case, the increased oil pressure is ignored. And this is a dangerous misconception, because due to fluid leakage through the seals, the normal operation of the engine can also be disrupted.
The instrument panel of any car has a warning indicator that warns of low oil pressure in the engine. Some car models are equipped with instruments that accurately indicate the measured value. Experienced drivers know how to check oil pressure in the absence of standard monitoring devices. This can be done using a specialized device - a pressure gauge.
Often you cannot do without a service that will carry out a complete diagnosis of your car. You should contact them in cases where there are problems with the car engine. This is a reasonable and timely step, otherwise repairing neglected faults will cost much more.
It should also be borne in mind that different cars have different engines with different technical characteristics, which means that the low and high engine oil pressure settings will also be different.
Mechanical sensor check
On a VAZ “classic” and many other older cars, checking the mechanical oil pressure sensor can be done without a multimeter, but this does not mean that the procedure will be easier as with an electronic analogue.
You will need:
- Electric car pressure gauge.
- Manual pump or electric compressor.
Algorithm of actions:
- Remove the sensor and locate the two contacts on it. The first one is responsible for sending a signal to the oil pressure warning lamp. The second is for displaying readings on the pressure gauge.
- You need to understand the pinout of the contacts on the electric pressure gauge. Where are the plus, minus and third wire receiving the signal from the sensor.
- We take the mass from the DDM body through the cylinder block.
Let's put together a diagram. We connect the power and supply air from the pump at a pressure of 1…2 atmospheres.
If the sensor is working properly, then on the electric pressure gauge, as the pressure increases, the arrow will deviate upward. If not, the device is faulty.
The oil pressure sensor cannot be repaired and must be replaced immediately. When installing it, the seat is lubricated with heat-resistant sealant.
Also read about signs of a malfunctioning mass air flow sensor.
Advice from experienced
It cannot be said that one electronic emergency oil pressure sensor is convenient. The light does not go out, but it is not visible what pressure is in the lubrication system at this moment.
Also, if the oil was not changed on time, different brands were used, and after a major engine overhaul, clots may form in the system, due to which the sensor may not work on time. Oil starvation will occur, which will lead to a decrease in engine life or its wedge.
To solve this problem, experienced motorists recommend installing, in addition to the electronic sensor, a mechanical one with readings displayed on the dashboard through a pressure gauge.
To do this, automobile Kulibins use a special tee (2103-3810610), a fitting (2103-3810310), and two gaskets (10282460), with the help of which a mechanical analogue sensor and a standard electronic one are connected to the lubrication system.
A pressure gauge is mounted on the dashboard in any convenient place. You can take it from any VAZ “classic”, Moskvich or UAZ. The main thing is that the scale is convenient and understandable for you.
The wires from the DDM are placed in a hose or plastic corrugation and carefully mounted in the engine compartment. This must be done in such a way that they do not overheat and are not subject to mechanical stress.
The installed oil filter is of poor quality or clogged
To avoid oil starvation, there should always be some amount of engine oil in the oil filter when starting the engine. The lubricating fluid is held there when the power unit is turned off thanks to a lock washer or check valve.
If the filter is of poor quality, then the above elements may not cope with their task or may be absent altogether. In this situation, the oil returns to the oil pan. This leads to the fact that when pressure builds up, the switched on engine experiences oil starvation, which causes increased wear of its parts.
A clogged oil filter puts additional stress on the oil pump. In addition, it causes a decrease in pressure in the system.