About the castle
The ignition switch on the Niva is a part that has a mechanical and electrical part. Each part is responsible for specific functions. The mechanical part protects the car from turning on the ignition with another key and increases the car’s protection against theft. The electrical part (contact group) is responsible for closing the power supply and vehicle control circuits.
Each of the parts can fail, which will lead to the inability to start the engine or stop it altogether.
Ignition switch and features of its replacement
Ignition system module for Niva
Before removing the ignition module on the carburetor or injector of the VAZ 21213, it is necessary to diagnose the ignition coil, distributor and spark plugs. As practice shows, spark plugs are often the cause of incorrect operation of the internal combustion engine. If you are sure that the problem lies in the fault, then the installed device will need to be changed.
How to replace the Niva ignition switch:
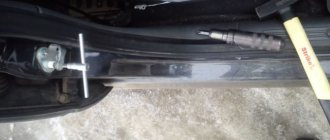
- First, the battery is disconnected and the steering column is removed.
- You need to mark the wires that are connected to the contact part of the VAZ ignition switch and disconnect them. Using a flat-head screwdriver, remove the bolt securing the system switch to the steering column bracket. You will also need to unscrew the screw that is located below, on the right side of the first one.
- Next, on Niva 21213 you need to turn the key to position 0, after which you need to use a screwdriver to slightly recess the device lock through the hole. The hole itself is located on the side of the steering column. Do not touch the exposed key.
- Before removing the ignition switch on the Niva, you need to pull it slightly towards you, after which the device is dismantled. In accordance with the connection diagram, the contact part of the device is replaced; to do this, you need to pry it off with a screwdriver and remove the retaining ring.
- Next, the contact part of the assembly is removed and changed if necessary. During installation, the rotating part must be turned counterclockwise using a screwdriver. Remove the key from the structure and install the contact part so that its wide protrusion can coincide with the wide cavity of the housing. Further assembly of the unit is carried out in reverse order.
1. Unscrew the 3Z mounting bolts.
2. Remove the assembly from its installation location.
3. Remove the contact part and replace it.
Breakdowns
Most often, the contact group fails, since it is made of plastic into which copper contacts are inserted; due to the flow of high currents and weak contact between the brackets, heating occurs. Due to high temperature, the plastic is deformed and damages the contact group.
The mechanical part fails much less often, but it also happens. It becomes damaged due to prolonged use, the springs in the lock sag, the lock becomes loose, which leads to its jamming or the ability to turn it with almost any key, which reduces the car’s protection to zero.
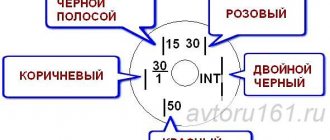
Niva ignition switch pinout
| Key position in the lock | Live contacts | Consumers to which voltage is applied |
| III (Parking mode) | 30 – INT 30/1 | — |
| I (Ignition on) | 30/1 — 15 | Generator excitation, lighting, wipers, internal combustion engine control (fuel pump, etc.), trunk lid heating, heater, turn, reverse lighting |
| II (Starter) | 30/1 – 15 30 — 50 | Turning on the starter |
How to replace the ignition switch of a VAZ-2121 car
To turn the car's electrical circuits on and off, use the ignition switch or simply the ignition switch. A mechanical anti-theft device is installed in the ignition switch, blocking the steering wheel rotation. The anti-theft locking rod extends when the key is placed in the “parking” position and removed from the lock. After this, turn the steering wheel so that the rod fits into the groove on the steering shaft, locking it.
The locking rod is recessed, releasing the shaft, when the key is turned from the “parking” position to the “off” position. The closure of the ignition switch contacts at various key positions and the switched circuits are shown in the table. The power supply circuits for the horn, brake light, hazard lights, cigarette lighter, lamp, plug socket for a portable lamp and high beam headlights are always turned on (regardless of the position of the key in the ignition switch).
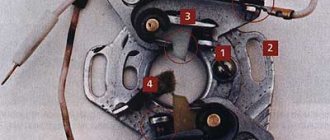
Closing the ignition switch contacts
Live contacts
Generator excitation winding. Ignition system*.
Outdoor Lighting. Instrument lighting. Low and high beam headlights.
Fog light. Windshield and tailgate glass cleaners.
Carburetor solenoid valve control unit*.
Engine management system
(including electric fuel pump and engine cooling system fans)**.
Heated tailgate glass. Washer. Heater fan.
Direction indicators. Reversing light. Control devices.
*Only for VAZ-21213 engine.
**Only for VAZ-21214 engine.
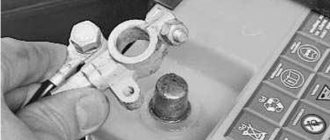
Removing the ignition switch
Disconnect the negative cable from the battery.
Remove the steering column covers.
| rice. 1 |
1. Mark the wires suitable for the contact part of the ignition switch...
2. ...and disconnect them.
3. Using a slotted screwdriver, unscrew one screw securing the ignition switch to the steering column bracket on the left and the second, located below, to the right of the first.
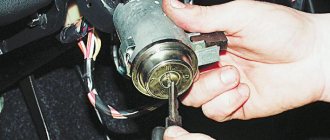
4. With the ignition switch key in position “0” (“off”), use a slotted screwdriver with a narrow blade to push the ignition switch lock through the hole in the side wall of the steering column bracket.
5. Pull it towards you and remove the ignition switch.
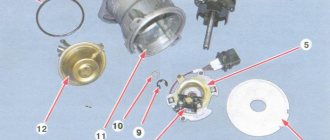
6. To replace the contact part of the ignition switch, pry it with a screwdriver and remove the retaining ring. The retaining ring may come off.
7. Remove the contact part of the ignition switch.
8. When installing a new contact part, turn its rotating part counterclockwise with a slotted screwdriver until it stops. We remove the key from the ignition switch and insert the contact part into the housing so that the wide protrusion of the contact part coincides with the wide cavity of the housing.
We assemble the ignition switch in the reverse order.
9. To facilitate installation of the retaining ring, use pliers to bend the tendril.
Differences between ignition switches
The ignition switches on the Niva are different; on the older VAZ 2121, the ignition switch is from the VAZ 2106, and on the Chevrolet Niva, the ignition switch is from the VAZ 2110.
Ignition switch on Niva until 2009. does not have a common connector, and the wires in it are connected separately. Quite often, when people remove the contacts from the lock, they forget their position and this complicates the assembly process, so it is best to mark the wires first, but if you have already removed the wires and now do not know how to connect them, then you can use the picture below indicating the color of the wires and their connections to a specific contact.
How to replace the ignition switch of a Chevrolet Niva with an immobilizer
All variations of the Chevrolet Niva are standardly equipped with a factory immobilizer - an anti-theft device that blocks the engine from starting if a flip key with a transponder is not located within the coverage area of the immobilizer antenna.
Replacing the ignition switch of a Chevrolet Niva with an immobilizer is complicated by the fact that the training key does not fit the new cylinder. Accordingly, it will not be possible to train a new key, so the immobilizer will prevent the engine from starting.
There are several ways out of this situation. You can try to completely disable the immobilizer, but this is not the best solution - reducing anti-theft security cannot be called a reasonable solution.
You can also continue to use two keys - one with a transponder in the immobilizer reception area, the other to start the engine. If carrying a whole bunch of keys is inconvenient, you can hide the old key with the transponder tag inside the car. But this also potentially reduces safety, and you will also have to open the car doors with a key rather than a button. Therefore, you can try to find another solution to the problem.
The tip of the key from the new lock can be transferred to the key fob from the old one, since it is collapsible. However, in this case, it is necessary that the new key also be removable - if it is soldered into the case, then removing it without damaging the tip is quite difficult.
You can also try transferring the transponder chip to a new key. The chip is located inside the body of the old key. It is desirable that the new key also have a collapsible body.
The replacement of the ignition switch with an immobilizer is completely similar to the replacement on a car that is not equipped with a start blocker. You will also need:
- hammer;
- chisel;
- Phillips and flat screwdrivers;
- pliers (round nose pliers);
- if necessary, a needle file.
The replacement procedure is also similar.
- The battery is turned off.
- The steering column protective cover is removed.
- The bracket attached to the tear-off bolts is dismantled.
- The contact group is removed.
- The lock itself is dismantled and a new one is installed.
- The contact group is installed.
- The lock is secured to the steering column, and a protective bracket is mounted on the breakaway bolts.
- The protective cover is installed in place.
Replacing the lock
The lock can be replaced either completely or only the contact group. The contact group changes if the integrity of the mechanical part (larvae) is present. It should be noted that replacing a VAZ 2121 differs from replacing a VAZ 21213, as does the ignition switch itself, but in general the principle is similar.
Replacing the ignition switch for VAZ 2121, 21213, 21214
- Remove the negative terminal from the battery;
- Unscrew the plastic steering column cover;
- We remove the connector from the lock (until 2009, there was no common connector on the Niva, but there were separate wires; it is recommended to mark the wires before removing);
- Using a flat-head screwdriver, unscrew the two bolts securing the lock to the steering column;
- Using a narrow, thin screwdriver, you need to press the lock latch and remove it (after inserting the ignition keys into the lock in position “0”);
- Install the lock in the reverse order;
Replacing a lock on a Niva Chevrolet
The ignition switch on a Chevrolet Niva is not secured with nuts, but with special rivets that need to be cut off with a chisel.
- Disconnect the ignition switch connectors;
- We cut off the nuts securing the lock to the steering column;
- We take out the lock;
- Install the new one in the reverse order;
Replacing the contact group
- Remove the retaining ring from the back of the lock;
- We take out the contact group;
- We install a new group by matching all the splines;
Replacing the ignition switch Niva VAZ 21213, 21214, 2131 lada 4×4
We remove the ignition switch to replace the assembly or its contact group.
Disconnect the negative cable from the battery.
Remove the steering column covers (see here).
Disconnect the wiring harness connector from the ignition switch.
Note. On cars manufactured before 2009, the wires to the ignition switch are connected without a common block (photo below), so before disconnecting them, we mark the wires suitable for the contact part.
...and disconnect them.
Using a slotted screwdriver, unscrew one screw securing the ignition switch to the steering column bracket on the left...
...and the second one, located below, to the right of the first.
By placing the ignition switch key in position “0” (“off”),...
... using a slotted screwdriver with a narrow blade, we recess the ignition switch lock through the hole in the side wall of the steering column bracket.
Pull it towards you and remove the ignition switch.
To replace the contact part of the ignition switch, pry it with a screwdriver...
...and remove the retaining ring.
The retaining ring may come off.
We take out the contact part of the ignition switch.
When installing a new contact part...
...turn its rotating part counterclockwise with a slotted screwdriver until it stops.
We remove the key from the ignition switch and insert the contact part into the housing so that the wide protrusion of the contact part coincides with the wide cavity of the housing.
. terminals “15” and “30” should be located opposite the locking rod of the switch.
We assemble the ignition switch in the reverse order.
Reinstall the retaining ring of the contact group.
To make it easier to install the retaining ring, use pliers to bend the tendril.
Before installing the switch, insert the key into it and turn the key to the “O” position.
Install the ignition switch in the reverse order.