The car's clutch is subjected to heavy load - constant use during operation of the car, engine vibration, too much load on the engine. The latter fact of wear is usually accompanied by the characteristic smell of a burnt clutch.
The first signs include a feeling of incomplete clutch operation, extraneous sounds, and even crunching sounds. The clutch pedal may also sag, which also indicates that it is necessary to replace the clutch on the Lada Priora as soon as possible.
However, inexperienced car owners often have a logical question: how to replace the clutch with your own hands? There is nothing complicated in this process, but it is necessary to stock up on tools and some knowledge.
Removal and installation of clutch VAZ 2170 Priora
- Repair manuals
- Repair manual for VAZ 2170 (Priora) 2004+.
- Removing and installing the clutch
You will need: an 8" wrench (a socket head is more convenient), a large screwdriver...
...a mandrel for centering the driven disk (can be made from the input shaft of the gearbox by removing the gears).
1. Remove the gearbox (see “Removing and installing the gearbox” ).
| 2. If you are installing the previous pressure plate, mark in any way the relative position of the disc housing and the flywheel in order to install the pressure plate in the same position as before removal (to maintain balance). | 3. Install the mandrel into the pressure plate hole. |
| Note You can remove the clutch without a mandrel, but hold the driven disc while doing so: it may fall out of the clutch housing. |
| 4. While holding the flywheel from turning with a screwdriver, remove the six bolts securing the clutch pressure plate housing to the flywheel. Loosen the tightening of the bolts evenly: each turn of the wrench, moving from bolt to bolt along the diameter. | 5. Remove the clutch cover assembly with the pressure plate. |
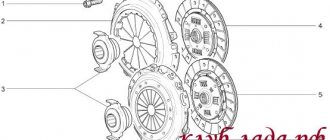
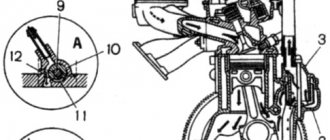
| 6. Remove the driven disk along with the mandrel. | 7. Cracks on the driven disk parts are not allowed. Check the wear of friction linings 1. If the heads of the rivets 2 are recessed to a distance of less than 0.2 mm, the surface of the friction linings is oily or the rivet joints are loose, then the driven disk must be replaced. Check the reliability of the damper springs 3 in the sockets of the driven disk hub; if the springs are broken, the disk must be replaced. |
8. Check the runout of the driven disk if warping is detected during a visual inspection. If runout exceeds 0.5 mm, replace the disc.
| 9. Inspect the working friction surfaces of the flywheel and pressure plate, paying attention to the absence of deep marks, scuffs, nicks, obvious signs of wear and overheating. Replace defective components. | 10. Using an external inspection, evaluate the condition of the disc spring 1 of the pressure plate. Cracks on the spring are not allowed. The contact points of the spring petals with the clutch release bearing must be in the same plane and have no obvious signs of wear (wear should not exceed 0.8 mm). Otherwise, replace the pressure plate assembly. If the rivet connections of the 2 parts of the casing and the pressure plate are loosened, replace the pressure plate assembly. |
11. Using an external inspection, evaluate the condition of the support rings of the pressure spring. The rings should not have cracks or signs of wear. Otherwise, replace the pressure plate assembly.
12. Before installing the clutch, check that the driven disk moves easily along the splines of the transmission input shaft. If necessary, eliminate the causes of jamming or replace defective parts.
| 13. Please note that when installing the driven disk into the pressure plate housing, the more protruding part of the hub should be directed towards the pressure spring. | 14. When installing the clutch, first install the driven disc using a mandrel... |
| 15. ...then place the pressure plate casing on the three centering pins and screw in the bolts securing the casing to the flywheel. | 16. While holding the flywheel from turning with a screwdriver, evenly tighten the clutch-to-flywheel bolts: each one turn of the wrench, moving from bolt to bolt along the diameter. The tightening torque of the bolts is indicated in Appendix 1. |
17. Remove the mandrel and install the gearbox.
18. Install the lower end of the clutch release cable to the transmission and restore the original adjustment of the clutch release cable (see “Replacing the clutch release cable” ).
| Note Before restoring the original cable adjustment, it is necessary to restore the wear compensation mechanism for the linings of the driven clutch disk to its original state, since if the clutch disk is completely worn out, the wear compensator slider will remain in its lowest position. After installing a new, unworn driven disk, the length of the threaded part of the lower end of the cable may not be enough to restore the initial position of the cable. To bring the wear compensation mechanism to its original position, by installing size L (see |
↓ Comments ↓
1. Car structure
1.0 Car structure 1.1 General information about the car 1.2 Passport data 1.3 Car keys 1.4. Controls 1.5. Heating and ventilation of the cabin 1.6 Ensuring a comfortable air temperature in the cabin 1.7. Doors 1.8. Passive safety equipment on the car 1.9. Seats
2. Recommendations for use
2.0 Recommendations for use 2.1. Safety rules and recommendations 2.2 Running in the car 2.3 Operating the car during the warranty period 2.4. Preparing the car for departure
3. Problems along the way
3.0 Malfunctions along the way 3.1. The engine does not start 3.2 Malfunctions of the fuel injection system 3.3 Idle speed has disappeared 3.4. Interruptions in the operation of the 3.5 engine. The car moves jerkily 3.6 The car accelerates poorly 3.7 The engine stalled while driving 3.8. Oil pressure dropped to 3.9. Engine overheating 3.10. The battery does not recharge 3.13. Knocks in the engine 3.16. Wheel puncture
4. Maintenance
4.0 Maintenance 4.1. General provisions 4.2. Inspection work 4.3. Lubrication and filling works 4.4. Diagnostic work 4.5. Repair and adjustment work
5. Engine
5.0 Engine 5.1 Design features 5.2 Possible engine malfunctions, their causes and solutions 5.3 Useful tips 5.4 Checking compression in the cylinders 5.5 Removing and installing the decorative engine casing 5.6 Removing and installing the engine splash guard 5.7 Installing the piston of the first cylinder to the TDC position of the compression stroke 5.8 Replacing the drive belt gas distribution mechanism and tension roller 5.9 Replacing the power unit supports 5.11. Replacing engine seals 5.13. Engine cylinder head 5.15. Engine repair 5.16. Lubrication system 5.17. Cooling system 5.18. Power supply system 5.19. Design Features
6. Transmission
6.0 Transmission 6.1. Clutch 6.2. Gearbox 6.3. Front wheel drives
7. Chassis
7.0 Chassis 7.1. Front suspension 7.2. Rear suspension
8. Steering
8.0 Steering 8.1 Design features 8.2 Possible steering malfunctions, their causes and solutions 8.3. Steering column 8.4. Steering linkage 8.5. Steering gear
9. Brake system
9.0 Brake system 9.1 Design features 9.2 Possible malfunctions of the brake system, their causes and solutions 9.3 Bleeding the brake system hydraulic drive 9.4 Removing and installing the vacuum brake booster 9.5 Replacing the brake pedal axle bushings 9.6. Main brake cylinder 9.7. Front wheel brakes 9.8. Braking mechanisms of the rear wheels 9.9. Pressure regulator 9.10. Brake hoses and tubes 9.11. Parking brake
10. Electrical equipment
10.0 Electrical equipment 10.1 Design features 10.2. Battery 10.3. Mounting block (relays and fuses) 10.4. Generator 10.5. Starter 10.6. Ignition switch (lock) 10.7. Electronic engine control system (ECM) 10.8. Ignition system 10.9. Lighting, light and sound signaling 10.10. Windshield cleaner 10.11. Washer reservoir 10.12. Electric fan of the engine cooling system 10.13. Electric motor of the heating and ventilation system fan 10.15. Cigarette lighter 10.16. Instrument cluster 10.18. Electronic anti-theft remote control system 10.19. Immobilizer 10.21. Replacing sensors and switches
11. Body
11.0 Body 11.1 Design features 11.2 Possible body malfunctions, their causes and solutions 11.3 Removing and installing windshield frame lining 11.4 Removing and installing soundproofing upholstery in the engine compartment 11.5. Removing and installing bumpers 11.6 Removing and installing the fender liner and protective wing cover 11.7 Removing and installing the front fender 11.8 Removing and installing decorative sill trims 11.9. Hood 11.10. Trunk lid 11.11. Doors 11.12. Seats 11.13. Seat belts 11.14. Rear view mirrors 11.15. Interior fittings 11.16. Instrument panel 11.17. Heater 11.20. Body care
12. Applications
12.0 Appendix 12.1 Appendix 1. Tightening torques of threaded connections, Nm 12.2 Appendix 2. Fuels, lubricants and operating fluids 12.3 Appendix 3. Nominal filling volumes 12.4 Appendix 4. Basic data for adjustments and monitoring 12.5 Appendix 5. Spark plugs used on vehicles 12.6 Appendix 6. Lamps used on a car 12.7 Appendix 7. What you need to have in a car 12.8 Appendix 8. Tools used when repairing a car
13. Electrical diagrams
13.0 Electrical Diagrams 13.1 Diagram 1. Instrument Panel Harness Connections 13.2 Diagram 2. Vehicle Front Wire Harness Connections 13.3 Diagram 3. Engine Electronic Control System (ECM) Harness Connections 13.4 Diagram 4. Vehicle Rear Wire Harness Connections 13.5 Diagram 5. Light Harness Connections license plate light 13.6 Diagram 6. Left front door wiring harness connections 13.7 Diagram 7. Right front door wiring harness connections 13.8 Diagram 8. Rear door wiring harness connections
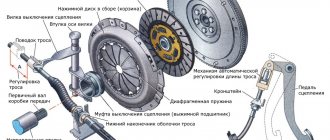
Mechanics
Mechanically, the clutch operation process is extremely simple. Let's analyze it from the moment the movement begins. After starting the engine, the car is in neutral gear (starting the engine in gear is bad manners). The clutch is depressed all the way - this means that it is turned off, the driven and pressure plates have separated, that is, a moment is created to change gear. The gearshift lever is moved to position 1, and first gear is engaged.
The pedal is smoothly released (the clutch is engaged), at this moment the most important thing happens: the distance between the pressure plate and the driven one is constantly decreasing, and the force transmitted by the engine has already set one disk in motion, which makes the moment of “collision” of the two disks become difficult. If the pedal is released abruptly, they will quickly touch, which means that the disc will pause (imagine walking and tripping over a stone - much the same thing happens with an engine).
Replacing the release bearing on a PRIOR. Tips for choosing
The Prior release bearing is an integral element of the clutch system, which is involved in the gear shifting process. The part is involved in the process of pressing the clutch pedal and changing gear, and is responsible for disconnecting the clutch discs.
If we talk about the service life of the bearing, in most cases it is quite long and amounts to at least 100 thousand kilometers of the vehicle. However, during operation in difficult conditions (off-road, constant switching in traffic jams, lack of lubrication), faults are diagnosed even after 15 thousand mileage.
Diagnostics of the release bearing on a Priora
There are no special devices or tools for troubleshooting. The main signs of possible defects or malfunctions:
- extraneous noise when changing gears (knocking, crunching, specific howling, creaking);
- Difficulty when switching.
If any of the listed symptoms appears when switching, pressing the clutch pedal and changing speed, it is recommended to dismantle the box and inspect, and in case of malfunction, replace the Priora release bearing
It is important to note that it is not always necessary to replace the product with a new, similar one. Sometimes the cause of extraneous noise from the gearbox and incorrect operation of the release unit is contamination, insufficient lubrication of the product and (or) the guide bushing along which constant, working rotation of the bearing occurs
Therefore, sometimes it is enough to clean or thoroughly lubricate the bushing and the part itself. Obvious signs indicating a malfunction are:
- significant play of the part;
- physical deformations (cracks, abrasions, chips);
- uneven or difficult rotation.
When diagnosing breakdowns or damage, dismantling and installation of a new part will be required.
Replacing the release bearing of Priora
In order to change the part, you will have to remove the gearbox. You can find detailed instructions for removing the gearbox here (link to page).
After removing the box, you need the following:
The first step to removing the bearing is to find the antennae of a special spring retainer. Next, we remove the two ends of the antennae from the bearing holder. To do this, you need to apply a little force and pull the antennae out of the two holes. Now the bearing together with the holder can be easily removed from the guide sleeve. In order to inspect or replace the part itself, you will need to remove it directly from the holder
To do this, use a flat-head screwdriver to press out the four metal tabs in several places on the case. Now the part can be removed and replaced with a new one. When installing a new bearing, pay attention to its visual condition (there should be no defects or cracks). After installation and lubrication, unscrew the part while checking its operation for any extraneous noise.
In addition, no noticeable backlash should be recorded. Reinstalling the gearbox.
Now you know how to change the release bearing on a Priora!
What determines the reliability of a car?
Many years have passed since the moment when it became possible to choose a car model. It has long become a habit to look through the catalogs of cars that are presented by the world's leading companies at the next exhibition. Domestic enterprises had to withstand enormous pressures in competition with world leaders. There is reason to believe that this struggle has benefited them. By adopting other people's experience and improving their own developments, Russian manufacturers managed to create a line of decent cars. It is advisable for the owner who installs a clutch on a Priora to know the design of the device. If you look at and analyze the reviews about this model, the balance will be positive. Of course, this does not mean that the car no longer needs improvement and modernization. Quite the contrary, each successive update creates the basis for its critical analysis. An additional sensor complicates the electronic circuit. Replacing or adjusting it requires additional knowledge and experience from the technician.
Every driver knows that a car includes three main components:
There is no point in selecting the most significant position from this list. The most important element of the transmission is the clutch. In terms of reliability, this unit is not inferior to all others. And the mean time between failures is, on average, 100 thousand km. After such a mileage, it is recommended to adjust it or replace worn parts. Many years of practice have proven that it is preferable to replace the entire clutch basket. The fact is that the wear of the entire mechanism occurs evenly. And when a new part appears in it, it will last longer. This fact is clear and does not give rise to objections. However, it must be taken into account that old parts will fail earlier. As a result, after a short period of time you will have to do repairs again.
Manufacturers and prices of analogues
- Kraft (article W05200G) – price from 3,300 rubles;
- Pilenga with a metal-ceramic disc (article CK-P4005XR) – price from 10,000 rubles (an excellent, but expensive sports kit with a reinforced mechanism with a reinforced release disc);
- Pilenga (article CK-P 4005) – price from 2,800 rubles;
- Sachs (article 3000 951 033) – price from 3,800 rubles;
- Valeo (828 222) – price from 2,300 rubles.
The Valeo kit for Priora is considered very similar to what Luk produces - it is also “soft” in feel.
Diagnostics of the release bearing on a Priora
There are no special devices or tools for troubleshooting. The main signs of possible defects or malfunctions:
- extraneous noise when changing gears (knocking, crunching, specific howling, creaking);
- Difficulty when switching.
If any of the listed symptoms appears when switching, pressing the clutch pedal and changing speed, it is recommended to dismantle the box and inspect, and in case of malfunction, replace the Priora release bearing
It is important to note that it is not always necessary to replace the product with a new, similar one. Sometimes the cause of extraneous noise from the gearbox and incorrect operation of the release unit is contamination, insufficient lubrication of the product and (or) the guide bushing along which constant, working rotation of the bearing occurs. Therefore, sometimes it is enough to clean or thoroughly lubricate the bushing and the part itself. Obvious signs indicating a malfunction are:
- significant play of the part;
- physical deformations (cracks, abrasions, chips);
- uneven or difficult rotation.
When diagnosing breakdowns or damage, dismantling and installation of a new part will be required.
Step-by-step instructions for replacing the clutch
First you need to remove the gearbox (see removing the gearbox)
1. In order to maintain balancing during installation, mark the position of the disk housing in relation to the flywheel (see gallery below).
2. Find a hole in the clutch pressure plate and mount a mandrel there. If suddenly you don’t have a mandrel, you can dismantle it without it, you just need to hold the clutch driven disc when removing it.
3. Unscrew and remove the 6 bolts that connect the flywheel and the clutch pressure plate housing. Using a screwdriver, try to fix the flywheel without allowing it to rotate. When you tighten the bolts during installation, do it gradually, moving from one bolt to another and making no more than one turn of the wrench at a time.
Symptoms of a problem
The main symptoms of a malfunction are:
- Hum, whistle and other unnecessary sounds when pressing or releasing the pedal;
- “Push” even if the working moment was caught on time.
If there is a suspicion that the clutch is faulty, then diagnostics can be done using traditional methods, without disassembling the engine compartment internals.
Slip check
We fix the car with the handbrake, engage third or fourth gear, slowly (slower than usual!) depress the leftmost pedal and press the gas at operating torque. If everything is fine with the handbrake, then the test will be true. The car has stalled, which means it’s time to change the pressure plate.
Replacing the release bearing Kalina 2, 1118, Cross, Sport
To make a replacement you will need to put your car on a pit or a lift. Repairs are also possible if you have reliable supports and a jack. It is worth noting that without a pit or lift, the replacement method without removing the box, which is described at the end of the article, is suitable.
Important to know: For work, it is best to use a set of sockets with a ratchet. When directly dismantling the manual transmission, ask someone to help you “pull” it off
To replace the VP without removing the box, you will need two studs with a diameter of 10 mm and a length of 30-35 mm.
How to remove the gearbox and release bearing on Kalina 2 (1.4-1.6 8kl) with your own hands
Replacing the release bearing on a Lada Kalina begins with dismantling the gearbox; this process is described in detail in step-by-step instructions with photos/videos. Perform the operations in order.
- Open the hood of the car and immediately remove the battery.
- Next, remove the air filter by unscrewing the clamp and disconnecting the fastenings to the body.
- The clutch cable is located behind the battery; you need to unscrew the nut and disconnect the cable from the fastener.
- Now disconnect the plug of the speed sensor wire, it is located behind the “engine”, in the area of the pipes.
- Next, find the upper bolts securing the gearbox to the engine and unscrew them.
- The last operations on top of the gearbox are unscrewing the starter and its terminals, as well as disconnecting the clutch cable and electrical wiring.
- Remove the front wheels and tighten the hub nuts. We disconnect the protection (mud flaps) under the wing.
- Immediately disconnect the terminal of the reversing lights wire.
- Nearby there is a suspension beam, first twist the rear nut with a 24mm wrench.
- Now we move on to the ball joints, loosen the nuts and remove them on both sides.
- On the same side of the manual transmission we find the oil drain plug, unscrew it and drain it into any container.
- Between the manual transmission and the engine there is a clutch protective cover. To remove it, unscrew the nuts around the perimeter.
- Let's move on to dismantling the gearshift mechanism. First, unscrew the two bolts and remove the cover.
- Then unscrew the screw that secures the linkage connection.
- The next step is to remove the wheel drive shafts from the gearbox on both sides.
AMT Robot
Priora with a robotic transmission was installed only on restyled versions (2013-2018), and the choice of car enthusiasts was not always in favor of the “robot”. But the robotic automatic transmission was developed based on the design of the new manual transmission, so there is nothing to be afraid of - everything is reliable. The computer or, in this case, the “robot” itself controls the engagement and disengagement of the clutch and changes gears itself (except in cases where the driver takes responsibility for manual gear shifting).
A Priora with a “robot” can also bite when starting and changing gears. The reason for this may be either an electronic error or wear of the “clutch” mechanism - if it’s time to change some part, then no matter how much the “robot” wants to smooth out the next peck, it will not be able to do so.