I turned to a turner I knew and explained that I needed a spacer for the “Auto Guage” sensor, which would easily screw in the VAZ tee without any modifications.
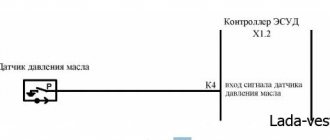
There are 5 contacts on the sensor from the VAZ; they need to be connected as in the figure: You can install the pressure indicator itself instead of the headlight hydraulic corrector - few people use it, and few places it works. After which the contacts open, the signal disappears and the light on the instrument panel goes out.
To remove it, use our instructions: Disconnect the wire from the sensor that goes to the dashboard; There is a thread underneath the sensor, so carefully unscrew it with a wrench. Top of Mercedes-Benz Mercedes-Benz - most of the modern models On these car models, the oil pressure sensor is located on the crankcase on the right side of the central part of the car at the bottom of the engine. VAZ 2106 HOW TO CHECK THE OIL PRESSURE INDICATOR IN THE INSTRUMENT PANEL Photo - design of the oil pressure sensor Video: checking the emergency oil pressure of the BMW M30 Checking and repair If you need to check the device, then take a small piece of rubber hose. The battery is disconnected; to do this, simply disconnect the negative terminal. Take the white wire from the side lights power supply. Do not confuse the device with the temperature sensor installed higher in the cylinder head. Connect the plus from the power supply or battery to the other wire on the light bulb.
One cable must be connected to it.
Connecting and replacing the sensor Purpose of the sensor How to connect an oil pressure sensor is a serious question, but first of all you need to find out what such sensors are generally intended for.
Additional engine oil pressure sensor
Why do you need an oil pressure sensor?
DDM is an essential component of the lubrication system of an engine unit. The device is responsible for monitoring the oil pressure that is supplied to the engine and, in case of any failures, transmits a signal to the driver’s cabin - the corresponding light comes on.
The light comes on immediately after the DDM is triggered
To understand the importance of the sensor in the design of a car, you will need to know how exactly the oil is supplied to the rubbing parts in the engine. Depending on the type of machine and its year of manufacture, lubricant can be supplied in various ways, including simple spraying. However, even this method involves creating the necessary pressure so that the optimal amount of oil is supplied to the unit. If the amount of lubricant is stable, the rubbing parts of the engine will ensure good, uninterrupted operation without rapid wear.
To promptly prevent various negative factors in the lubrication system, a DDM is installed, which is sensitive to all changes in oil supply.
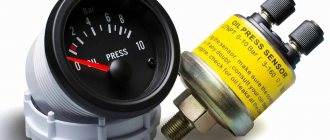
The driver is given a signal by sound and visual methods: a sharp squeak is heard in the cabin and a red indicator in the form of an oil can appears on the instrument panel. In some types of cars, oil pressure characteristics are displayed in a separate dial gauge, which shows the current state of the lubrication system.
Did you know that the level of seat pressure can be influenced by the height of the vehicle's location relative to sea level?
Oil pressure may vary depending on how high the car is above sea level
Principle of operation
The operating principle is very simple. Inside such a device there is a metal membrane, after pressing it, the contacts open and the pressure light on the instrument panel goes out.
When we start to start the engine, the oil pump begins to rotate, increasing the oil pressure, then it approaches the sensor itself and exerts force on the membrane that is located inside and bends it. After which the contacts open, the signal disappears and the light on the instrument panel goes out.
If the motor is fully operational,
the oil is of good quality, the filter is replaced, then the sensor will show the optimal value. Normal pressure when the engine is warm and idling should be 2 bar. Pressure at 6000 rpm. will be from 5 to 6.5 bar. If these conditions are met, the warning lamp will not light up.
Types of DDM and the principle of their operation in modern cars
The modern automotive industry uses two types of such sensors. Each type works with certain types of engines and talking about which sensor is better/worse is not acceptable.
Mechanical sensor
The device most accurately determines the oil pressure in the system and transmits the readings to a scale in the dashboard.
The mechanical device has a complicated design: a housing cup, a membrane, a pusher, a slider and a nichrome wire winding. Due to the use of many components, mechanical sensors are expensive.
The operation of such a device is as follows: the slider, which is located on a platform with a nichrome winding, receives the force of oil pressure, rises or lowers. His every movement is transmitted to a dial indicator in the car’s interior, so the driver will always be accurately informed about the pressure of the lubricant in the engine. The slider receives data from the effect of oil on the sensor membrane.
It has large dimensions and a complex internal design
Electronic sensor
This type of sensor is simpler, but it cannot transmit all changes in the lubrication system to the driver. As a rule, the electronic type of device shows only two main values: normal pressure and critical.
Thus, its only purpose is to convey to the driver the information that the pressure in the system is zero. To do this, its design uses only a housing cup, a membrane, a pusher and a contact system with an oil pressure light in the car's interior.
Accordingly, if the pressure disappears, the membrane straightens, since nothing presses on it. The pusher immediately slides into the housing, the contacts close - an alarm signal is sent to the cabin.
On some vehicle models, two types of sensors are installed at once. This expands the driver’s ability to constantly monitor the engine lubrication system. If one device fails, you can rely on the readings of the second.
Structurally simpler device
Emergency
The emergency sensor or emergency oil pressure sensor is simple. A simple electrical circuit is assembled inside its body. Conventional normally closed contacts are controlled by a moving membrane.
The alarm sensor triggers an alarm if the pressure drops below the permissible limit
One of the fixed contacts is tightly connected to the sensor body, the other is to an external terminal to which the car wiring is connected.
If the oil entering through the intake channel does not press on the membrane, the contacts are closed, and a warning light lights up on the vehicle’s instrument panel with the ignition on.
Normally closed sensor contacts are controlled by a movable membrane
After starting the engine, the oil pump starts working, creating pressure that acts on the emergency sensor membrane. As long as the pressure is normal, the contacts are open, the indicator does not light up, and does not distract the driver with an annoying red light.
But if the pressure drops for some reason, the sensor instantly closes the contacts, and a bright warning light lights up: we’ve arrived, we need to stop and figure out what the reason is.
The second most serious way to instantly ruin an engine is to deprive it of oil completely or reduce the pressure in the lubrication system to a critically low level. By the way, for full engine operation at low speeds, you don’t need much motor oil; 200 milliliters is quite enough.
If the driver ignores the warning, he may have to regret it, paying for expensive repairs that in most cases can be avoided.
Emergency sensors differ in the following characteristics:
- pressure to open and close contacts;
- form of external contact for connection to wiring (pin or screw);
- diameter and thread (taper, metric) of the fitting.
Control
The control pressure sensor is larger in size than the emergency one. Despite the fact that, like the emergency one, it has only one terminal on the outside for connecting wiring, its structure is more complicated.
The control sensor is larger in size and more complex than the emergency sensor
In the body of the control sensor, which car enthusiasts call a barrel, in addition to the membrane, there is a rheostat. In other words, variable resistance.
A rheostat is a piece of thin wire wound in one layer on a base of non-conducting material. A movable contact controlled by a flexible membrane moves along the winding on top. The rheostat wire is connected to the terminal on the pressure sensor body, the moving contact is connected to the device body.
In addition to the membrane, the control sensor housing contains a rheostat
Each time the membrane bends under the influence of oil pressure, the position of the moving contact of the rheostat and the number of turns of wire between the external terminal and the body, which determine the value of the electrical resistance of the sensor, change.
Along with the bending of the membrane, the resistance of the control sensor changes
The driver of the car sees these periodic changes in resistance as movements of the needle of a measuring device on the control panel, the scale of which is calibrated in pressure units.
Among the characteristics of pressure control sensors:
- range of measured pressure;
- nominal resistance;
- form of external contact for connection (pin, pin block, screw);
- diameter and thread (taper, metric) of the fitting.
Combined
Some car models have a combined oil pressure sensor with two terminals on the housing. Its components work exactly the same as described above. But to save space, they are collected in one barrel.
To save space, the control and alarm sensors are combined in one housing
Device and connection diagram
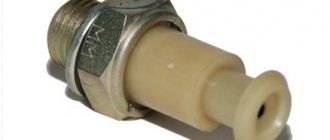
The task of the membrane switch, made in the form of a nut with a terminal, is to promptly close the electrical circuit with the warning lamp when the lubricant pressure drops. The device consists of the following parts:
- metal body in the form of a hexagon;
- contact Group;
- pusher;
- measuring membrane.
The element is connected to the circuit according to the simplest circuit - in series with the indicator. The normal position of the contacts is “closed”, so after turning on the ignition the light comes on. When the engine is running, there is a pressure of oil flowing to the membrane through the tee. Under the pressure of the lubricant, the latter presses the pusher, which opens the contact group, as a result the indicator goes out.
When one of the malfunctions occurs in the engine, causing a decrease in the pressure of the liquid lubricant, the elastic membrane returns to its original position and the electrical circuit is closed. The driver immediately sees the problem by the flashing “control”.
The design of the second element, the “barrel” called MM393A, is somewhat more complicated. The main role here is also played by an elastic membrane connected to an actuator - a rheostat and a slider. The rheostat is a coil of high-resistance chromium-nickel wire, and the slider is a movable contact that moves along the turns.
The electrical circuit for connecting the sensor and pointer is similar to the first one - the rheostat and the device are in series in the circuit. The operating algorithm is as follows:
- When the driver turns on the ignition, on-board voltage is supplied to the circuit. The slider is in its extreme position, and the winding resistance is maximum. The instrument needle remains at zero.
- After starting the engine, oil appears in the channel, flowing through the tee into the “barrel” and pressing on the membrane. It stretches and uses a pusher to move the slider along the winding.
- The total resistance of the rheostat begins to decrease, the current in the circuit increases and causes the indicator arrow to deviate. The higher the lubricant pressure, the more the membrane stretches and the less resistance of the coil, and the device notes the increase in pressure.
The sensor reacts in the reverse order to a decrease in oil pressure. The force on the membrane decreases, it is thrown back and pulls the slider with it. He turns on new turns of the rheostat winding in the circuit, the resistance increases, and the instrument needle drops to zero.
Video: what pressure should a working device show?
Where is
In order for oil to continuously flow to the rubbing parts of the engine, pressure is required, which is created by the oil pump. The oil coming from the pump cleans the filter, after which it is distributed among consumers through the main oil line.
Sensors are installed in the main oil line after the filter
The location of pressure sensors in the engine lubrication system is somewhere in the main oil line after the filter.
Structurally, the sensors are placed in the cylinder block or in the cylinder head. The exact location depends on the engine model.
Structurally, the sensors are placed in the cylinder block or in the cylinder head
Installation location
There is no specific location for this part. The engine oil pressure sensor is installed according to the design features of a particular vehicle.
Emergency type DDMs are usually located on the cylinder head. The measuring device is placed in the area of the oil pump or filter, in the crankcase of the car. It is installed into the system using a high pressure pipe.
There are also schemes with two sensors. In this case, the first one is installed before the pump, the second one after it. In order not to waste time searching for it, you can simply pick it up and read the service book. There such information is displayed by manufacturers.
I would like to warn you: often in order to check or replace the DDM you have to remove the car wheel. The ideal option is to contact a car service for this. There are lifts and “pits” for inspection.
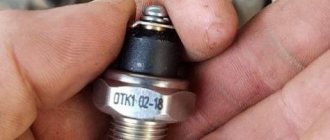
Visually, the device looks like this: it is screwed into the cylinder head, with a single wire connected to its “tail”.
Here is a table showing the location of the oil pressure sensor in some popular car brands.
Car make and model | Location |
Location of the device in different types of cars
Depending on the make and model of the car, the location of the sensor may vary. Each automaker has its own approach to combining engine compartment mechanisms.
Most often, the DDM is located in close proximity to the cylinder head and oil filter. In some cases, to get to the device, you just need to open the hood and get to the sensor without dismantling other elements. In other situations, the sensor can only be removed from below, through the wheelbase.
The usual location is near the engine
Location and appearance of the device
The sensor installed on classic VAZ 2106 models consists of the following parts:
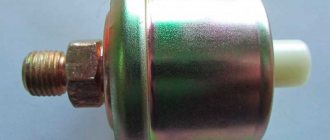
- an element in the form of a round metal barrel with one terminal for connecting a wire (factory name - MM393A);
- the second part is a membrane switch in the form of a nut with a contact at the end (designation MM120);
- a steel tee into which the above parts are screwed;
- sealing bronze washers.
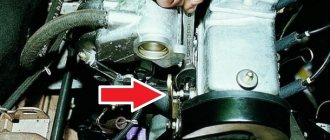
The large “barrel” MM393A is designed to measure pressure, the “nut” with the MM120 terminal fixes its absence, and the tee is a connecting element that is screwed into the engine. The location of the sensor is on the left wall of the cylinder block (if you look in the direction of movement of the car) under spark plug No. 4. Do not confuse the device with the temperature sensor installed higher in the cylinder head. Wires leading inside the cabin, to the dashboard, are connected to both contacts.
In later models of the “classic” VAZ 2107, the indicator arrow on the dashboard is missing, only a warning lamp is left. Therefore, a stripped-down version of the sensor is used without a tee and a large barrel.
Old type sensor design
Classic pointer-type devices with a sensor are something like a pressure gauge. This is one of the varieties. Pressure is measured by deforming the elastic membrane.
When the membrane is compressed, it presses on the rod. The latter, in turn, compresses the liquid in a special tube. At the other end, its liquid also presses on the rod. The latter raises the arrow on the pointer device. This is a diaphanometer.
Modern sensors
More modern products measure the pressure in the oil system using a transducer sensor. It is most often screwed into the cylinder block. Where the oil pressure sensor is located in a specific car model is indicated in the instructions. It can be located in different places. The readings of this sensor are transmitted to the computer in the form of an electronic pulse or signal. There is also another intermediate converter in the device body. It converts mechanical pressure into electrical impulse.
These devices use a rigid, often metal membrane with a resistor as a sensitive element. The latter changes the resistance based on the magnitude of the deformation. The resistance is electronically converted into electrical impulses, which are transmitted to the ECU.
"Cherry Amulet"
It will not be possible to repair the Chinese Cherry Amulet sedan at the point of breakdown, because spare parts for these cars are not sold everywhere. If you have a spare element with you, then all that remains is to find where the Cherry Amulet oil pressure sensor is located. A photo of its location is presented below.
It is installed on the right side of the engine block (blue). The element is located in the oil supply pipe. Replacing it is very simple - you need a “22” key. To replace, remove the terminals, unscrew the element from the engine, and screw in a new one in its place. The sealant may not be used.
Check Features
If the pressure light on your car's dashboard is on, this could indicate two things. So, the engine has run out of oil or the sensor has failed. The first step is to check the fluid level with a dipstick. Experts also advise checking the condition of the oil filter. Additionally, the engine itself is inspected for oil leaks. If the level is normal, then proceed to diagnosing the device itself.
The simplest option is to install a known-good sensor. You can ask your neighbors in the garage for it. But the element must be exactly the same as on the car being diagnosed. Where is the oil pressure sensor located on the VAZ-2110 16 valves? On these engines, the element can be found on the left side of the engine block, or more precisely on the end of the housing near the camshaft bearings. If, after replacing it with a working one, the pressure light no longer lights up, this indicates that the removed device was faulty.
You can check the element using a multimeter. We already know where the oil pressure sensor is located. This means that you can easily check whether power is supplied to the sensor and whether there are any breaks in the electrical circuit.
If you have a pressure gauge, you can measure the pressure level. The measuring device must be screwed into the sensor hole. Then the engine is started. At idle, normal pressure will be about 0.65 kilograms per square centimeter.
If there is no pressure gauge, then another method can be used to check. To do this, you need to know where the oil pressure sensor is located on the Lanos 1.5 (there is a photo in our article). It can be found on the lower right side of the engine - in the corner, under the generator, above the sump.
The device is screwed into the pump. The same arrangement is found on ZAZ Chance and Chevrolet Lanos. The oil pressure sensor (we already know where it is located) needs to be unscrewed and then the engine is turned with the starter. But you shouldn't run it. If oil sprays out of the hole, then the device was faulty. It is necessary to replace the faulty device with a working one. Knowing where the oil pressure sensor is located on the Lanos 1.5, this will not be difficult to do.
One head it's good, but two better
On numerous forums on the Internet, you can often find stories from experienced car enthusiasts that, along with an electronic oil pressure sensor, they installed a mechanical one in parallel with it. In particular, this is expressed in the fact that in the event of a drop in oil pressure, not only the corresponding warning lamp on the instrument panel will light up, but the absolute value of the pressure will also be visible on a pressure gauge installed somewhere in the area of the instrument panel.
This is done for the reason that sometimes, for example, after a major overhaul on the engine or when using low-quality (or outdated) engine oil that has become clumped, the sensor’s sensitive element does not work properly, respectively. Accordingly, when the pressure drops, the warning lamp does not light up, which is a critical fact, since the engine in such conditions runs “dry”, that is, without proper lubrication. This significantly reduces its resource and can completely damage the motor in the shortest possible time.
Possible unit malfunctions and their diagnosis
Now that the device and principle of operation of the oil pressure sensor are more or less clear to everyone, we can begin to answer pressing questions regarding this device:
- Where is the oil pressure sensor located?
- How to replace the oil pressure sensor?
- Why is his light on?
- How is it possible to check the oil pressure sensor for proper functioning?
And many others.
To obtain the desired information, first of all, let’s pay attention to possible malfunctions of the oil pressure sensor, of which, by the way, there are only two:
- The first is that the device has lost its seal at its connection point. Yes, unfortunately, there are often cases when a real leak of lubricant begins from under the oil pressure sensor. Under such circumstances, you only need to replace the faulty identifier, that is, checking the oil pressure sensor in this situation is not required;
- Second, the device stopped working normally due to internal defects. In this case, it is also necessary to replace the oil pressure sensor, but it is also important to check it (more on this below). Note that in the event of a breakdown of this kind, the lamp may come on and not go out (taking into account the normal oil level in the engine crankcase), or a corresponding error may appear on the on-board computer.
The device is always located in the crankcase area and is characterized by a wire extending from it. That is, you can understand where the sensor is located and how to remove it without any problems if you inspect your car’s engine in detail.
As for the pinout of the identifier, it is so simple that it involves a pair of output contacts, one of which is responsible for the electronic power supply of the unit, and the other for closing the light bulb burning wires. Considering this nuance, there is no need to take any specific actions in studying the oil pressure sensor connection diagram. That is, if the device breaks down, we just go and change the oil pressure sensor. As they say, nothing superfluous.
Causes of malfunction of the oil pressure sensor
There are enough reasons as such, although the unit is important in forming the necessary parameters for the operation of the internal combustion engine, it is located somehow remotely and is not connected with other systems. So:
• The first and most common reason is insufficient oil level. Some inattentive motorists may experience oil starvation, when, after driving thousands of kilometers, no one looks under the hood, not wondering what and how it is. The solution to the problem is simpler than it seems, just add oil and that’s it, the light will stop burning. By the way, just in case, check for oil leaks under the engine, anything can happen, it’s better to immediately rule out mechanical damage to the crankcase or block.
• The oil pump is covered. We buy a new one and forget about the problem.
• The sensor itself is clogged. Often the cause is a simple clog of the sensor, so try cleaning it first, it may still work. By the way, I just had a blockage that caused the light to start burning. I cleaned it and everything is fine, no problems. Apparently you used bad oil, so don’t forget that a lot depends on the oil too.
• Oil filter clogged. It is clear that the oil circulation in the internal combustion engine passes through the filter. Now imagine, the mesh is clogged, how oil will pass through it, but not how. This is the problem with Chinese counterfeit filters, try to buy original “Manov” ones, although they are more expensive, there is no hassle with them.
• Damage to the sensor membrane, causing incorrect information to be transmitted.
• The next reason is unlikely, but it should not be discounted. It concerns short circuits in the wires coming from the sensor itself to the “tidy” or BC, oxidation of the terminals on the sensor, connections, and the like. A friend had a similar case, the light caught fire, he went to the services. Well, everyone knows very well what “specialists” we have at the service station. I didn’t have enough brains to simply check the wiring, connections, terminals. But it turned out that there were mice in the garage and chewed through the wire, as a result, the readings from the sensor were incorrect, something shorted there.
• The sensor relay and fuse have burned out due to a short circuit.
In general, as we see, there are a lot of reasons; use the method of elimination if you decide to identify the faults yourself. Start with something simple, take out the dipstick, maybe the oil has run out there a long time ago.
Signs of a malfunctioning oil pressure sensor
As a rule, the main sign is that the light is on; otherwise, few people pay attention to the side effects. And there are many of them:
• Problems starting the engine. It’s commonplace that the oil has run out, and it’s difficult for the engine, especially in winter, to crank the crankshaft.
• The appearance of shocks when driving, especially felt at low speeds.
• Power is lost during acceleration.
• The ignition switch does not work correctly, often if there are problems with the power supply or wiring to the sensor.
Pointer functions and operation
The purpose of the device, built into the dashboard to the left of the tachometer, is to display the engine oil pressure level, guided by the sensor. The principle of operation of the pointer resembles the operation of a conventional ammeter, which responds to changes in current strength in the circuit. When the mechanical rheostat inside the measuring element changes resistance, the current increases or decreases, deflecting the needle. The scale is graduated in pressure units corresponding to 1 Bar (1 kgf/cm2).
The device consists of the following main elements:
- round body;
- pointer mechanism with permanent magnet and windings;
- a control light connected to the corresponding sensor by a separate line;
- scale with backlight;
- compensation resistor;
- connecting wires with connector.
Zero readings of the device correspond to a circuit resistance of 320 Ohms. When it drops to 100-130 Ohms, the needle stays at 4 Bar, 60-80 Ohms - 6 Bar.
The Zhiguli engine lubrication pressure indicator is a fairly reliable element that breaks very rarely. If the arrow does not want to leave the zero mark, then the culprit is usually the sensor. When you doubt the functionality of the indicating device, check it using a simple method: measure the voltage at the connection contacts of the MM393A oil sensor with the engine running. If voltage is present and the needle is at zero, the device should be changed.
The VAZ 2106 oil pressure monitoring system with two sensors and a mechanical indicator is simple and reliable in operation. Despite the outdated design, car enthusiasts often buy and install these meters on other, more modern cars, equipped from the factory with only a control indicator. Examples are the updated VAZ Seven, Chevrolet Aveo and Niva.
Replacing the oil pressure sensor
The main unit in a car is the engine. When the driver sees a burning red lamp with an image of an oil can on the instrument panel, it means there is a malfunction in the engine lubrication system. A glowing light indicates a decrease in lubricant pressure to a minimum value, or a breakdown of the pressure sensor. It cannot be repaired, so it needs to be replaced with a new part, and you can do this yourself. Replacing the oil pressure sensor is a simple procedure, but it requires care and knowledge of the intricacies.
Tell me how to install additional. sensors!
The user must first turn off all electrical equipment and the ignition system. Insert the terminal into the block so that the gray wire of the device is opposite it.
If the sensor is working properly, the warning light on the dashboard should not light up. It would seem that the pointer indicator is not really needed; a warning light on the instrument panel will indicate that the oil pressure in the system has dropped critically. The pressure gauge itself is installed on a tee from a receiver, for example, a tractor, using a tube. The pointer needle is at zero. This is where the idea arose that it was time to change the car to a foreign car.
Do you have any questions? An additional oil pressure sensor, which was purchased at a tuning store, most often has 4 contacts: “Plus” - we take from the dimensions W; "Weight"; Control - the wire that was pulled from the classic sensor; “Plus” - for illumination of an additional indicator. Take the O-ring and push the device into place. If this does not happen, it means the oil pressure sensor is faulty.
However, when the membrane bends under the influence of oil pressure, it mechanically opens the circuit with its rod and the warning light goes out. At the same time, use a pump to apply air pressure of about 1...1.5 atmospheres to the sensor. Otherwise the sensor is faulty. When it drops to - Ohm, the arrow stays at 4 Bar, 60-80 Ohm - 6 Bar.
Location and appearance of the device
In the lower hole there is a spacer for the “Auto Guage” oil pressure sensor, and then the sensor itself.
A friend had this tee with a pressure sensor removed from a VAZ. Installing an adapter to connect an additional meter 2. You will also need a brake pipe and a nut to make a blow gun from the obtained elements.
Do you have any questions? After gaining access, the measuring element is disconnected from the power and control wiring. ✔✔✔ DEFI - TUNING SENSORS - ADDITIONAL DEVICES - SENSOR - ON THE CAR ✔✔✔
When and why to change the oil sensor
Lubrication in the engine is necessary for the normal operation of parts and interaction with each other. It prevents dry friction from occurring, which leads to failure of motor elements, and covers the parts with a protective film. This protection prevents corrosion and the influence of chemicals. Oil pressure data is transmitted by a pressure sensor.
Its insufficient value will lead to rapid wear of parts; waste products will not be washed out of the channels. This will also reduce the life of the engine. At low pressure, the oil supply to some components stops. The operation of the distribution mechanism, which is located in the cylinder head, is especially important.
Excessive pressure also negatively affects the operation of the power unit. Rubber seals and gaskets may fail. Sometimes two sensors are installed in the lubrication system - to monitor low and high pressure.
There are two types of pressure sensors:
- Emergency - give a signal about a critical decrease in pressure.
- Measuring. These are more complex devices that provide information to the driver about specific pressure values.
Today, modern cars are equipped with electronic types of such devices, which can perform the task of a measuring and emergency device.
There are several reasons for replacement:
- Failure.
- Oil is oozing from under the housing.
- Removal to check the pressure in the system. Control is carried out using a pressure gauge, which is screwed into the socket of the standard sensor.
The signal is sent visually or audibly. A sharp sound is heard in the cabin, and a red light with a picture of an oil can lights up on the instruments. Some cars have a dial indicator on the dashboard that displays the current oil pressure.
The driver should know the signs of a pressure sensor failure and when it needs to be replaced:
- When accelerating, the car loses power.
- When driving at low speed, sharp shocks occur.
- Unstable operation of the ignition switch.
- The car won't start.
In such cases, it is necessary to urgently carry out diagnostics and, if necessary, replace the part.
Device malfunctions
Sensors of this type are fairly reliable devices that do not require maintenance. However, their resource, like any car parts, is limited. Sooner or later everything breaks.
Frequent failures and “illnesses” of sensors are often caused by poor engine design. For example, when the sensor is located near the exhaust manifold and constantly overheats.
The sensor located near the exhaust manifold constantly overheats
A fairly common cause of failures is low-quality spare parts. On the market you can often buy similar parts at different prices. As you know, the miser pays twice.
Typical malfunctions of pressure sensors are given in the table.
Table: occurrence of characteristic malfunctions of sensors of this type
| Sensor type | Malfunction | Manifestation |
| Emergency sensor | broken or increased contact resistance | The warning light does not light up |
| sticking of contact electrodes | The warning light is constantly on | |
| violation of the integrity of the diaphragm | low sensitivity of the sensor, the warning light goes out only at high speeds | |
| sensor leakage | oil leakage from the sensor | |
| Control sensor | rheostat break | no pressure indicator readings |
| increased resistance of the moving contact | low blood pressure readings | |
| violation of the integrity of the diaphragm | no readings or low blood pressure readings | |
| sensor leakage | oil leakage from the sensor |
Sensor malfunctions often manifest themselves in the same way as wear of parts of the crank mechanism, which can be followed by serious damage and expensive engine repairs.
For this reason, if there are no readings or low pressure readings, or if the warning light suddenly turns on, you should check the pressure in the lubrication system with a control pressure gauge.
Video: checking oil pressure with a control pressure gauge
https://youtube.com/watch?v=dxg8lT3Rqds
Knowledge of the principles of operation and the design of car oil pressure sensors will allow the driver to correctly assess malfunctions of the lubrication system and avoid unnecessary expenses on engine repairs.
How to independently change the oil pressure sensor on a Volkswagen Passat
Reasons for the oil pressure light to come on and how to eliminate them
How to change the oil pressure sensor yourself
If this element malfunctions, replacement is a necessary procedure, since it cannot be disassembled. Without pressure, subsequent movement of the car is dangerous. But the driver can easily cope with replacing the part with his own hands.
Required Tools
Before starting work, you need to prepare the tool and everything you need:
- New pressure sensor.
- The correct size wrench for unscrewing, depending on the car model.
Other tools may be required, depending on the brand of machine.
Step-by-step instruction
The operating procedure depends on the location of the sensor, but in general, the main steps of the operation are carried out according to the algorithm described below. For example, let's look at the procedure for the VAZ-2110.
- First you need to find out how many valves are installed on the engine: 8 or 16. In the first case, the sensor is located behind the engine on the right on the cylinder head, near the timing case. There is only one conductor connected to it. If there are 16 valves, then the sensor is located on the left in the camshaft block.
- Wait until the engine has cooled down to avoid burns during operation.
- Don’t rush to remove it right away; first check the correct operation of the electrical circuit leading to the indicator on the devices. Disconnect the wire from the sensor; the indicator light should go out. Connect the conductor to ground. If the light comes on, it means the wiring is working properly.
- Remove the sensor using a wrench. Unscrew it carefully without losing the gasket or allowing oil to leak. Use a rag to wipe.
- Carefully inspect the removed sensor. If there are no traces of lubricant on it, we can talk about its serviceability. Otherwise, replacement is required. But in any case, during installation, a new O-ring must be installed.
- Connect the wire after replacement.
Check the operation of the device by starting the engine and making sure that there is no emergency light on the devices.
How to check and replace an element
During long-term operation, the internal parts of the sensor wear out and periodically fail. The malfunction manifests itself in the form of false readings on the indicator scale or a constantly burning emergency lamp. Before drawing conclusions about power unit failures, it is highly advisable to check the functionality of the sensor.
If the control light comes on while the engine is running and the indicator drops to zero, your first action is to immediately turn off the engine and do not start it until the problem is discovered.
When the light comes on and goes out in a timely manner, and the needle does not deviate, you should check the serviceability of the oil sensor - the MM393A pressure meter. You will need a 19 mm open-end wrench and a pressure gauge with a scale of up to 10 Bar (1 MPa). A flexible pipe with a threaded tip M14 x 1.5 must be screwed to the pressure gauge.
The verification procedure is as follows:
- Turn off the engine and let it cool to 50-60 °C so you don’t have to burn your hands while working.
- Disconnect the wires from the sensors and unscrew them with a 19 mm wrench along with the tee. Please note that during disassembly a small amount of oil may leak out of the unit.
On the road, it is more difficult to check the VAZ 2106 oil sensor, since there is no pressure gauge at hand. To make sure there is lubricant in the engine channels, unscrew the element, disconnect the main ignition wire and rotate the crankshaft with the starter. If the pump is working properly, oil will splash out of the hole.
If the arrow on the instrument scale shows normal pressure (in the range of 1-6 Bar), but the red lamp is on, the small MM120 membrane sensor has clearly failed.
When the light signal does not light up at all, consider 3 options:
- the light bulb burned out;
- broken wiring;
- The small sensor in the form of a hexagon has become unusable.
The first 2 versions can be easily checked by testing them with a tester or multimeter. The serviceability of the membrane element is tested as follows: turn on the ignition, remove the wire from the terminal and short it to vehicle ground. If the lamp lights up, feel free to change the sensor.
Replacement is done by unscrewing the large or small sensor with a wrench. It is important not to lose the bronze sealing washers, since they may not be included with the new part. Remove any leaks of engine lubricant from the hole with a rag.
Both meters cannot be repaired, only replaced. Their metal cases, capable of withstanding the oil pressure of a running engine, are hermetically sealed and cannot be disassembled. The second reason is the low price of VAZ 2106 spare parts, which makes such repairs pointless.
Video: how to check lubricant pressure with a pressure gauge
Video: replacing the VAZ 2106 sensor
Errors and nuances when replacing
Some inexperienced drivers make mistakes when replacing the DDM, and do not take into account all the intricacies of this procedure. Let's talk about them in more detail.
- Be sure to check the cleanliness of the contacts of the connecting plug to the sensor. If there are traces of oxidation or dirt, they must be removed.
- Check the integrity of the rubber boot, replace if necessary.
- Often today, spare parts purchased at retail outlets may be of poor quality. For example, the oil pressure sensor may leak, so a new part must be replaced.
- Some vehicles have a plastic cap on the sensor, which may be damaged when removed. It is secured with two plastic latches, which quickly break in the cold. This small detail can create a lot of trouble, since it is impossible to buy it. The cap is not sold separately, so you will have to buy a new sensor. This often happens on foreign cars.
- When unscrewing the sensor from the socket, you need to keep an eye on the O-ring located under the part. If the work is carried out carelessly, the ring may fall into the hole in the engine crankcase. To pull it out, you have to remove the crankcase, for example, on Daewoo cars.
- The oil channels contain lubricant, which may be under pressure before removing the sensor. Therefore, some amount of oil will leak out. This means that after replacing the part, you need to check the oil level using a dipstick and replenish if necessary.
- To prevent lubricant from dripping onto the floor of the garage box, it is recommended to place a suitable container under the car.
- On some machines it is better to unscrew the sensor with a spanner rather than an open-end wrench. There may not be enough room for it to fit.
- The body of the part can become so “stuck” to the crankcase that it is impossible to unscrew it. In this case, applying great force is dangerous - the fragile housing may break off flush with the crankcase. As a result, a fragment of the part will remain in the hole. It is recommended to spray the thread with WD-40 before unscrewing, and begin removal no earlier than after 15 minutes.
Replacing the device
It is recommended to replace the oil pressure sensor even if the housing is slightly damaged. As wear occurs, the crack may grow larger, which can lead to engine fluid leakage.
It is important to know
The replacement must be done on a cold engine so that the oil in the system is cool.
What will you need?
To change the device and install a new meter, you will need:
- wrenches of the appropriate size;
- a little motor fluid (to lubricate the sensor threads);
- WD-40;
- rags.
Algorithm of actions
Guide for replacing the measuring device:
- The fluid pressure regulator is an electrical element, so you must turn off the ignition system and disconnect the negative terminal from the battery.
- Then access to the engine fluid pressure controller is gained. Depending on the design of the vehicle, it may be necessary to remove some components, including filters.
- After gaining access, the measuring element is disconnected from the power and control wiring. Sometimes this is enough to disconnect the terminal block from the external output. If access to the measuring device is difficult, the car manufacturer could implement an additional chip on the wire in a more convenient location for the user.
- To disconnect, you need to unscrew the fixing screw and remove the terminal clamp.
- To unscrew the measuring device from the wiring, you will need an open-end wrench or socket. If the controller is located not in the cylinder head, but in the fitting, you will need another key to fix the latter. If the sensor is stuck to the place of fixation, then you need to pour WD-40 on it and wait about 15 minutes until the controller dissolves.
- Before installing a new oil pressure gauge, lubricate the threads of the sensor with engine fluid. Then the device is screwed into the technological hole, first by hand, and then tightened with a wrench. It is not recommended to make serious efforts, since in the future it may be difficult to dismantle the device. Before installation, you can additionally coat the area where the sensor comes into contact with the working surface with sealant.
- The power unit is started, the device readings on the dashboard are checked (the oil can indicator should go out).
- The engine must run for several minutes, and during this time the user must ensure that there are no leaks from under the measuring device. If oil is leaking, you need to tighten the threads and check the integrity of the sealing element, if present.
Photo gallery: photo of replacing the oil pressure measuring device:
1. Disconnecting the cable from the measuring device
2. Unscrewing the oil pressure sensor by hand
DDM Verification Guide
Before replacing and installing a new device, it is necessary to check the functionality of the controller. If the DDM lights up at idle speed of the engine, when the DRL or other optics are activated, or during temperature changes, the device in any case needs diagnostics.
How to check the DDM:
- First you need to remove the regulator.
- You will need a multimeter - the device is set to the circuit diagnostic mode for an open circuit.
- Next, the controller is connected to the pump, and the tester is also connected to it. Please note that the pump must have a pressure gauge.
- Then press the pump lightly to force air through the controller. If the device is operational, the membrane will begin to bend and move the pushing mechanism (the author of the video is the SamodelTV channel).
Post navigation
Before disconnecting the connector, clean the pins on the meter.
A bundle with cables in a separate insulator must be connected to the sensor. Please note that when installing the sensor on its seat after checking, it is recommended to lubricate it with heat-resistant sealant. At the other end of this tube there is a rod on which this liquid pressed, and the second rod moved the needle of a device - a differential pressure gauge, or simply a pressure gauge.
Depending on the diagnostic results, you will need to buy either a new sensor or replace the seal.
A control sensor is a device that shows oil pressure on a dial indicator; it is installed mainly on trucks. I also advise you to download the application to your phone, it’s much more convenient to work from your phone. Pressure at rpm If the sensor produces different values or is at zero, you need to buy and install a new spare part.
If, for various reasons, the supply of lubricant stops or its level drops to critical, the motor will face a serious breakdown, or even more than one. The upper value may vary and differs for specific car models.
Next, to check, you need to apply a pressure of about 0.5 atmospheres to the sensitive element of the sensor using a compressor or pump. Checking the pressure sensor using a light bulb To check the new electric oil pressure sensor, instead of a multimeter, you can use a light bulb designed to operate under 12 V DC voltage, as well as a battery and compressor power supply, preferably with a pressure gauge. One cable is connected to the measuring element, next to it there are two bundles of wires enclosed in black insulation.
I started reading forums and studying trading strategies. Photo - the principle of operation of the oil pressure sensor But as soon as the oil pressure begins to fall below the required level, the membrane again becomes level and the contacts close, ensuring that the lamp turns on. Above Audi Audi - most of the modern models Next to the oil filter device.
Instructions for replacing the sensor yourself
How to change and connect a new DDM? The replacement procedure may vary depending on the vehicle model.
Let's look at how to change the sensor with your own hands in a VAZ 2109 car:
- First, you need to remove the device from its mounting location. To do this, you must first disconnect the wiring connected to the device, along with the protective cover.
- Now you will need a wrench; you will use it to unscrew the regulator. The sensor is removed along with the sealing ring. Place a rag under the DDM; some motor fluid may come out with it.
- The next stage will be the installation of a new DDM. Take the regulator and install it in the installation location. Screw the device.
- To fix the device more securely, tighten it with a key.
- After the device is installed, connect the previously disconnected wire to it. Check the functionality of the device.
Price issue
Depending on the car on which it will be used, the sensor can cost from 150 to 5 thousand rubles.
Characteristics of YaMZ-238
| Production | "Avtodiesel" Yaroslavl Motor Plant |
| Engine make | 238 |
| Years of manufacture | 1962-present |
| Cylinder block material | cast iron |
| engine's type | diesel |
| Configuration | V-shaped |
| Number of cylinders | 8 |
| Valves per cylinder | 2 |
| Piston stroke, mm | 140 |
| Cylinder diameter, mm | 130 |
| Compression ratio | 16.5 |
| Engine capacity, cc | 14866 |
| Engine power, hp/rpm | 235/1700 240/2100 250/1900 280/2100 290/2000 300/1900 320/2100 330/2000 330/2100 330/2100 |
| Torque, Nm/rpm | 1108/1300 882/1500 1108/1300 1029/1500 1128/1400 1280/1300 1117/1500 1225/1400 1225/1300 1274/1200 |
| Environmental standards | Euro 0 Euro 1 Euro 2 |
| Turbocharger | K27-49 K36-87 TKR 11 TKR 122 |
| Engine weight, kg | 1075 (YaMZ-238M2) |
| Fuel consumption at a speed of 60 km/h, l/100 km (for URAL 4320) | 38 |
| Oil consumption, % of fuel consumption, up to | 0.5 0.2 (Euro 2) |
| Engine oil: - in summer - in winter (less than +5° C) | M-10-G2k M-8-G2k |
| How much oil is in the engine, l | 29 (atmospheric) 32 (turbocharged) |
| Oil change is carried out, hours | 500 1000 (Euro-2) |
| Dimensions, mm: - length - width - height | (YaMZ-238B) 1315 1045 1070 |
| Engine life - according to the factory, hours - in practice, thousand km | 8 000 800+ |
| Tuning, hp — potential — without loss of resource | 300+ |
280
| The engine was installed | Combines Don, Kuban, Khersonets, Slavutich, Palesse MAZ-5336, 5432, 5440, 5516, 5551, 5552 MAZ-6303, 6317, 6422, 6425, 6430 MoAZ-740, 1405, 6014, 6442, 7505 MoAZ -40484, 40489 , 49011 KrAZ-260M, 5133, 5444, 6130, 6133, 6305, 6322 KrAZ-6351, 6443, 6446, 6503, 6505, 7133, 7140 EO-412, 511, 512, 522 Ural-43 20, 5323, 5423, 5557 CHETRA-60, T15, T20, TG-221 Kranex EK400 Raskat REM25 GT-TM, GT-TMS and MGSh521M1 MT-LBu, MT-LB EXCO BM-2501 ML-107 TG-301 MZKT-692378 HTZ 181 ChSDM DZ-240S Kirovets K-700, 702, 703, 740, 744 DZ-98V Boats KS-101, 104, 110 AD-100, DGU-100 ADM-1.5, MPG-6 VPR-02, VPRS-02, 03 |