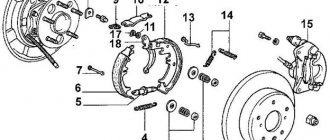
Replacing brake drums on a VAZ 2110 is a classically simple procedure. Take a jack, lift it from the desired side, and remove the wheel. The only difficult moment may be unscrewing the drum studs and breaking the brake drum (since very often they are tightly stuck).
And then, by lightly tapping the hammer (so as not to damage the drum, it is fragile), we remove and change the brake drum of the VAZ 2110, 2111, 2112 or Kalina, Priora, Grants (on all these cars the process of replacing brake drums is absolutely the same). It is best to combine such tappings with uniform screwing of the pins into the corresponding holes in the drum. The main thing is not to break the thread!
Installing a new brake drum is carried out in the reverse order. If the drum does not fit, you may need to loosen the handbrake cable and then adjust the handbrake.
Source etlib.ru
Typically, “tens” have rear drum brakes, but today you can buy and even independently install rear disc brakes on a VAZ 2110, which fit perfectly and are installed without much effort or difficulty. Everyone who has installed them claims that they have a lot of advantages.
Rear wheel brake
pros
Let's look at why disc brakes are better than drum brakes:
- Braking becomes more reliable, braking distance is reduced;
- Braking forces are distributed more evenly, given that the VAZ 2110 is a front-wheel drive car;
- There is an effect of faster response after pressing the pedal;
- Unsprung masses are reduced;
- Heat dissipation occurs better, which is especially important when driving on a mountain road or during active acceleration/braking. For this reason, the brake system is cooled better;
- Disk ones are much easier to dismantle and replace;
- There is no need to adjust the handbrake after each repair of the rear brakes, although this will have to be done the first time;
- They do not freeze in winter after washing, like drum ones;
- Rear disc brakes installed on the VAZ 2110 are much more convenient to control and promptly notice pad wear.
How to replace the master cylinder
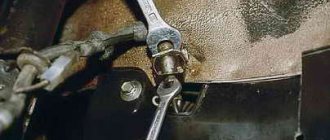
It is necessary to remove the upholstery in the engine compartment to gain access to the cylinder. To do this, unscrew three self-tapping screws on the VAZ-2110. The brake system, the malfunctions of which are discussed in the article, is hidden under this upholstery. It is worth noting that there is no need to completely remove it. Just bend it a little. Once access to the cylinder is gained, the liquid level sensor must be disconnected. Then you need to unscrew the cap from the expansion tank. Using a bulb or syringe, pump out all the liquid. After this, unscrew the tube fittings from the cylinder. Put them away.
Now you can unscrew the two nuts that secure the GTZ to the vacuum booster housing. Remove the cylinder along with the expansion tank. To dismantle the latter, just pry it off with a screwdriver. Installation of the master cylinder is carried out in the reverse order. In this case, it is necessary to bleed the system. However, almost any repair of the VAZ-2110 brake system ends with bleeding.
Minuses
Replacing brakes with disc brakes was not without the famous “fly in the ointment,” although it rather concerns precisely those problems that their installation can cause.
Firstly, our law enforcement agencies consider their installation on a VAZ 2110 as a design change.
What might this entail?
- Fine when passing a technical inspection;
- You can be simply wrong in a controversial accident if traffic police officers emphasize that you have “wrong” brakes;
- And the insurance company may also consider this a reason for non-payment of insurance.
Secondly, the handbrake will additionally need to be modified - or replaced with a hydraulic handbrake, although the latter weakens over time.
Thirdly, it is necessary to refine or carefully adjust the sorcerer so that on the VAZ 2110 the rear wheels do not brake more than the front ones, as this will certainly cause a skid, especially on ice or wet asphalt. To do this, sometimes you even have to grind down the pads by a quarter, or even more.
Replacing rear brake pads on VAZ 2108, VAZ 2109, VAZ 21099
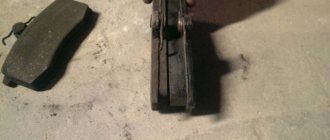
Welcome! Rear brake pads - perform braking of the car, and also stop it on small slopes using the handbrake, the rear pads play a rather important role in braking the car, if they wear out, then you can forget about stopping the car quickly because the front ones simply cannot brake a ton quickly weight, you can easily understand that the pads are worn out, if when braking in the rear part there is a grinding sound of metal on metal, then you need to look at them, but it is better not to let it get to this state and change the pads in time (You can also understand that the pads are worn out by using the handbrake, if it is well tightened, but the car still does not stand still, then the rear pads need to be replaced).
Note! To change the pads at the rear, you will need: Wrenches, spanners, screwdrivers, pliers, and two mounting blades will be needed or pry bars instead!
Where are the rear brake pads located? They are located on the rear wheels, under the brake drums, and by the way, unlike the front, in the rear they are made completely differently, but their composition is the same as that of the front pads, namely: A friction lining that wears off over time and thanks to which the car stops (it is indicated by a red arrow) and the base of the pad (it is indicated by a blue arrow, the base is metal and the friction lining is attached to it), if you want to know in more detail about what brake pads are, what they consist of and how to buy To avoid running into a fake, read the article entitled: “What are brake pads? » in which everything is described down to the smallest detail.
When do you need to change rear brake pads? They must be replaced if they are heavily worn; the pads have no specific mileage at all, because they wear out depending on how hard you press the brake pedal, for example, if you stop using them altogether and just drive while braking in gears and only in If you use the brake in emergency situations, then the pads will last you for a very long time, but you can only understand that their time has come and you need to change the pads based on two signs (We have already indicated them above, the handbrake does not hold, although the cable is tense and there is a grinding noise). rear part when braking), in addition to such situations, it happens that something else happens to the friction lining (for example, it begins to fall off from the base or chips, grooves appear on it, and if the lining becomes oily, the pad, by the way, also needs to be replaced, and the most common one is, this is a friction lining ground down almost to the metal, which is why a grinding sound appears on cars), but in order to see the friction lining you will need to remove the brake drum, so as a rule, few people do this and most people drive until the grinding of metal on metal does not they will hear, we strongly recommend that you look into the brake system of the rear wheels once every 15-30 thousand, especially since the rear drums do not take very long to remove; in 2-3 hours you will be 100% done.
Design Features
It is better to purchase rear disc brakes as a complete set. The VAZ 2110 fits 13 or 14 inch brake discs (ventilated or non-ventilated). Try to purchase certified discs so that they do not have to be modified.
Rear disc brake kit with necessary components
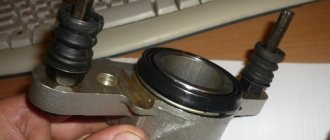
You also need a caliper, which comes in three types, so you need to select it to match the disc. The caliper comes with a hose and brake pads. The kit includes a universal clamp suitable for all calipers - a faceplate.
Dismantling
Before installing disc brakes, you need to dismantle the old rear brake mechanisms of the VAZ 2110.
This is done like this:
- Remove the wheel;
- Remove the brake drum;
- Remove the pads;
- Remove the hub from the wheel, having first unscrewed the brake pipe.
You should prepare for the fact that dismantling will not be easy. Not only do the brakes have the unpleasant tendency to stick during operation, but the bolts are also “welded” by corrosion. Therefore, it is advisable to treat the nuts and bolts themselves with a special agent (for example WD 40) so as not to tear off their edges.
It is important to plug the removed pipe with something so that brake fluid does not leak out and air is not sucked into the system. After that, knock down the hub. This works best if you attach a board or lath to the back of the support disk and hit it with a hammer, moving the blows: one from below, the other from above. This will prevent you from causing serious damage to the disk.
Machine and stand for boring brake drums - a solution to the problem
Not so long ago, a motorist did not even have to choose where and how to bore. I simply took them off and took them to the lathe. Where an experienced turner, who knows his business well, gave your spare parts a “second life” in turn. It was a rather complex and time-consuming technological process.
Boring is not just a banal grinding of the top layer of the working surface
It is also important to adhere to all parameters when balancing regarding the drum and wheel hub. Inaccuracies or failure in one of the stages of this process can lead to serious and sometimes tragic consequences
Therefore, it is recommended to approach these moments with all responsibility and attention.
Nowadays, modern service station masters have at their disposal a specialized miracle machine in which all parameters can be programmed, and grinding, grooving, or boring of the drum occurs in the specified program mode. This will minimize the likelihood of errors and errors in this technological process.
Grooving with removal is usually carried out on a stationary lathe or a specialized stand for boring drums. The process without removal is carried out using a portable specialized machine for grooving. The option of boring yourself or grinding the drums using improvised means is possible, although this method looks rather dubious in terms of its effectiveness and further operational safety.
In the case of professional grooving by a master using specialized equipment, we will receive:
- elimination of runout;
- increasing the efficiency of the braking system;
- increasing the service life of brake drums;
- real savings on the family budget (which is nice).
Well, now let's summarize:
It is quite possible to drill the brake drum yourself. However, to complete this process you, at a minimum, need to be prepared to fulfill two conditions: to be a turner of a certain qualification and to have a lathe. In all other cases, using common sense, it is better not to take risks.
Installation
It's time to install disc brakes instead of the removed rear drum brakes.
Having knocked off the hub, we will put it back, but in a different way:
- It should be installed through the plate into which the caliper is already mounted. Carefully ensure that all holes line up. Particular attention to alignment;
- Next, use a hammer to straighten the corner of the beam so that the caliper does not rest against it;
- Now you can put the brake disc on the hub, placing spacers between these parts, and secure the disc with a bracket;
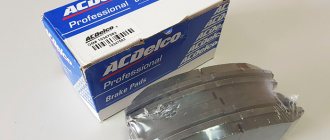
- We install brake pads from VAZ 2110;
- First, carefully and securely attach the brake hose to the caliper, and then to the tube;
- To reduce the braking force of the rear brakes compared to the front, you need to partially grind off the friction material of the pads.
Downloading a book
After successfully completing the payment (by any method) and returning to the KrutilVertel store from the payment system website, you will be taken to the successful payment page:
The book you purchased will be in your personal account, from where you can always download it.
Please note that after making the payment, you need to return back from the payment system website to the KrutilVertel website. If for some reason you did not return back to the site and closed the payment system tab with a message about the successful completion of the payment, please let us know - we will send you a letter indicating access to download the book
If for some reason you did not return back to the site and closed the payment system tab with a message about the successful completion of the payment, please let us know - we will send you a letter indicating access to download the book.
Examination
Having carried out all the above operations - first on one wheel, and then on the second, you also need to check the system for leaks. The first phase is to simply press the pedal.
The fact that everything is done normally is indicated by the fact that the pedal is pressed with force, quite tightly.
But this is not enough. Have someone else press the brake pedal while you try to rotate the parts that make up your new rear disc brakes.
If nothing moves, it means that your VAZ 2110 now has new rear disc brake systems - better and more reliable than the previous ones.
To minimize the braking distance, it is recommended to install a vacuum booster. Details: https://vazweb.ru/desyatka/tormoza/vakuumnyi-usilitel-tormozov.html
Improvement of the braking system
Many VAZ 2110 owners agree that the factory brake system is far from perfect. Therefore, they decide to modernize and improve the unit using technical tuning.
A popular solution to the issue of brake efficiency is to replace drum mechanisms with disc ones. Of course, in the case of the “ten” we are talking about the rear wheels
When replacing brakes, be sure to take into account the fact that the rear wheels must brake more softly and somewhat later than the front wheels. This way the car won't skid and you won't fly off the road.
Another option is to remove the factory brake master cylinder and vacuum booster. Instead, units from Priora are excellent. Such tuning will eliminate vibrations and also allow you to use the brake pedal effectively and without excessive effort.
Regardless of the changes made to the brake system, after each modification it is mandatory to pump the brakes.
Bleeding and adjustment
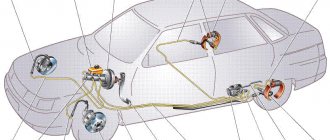
After any manipulations with the brake system (it doesn’t matter whether you repaired the rear, front or parking), on a VAZ 2110 it is vitally important to bleed the brakes so that an air plug does not form anywhere in them, which can negate the ability to brake at the right moment.
It is convenient to do this together, but you can do it yourself, although this requires some additional equipment. Many people know how to bleed the brakes on a VAZ 2110. The main thing is not to forget to do this diagonally, always starting with the front wheels, and pump the right one first.
After bleeding, you still need to check the braking forces. This requires an outside observer. You accelerate and brake sharply, and he watches as the brakes apply. The front ones should work first, then (with a small gap) the rear ones, and the braking force should be greater for the front ones.
Source vazweb.ru
Owners of the domestic “ten” know that the standard braking system involves the use of drum brakes at the rear and disc brakes at the front .
In terms of reliability, there are no special complaints about the drums, however, the rear disc brakes on the VAZ 2110 serve better, more efficiently and longer. Replacement is especially relevant in cases where the power of the power plant increases. The brake system must be modernized.
VAZ 2115 brake drum cast iron or aluminum
The time has come to replace the brake drums, I wanted to take the same aluminum ones as they are now. The store said it was better to take cast iron ones, but they couldn’t explain why they were better. So which ones should you take?
- Roma_Mayorov
- 27 October 2011, 18:26
- Stanny_Sokolovskiy
- October 27, 2011, 6:31 pm
- v
- Sergka_Malishev
- 27 October 2011, 18:32
- v
- Roma_Ostrovskiy
- 28 October 2011, 02:42
- v
- Alekhandro_Goncharuk
- October 28, 2011, 12:48 pm
- v
- Roma_Ostrovskiy
- October 28, 2011, 6:44 pm
- v
- Maksim_Kudryavtsev
- October 28, 2011, 20:41
- v
Solid cast iron, i.e. heat is distributed better. And therefore it should brake better. On the other hand, cast iron is heavier, and therefore has more inertia, i.e. its weight is added to the weight of the wheel and according to the plan it should brake harder.
I don’t know what wins in this balance. I think nothing.
Personally, I use cast iron.
PS another minus of cast iron is the appearance. collapse branch
- Dmitriy_Ponomarev
- 29 October 2011, 14:04
- v
- Sergka_Malishev
- October 29, 2011, 10:06 pm
- v
- Maksim_Kudryavtsev
- October 29, 2011, 10:49 pm
- v
Sergey Ponomarev, cast iron bends easily. so I wouldn't say they are stronger.
Pasha ¤¤¤ EVOSIF fucking KOBZDON ¤¤¤ Malyshev, I didn’t understand what to take apart. collapse branch
Some drivers wonder which brake drums are better, cast iron or aluminum. And this is not surprising, because the material is different, it has its pros and cons. All this needs to be understood in order to answer the question posed. Of course, when choosing, each driver relies on his own knowledge and reviews. It is worth remembering that not only your safety, but also the comfort of movement depends on the quality of brake drums.
It is worth focusing your attention on this matter and carefully examining the presented models. There are currently two types of brake drums:
- Cast iron;
- Aluminum.
Which brake drums are better, cast iron or aluminum - this is a question that arises among many drivers. The safety of not only the driver, but also the passengers depends on this.
It is very important that the system works like a clock, without failures or jams. Of course, at the first malfunction they can be easily changed
But this is extra money and time. There are times when the brake drum simply sticks to the base and is not very easy to remove.
You have to resort to physical force, spend extra effort and money. To prevent this from happening, it is necessary to regularly check the brakes and lubricate them. It is not very easy to answer this question, since cast iron and aluminum have their own characteristics, pros and cons. We will talk about them further.
Many can say that this material is very popular and lightweight. It can compete with cast iron drums, which is not surprising. The main advantages include:
Price category. This part can be purchased much cheaper than cast iron. The fact is that during production it does not require a lot of time and money;
Weight. The aluminum drum weighs almost nothing, which is great. Due to this, the driver will not have problems with servicing the system, removing the drums;
Corrosion. This material is absolutely not susceptible to corrosion.
This is very important for any driver, since you will not have to spend additional money to prevent the process;
Cooling. The material cools down very quickly, which is important.
Disadvantages of drum mechanisms
Drum brakes
Despite the fact that drum brakes are correctly designed, mounted and adjusted at the factory, which is why intervention is not required, they have certain disadvantages:
- This is an outdated solution that is practically never found on new cars from leading European manufacturers;
- When compared with disk mechanisms, drums are significantly inferior in efficiency;
- There is no cooling or ventilation on the drums, which leads to overheating under heavy loads on the car;
- The drums have a closed space, so it is not possible to remove dirt and wear products in the form of black dust, leaks of fuel oil and trapped moisture naturally. This is done by cleaning.
The best brake drums for VAZ 2110-12
| It's no secret that the VAZ rear brakes are of the tenth family of drum type. Over time, their lifespan comes to an end and they have to be replaced with new ones. How to choose the right drum brakes if there are so many manufacturers? |
Original AvtoVAZ brake drums (catalog number 2108-3502070) aluminum. They have proven themselves well, but cast iron options are trying to make their way into the fight for first place. Which drum brakes are better, cast iron or aluminum? Cast iron rear brakes are more durable and are popular in Europe. However, they carry a lot of weight when we are trying to reduce the weight of the suspension as much as possible.
ZaRulem magazine tested rear drums made of different materials back in 2002. During the tests they checked geometry, balance, weight, thermal behavior and static stiffness.
Cast iron drums ATE turned out to be 2 times heavier than aluminum drums from Metallist (5020g versus 2420g). If you tried to reduce the weight of the suspension by replacing the wheels with alloy wheels and installing tubeless tires, then there is no point in considering cast iron brakes. In addition to weight, the German representative lost in all other tests. The only advantage of cast iron drums is increased strength, from which one should not expect advantages in practice. Comparison of brake drums (cast iron, aluminum):
Price of brake drums: The cost of cast iron brake drums is 2-3 times higher than aluminum ones. If original drums cost about 600 rubles, then cast iron ones will cost 1,600 rubles.
Replace rear brake drums yourself
Instructions for VAZ 2110
By the way, many people are abandoning outdated drum brakes and installing disc brakes instead.
So, let’s vote and leave reviews about the VAZ brake drums of the tenth family:
- What material (cast iron, aluminum) did you choose?
- Impressions and comments on the operation of the rear brakes?
- How long did the last rear brakes last?
ps Off-topic comments will be deleted.
| Which brake drum manufacturer is better to choose? | Which brake drums are better to choose? |
Keywords:
Advantages of disk mechanisms
Accessories
The main advantages of replacing drum brakes with disc brakes include:
- Increased reliability when braking;
- Reduced braking distance;
- Uniform distribution of braking force, which is especially important for a front-wheel drive “ten”;
- The brakes respond faster when you press the brake pedal;
- Unsprung masses are reduced;
- More efficient cooling when driving in mountainous areas and during sudden acceleration or braking;
- Disc mechanisms are easier to replace and dismantle;
- There is no need to adjust the handbrake after each repair. You only need to do this once after installation and that’s it;
- Discs do not freeze in winter after washing, unlike drums;
- Disc mechanisms allow you to detect pad wear in a timely manner.
Causes
VAZ 2109 brake malfunction
Causes of malfunctions:
For some reason, brake fluid leaks from the cylinders.
Note: Low brake fluid can be the cause of many vehicle problems. Therefore, you need to regularly ensure that it is in sufficient quantities.
- The brake pedal does not move well. In this case, when you press it, the brake setting does not reach the wheels in the optimal time, so there is a delay in the brake.
- Air in the brake system. In this case, air can get here in various ways (perhaps the car was recently repaired, and the mechanic did not keep track of something, or missed a valve).
Brake pedal doesn't work
VAZ 2109 does not brake the rear wheel
In this case, the pedal does not necessarily not work at all. It works, but not correctly. That is, when you press it, the load is slightly increased. And even if the driver does not press the pedal hard, the braking is too noticeable. In this case, the car brakes “abruptly”: at first it goes quickly forward, and then returns back. You can fix this problem like this:
- First, change the parts of the cylinders that are no longer working at full strength.
- The brake pads need to be thoroughly washed and dried (if they are too coated with oil, they will not function properly).
- You need to check the brake system for air in it. If it is still there, then it must be removed immediately.
Note: The air in the brake system is the same as the air in the human body. And when it reaches the periphery point, the body (car) will stop working correctly.
Replace rings and hoses, and then bleed the system.
VAZ 2109 does not brake the rear wheels
- The disc should be thoroughly sanded. You need to measure its thickness. If it is too small (less than 17.8 mm), then the disc urgently needs to be changed, since when braking it does not have time to slow down its speed in the required time.
- Change the O-rings.
Long braking
VAZ 2109 no brakes
After the driver pressed the brake, braking did not occur. To resolve this issue, you should:
Wash and dry the pads. This is necessary in order to get rid of unnecessary amounts of oil.
Note: if necessary, the brake pads can be replaced altogether. This is necessary if they are already out of order.
- Replace parts that are damaged. Bleed the system. If the pistons are jamming, then this problem must be corrected.
- Allow all brake components to cool if they are overheated.
- If your car has pads with inappropriate linings, they need to be replaced.
Note: it is advisable to use pads recommended by the VAZ 2109 manufacturers.
https://www.youtube.com/watch?v=nXaQTpTp_jQ
Not all wheels release brakes
VAZ 2109 if the front brakes do not work
That is, not all wheels begin to brake in time. This problem is solved like this:
- You need to see if the brake pedal is working correctly. If not, then the pedal free play should be adjusted.
- Sometimes gasoline seeps into the cylinder that contains the brake fluid. This causes the cylinder rubber to swell slightly.
Note: In this case, replacement of damaged parts is necessary. You should also flush the entire system with brake fluid.
- If the cylinder piston jams, you need to check it and, if necessary, replace it.
- It is also advisable to adjust the protrusion of the adjusting bolt. It is necessary that it protrudes no more than 1.25 mm.
Selecting disc brakes
Discs
You understand that it is stupid to save on brakes, at least from the point of view of your own safety. It is also recommended to purchase ventilated discs. Additionally, it can be equipped with the option of ABS or hydraulic parking brake.
If you have not previously upgraded the brakes on the front wheels, then 13-inch discs are installed at the rear. If the front wheels are larger in size than the standard ones, then choose the rear ones 1 inch smaller.
Don't forget the importance of the caliper, which is available in three versions. It is selected according to the disk. The caliper comes with a brake pad and hose. Plus, each kit includes a faceplate. This is a universal clamp that will fit any type of caliper.
Problems when paying with bank cards
Sometimes difficulties may arise when paying with Visa/MasterCard bank cards. The most common:
- There is a restriction on online purchases on the card
- A plastic card is not intended for online payments.
- The plastic card is not activated for making payments online.
- There are insufficient funds on the plastic card.
To resolve these issues, you need to call or write to the technical support of the bank where you were served. Bank specialists will help you solve them and make payment.
That's basically it. The entire process of paying for a car repair book in PDF format on our website takes 1-2 minutes.
Dismantling and installation
Of course, you will not be able to install new disc brakes on the rear axle of the VAZ 2110 until you remove the drum mechanisms. To dismantle them, do the following:
- The wheel is removed;
- The drum is dismantled;
- The pads are removed;
- The brake pipe is unscrewed;
- The hub is removed from the wheel.
In words it looks simple, that's a fact. But in reality, certain difficulties may arise. First of all, due to sticking of elements and sticking of fastening bolts as a result of corrosion. In order not to suffer with them, treat them in advance with the almighty WD40, which will dissolve rust and “scale”, and remove them without serious effort or harm to the edges of the fasteners.
Fastener drawings
Now we proceed to the installation, in which the old drums are sent to their well-deserved rest, and new disc brakes take their place.
- When you knock off the hub, it needs to be put back in place.
- Install the element through a plate with a caliper built into it.
- Make sure all holes line up and alignment is correct.
- Use a hammer to adjust the angle of the beam. The caliper should not rest against it.
- Place the brake disc on the hub. A spacer is placed between the elements and the disk is fixed with brackets in its new place.
- Now install brake pads selected specifically for the VAZ 2110.
- First, attach the brake hose to the caliper, and then connect it to the pipe.
- The friction material of the pad must be partially worn off. This is necessary so that the braking force on the rear brakes is less than on the front.
VAZ 2110 - replacing brake discs
The road is not a joke, and despite the fact that the brakes were invented by cowards, the braking system should always be in order. Our safety, health and life often depend on it. The VAZ 2110 cannot boast of outstanding dynamic characteristics, however, it must somehow stop, and sometimes urgently. Therefore, you should not treat brake system malfunctions with disdain.
Replacing a brake disc on a VAZ 2110
We will talk about the features of running in the brake system later, but now we will schematically present the stages of work for a VAZ 2110 car. Replacing a brake disc takes place in several stages:
- Place the car on a level surface. We fix the rear wheels with wheel chocks.
- Using a jack, we raise the front part of the car, having previously removed the wheel mounting bolts.
- Remove the wheel and place a stand under the suspension arm.
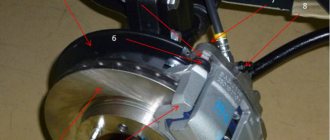
- Remove the old pads from the caliper. It should be taken into account that the pads will have to be changed in any case, so it is necessary to open the piston bracket as much as possible in order to subsequently install new pads. Using a new brake disc with old pads is not permitted.
- Let's prepare a place to hang the brake caliper. The easiest way to do this in a VAZ 2110 is by tying the unscrewed caliper through the mounting eye to the suspension spring.
- We remove the brake caliper without disconnecting the brake hose so that air does not enter the system. We hang the caliper on the prepared wire.
- Remove the old brake disc.
- We carry out a visual inspection of the wheel hub. This procedure is often ignored, but it is worth taking a closer look at the hub. The surface of the hub must be cleaned of dirt and dust. Adhered dirt can cause wheel wobble, wheel imbalance and vibration in the steering wheel and when braking.
- We control the hub runout. It should be no more than 0.1 mm according to factory standards. There is a special device designed to measure runout, but for this you can use an accurate depth gauge, if you have one in your arsenal of tools. Visual assessment of runout is unlikely to yield results.
- We wipe the new brake disc dry. It should be in a preservative lubricant, so it is better to first wash it off with a solvent, and then tidy it up with a clean rag.
- Once again we check the hub together with the disc for runout. Along the maximum radius of the disk, runout should not exceed 0.15 mm. If the disc runout is greater, then vibrations are inevitable, which lead to ineffective brake operation.
After the simple work has been done, we install the caliper and, of course, new brake pads in place.
Recommendations for running in a brake disc
Each new part installed on a working and run-in mechanism cannot be immediately subjected to maximum loads. The brake disc and brake pads must also be run-in. This is due to the fact that with a sharp increase in load, the temperature regime of the brake mechanism changes greatly.
If the disc and pads are not run in and ground into each other, overheating can lead to deformation of the disc surface and destruction of the friction lining on the brake pads. To avoid this, it is necessary not to subject the brake system to emergency loads for at least 600-700 km. The longer the boards and pads are rolled, the longer they last and work more efficiently.
Types of brake discs VAZ 2110
When replacing brake discs on a ten, it is possible to choose several types of brake discs
Standard brake discs are quite satisfactory for most owners, but if the owner pays special attention to the front brakes, then it is possible to install ventilated brake discs. They consist of two mono disks connected to each other by jumpers, which form a turbine that promotes better cooling of the disks
Brake discs with gas outlets
For an active driving style, especially when you have to frequently operate the car in mountainous areas, brake discs with gas outlets are installed. This is the same ventilated disc, the design of which includes grooves made at a certain angle and perforations that help remove gases and dust released during braking.
There are plenty to choose from, so if you want to save money, you can easily install a standard disk if you do not plan to participate in a rally raid in the near future. Check your brakes often, and good luck on the road!
Installation Quality Check
Ventilated
When you complete the assembly process, be sure to check how sealed the installation was on each of the wheels.
- Press the brake pedal. If you did everything correctly, pressing will be accompanied by tightness and effort;
- You or your assistant press the pedal again, while the second person begins to turn the new disc brakes;
- If you couldn’t move anything, it means the assembly was done efficiently and reliably.