Russian NIVA Chevrolet SUVs were initially produced with two engine options: VAZ-2123 with a volume of 1.7 liters, Z18XE from the auto industry with German Opel quality, the volume of which is 1.8 liters. If the car has a modified German engine, then you should not expect any failures from it. With the Russian assembly, things are more complicated, since, according to reviews from car owners, knocking occurs over time, the engine begins to work intermittently, which leads to premature replacement of hydraulic compensators. If you hear a knocking sound from the valves, experienced auto mechanics recommend first replacing the engine oil and oil filter.
Reasons for replacing hydraulic compensators with bolts in a Chevrolet Niva
When the design features replaced the adjusting support in the Niva Chevrolet engine with a hydraulic compensator, the engineers were tasked with adjusting the thermal clearances of the valves, which at the same time should reduce the noise level. In the end, the result was not as expected. The quality indicators of hydraulic compensators turned out to be unstable. And this feature affects the operation of the motor. Alarm signals include: knocking under the valve cover, engine tripping, failures, difficulty starting the car engine.
On top of this, inaccurate installation work leads to such a problem that the valve cannot close in time. If this happens at high speeds, the valve inevitably meets the piston. And this leads to valve deformation, which in turn causes loss of compression and the risk of melting. The control system sees the error and turns off the injector to save the catalyst. The motor system begins to trip for no reason. In some engines, there is a surface area at the bottom of the piston that prevents the valve from meeting the cylinder. The valve stops closing completely, its edges burn, and over time the pressure in the cylinder returns. Bolts instead of hydraulic compensators are the most suitable option for the Niva.
If a characteristic valve knock is observed when the engine is warm, then an ordinary oil change is not enough. The work ahead involves removing the “head” and camshaft with further cleaning of the channels. If this work does not bring positive results, the hydraulic compensators will need to be replaced.
Wrong choice of oil
Noises on a cold engine can occur for trivial reasons - the engine is filled with oil of higher viscosity. Sometimes it does not meet the manufacturer’s requirements or has expired.
When buying a car secondhand, it is recommended to immediately change the oil to a new one. Also, before replacing, you need to flush the inside of the engine. This can be done simply with your own hands in a garage. Experts recommend using semi-synthetic fluids. If the oil has been changed, but the knocking of the hydraulic compensator when cold is still heard, it is worth considering other reasons.
Design of hydraulic compensators on Niva Chevrolet
On all classic VAZ engines, rockers were installed in the gas distribution mechanism, and valve clearances were adjusted using special screws. The engine systems of the 2123 Niva Chevrolet models are equipped with hydraulic shock absorbers, which are similar in shape to adjusting bolts. Clearance holes are eliminated due to displacement elements and the required oil pressure in the engine. The design, complex at first glance, consists of the following parts:
- Hydraulic compensator housing.
- Return spring.
- A plunger pair, which is divided into two parts - upper and lower.
Reasons for the characteristic knocking sound:
- lack of oil pressure in the system;
- the oil channels in the engine are dirty, causing the entire lubrication system to become clogged;
- lack of oil material in the design;
- the area intended for the hydraulic compensator is worn out;
- parts and components of the device designed to automatically adjust the thermal clearances of engine valves have worn out.
Practice and life
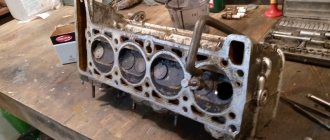
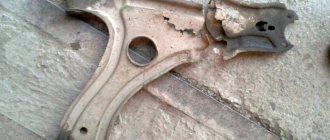
jammed hydraulics and eaten rocker
When in 2008 AvtoTAZ switched to a new type of hydraulics, everyone was as happy as at a matinee in kindergarten. But certain runs passed and the engines began to rattle. I talked about this in more detail in the second part. But if it were only sounds)). In the photo there is a hydraulic valve from the engine, which, in the words of the owner of the car, “began to tap something.” The case is far from isolated. This picture is only possible on hydraulics that can jam.
adapter bushings are history
No special tricks were required to remove old-style hydraulics. Everything was perfect from the good old classics. But with the new sample we had to get a little tricky. Initially, I made a set of threaded bushings that screwed into the cylinder head. But there was one design flaw - it was necessary to file the cylinder head and slightly bend the plates. In general, not comme il faut. The final version was born when I accidentally found a CNC workshop that had not been sold for scrap.
Step-by-step procedure for replacing hydraulic compensators
If the knocking in the mechanism cannot be eliminated, you will need to replace it with new spare parts. The car is placed on level ground, the handbrake is engaged and the gear is in neutral.
Work progress:
- The air duct is removed.
- Release the valve cover from the pipes and unscrew the clamps.
- Unscrew the 8 bolts that secure the valve cover.
- A mark is placed on the camshaft, and the mark is left on the back of the gear.
- The sprocket bolt is loosened and the chain tensioner is removed.
- It is recommended to immerse the tensioner in the plunger and secure it with a nut with a cap.
- Unscrew all fasteners securing the camshaft, and then remove it.
- Unscrew 8 rockers and unscrew the expansion joints.
- New spare parts are installed; they should be tightened with a force of 2 kgf, using a special tool.
- The rockers are installed in their places.
- Check the intended docking marks and secure the camshaft in place.
- The sprocket and chain tensioner are mounted.
- Before tightening the chain, you should check that all the marks match, then finish fixing it with a nut designed for tensioning the chain.
- The valve cover is put in place, all pipes are connected. In this case, it is recommended to make a visual inspection of the pipes and clamps. If signs of wear are found, they should be replaced.
- Start the engine and listen to its operation. At the first start, the same characteristic knocking sound will occur, but as soon as the system is filled with oil, it will no longer occur, since the engine operation has returned to normal.
Preparing for washing
So, if there is a knocking sound, but the hydraulic fluids are in good working order, then you should wash them. To do this, remove the air filter and cylinder block cover. The rocker arm axles, where the hydraulic compensators are located, are also dismantled. They are carefully removed from their seats. Before washing, prepare three containers, which together have a volume of about five liters.
Before washing, you should let the car sit in the garage for a day. During this time, the oil will drain from the hydraulic fluid into the pan. Flushing hydraulic compensators will be successful and effective if done indoors, where there is no dust and wind. Kerosene or A-92 gasoline can be used as a flushing liquid. But you can also use specialized products.
How to find out a faulty element
Having dealt with the causes of a possible malfunction in the engine, you need to consider a method for identifying the faulty part. In specialized workshops, a knocking hydraulic compensator is determined using acoustic diagnostics.
In addition, a knocking hydraulic compensator can be detected on a disassembled engine. To do this, you need to remove the valve cover and push each of the elements. Elements that easily sink will be faulty, since the lowest pressure prevails in them. The most important thing when diagnosing a malfunction is that the camshaft cam does not affect the units. It is impossible to determine the faulty element using other methods.
A few words for thrifty car enthusiasts
Most often, hydraulic compensators do not fail completely, but become heavily contaminated, as a result of which they are simply unable to perform the task assigned to them correctly. Or only one breaks, as noted above. If you have the time and desire, you can try to take the hydraulic compensators that we previously threw out there back out of the bucket and carry out restoration work.
To do this, you need to disassemble the units and rinse everything thoroughly. After that, assemble everything in reverse order. Sometimes there are situations when additional replacement of adjusting bolts, which also fail over time, leads to good results. What to do is up to you to decide. The main thing is that the machine starts again and pleases you with the uniform hum of a steadily running engine.
Every car enthusiast, when operating a vehicle, certainly listens to how his car works. The appearance of extraneous noise during engine operation, as a rule, does not bring joy to the owner. The slightest malfunction requires urgent diagnosis and elimination of the problem. During operation, the engine generates heat, and when it is exposed to metal, the latter begins to expand. As a result, large gaps form on some parts, which lead to the appearance of extraneous noise. One of the problems can be knocking hydraulic compensators, which independently adjust the required clearance. In this article we will come to a broad explanation of the topic. What are hydraulic compensators (their design, purpose), why do they knock at different engine operating modes - read about all this below.
Transmission
- Reversing light switch M14x1.5 28.4-45.1 (2.9-4.6)
- Bolt securing the clutch housing to the engine M12×1.25 53.9-87.2 (5.5-8.9)
- Nut securing the clutch housing to the gearbox M10×1.25 31.8-51.4 (3.25-5.25)
- Nut securing the clutch housing to the gearbox M8 15.7-25.5(1.6-2.6)
- Rod clamp cover bolt M8 15.7-25.5(1.6-2.6)
- Rear cover mounting nut M8 15.7-25.5(1.6-2.6)
- Nut of the rear end of the secondary shaft M20x1.0 66.6-82.3 (6.8-8.4)
- Intermediate shaft bearing clamping washer bolt M12×1.25 79.4-98.0 (8.1-10.0)
- Bolt securing the fork to the gearshift rod MB 11.7-18.6(1.2-1.9)
Steering
- Steering housing mounting bolt nut M10×1.25 33.3-41.2 (3.4-4.2)
- Nut of the pendulum arm bracket mounting bolt M10×1.25 33.3-41.2 (3.4-4.2)
- Ball pin nut for steering linkages** M 14×1.5 42.1-53.0 (4.3-5.4)
- Nut securing the steering shaft bracket and ignition switch M8 15.0-18.6 (1.53-1.90)
- Steering wheel nut M 16×1.5 31.4-51.0 (3.2-5.2)
- Bipod fastening nut M20x1.5 199.9-247.0 (20.4-25.2)
- Pendulum arm axis nut M 14×1.5 63.7-102.9 (6.5-10.5)
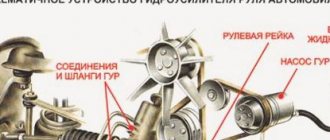
What it is?
This element is a piston with the help of which automatic operation occurs. The operating principle of this device is quite simple. The bottom of the piston interacts with the camshaft cam.
A ball valve is installed in the piston, with the help of which the valve opens and oil flow begins. As the piston is filled with oil, pressure will be applied to the existing plunger, causing the piston to move all the way to the cam. As a result, the most optimal gap is automatically installed. When the cam acts on the piston, some of the oil escapes through the valve.
The piston drops slightly, thereby creating a gap. The latter on the hydraulic compressor is regulated by the flow of incoming oil. At this stage, we learned what hydraulic compensators (their devices) are.
"Death to hydrikas"
set “death to hydraulics” for the old-style cylinder head
Replacing hydraulic compensators with bolts on the Niva and Niva Chevrolet required the selection of parts, which, at my suggestion, began to be called “death to hydraulics”. The old and new model kits consist of the same components: 8 cylinder head screws, 4 rocker spring fixation plates, 8 adjusting bolts with locknuts, 8 rockers. Separately, I will focus only on the rockers. A separate story was dedicated to them. But I want to say something else. I had to go through the products of several factories to find a rocker for a small ball, with the correct profile and traces of heat treatment. With the “wrong” profile, the camshaft cam will hit the working surface, and you will never adjust the engine as expected. It is necessary that it smoothly rolls and “licks” the work site. The difference between the old and new sets is shown in the photo below.
differences between sets using the example of one cylinder
Transfer case
- Nut securing the suspension bracket to the pillow axis M10×1.25 26.5-32.3 (2.7-3.3)
- Nut securing the suspension bracket to the body M8 15.0-18.6(1.53-1.90)
- Nut securing transfer case housing covers, front axle drive housing, speedometer drive housing, control lever bracket M8 14.7-24.5(1.5-2.5)
- Differential lock switch M16×1.5 28.4-45.0 (2.9-4.6) Bolt securing the forks to the gear shift rods MB 11.8-18.6 (1.2-1.9)
- Bolt securing the forks to the differential lock rod M12×1.25 11.7-18.6(1.2-1.9)
- Nut securing the propeller shaft flange to the drive shaft and to the drive shafts of the front and rear axles M16×1.5 96.0-117.6(9.8-12.0)
- Driven gear mounting bolt М10×1.25 66.6-82.3 (6.8-8.4)
- Nut for securing the rear bearing of the drive shaft and the rear bearing of the intermediate shaft M18×1.5 96.0-117.6(9.8-12.0)
Front suspension
- Nut of the lower bolts securing the cross member to the body side members M 12×1.25 66.6-82.3 (6.8-8.4)
- Nut of the upper bolts securing the cross member to the body side members M 12×1.25 66.6-82.3 (6.8-8.4)
- Nut of the bolt securing the rebound buffer bracket to the cross member M8 15.1-18.6 (1.53-1.90)
- Nut of the upper arm axle mounting bolt M 12×1.25 66.6-82.3 (6.8-8.4)
- Nut securing the upper end of the shock absorber M10×1.25 27.4-34.0 (2.80-3.46)
- Nut securing the lower end of the shock absorber M10×1.25 50.0-61.7 (5.1-6.3)
- Front wheel hub bearing nut M 18×1.5 cm, “Chassis”, p. 169
- Bolt securing the caliper to the steering knuckle M10×1.25 29.1-36.0 (2.97-3.67)
- Anti-roll bar mounting nut M8 15.0-18.6(1.53-1.90)
- Nut securing ball pins to steering knuckle M 14×1.5 83.3-102.9 (8.5-10.5)
- Nut for fastening the brace to the suspension cross member M 12×1.25 66.6-82.3 (6.8-8.4)
- Nut for fastening the extension to the body M 16×1.5 104.9-169.5 (10.7-17.3)
- Nut connecting the lower arm axis to the cross member M 16×1.5 114.7-185.2(11.7-18.9)
- Nut for fastening ball joints to suspension arms M8 20.60-25.75 (2.10-2.63)
- Wheel bolt nut M 12×1.25 62.4-77.1 (6.37-7.87)
- Upper suspension arm axle nut M 14×1.5 63.7-102.9 (6.5-10.5)
- Nut of bolts securing the swing arm M 12×1.25 66.6-82.3 (6.8-8.4)
Why do Chevrolet Niva valves knock?
On regular “Classic” VAZ engines, rockers are installed in the gas distribution mechanism, and the valve clearances are adjusted with screws. On VAZ-2123 engines, instead of screws, hydraulic compensators are installed - they are made in the form of the same adjusting screws, but excess gaps in the hydraulic device are removed due to a plunger pair operating under oil pressure. The hydraulic compensator on the Shevinivsky engine is designed very simply and consists of four parts:
- the body itself;
- return spring;
- the lower and upper parts of the plunger pair (check valve with piston and the plunger itself).
Valve knocking in the Chevrolet Niva timing belt can occur for several reasons:
- there is insufficient oil pressure in the system;
- the engine oil is dirty, the oil channels are clogged;
- insufficient oil level in the lubrication system;
- the seat for the compensator is worn out;
- The parts themselves are of low quality and therefore require replacement.
Often the hydraulic compensators (HC) of the Chevy Niva knock only when cold, and after 30-40 seconds the knock disappears. The reason for this phenomenon is the supply of oil pressure to the hydraulics with a slight delay. To get rid of this problem, you can try replacing the oil and oil filter. When the valves knock “hot” - this is worse, you need to remove the camshaft from the main body and clean the channels. If flushing does not help, the hydraulic compensators need to be replaced.
Valve knocking can be different, and it does not always occur due to the fault of hydraulic valves; it can be caused by:
- worn camshaft cams;
- worn rocker surfaces;
- wear of the end of the valve stem itself.
But it often happens the other way around - due to hydraulic compensators, intense wear of the rockers and camshaft occurs. It is not recommended to drive with valve knock:
- parts of the gas distribution mechanism fail;
- due to large valve clearances, engine power decreases and fuel consumption increases;
- It's unpleasant to listen to such a knock.
The result of ignoring repairs
If the driver heard that the hydraulic compensator was knocking “when cold”, but still ignored the repairs, the consequences may not be the most pleasant, despite the fact that compensators do not have much effect on the wear of other engine components.
As a result of untimely repairs, problems with the engine lubrication system may occur. In addition, signs of serious problems will be a decrease in the overall power of the power unit, as well as a drop in the vehicle’s acceleration speed and an increase in fuel consumption when driving at medium settings.
So, we found out why the hydraulic compensator knocks “when cold.”
What tools are needed
Having determined that the hydraulic compensators and hydraulic supports are knocking and need to be replaced, and also having selected a suitable hydraulic compensator 21214, you can proceed to replacement.
To change the hydraulic compensators of a Chevrolet Niva, you need to prepare the following tools for replacement: a set of keys, screwdrivers (flat and cross), a metal brush and a medical syringe, as well as wire (can be replaced with a plastic clamp).
- ratchet wrench with extension and set of attachments;
- socket wrench (tube) “10”, “12”;
- torque wrench;
Recommendations
- It should be noted that not in all cases Niva hydraulic compensators need to be replaced. The fact is that often their thin channels simply become dirty, as a result of which the valve mechanism begins to knock heavily. For this reason, you can wash old hydraulic mounts in gasoline.
- Also, upon inspection, it often turns out that only one Niva Chevrolet hydraulic compensator makes a knocking noise. This means that replacing the entire set is not required. In this case, all hydraulic supports are also washed, and only one faulty Niva hydraulic compensator is replaced.
Source
Final Installation Process
After this, apply a thin layer of sealant to the clean, grease-free surface of the lid at the point of contact with the metal. This must be done carefully and evenly distribute the sealing material squeezed out of the tube. Now let's put the gasket in place. All these actions must be done with pinpoint precision, making sure that nothing is warped and the gasket does not stick out.
Now all that remains is to tighten the lock correctly. Under no circumstances should you tighten one side first and then the other, as the gasket will still be skewed and pressed to the side. It is necessary to screw it diagonally, gradually tightening it to the end.