Using the built-in controller, drivers can identify the main error codes for Priors 8 and 16 valves on their own. The procedure is carried out using a built-in computer or a connected device. Almost all modern cars are equipped with a system of various sensors that monitor the condition of automotive components. The bottom line is that the functionality of many working units directly depends on the correct functioning of the existing sensors.
On the other hand, turning off some indicators may not affect the operation and movement of the car, and malfunctions are detected much later, when the negative consequences of deactivating the sensors appear. Symptoms of the indicators turning off include unstable engine operation, excessive fuel consumption, and excessive wear of parts.
Self-diagnosis using BC
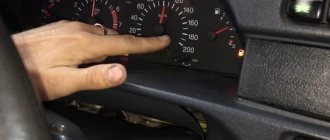
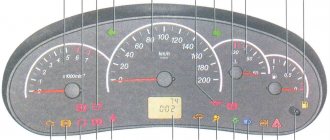
The owner can identify the main error codes of Priora 8 and 16 valves using the built-in controller and on-board computer (BC), without resorting to the services of car service diagnosticians. To do this, you must activate the vehicle testing option. The arrows on the instrument panel move to the maximum possible position. Further manipulations are performed in the following sequence:
- The ignition is turned off and the daily mileage reset button is activated. Then the ignition is turned on again with the button held down;
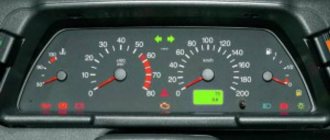
- After this, all the icons on the instrument panel should light up, and the arrows of the control devices should begin to move from zero to maximum values. This behavior indicates the normal functioning of all sensors;
- On the right steering wheel switch there is a key for selecting BC functions. After pressing it, information about the software category will appear on the display;
- You should press this button again, combinations of problems will be displayed on the monitor. If necessary, error information is also reset here. To do this, hold down the mileage reset button for a few seconds.
Error p0504
Many drivers do not understand what the appearance of code p0504 on the display means. This error appears when the brake pedal sensor is faulty. To determine the exact reason for the appearance of this code, you need to disassemble the sensor and carefully examine it. Perhaps one of the springs has burst or the contacts have simply burned out. In some cases, error p0504 on a Priora appears due to the incorrect position of the brake pedal sensor. It must be installed in the correct position, then error p0504 will disappear.
Code meanings for self-diagnosis
Using the on-board computer, the driver can determine the following faults:
- Code “ 2
” – excessive voltage in the on-board network. To eliminate it, you need to check the main electrical circuits; - The number “ 3
” indicates a malfunction of the fuel control indicator; - «4
» – problems with the refrigerant temperature sensor; - The number “ 5
” means incorrect operation of the environmental indicator; - Code “ 6
” means engine overheating; - «7
» – critical lubricant pressure; - The number “ 8
” indicates a malfunction in the brake system; - «9
» – signals that the battery is low; - The " E
" symbol indicates a problem with the packet data.
It is worth noting that if the BC options switch key is inactive for more than 10 seconds, the instrument panel will return to normal operation.
Error 1602
If the standard on-board computer of the Lada Priora 16 valves showed error 1602, then this indicates that the on-board voltage in the controller has decreased.
As practice has shown, this error 1602 does not affect the performance of Priora in any way.
If you remove the terminal from the battery, the problem disappears for a while, but it will definitely appear again. There may be more than one reason for this error to appear:
- Generator malfunction. To determine accurately, you need to measure its voltage in operating condition, it should be within 14 V.
- A large voltage drop when starting the engine also leads to this error. First of all, you need to check the ground and the ECU.
- This error code also appears when the security system blocks one of the electrical circuits.
Checking with a plug-in tester
More accurate and comprehensive diagnostics can be performed using a connected computer or a special tester. However, the data displayed on the screen is alphanumeric. The letters have the following meaning:
- P
– errors in the operation of the electronic systems of the power unit; - C
– problems with the functioning of the chassis; - B
– electronic malfunctions in the cabin; - U
– joint system errors.
In addition, the number 0 means OBD code 2, numbers 1 and 2 indicate the enterprise code, and 3 is the backup password.
Basic ignition system
(the letter P precedes the digital designation):
- 0300
– no spark in the cylinders of 16 valves; - 0326
– defect or short circuit in the knock indicator circuit; - 0337
– difference of the crankshaft controller to ground; - 0343
– high level in the headlight sensor circuit 0342 – a similar low indicator; - 0422
– signaling device malfunction; - 0444, 0445
– failure of the adsorber valve; - 0480, 0481
– problems with the fan assembly.
Fuel-air system
(the letter P is located before the numbers):
- 0030
– open circuit between the oxygen indicator and the exhaust gas converter; - 0116
– problems with thermal control of the cooling fluid; - 0102
– error in the air flow control circuit; - 0201, 0202, 0203, 0204
– break in the injector wiring; - 0217
– overheating of the power unit; - 0172
– excess amount of air,
0171
– gasoline, in the fuel mixture; - 0230
– malfunction of the electric fuel pump; - 0266 0269, 0270, 0272, 0274
– problems with injector drivers.
In principle, diagnostics using BC makes it possible to identify the main faults. Basic error codes for Priora 8 and 16 valves using a plug-in tester provide significantly more information. To understand it, you should study the decoding of indicators, which is not so difficult.
Error p0422
This error informs the owner of the Priora that the effectiveness of the neutralizer has been reduced below the permissible level. Practice shows that error p0422 appears on the screen of a 16-valve Priora quite rarely, but if it does happen, you must:
- Inspect the catcollector. Its body must be free of mechanical damage.
- If any defects are found, it must be replaced.
- If the cause of error p0442 is not in this element, you need to contact specialists, since in some cases the catalytic collector will need to be re-flashed.
Diagnostics using the built-in BC
To view the error codes, you need to find the daily mileage reset button on the dashboard, press it and, holding it, turn the ignition key. The self-diagnosis mode will turn on. All arrows on the instruments should move from minimum to maximum values and back, and all positions on the LCD display should light up. You need to look: if any position does not light up or the arrow on any device does not move, then you should check the corresponding sensors, their networks or display for malfunctions.
Priora on-board computer
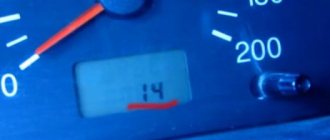
In the same mode, press any button for switching modes of the built-in BC 2 times, after which digital codes may appear on the liquid crystal display:
- 2 - very strong voltage in the BS;
- 3 - errors in the fuel level sensor system in the gas tank;
- 4 - error in the coolant temperature sensor system;
- 5 - error in the air temperature sensor system outside the car;
- 6 — motor overheating;
- 7 — emergency low oil pressure;
- 8 - malfunctions in the brake system;
- 9 - battery is low;
- E - error in the data packet stored in the EEPROM.
Many drivers ask how to reset error codes on a Lada Priora. Perhaps their built-in BC is faulty, since a working on-board computer automatically exits the diagnostic mode after 30 seconds if you do not press any control buttons.
Troubleshooting
After finding out the reason why the Priora or Kalina does not drive, it is necessary to correct the situation. If the coding indicates a break in the power supply to a structural element, you need to completely check the entire line and the device itself. It is better to do this by replacing parts with known good ones (new ones). It is also taken into account that standard connectors may become loose or fail over time. In such a situation, the computer will show errors even with a 100% working network. To detect such “surprises”, it is necessary to check all terminals and connections for oxidation, broken contacts or loosening - the elements must fit tightly in the sockets, without play.
Note! If you are unsure of your own abilities, the motorist is strongly recommended to seek help from a specialized workshop or a qualified technician.
Checking using a connected computer or tester
Driver Information Panel
Checking system malfunctions using connected devices gives more accurate results, but at the same time requires deciphering special codes. For example, the monitor displays code p0441 or p0130 or error p0422. Oh, these car manufacturers, in human language they could write “replace the oxygen sensor” instead of P0130 or “check the canister valve” instead of P0441. But nothing can be done, the Lada Priora is also intended for export, so it is easier to write p0441 in the program than to give explanations in Russian, Kazakh, Arabic, Armenian and 10 other languages. And then attach special tables that indicate the meaning of certain codes. Just look at them and everything will become clear. But these tables are not included with the operating instructions. Either way, you can check them out below.
All fault codes for Lada Priora car systems consist of 5 characters. Here is a breakdown of Prior's errors.
The Latin letter comes first:
- P - error in the electronic systems of the motor;
- C - error in the electronic systems of the chassis;
- B - error in interior electronics;
- U is an error in the joint operation of different systems.
Next comes the number:
- 0 - OBD-2 code;
- 1 - enterprise code;
- 2 - enterprise code;
- 3 - reserve code.
The system indicates an error
The next digit indicates the system in which the malfunction was found:
- 0 — exhaust;
- 1, 2 — fuel and air supply system;
- 3 - ignition;
- 4 - additional control;
- 5 — idle system;
- 6 - ESC;
- 7, 8 - transmission.
The last 2 digits indicate the serial number of the fault.
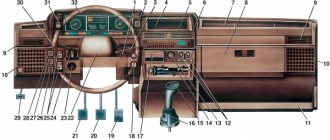
In what cases is it necessary to remove the instrument panel?
Dismantling the Priora tidy is required for tuning or replacing burnt out lamps. The VAZ 2170 is a modern model, so there are not many fastenings on the panel. To disassemble you will need a set of screwdrivers. Don't forget to turn off the negative battery.
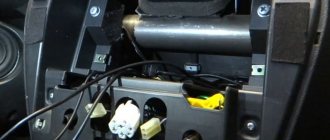
- The process begins with removing the mounting block. To do this, you need to turn the latches on the fuse cover and then remove it;
Turn the marked latches to remove the cover. - It is not necessary to remove the steering wheel, just lower the steering column down. Using a Phillips screwdriver, unscrew the screws of the lining;
- Using the same tool, we unscrew the screws of the instrument cluster. Tilt the top towards you and then remove the combination from the slots. Now you can turn the lock;
Pull the cover out to remove it from the groove - After disconnecting the wires, the Lada tidy can be completely removed.
Deciphering faults in the fuel and air systems
- P0030 - the oxygen sensor heater wire to the exhaust gas converter has broken;
- P0031 - the same electrical wire has shorted to ground;
- P0032 - the same wire has shorted to the on-board network (BS);
- P0036 - the wiring of the oxygen sensor heater is broken, after the converter;
- P0037 - the same wiring has shorted to ground;
- P0038 - it has shorted to BS;
- P0102 - weak signal in the mass air flow sensor network;
- P0103 - very strong signal in the network of this device;
- P0112 - weak signal in the air temperature sensor network;
- P0113 - very strong signal in the network of the same device;
- P0116 - antifreeze temperature sensor signal is out of operating range;
- P0117 - poor signal from the antifreeze temperature sensor network;
- P0118 - very strong signal from the antifreeze temperature sensor;
Error p1558
It often appears when the throttle valve is not operating correctly, the quality of which leaves much to be desired. It does not interfere with the proper functioning of the engine, but you should still try to remove it. Some people prefer to solve this problem by flashing it, but there is another way.
To do this, you need to remove the throttle valve, disassemble it and lubricate the plastic gear, which is the working part of this element. In most cases, after lubricating the gear, error p1558 disappears.
Malfunctions of auxiliary systems and ignition
Camshaft sensor location
P0337 - crankshaft sensor shorted to ground;
Return to contents
Priora: why the check is blinking or on - the main reasons
“Check Engine” is translated from English as “Check the engine.” On different cars, on the dashboard there is either such an inscription, or simply “Check”, or an engine icon. On the Priora, it is the yellow icon that lights up, resembling an engine in shape. “Check” lights up in two cases:
- Checking the functionality of the sensors. When you turn on the ignition, all the icons on the dashboard light up, indicating that there is a signal from the ECU and the system is ready to operate. After 2-3 seconds of turning on the ignition, the icon will go out.
- Malfunction of the engine operating system. There are several important aspects. Firstly, the ECU does not receive data about all breakdowns: it cannot technically record any mechanical damage. Secondly, the appearance of this icon may be erroneous. But you shouldn’t trust the opinion “it’s all for nothing” - a problem with the engine can grow like a snowball and cost a pretty penny if you ignore it. Regardless of whether the “check” on the Priora is on or flashing, the problem needs to be solved.
https://www.youtube.com/watch?v=YObsWXcZEJQ
The diagnostic connector will help you “talk” to the electronic control unit and find out why the check light is on. Well, before you start diagnosing, check out the list of the most common Priora “errors”:
- Low Oil Level – Low oil levels ultimately lead to increased engine wear. If the oil level turns out to be normal when checked, then it needs to be replaced and the integrity of all Priora components checked. Faulty fuel pump or fuel filter. You can’t always “hear” this, but diagnostics, replacing the filter, and checking the fuel pump will “cure” the breakdown.
- An error in the operation of the exhaust gas system - this is not something to joke about - it is better to start repairs as soon as possible.
- The ignition coil does not produce a spark / the catalytic converter is unstable.
- Wiring problems - high voltage wires can give an erroneous signal to the ECU - "Check" will light up on the dashboard.
- Malfunction of sensors - unfortunately, they very often fail. The “Check” lights up due to the fault of the mass air flow sensor (MAF), two oxygen sensors (after the fuel afterburner and in the exhaust manifold), a crankshaft sensor and a camshaft sensor. In frosty weather, the “Check” can light up because three are activated first cylinder, and then, during normal startup, does not disappear. This is due to the fact that soot particles remain on the contacts - they disappear after a few days.
- False sensor activation due to high humidity
- The engine starts running when cold and the check light comes on.
The reasons for the “Check” fire on a Priora (16 valves), as we see from the list, can be serious. There is no need to panic: when the “Check” light comes on, you need to immediately reach for the diagnostic connector. It’s funny, but earlier diagnostics were carried out in the service with special software, but today any error code can be displayed on your smartphone, deciphering it using a mobile reading device.
If this causes the spark plugs to flood, you will see the “check” blinking. Low-quality gasoline can be sold at any gas station; experienced car enthusiasts advise carrying a couple of candles with them. Sometimes the “Check” light comes on due to gasoline and the engine stalls. If he continues to work intermittently, things will be bad.
“Check” should light up when the ignition is turned on. A malfunction is also considered to be the case when the check light does not light up when the ignition is turned on, that is, the ECU does not send a system check report stating that “the system is ready for operation” - there is a problem in the wiring. You need to get rid of the chek icon not so as to “hide all the problems”, but so that the process of processing the fuel mixture occurs in order. Otherwise, you will have to seriously repair the car.
If the check light is on, then there are two solutions to the problem: fix it, or reset it. The engine icon that lights up is evidence that the ECU has received information about some kind of malfunction in the engine and is informing the driver about it. All errors remain in the computer's memory, so in order to get rid of them without repair, they need to be reset or erased. You can reset a check by following these steps:
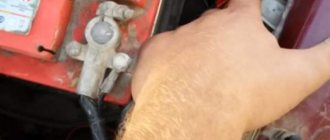
- Turn off the engine, secure the car, and open the hood;
- Find the fuse box, in the yellow group, remove F1 (30 Amperes) and wait about 20-30 seconds;
- Put the fuse back and close the hood. Start the engine and check if the signal disappears.
About notOshibka.Ru
Consent to the processing of personal data
I hereby confirm and give my voluntary consent to the website neoshibka.ru (Internet address https://neoshibka.ru/) in accordance with Article 9 of the Federal Law of July 27, 2006 N 152-FZ “On Personal Data” for processing and the use of my personal data specified during the registration process, commenting, or when filling out any other contact form on this site, with or without the use of automation tools, including collection, recording, systematization, accumulation, storage, clarification (updating, changing ), extraction, use, transfer (distribution, provision, access), depersonalization, blocking, deletion, destruction of personal data in order to collect statistics and improve the services provided by the site. The processing of personal data is also carried out for the purposes of my information notification (distribution of information, if desired, there is an unsubscribe function) and for conducting analytics and statistics.
I am aware that:
- This consent to the processing of my personal data specified during registration on the Site, sent (filled out) using the Site, is valid for 20 (twenty) years from the date of registration on the Site;
- Consent can be withdrawn by me based on a written statement in any form;
- Providing personal data of third parties without their consent entails liability in accordance with the current legislation of the Russian Federation.
Check Engine (translated as Check Engine) is an indicator located on the dashboard, well known to all owners of modern cars. Sometimes it is simply called Check or MIL (Malfunction Indicator Lamp).
This light comes on when any problem occurs in the car's engine. In this case, car manufacturers recommend urgently contacting a service station (service station). At the service station, a special device is connected to the car's diagnostic connector - a scanner, with which they read the fault code (error code) registered by the car's self-diagnosis system, indicating the cause of the malfunction, or an On-Board Diagnostic Computer is installed in the car thanks to which you can read the error code ( see the transcript in the instructions), or view an already decrypted error (modern on-board computers decrypt the error on their own).
The easiest way to check the error is whether it is real or just a malfunction in the system. You need to do the following:
1. Remove the terminal from the battery for 10-15 minutes.
2. Put on the terminal and check whether the Check Engine light is on or not.
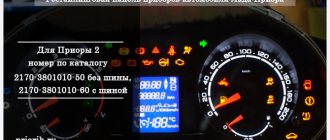
Priora dashboard indicators with interpretation
A separate category of indicators is mainly responsible for indicating the status of on-board systems and mechanisms. Such symbols do not indicate serious damage, they simply notify the driver.
The description and full explanation of the indicators looks like this.
| Visual Identification | Decoding |
| Fuel level indicator | Indicates the remaining gasoline in the fuel tank. When the supply is exhausted, the following sign lights up. |
| This indicator indicates that there are less than 10 liters of fuel left in the gas tank and the car needs to be refueled urgently. Initially, the red symbol of the gas station flashes, but when the fuel reaches 5-6 liters, it lights up constantly. | |
| On VAZ models, it indicates a low battery or a strong drop in voltage in the network. It usually appears after prolonged attempts to start the car in the cold. To fix it, just replace or charge the battery. | |
| The key against the background of the red car indicates that the immobilizer is turned on. This option is not available on 2008 models. Depending on the configuration, a green key may flash on the car’s dashboard. If the lamp blinks, the system is faulty. | |
| Standard turn signal activation indicators. The indicator lights light up for left or right turns respectively. If the indicator lights blink simultaneously, the hazard warning system is on (the red triangle lights up in parallel). | |
| A similar indicator lights up when the car is parked with the handbrake. It may also indicate a serious malfunction of the engine. | |
| The ABS system is not working correctly or the wheel is punctured. The system is present in cars optionally and is not directly related to the brake system. | |
| The red watering can is marked accordingly. The light indicates a critical drop in engine oil pressure. If the indicator goes out after the car warms up and the speed of the power plant is equalized, everything is in order. | |
| The green symbol indicates the activation of the side lights. | |
| The car's headlights are in long range mode. Lights up only when the mode is activated. | |
| Antifreeze temperature dial indicator | The indicator is installed on all machines without exception and displays the actual antifreeze temperature. |
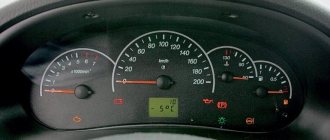
How to enable autotesting on Priora
Self-diagnosis of the VAZ Priora dashboard is necessary to be able to detect hidden problems or defects in on-board systems. To complete the procedure, you will need to perform a certain sequence of actions.
- Get into the car and insert the key into the ignition lock.
- Press and hold the daily mileage reset button.
- At the same time, turn on the car's ignition.
- If everything is done correctly, the instrument arrows will make several full revolutions and return back. All indicators will also flash.
The problem will be identified if any signal does not respond to manipulation.