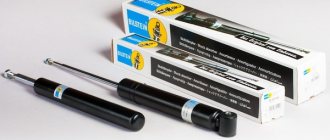
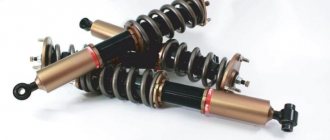
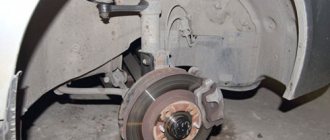
The front and rear shock absorbers on the Chevrolet Lacetti are presented in a classic form: oil type with top-mounted springs. Depending on the technical characteristics and configuration, the model is equipped with gas-oil struts. Gas-type shock absorbers are not installed by default. Only within the framework of an individual order, so-called upgrade by the owner of the technical equipment.
The average service life of standard racks exceeds 60,000 km, after which maintenance is required with subsequent replacement of mechanisms. Owners prefer the following brands: Sax, Kayaba, Profit, Monroe. There is no data available regarding other modifications. In order to save money, owners continue to install original front (rear) shock absorbers, despite their low actual mileage. As for the country of manufacture, the majority of opinions here are on Korea and Japan, all other manufacturers occupy secondary places.
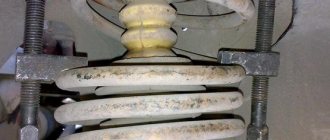
Signs of a rack malfunction
- characteristic roll of the car to one side;
- the metal body of the suspension element is coated with hydraulic oil;
- during the control process, a hissing sound is clearly audible;
- difficulties in driving the car at medium and high speeds;
- driving is accompanied by creaking, metallic sounds, blows, jolts.
Both single signs and several in aggregate are characteristic.
Price, originals, analogues, articles
| Name | Article/OEM number | Price, rub.) |
| Chevrolet Lacetti 1.4 16V | ||
| Rear shock absorber | 333419 | |
| KYB (Kayaba) Excel-G | 333420 | from 3000 |
| Right left | ||
| —/— | 339029 | —/— |
| Kayaba gas | 339030 | |
| Magnum Technology | AG0017MT | from 2500 |
| (sedan) | AG0018MT | |
| —/— | AG0019MT AG0020MT | —/— |
| —/— | Monroe G7288 | from 3000 |
| —/— | Profit 2004-0437 Profit 2004-0438 | from 2500 |
| —/— | Profit 2004-1196 Profit 2004-1197 | from 2500 |
| Shock absorber Sachs | 313466 | |
| Super Touring | 313467 | from 2500 |
| (sedan) | 313468 | |
| —/— | SFE22X172A SF20X200A | from 3100 |
| —/— | 313469 317139 317140 317151 317152 | |
| Chevrolet Lacetti 1.6 Chevrolet Lacetti 1.8 (after 2008 onwards) Chevrolet Lacetti 1.8 (before 2008 onwards) Chevrolet Lacetti 2.0 | ||
| Shock absorber KYB Excel-G (Kayaba) | 333419 333420 339029 | from 3000 |
| Kayaba | 339030 | |
| AG0017MT | ||
| Magnum Technology (sedan) | AG0017MT AG0018MT AG0019MT AG0020MT AG0017MT AG0018MT AG0019MT AG0020MT | from 2500 |
| —/— | Monroe G7288 Monroe G7289 Monroe G8089 Monroe G8090 | —/— |
| —/— | Profit 2004-0437 Profit 2004-0438 Profit 2004-1196 Profit 2004-1197 | —/— |
| Shock absorber Sachs | 313466 | |
| Super Touring | 313467 313468 | from 2500 |
There is no data available regarding the quality of other manufacturers. All actions are carried out by the owner at personal responsibility. It is better not to experiment, but to supply those parts recommended by the manufacturer.
Replacing rear and front struts on a Chevrolet Lacetti
The algorithm for replacing the front shock absorber struts is identical and similar to many vehicles, including the Chevrolet Lacetti. Differences can only be in dimensions, thickness, and method of fixation to body elements.
Preparatory stage: a set of tools, new consumables, bushings, boots, a hydraulic jack to remove the wheel.
Before starting work, we carry out comprehensive diagnostics in order to study the general technical condition of the car, calculate time, quantity of spare parts, and identify breakdowns. Often, due to lack of inspection, another part must be replaced. For example, instead of a new rack, a steering rack, stabilizers, and ball joints are installed.
Engine mechanics with many years of experience recommend installing new support bearings along with the struts. The service life of the latter is approximately equal. If the recommendations are ignored, a quick re-repair is inevitable.
Sequencing
- Using a hydraulic jack, we hang the wheel to be dismantled. Unscrew the mounting bolts with a special wheel wrench. If necessary, we treat the holes with a special anti-rust liquid;
- unscrew the fastening of the front strut to the steering knuckle, the stabilizer bone;
- knock the pin out of the hinge and the rack eye. Unscrew the nut and move aside the fastening of the brake hose and ABS sensor. To avoid damaging the nuts, unscrew the bolts;
- Use a puller to compress the spring several turns. This is enough to loosen the fasteners at the top;
- The work in the lower part is completed, let's move on to the engine compartment, to the so-called glasses. Using a special wrench, unscrew the triangular fastening (nuts at “17”);
- remove the stand from the glass, complete the complete disassembly, remove the spring and support bearing;
- Before installing new consumables, we carry out preventive maintenance of the seat, inspect the rubber boots and bushings. If there are signs of wear, replace them with new ones from stock;
- We install a new bearing in the old support housing, having previously dismantled the old one;
- We assemble the structure in reverse order.
To avoid the formation of rust and corrosion, we treat the bolts with solid oil (analogues). We repeat the procedure with the second wheel. Recommended replacement of two front (rear) struts. Subject to proper operation, subsequent replacement is not earlier than 65 - 80 thousand km. mileage
Installing rear shock absorber struts
- From the inside of the wheel we remove the brake hose from the latch;
- In the car interior, we remove the plastic trim and provide ourselves with access to the fastening connections. The support is unscrewed with a ratchet (three nuts);
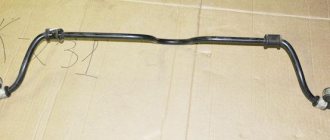
- Under the bottom, unscrew the nuts of the stabilizer rods in the upper and lower parts. They stand perpendicular to each other;
- remove the rack assembly from under the bottom of the car;
- We carry out preventive maintenance, replace the worn rubber bumper, bushing, seal, boot. If there are defects, remove damaged consumables.
During installation, we inspect the brake circuits; perhaps some parts require updating. The risk group includes: brake pads, supply lines - fluid returns, cylinders.
The service life of the rear springs is longer than the front ones, since they are less likely to be subject to deformation and shock than the front ones. The driver does not always have the opportunity to react in a timely manner to changes in the road situation. That is why it is worth replacing the front suspension elements twice as often as the rear ones.
ALL WITH YOUR OWN HANDS
02/22/2019 . . During the New Year holidays we got frosts of about 20 degrees. Northerners probably find it funny - for them it’s a thaw. Well, that's not the point. The snow just starts to crunch underfoot when the temperature drops below ten degrees. There are already snowdrifts in our garages and we can’t move in at once. You have to turn the steering wheel while standing still. But I really don’t like it - a large load is put on all the components - wear out faster. Well, in winter it’s okay - the wheels turn in the snow. It was here that I felt the snow crunching under the wheels when turning - almost like under my feet. But soon the thaw came, and the snow still crunched under the wheels when turning. This is what alarmed me. I drove out onto clean asphalt and turned the steering wheel - the same creaking sound as in the snow. That’s when I realized that I had been deceived by this frost and snow. I went to the pit to look for the cause of the “snow” crunch. I immediately went through the reasons in my head - ball joint, tie rod end, support bearing. But when I looked under the fender, I saw that it was the lower coil of the front strut spring on my driver’s side that had broken.
Well, no shit, I told myself. I had a dream this summer to replace both front struts with Kayaba, since the right one is a little snotty, but so far it’s working properly. And then this front left strut spring ruined my whole mood. I really wanted to go to the store, buy both racks assembled and install them on the car. But I sat, smoked, cooled down and decided for now to set the lower end into the place where the working spring would fit, so that it wouldn’t fly out by accident. I jacked up the car, turned the spring with the mounting tools and inserted it. It’s bad that the spring didn’t break off a whole coil, but 5 centimeters less. Therefore, after turning, the top-bottom alignment was disrupted, and the plastic boot stood crooked. Somehow I lowered the car, adjusting it with a mounting tool so that the boot did not rest against the rack body itself. I spent three hours poking around, my nerves were on edge. During this time, if there was a spring, I would have removed everything long ago, assembled it and put it in place.
In general, I decided to go to the store the next day and buy or order a spring, boot and support bearing. The store had everything in stock, although not something cheaper, like Kayaba, and Swedish cold-curled Lesjofors springs for 2,300 rubles. I didn't want to tempt fate and bought it. There was no boot separately, only included with bumpers for both racks for 900 rubles. And a support bearing for about 500 rubles. I didn’t drag it out and put it on the back burner. I replaced everything after work. In this video I showed how I increased the ground clearance by 4.5 centimeters and got 190 mm. instead of the factory 145. When I picked up the car, I didn’t yet have a blog or a YouTube channel, and I wasn’t very familiar with the Internet, so I only wrote an article. But it’s better to see it with your own eyes once. And how to correctly install the upper spring cup assembly with the protective casing relative to the rack itself. For some reason this is not written .
Description of springs on a Chevrolet Lacetti
Standard parameters: weight 2.6 kg, thickness 1.3 cm, outer diameter 15.4 cm, length 34.5 cm. In order to increase technical characteristics, the so-called upgrade, some motorists install spacers and springs with non-standard dimensions. They are stiffer, taller, and have a thicker spiral coil. Despite this, improvements are not always useful, as they damage the front (rear) suspension of the vehicle. The service life of the latter is significantly reduced.
Service station mechanics strongly recommend using only standard springs with factory catalog numbers. When using customized consumables, there are often cases of loss (cancellation) of the warranty at the service stage.
The average service life of springs is 120 – 150 thousand km. mileage Compliance with the manufacturer’s operating requirements will increase the service life by 50 – 70 thousand km.
What does the market offer?
It is possible that the original struts are the best that can be installed on the Lacetti. However, each driver has his own preferences, his own driving style and his own financial capabilities, and original GM shock absorbers are very expensive and, as a rule, are sold only by official dealers.
Therefore, we have selected the most popular options for shock absorber struts. Among them there are hard and soft, and expensive, and cheaper. Be that as it may, it is up to each individual to decide.
- Nipparts N5530904G . Gas moderately rigid strut. A fairly well-known young company that supplies spare parts both to some conveyors and to the spare parts market. The price of one rack is in the range of 2.4–2.6 thousand rubles . There are few public reviews, but dealers always have them in stock.
Price, originals, analogues, articles
| Name | Article/OEM number | Price, rub.) |
| Chevrolet Lacetti 1.4 16V | ||
| Screw spring | 4217713 | from 1700 |
| sedan | LESJOFORS | |
| —/— | Profit 2010-0003 | —/— |
| —/— | KYB(Kayaba) | from 1500 |
| RG3218 | ||
| —/— | KYB(Kayaba) | from 1700 |
| RG6557 | ||
| Chevrolet Lacetti (1.6, 1.8, 2.0) | ||
| Screw spring | 4217715 | from 1700 |
| front, rear | LESJOFORS | |
| —/— | Profit 2010-0012 | —/— |
| —/— | KYB(Kayaba) | from 1500 |
| RG3225 | ||
| —/— (sedan) | KYB(Kayaba) | from 1700 |
| RG6589 |
Chevrolet Lacetti manual
Chevrolet Lacetti Removing the shock absorber strut and disassembling it
We remove and disassemble the shock absorber strut when it is necessary to replace its upper support, bearing, spring, compression stroke buffer, or the efficiency of the telescopic strut has decreased.
If the telescopic strut or spring is faulty, both struts or springs must be replaced so that the performance of the shock absorber struts on both sides of the vehicle is the same.
In the engine compartment, remove the cover of the upper pillar mounting.
Replacing springs on a Chevrolet Lacetti
Installation of new springs is not carried out so often, there must be good reasons for this:
- mechanical deformation, coil fractures;
- knocking in the front (rear) axle of the vehicle;
- defects in the manufacture of a part;
- sagging of the spring due to transportation of loads in excess of the norm;
- damage to the turning mechanism, knuckle, rear pillar resulting in deformation of the metal spring;
- corrosion of fastenings, stands.
Preparatory stage: a set of automotive tools, new springs, a ratchet, graphite-based lubricant, rags. The support bearings are replaced depending on the diagnostic results. Experienced technicians recommend installing new springs along with struts no earlier than 120,000 km.
Recommendations for repairing front support bearings
- It is not always the case that both bearings are broken. The right part suffers more often due to its proximity to the side of the road, where, as a rule, there are more potholes. Therefore, when diagnosing a problem, you should not change two parts on the racks. If the second one is in order, then you can get by with working on one side.
- When dismantling the support, it is better to first loosen the upper fastenings and then jack up the car. Because when hanging, it will be more difficult to remove the bolts.
- When assembling the unit, it is important to use a torque wrench. The tightening torques are indicated in the vehicle's operating manual. Incorrect torque will cause both journal bearings to be severely over-tightened, causing them to wear out more quickly. Or vice versa - loose fasteners can lead to independent disassembly of the unit.
- You can carry out the procedure without special spring ties. To do this, it is necessary to disconnect the nut securing the shock absorber rod before dismantling. However, this method is not suitable for inexperienced drivers; in this case, it is advisable to have experience in repairing the chassis.
- Also, don't overlook the rear wheels. It is recommended to diagnose the rear hub bearings and the strut with support ball bearings.
Sequencing
Installing new springs has a similar algorithm with replacing the front (rear) shock absorbers. To avoid repetition, the process should not be described until the stand is removed from under the car.
After dismantling the shock absorber, remove the spring and inspect the seat, bowl, and support. We install a new spring, compress several turns with a special puller for ease of installation. Then we fix the structure in its original place. By analogy, we carry out actions with the second rack. Subject to the manufacturer's recommendations, subsequent replacement is no earlier than after 150,000 km.
To increase the service life of suspension elements, service center mechanics recommend choosing a moderate driving style of the vehicle and medium speed modes. When carrying out technical inspections, buy only original parts with factory catalog numbers.
Kayaba shock absorber rod nut
Now about the nut. The fact is that there is a groove on the rod on which the support is installed. I have mentioned her several times.
But the fact is that the height of this groove is often greater than the thickness of the support body! Therefore, the original nut has a specific shape in order to level out this difference and reliably fix the support on the shock absorber rod. This is clearly visible in the photo. I showed this with arrows. I think the meaning is clear.
But the nut that comes with the Kayaba shock absorbers does not have such a groove. It's just an ordinary nut
Therefore, it will not be able to guarantee a reliable connection between the support and the rod. This is where the knocking feet begin to increase after installing the Kayaba shock absorbers. And, as a result, negative reviews about these shock absorbers are multiplying.
Therefore, keep this in mind and install the original original nut.
It is clear that you can get out of the situation with the help of pucks, but this is somehow collective farm.