The braking system of any car is one of the systems responsible for driving safety. The main task of this system is to partially slow down the car, as well as completely stop it. The traffic rules state that it is completely prohibited to operate a car with a faulty brake system.
The components of the brake system must be carefully monitored
When to change brake pads
The brake system of a car, as one of the most critical from a safety point of view, requires regular inspection. Experienced auto mechanics recommend inspecting the condition of the brake pads simultaneously with vehicle maintenance - every 10 thousand km. This recommendation is especially relevant for cars out of warranty.
To decide whether it is necessary to replace the pads during inspection, primary attention is paid to the following circumstances:
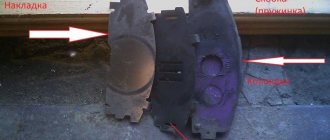
- Residual thickness of the friction layer. There are no uniform rules here, however, approaching the thickness to 2 mm indicates the need for immediate replacement.
As a rule, the brake pads of modern cars are equipped with sensors to indicate unacceptable wear. These can be either mechanical devices (they emit a sharp creak when the lining reaches a certain thickness) or electromechanical (indication on the dashboard). The receipt of a corresponding signal indicates the need to immediately replace the pads.
- Presence of mechanical damage not related to natural wear of the pads: chips, cracks, etc.
- Presence of damage to the “reciprocal” part (applies to disc brakes): grooves, cracks, waviness (leads to uneven wear of the pad surface).
In addition to the inspection results, there may be other external manifestations of the need to replace the pads:
- increase in braking distance;
- sharp noise (creaking, grinding) when braking, not associated with an indicator of unacceptable wear;
- inadequate reaction of the car when braking (sharp impacts, jolts).
Among the factors influencing the reliability of the braking system as a whole, the following should be noted:
- Quality of workmanship and materials of the pads.
- Driver's driving style.
- Condition of roads (predominance of clean surface or aggressive environment, dirt, abrasive inclusions, etc.).
- Climatic features of the operating region.
- Natural wear during braking.
High-quality brake pads are the key to reliable operation of brake mechanisms, and therefore it is advisable to save on their cost within reasonable limits. In fact, if a 20% savings when purchasing pads results in a 30% reduction in their service life, then these will be rather unnecessary costs.
On the other hand, there is an opinion that if high-quality brake pads (for example, for premium cars) “do not quite fit” a particular car, they can be “adjusted” (cut, filed, sharpened). This is strictly not recommended: any mechanical impact on the friction material and substrate (except, of course, normal operation) can lead to early destruction of the pad.
The recommendation for choosing brake pads is simple: buy pads of good quality and standard size for a specific car model.
Read about which brake pads are best here.
By the way, when replacing brake pads, beginners often ask the question: is it necessary to change the pads on both sides if on one side they are still in satisfactory condition? The answer is clear - you need to change it on both sides at the same time, since otherwise there is a dangerous situation of uneven wear and non-simultaneous operation of the brakes.
It is also clear that if you drive aggressively, especially on dirt roads with a high abrasive content, it is necessary to inspect the condition of the brake system more often than recommended intervals. The same applies to cars with an automatic transmission - their pads tend to wear out faster than in cars equipped with a manual gearbox.
What is needed for replacement
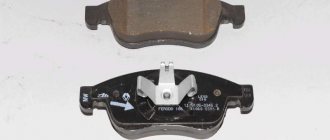
To do this, first of all you will need the pads themselves. It is advisable to buy original ones or a good quality analogue. You can’t save on this, unlike the costs of a master’s work. The parts should not be too soft or too hard. In the first case, they will wear out very quickly, and in the second, they will damage the brake discs.
You will also need a jack, a balloon and a set of keys.
Replacing brake pads on front disc brakes
Before changing the front brake pads, you need to perform a number of simple operations:
- Place the car on a level surface and place chocks under the wheels to prevent further movement of the car.
- Open the hood and remove the brake fluid reservoir cap (to make it easier to move the slave cylinder piston later).
- Loosen the wheel, jack up the car and remove the wheel.
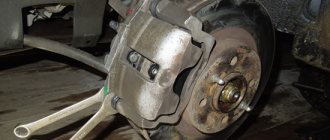
Next, turn the steering wheel to provide better access to the caliper (and also better visibility - in Figure 1 above there is a Toyota Camry disc brake) and inspect the surface of the brake disc.
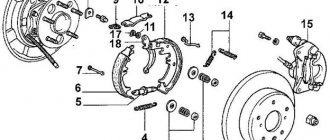
The design of fastening brake pads in different brands and models of cars may differ slightly, but almost all models have common design elements. These elements include the fastening of the caliper or its part (cover): by loosening one of the bolts (2) and completely unscrewing the other, you can lift the caliper cover, freeing access to the pads (3).
Since the caliper is connected to the brake fluid source by hoses, do not allow it to hang on them during operation. It is advisable to secure the completely or partially removed caliper with wire to the suspension parts, making sure that there is no load on the pipelines.
The next stage is dismantling the old brake pads and installing new ones. After dismantling, you should carefully inspect the surface of the old pads and assess the condition of the brake disc.
Before installing new pads, it is necessary to “press” the piston rod of the working cylinder into the adjacent surface of the caliper. Since new brake pads are thicker than worn ones, they need extra space.
This operation can be conveniently carried out using a clamp, as shown in the following figure and in the video at the end of the article.
You can use an old brake pad as a spacer between the rod and the clamp clamp.
If there is no clamp at hand, then the old pads in the caliper (and therefore the piston rod of the working cylinder) are pressed out with a small pry bar (or a large flat-head screwdriver) until the caliper itself is disassembled.
Remember to close the brake fluid reservoir cap. The fact is that brake fluid is hygroscopic and prolonged contact with the atmosphere does not benefit it. Read more about brake fluids at this link.
Next, the new pads are installed in the caliper and secured there as provided for by the design of the car. Further assembly is carried out in the reverse order of disassembly.
After replacing the brake pads, press the brake pedal several times to make sure everything is in place.
Replacement of rear pads on disc brakes is carried out in a similar way.
Possible problems and their causes
As mentioned above, if the installation of new pads is carried out by an inexperienced car enthusiast, then problems may arise during future operation. These include:
- Overheating of brake discs. The main reason for this is the “wedging” of the caliper guides. In such a situation, the pad cannot fully interact with the working surface of the disc. Uneven pressure resulting from deformation of the pad leads to overheating. Its premature wear can also be a cause.
- Creaking and grinding of pads. The reason for the appearance of such sounds during operation of the brake system may be a violation of the integrity of the boot of the main piston, the use of low-quality consumables, the absence of cuts or bevels on the surface of the pad, excessive overheating of the disc or its wear. Extraneous noise can be eliminated in various ways, depending on the specific reasons.
- “Sinking” of the brake pedal. This phenomenon can be caused by damage to the cylinders, a lack of working fluid in the system, or poor-quality assembly. Most often, the pedal fails after replacing the pads due to the carelessness of the car enthusiast who installed them. Inexperienced intervention in the system will most likely cause air to enter or working fluid to leak out.
- Knock when braking. It can be caused by play in the caliper guides, wedging of the piston, bending of the brake disc, or loosening of the cable in the parking brake system. Another reason for the appearance of such extraneous noise can be the anti-lock braking system, if it is included in the design. To check this, you need to pull the fuse from it, which will “turn off” the ABS, but the brakes will continue to function.
- Vibration. It may be caused by deformation of the brake disc. It may be caused by excessive heat during operation. The fact is that during intense braking, the pads can be pressed too hard against the disc, creating enormous pressure and temperature. This can cause the disk to lose density and change its shape. It is worth noting that sudden cooling of the disk can also cause deformation in certain places.
Taking into account the above reasons, you can adjust your driving style in such a way that the service life of discs, pads and other elements of the brake system will increase several times. An inexperienced driver can protect the braking system from such problems to some extent by installing ABS.
Replacing brake pads on rear drum brakes
The rear brake pads of drum brakes are changed much less frequently than the more heavily loaded front pads. And although drum brakes look structurally more complex than disc brakes, replacing them, as a rule, is even a somewhat simpler procedure.
The main thing in this procedure is to remember the location of all the springs and rods so that during assembly they are installed exactly the same, otherwise the brake will not work.
The sequence of operations is as follows:
- The first three steps of the disc brake replacement procedure are performed. It is important to remove the car from the hand brake, which is part of the drum brakes.
- Unscrew the nuts and fastenings of the drum and if it has become sour, tap it and dismantle it.
- Carefully study the location of the springs, clamps and rods.
- Release the handbrake and all springs and rods. Remove the old pads.
- Assemble new pads with rods and springs;
- Install the assembled kits inside the brake mechanism.
After installing new brake pads, a mandatory check of the brakes is performed.
How to determine pad wear
These parts are consumables. In this case, the elements installed at the front are the first to fail. They must be regularly replaced approximately every 30,000-35,000 km. Some cars have to be changed a little more often. Fortunately, replacing front brake pads is a very simple operation. It is quite possible to do it yourself, without contacting a car service.
Elements should be changed in accordance with the regulations established by the automaker. But sometimes it may be necessary a little earlier. Therefore, the condition of the parts must be constantly monitored.
Their wear today is shown by special indicators. They come in two types:
- mechanical in the form of a special metal plate (in case of severe wear, it rubs against the disk, producing a characteristic sound);
- electronic – a sensor that transmits information to the car’s on-board system.
In addition, you can assess the condition of the pads visually. Their wear can be seen by eye. Also in this case, braking may deteriorate and extraneous sounds may appear.
Checking the brakes after replacing the pads
When checking the performance of the brakes, first of all, you should make sure of the quality of the assembly of the mechanism - the brakes should operate smoothly, without jerking or extraneous noise.
In addition, and this is especially important for front disc brakes, new pads require running-in of the friction surfaces (the so-called “grinding in”).
If the disc brakes are assembled correctly, then break-in is carried out as follows:
- the first 150-300 km after replacement use a series of so-called soft (no more than 50% of the maximum force on the clutch pedal) braking, which are short-term in nature (to avoid overheating of the friction surfaces);
- During the break-in period, it is recommended to carry out at least 30-50 stopping cycles with gradual, loose braking and each stopping time of at least 3-5 seconds (to allow the brake mechanisms to cool down somewhat).
Checking the assembly quality of the handbrake is carried out even before removing the car from the jack: by tightening the handbrake and trying to turn the wheel. The drum brake assembly as a whole is evaluated during the running-in process.
It should be borne in mind that creaking and extraneous noise are not always the result of poor assembly or poor-quality pads. The causes of such noise may be small pebbles caught in the brake mechanism or weather conditions associated with high humidity or condensation.
If the friction material of the linings is incorrectly selected and the new pad is “dusty,” then the noise consequences of this are detected in a drum brake mechanism much sooner than in a disc brake, since the dust simply has nowhere to go.
Classification by “price-quality”
Since each manufacturer uses its own friction mixtures, it is extremely difficult to indicate which lining will be better. There is a wide variety of them, even within the products of one manufacturer.
Each product group is suitable for different classes of cars. A cheap block may be installed in a car at the factory, but in addition the car owner can buy a more reliable analogue, which will allow the vehicle to be used in more severe conditions.
Conventionally, friction linings are divided into three categories:
- Highest (first) class;
- Middle (second) class;
- Lower (third) class.
The first class category includes so-called original spare parts. Most often, these are products that are manufactured by a third-party company for a well-known brand. Its products are used on assembly lines.
It happens that the automaker receives better quality pads than those that go on the auto parts market. The reason for this is preliminary heat treatment. To ensure that a car leaving the production line meets the certification requirements, the brake pads are “burned.”
In auto parts stores, under the “original” label, an analogue with a simpler composition and without pre-treatment will be sold. For this reason, there is not much difference between the original spare part and a similar one sold by another well-known brand, and new pads need to be “ground in” over a period of approximately 50 km.
Another difference between “conveyor” products and similar ones sold in car dealerships is the difference in the friction coefficient and their working life. Cars that come off the assembly line have brake pads with a higher CT, but they last less. As for analogues sold on the auto parts market, they have the opposite - the CT suffers, but they wear out longer.
Products of the second class are of lower quality compared to the previous ones. In this case, the company may deviate slightly from the manufacturing technology, but the product complies with the certification. The designation R-90 is used for this. Next to this designation is the number of the country (E) in which the certification was carried out. Germany corresponds to the number 1, Italy – 3, and Great Britain – 11.
Second class brake pads are in demand because they have an ideal price/quality ratio.
It is completely logical that third-class products will be of worse quality than the previous ones. Such pads are produced by small enterprises, which may be part of the production group of a particular car brand, or may be separate small companies.
When purchasing such pads, the motorist acts at his own peril and risk, as this affects the safety of the vehicle when emergency braking is required. In one case, the friction lining may wear unevenly, and in another, it can be so hard that the driver’s foot quickly gets tired when pressing the pedal frequently.
What types of manufacturers are there?
Before buying pads, you should pay attention to its packaging. An ordinary cardboard box without identification marks is a reason for concern, even if it shows a familiar label. A manufacturer who cares about its name will spare no expense on quality packaging. It will also display the certification mark (90R).
Brake pads from the following companies are popular:
- Most often, the Brembo inscription causes admiration among motorists;
- Ferodo produces good pads for amateur sports competitions;
- ATE brand pads are considered premium products;
- Bendix is a world-famous manufacturer of high-quality braking systems;
- The best option for urban mode can be chosen among the products sold by Remsa;
- The German manufacturer Jurid uses advanced technologies in production, making its products popular among car enthusiasts;
- Pagid produces assembly line products for the assembly of cars such as the Volkswagen Golf, Audi TT and Q7, as well as some Porsche models;
- For lovers of a sporty driving style, there are reliable products manufactured by the Textar brand;
- Another German manufacturer that produces not only high-quality brake pads, but also a variety of all kinds of equipment is Bosch;
- Although Lockheed primarily manufactures aircraft engines, the manufacturer also offers high-quality brake pads;
- If you bought a new car, you can replace the standard elements with analogues from Lucas/TRW.
Adhesive for brake linings: types, rules of use
The life of the vehicle owner and pedestrians depends on the health of the car. Therefore, the brake system must be in order. When replacement of the linings is required, special adhesive for brake linings is used for gluing. Otherwise, unpleasant situations will arise when braking.
Overview of brake lining adhesive characteristics
The adhesive for the pads must have the following characteristics:
- Guarantee 100% reliability when connecting brake plates to metal bases. This is especially important in circumstances of vibration and high loads.
- High temperature resistance.
- Resistant to structural changes when exposed to various liquids and oils.
Rating
Based on reviews from car enthusiasts, we have compiled a rating of the best products for repairing the brake system.
VS-10T
VS-10T glue has all the necessary data . Specially designed for the purpose of gluing the material to the pads and driven discs of the clutch, it can withstand high temperatures up to 300 degrees. Temperature drop can withstand up to -60 degrees.
The composition includes 2 resins, tetraethoxylane, methenamine, and quinoline are added. After the composition has completely dried, the connection is ensured with strength and is able to withstand the forces of vibration and heavy loads. When used, withstands contact with oils, gasoline and other liquids.
The adhesive consistency is viscous, transparent, tones range from light to dark brown.
Poxipol
Gluing can also be done using Poxipol . Available in two tubes. The first contains epoxy resin, marked with the letter A. The second contains a hardener, marked with the letter B.
The need for a hardener arises due to the long drying time of the resin, but it is this that has high flexibility and provides increased adhesion. The color of the composition is transparent, perhaps a metallic shade.
Epoxy resin (ED-20)
Epoxy resin , for example ED-20 , is also used to glue brake plates to pads . Provides high adhesion to metals.
It is not destroyed by various liquids, except powerful acids. Due to their different composition, resins are divided into cold and hot cure. Without additional components, the resin has a transparent yellow or orange color.
With components, the color changes from white to red, even black.
How to glue pads with your own hands
To glue the brake linings onto the pads yourself, you must adhere to the following points:
- The plane of the block is thoroughly cleaned of dirt and rust. If necessary, clean with sandpaper.
- Degreasing is carried out (acetone or gasoline).
- Wait until the surface is completely dry.
No more than 5-6 hours should pass between cleaning the surface and gluing.
- Apply glue to both surfaces to be glued. Application is carried out with a brush and in one direction.
The applied layer should evenly fill the plane. Glue-free areas are not allowed.
- Allow to dry for 1 hour. The room temperature should be close to 24 degrees.
- Apply another layer on top of the first one.
- Leave for 1 hour.
- Connect the planes, clamp them tightly (clean off any glue drips from the ends) and place them in a heating cabinet for 2 hours. The cabinet is preheated to 180 degrees.
- After cooling, the block is ready for use.
Finally
When choosing an adhesive composition, you need to focus on quality characteristics. Since we are talking about the serviceability of the braking system, which is very important for the safety of human life.
Did the article help you decide on the choice of adhesive composition? Leave your comment, share information on social networks.
Source: https://VseProKley.ru/avto/klej-dlya-tormoznyh-nakladok