Many car enthusiasts know that shock absorbers play an important role in a car. Without them, it is impossible to ensure comfort for the driver and passengers during the trip. Shock absorbers sometimes fail, so it will be useful for drivers to know about the signs of a breakdown of this unit and how to change a rear or front shock absorber.
Symptoms of a problem
The car body must maintain a horizontal position when driving. This condition will only be met if the shock absorbers are in good working order. If the body is supported only by elastic elements, springs or springs, its vibrations will not be damped, and this is not only a lack of comfort, but also the creation of an emergency situation on the road. Shock absorbers are constantly working while the car is moving, so the parts of this device wear out.
Therefore, periodic repair of struts or replacement of rear shock absorbers is necessary. Many vehicle owners pay attention to the condition of the struts or rear shock-absorbing devices when their functionality completely fails. For such owners, it would be useful to learn about what can lead to failure of these components, what signs of malfunction of these devices may be, and how to change the shock absorber. Let's look at some signs of wear and tear on these components:
- The vehicle bounces while driving on uneven surfaces;
- After overcoming the unevenness, the vibrations do not stop, but continue for some time;
- Traces of hydraulic fluid leaks appeared on the body;
- Damage to the shock absorber strut housing was discovered;
- The operation of the shock-absorbing device is accompanied by a grinding or knocking sound;
- There was a noticeable deterioration in the car's handling when driving on uneven roads;
- Strong shaking when driving over potholes.
Not only poor road conditions, but also sagging springs, torsion bars, and rubber cushions accelerate the failure of shock absorbers. If you detect even the slightest signs of poor performance of the shock absorber struts of your car, you can check their performance yourself. To do this, you do not need to purchase expensive equipment and tools. It is enough to press firmly on the front or rear of the car until it stops, and then release the body.
If the shock absorber strut is working properly, the body will smoothly rise up and stop; if the rocking continues, this is evidence of problems with the strut. Problems can be detected by external inspection of the unit. Curvature of the strut rod, damage to the housing, and leakage of hydraulic fluid are undesirable signals for the machine owner.
Recommendations
- Please note that the rear pillar wears out much more actively if the driver carries cargo and a large number of passengers in the car. At the same time, wear increases significantly if a loaded vehicle is driven on a bad road (with a lot of potholes and uneven surfaces) at high speed.
- If you need to change the rear shock absorber 2110, the replacement usually involves installing two new struts at once. It is important to understand which shock absorbers are best installed on the rear axle. Today you can buy gas, oil and gas-oil struts.
In practice, it is better to install “softer” and quieter shock absorbers for the rear axle. For such purposes, oil or gas-oil struts are optimal. The former do not have a long service life, are not designed for heavy loads and can be knocked when cold, but they provide maximum comfort.We also recommend reading the article about which shock absorbers are better, gas or oil. From this article you will learn about the features of gas shock absorbers, as well as what are the pros and cons of gas struts.
- The gas-oil shock absorber is stiffer and noisier, however, a car with such struts holds the road better, handling and stability are improved. For this reason, it is important to select the right replacement struts in advance, taking into account individual preferences, the characteristics of the vehicle’s operation, as well as specific goals and objectives.
- If the rear strut of the VAZ 2110 and/or the spring fails, it is important to purchase only high-quality analogues for replacement. The fact is that cheap solutions can knock immediately after installation, and low-quality shock absorbers and springs often require replacement after 10-15 thousand kilometers.
What other problems are possible?
Front shock absorbers or rear shock absorbers are connected to the body and suspension through rubber pads or silent blocks. These are the parts that get damaged first. Their service life depends on the quality of the materials used in manufacturing, the operating conditions of the machine, and some other factors. Long-term operation of a car with a faulty shock absorber not only impairs travel comfort, but can lead to breakage of the bolts securing this unit to the car body or suspension parts. It is impossible to move a car with such damage, except to get to the garage or repair area. Not everyone will be able to fix such a malfunction on their own, since you will need a welding unit, cutting machine, and other tools. It is best to prevent such problems, monitor the condition of the shock absorbers, change or repair them in a timely manner.
How often should shock absorbers be inspected and replaced?
Along with other components, shock absorbers are exposed to external factors that worsen their general condition and accelerate the rate of mechanical wear. Among the most obvious:
- what is the condition of the road surface for moving the car;
- what is the driving style of the car driver;
- climatic factor, especially precipitation (frequency and intensity) in the area where the machine is operated, for example, in Moscow.
So, the less rain and snow, the less often you will have to deal with the front and rear struts of Renault Logan. But the current state of roads in most of Russia is not satisfactory.
Rear shock absorber Renault Logan
Taking into account these conflicting factors, the time frame for replacing rear shock absorbers is on average 32.5 thousand km. But if you drive the car carefully and on relatively good roads, the components in question can withstand up to 55 thousand km.
Shock absorber repair or replacement
Experienced motorists can share their experience in repairing such components. Domestic cars and some foreign cars had shock absorbers that were subject to repair. In retail chains there were repair kits consisting of a piston ring and rubber seals. It was also possible to purchase hydraulic fluid for shock absorbers. The upper part of the body was closed with a threaded lid.
They unscrewed it, drained the liquid and pulled the rod and piston out of the body. The worn piston ring is replaced with a new one, fresh fluid is poured in and the assembly is assembled. Next, the restored unit should be pumped and installed in place. Subsequently, the racks began to be made non-removable, which after failure were replaced with new products.
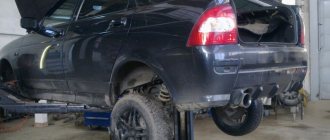
Sequence in removing rear struts
On the top of the trunk we are looking for a cap that needs to be pulled out. We use wrenches - unscrew the nut and hold the installation rod (do not allow it to twist). Next, unscrew the lower nut on the shock absorber. This position is on the beam bracket fastener.
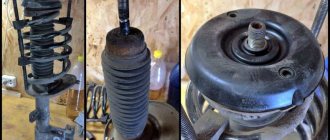
To completely remove the shock absorber unit, press the beam down. This will allow you to pull out the component. Now take out the rubber gasket. It is located on the mounting cup of our stand. We take the boot out of the spring and dismantle the buffer. If defects are found on the rubber components, the parts should be replaced. Having carried out such actions, we assemble and restore the mechanism.
About replacing shock absorbers
If the diagnosis of a malfunction of this device does not raise doubts among the vehicle owner, the shock absorber must be replaced. This operation is not particularly difficult; even novice drivers can perform it. You also don’t need any special tools; all you need is a car jack and a set of wrenches. Particular attention should be paid to the choice of a new front strut or rear shock absorber. On sale you can find spare parts from dubious manufacturers, which can quickly become unusable.
Before you get started, you should consider the equipment needed to repair and replace shock absorbers. A repairman may need the following tools and accessories:
- Car jack;
- Wheel removal key;
- Reliable stand under the car body;
- Set of wrenches;
- Torque wrench;
- Liquid WD-40 or similar;
- Crowbar or small crowbar;
- Metal brush to remove dirt;
- Wheel lock to prevent vehicle movement.
In some conditions, you may need a wrench extension to unscrew a “stuck” fastener, and this happens quite often. Work should begin only when stops are installed under the wheels to prevent the machine from rolling away. There is no fundamental difference in removing and installing the front or rear shock absorber, so we will focus on one of them.
Procedure
To change the front struts, for example, on a Hyundai Getz, you need to perform a number of the following manipulations:
- Remove the engine compartment seal, as well as other elements that prevent access to the upper strut support.
- After removing the plug, unscrew the nut securing the strut rod to the upper support. This is done with a head with an extension and a wrench while the car is on wheels and the rack is not removed. It is much more difficult to do this with it removed, because you will have to look for a tool to fix the rod from twisting.
- Loosen the wheel mount and lift the car with a jack so that the wheel does not touch the floor. For insurance, be sure to place a stand under the car.
- Remove the wheel. Using a wire brush, clean the threaded connection of the stabilizer bar joint, the screw securing the brake hose, and the bolts securing the steering knuckle strut. Moisten them with Vedashka or kerosene.
- Unscrew the nut securing the stabilizer joint and the screw securing the brake hose. If the car is equipped with an ABS system, remove the tube with the sensor wires from the rack.
- Unscrew the nuts from the bolts securing the knuckle to the strut. Knock out the bolts with a hammer. On some cars you will also have to remove the bushing. After removing the bolts, nothing holds the rack down.
- Remove the nuts securing the upper support to the body. Remove the strut assembly with support and spring.
- Compress the spring with ties until a small gap appears between its outer coil and the support cup.
- Unscrew the previously loosened nut from the rod. Remove the upper support and the spring with the cup.
- Inspect the boot and bumper, and if necessary, replace them with new ones.
- If the manufacturer of a new shock absorber recommends bleeding its products, carry out bleeding in accordance with the recommendations.
- Place the bumper with the boot on the rod of the new strut, do not forget to move the gasket under the spring from the old strut to the new one. Place the spring on the strut body, aligning its lower coil with the seat under it. Place the support on top of the cup and screw on the stem nut.
- Remove the tie rods from the spring and insert the upper support studs into the holes provided for them and tighten with nuts.
- During assembly, pay attention to the anti-roll bar; if you notice that it moves too freely, then it’s time to change the rubber bushing in its bracket, or better yet, both.
- Pull the stand mount from below, screw on the wheel, remove the stand, and lower the car.
- Tighten the wheel mount, the rod nut, and the nuts on the upper support studs.
As you can see, the process is simple, do the same on the other side and the front ones are ready. Camber adjustment is not provided on this model, which means that when installing serviceable components on an undamaged body, the desired camber value is obtained. And since we did not change the length of the steering rods, the wheel alignment angles should be normal (if the toe-in was adjusted correctly before the replacement). This means you don’t have to do “geometry”.
Please note that it is recommended to replace shock absorbers in pairs. This way you will insure yourself against unexpected behavior of the car on the road.
Rear axle
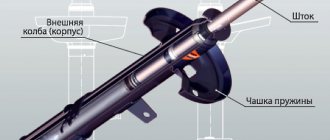
Often on passenger cars, the rear axle is equipped with only a shock-absorbing element (unlike the front axle, where the shock absorber is installed in a cartridge, and the entire assembly is called a strut). In this case, to replace, you will need to unscrew the upper and lower fasteners. In cases where the shock absorber is located separately from the spring, you will not need ties, and the process itself will take much less time.
Most often, on rear axle shock absorbers you have to change the bushing, which breaks over time and causes play.
Removing the shock absorber
Replacing the shock absorber struts yourself can be done in the garage. An inspection hole or a lift can make the work easier, but you can do without it. Let's look at how to change the rear shock absorber in more detail. Car suspensions have some features, which include the placement of the spring and the shock-absorbing device itself. It can be inside the spring or outside it. If it is inside a spring, you will need zip ties to compress it. A few hours before starting work, the fasteners should be treated with WD-40. The further algorithm for removing the shock absorber will be something like this:
- The gearshift knob is set to the first gear position. Stops are placed under the wheels, the body is lifted and placed on stands.
- Next you need to remove the wheel.
- Wires coming from the ABS sensor and brake hoses may interfere with dismantling the faulty part. The connector with the wires is disconnected, after which they are taken to the side. The brake hoses are removed from the clamps and also removed from the work area.
- When replacing front shock absorbers, you may need a steering linkage puller. Before lifting the body, you need to loosen the top nut securing the strut to the car body.
- After all the preparatory work has been completed, you can begin to unscrew the fasteners of the strut or shock absorber to the suspension.
- If you cannot immediately unscrew the nut of the fastening bolt, try using an “extension”, which can be a pipe of a suitable size. Local heating of the nut with a hair dryer helps. Using a worn tool can damage the edges of the nut, so check the condition of the wrenches before working.
- When the nuts are unscrewed, the bolts are removed from the eyes and the faulty shock absorber is removed for inspection and detection of defects.
Advice! Two shock absorbers on one axle should be replaced at once, otherwise the suspension geometry will be disrupted, and this will disrupt the stability and controllability of the vehicle while driving.
Rear strut wear test
You are allowed to test the car: perform some kind of rocking of the body part. This will allow you to find out the property of “damping” oscillatory moments.
We replace the racks if we are convinced that this work is necessary.
The operation is performed in pairs, so you will need to purchase two products. The parts on the axle must match each other. You may need additional “consumables” - a set of bushings, buffers.
Installation of a new product
Install a new unit or after repairing it in the reverse order. Before this, carefully clean its body from dirt or other foreign objects with a metal brush. It is advisable to coat the cleaned body with protective paint to prevent the possible occurrence of corrosion. The installation eyes of the front struts are treated in the same way. Next, check the fastening elements, carefully inspect the threaded part of the bolt and nut; it should be full-size, without visible damage. If something is found, it is better to replace the fasteners with new parts. First of all, combine and secure the upper attachment point. Next, lift the suspension with a jack, align the lower point and install the fasteners in the eyes. The nuts are tightened with a wrench, and the tightening torque is checked with a torque wrench.
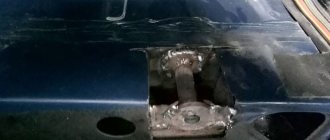
If you cannot remove the lower rear shock absorber mounting bolt
The process of dismantling the rear shock absorbers could be carried out simply and quickly, if not for the problem of sticking of the lower mounting bolt. If you cannot remove the bolt at the initial stage, then there are the following ways to unscrew it.
Method 1:
If the fastening bolt is stuck to the inner bushing of the silent block and refuses to be unscrewed at all, then the first option involves performing such actions as cutting off the cap with a grinder.
The remaining bushing is unscrewed using a drill with a high-quality drill bit made of high-strength high-speed steel. It is necessary to drill through the remaining stud.
After removing the pin, you can dismantle the shock absorber. When installing, you will need to use a new bolt and nut M10x65 with a pitch of 1.25. Be sure to measure the length of the required bolt. If you cannot find a suitable bolt length, then you should use spacer washers. This method does not require barbaric intervention, and therefore, in the case when it is not possible to unscrew the bolt of the lower mounting of the Lanos rear shock absorber, you should use it.
Method 2:
The second option involves using a grinder, which needs to cut off the bracket. How to do this is shown in detail in the video below. This method has one drawback - interference with the suspension design will lead to a decrease in the strength of the connection.
Shock absorbers at the joints experience heavy loads, so the weld may not withstand such a replacement. In addition, water entering the weld will lead to its rapid destruction, so if you choose this method, then it is recommended to follow these recommendations:
- Boil the bracket cut with a grinder thoroughly and on both sides
- Clean the weld seam thoroughly and then paint it
- After the paint has dried, it is necessary to carefully treat the bracket with bitumen, preventing the slightest chance of moisture penetrating the metal and causing corrosion.
Owners are well aware of the problem of replacing rear shock absorbers on Lanos, Sens and Chance, so when faced with the difficulty of unscrewing the lower bolt, they modernize this area. For this purpose, an adapter is made of durable profiled steel with a thickness of at least 3 mm. Part of the adapter is engaged with the standard bracket on the beam, and a hole is made in its upper part into which the shock absorber is installed. An example of such an installation is shown in the photo below.