Starting with the VAZ-2108 model, the Volzhsky Automobile Plant switched to using a belt drive for the gas distribution mechanism, and continues to use it on modern models, including the Lada Granta.
This type of drive has a number of advantages over a chain drive, including:
- no need for lubrication, which makes it possible to move the timing drive to the outside of the engine;
- quiet operation and simpler replacement process.
But the belt runs much less than the chain. Therefore, the basis for long-term and problem-free operation of the power plant is timely checking the condition of the belt and replacing it.
Replacement frequency
The manufacturer's technical documentation states that the timing belt on the Lada Granta must be replaced every 60 thousand kilometers.
But here it is worth noting that this is a limit value and it is better to replace it before reaching such a mileage, approximately 50 thousand km, but there are cases when the drive requires replacement at 40, or even 30 thousand km, it all depends on the quality of the belt and its working conditions.
In any case, it is better to periodically check the condition of the drive (recommended every 15 thousand km) and if signs of wear are detected, replace it immediately.
If this is not done, then it may break, which is fraught with serious consequences - the engine pistons will collide with open valves, leading to their damage and subsequent expensive repairs.
Imported analogues
Various components are suitable for replacing belts “2108-1006040-10”:
- GATES – 5521 or 5521XS;
- BOSCH – 1 987 949 095;
- DAYCO – 94089;
- CONTITECH – CT527;
- Finwhale - 2108-1006040.
The timing belt “21116-1006040” can be replaced with another part:
- GATES – 5670XS;
- CONTITECH – CT1164;
- QUARTZ (Germany) – QZ-5670XS.
Usually the choice is made in favor of GATES products. The letters "XS" in its catalog mean "reinforced". Grantovods have already told us in detail about the timing of replacing the timing belt, its choice, and signs of wear in the material: when to change the timing belt on Grant: recommendations from the plant and grantovods.
Original timing belt and fake
Attention! Components from GATES (England) are most often counterfeited! From the photo you can understand what the main difference is. Beware of fakes.
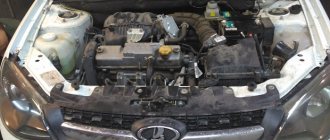
Design features of the drive of different motors
To understand how maintenance work is performed on the timing drive, let’s first consider its design.
So, the gas distribution mechanism is driven from the crankshaft. In this case, the valve timing in the engine cylinders has 4 cycles and they are performed in two full revolutions of the crankshaft.
But 2 of these cycles occur with the valves closed, so the camshaft must ensure only one closing and opening of the valves during all 4 cycles.
Therefore, for two revolutions of the crankshaft, only one revolution of the camshaft is made. Moreover, this is achieved quite simply - due to the different diameters of the drive toothed pulleys.
The belt has a toothed working surface, which prevents it from slipping on the pulleys. In addition to transmitting force from the crankshaft, the belt performs another function - it drives the cooling system pump.
In this case, the drive must be constantly tensioned to prevent the teeth from jumping on the pulleys, which is why a tension roller is included in its design.
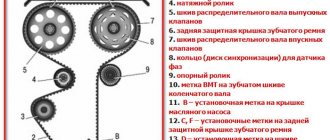
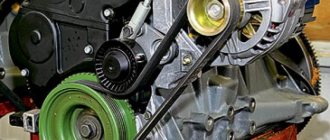
This is the entire drive structure, that is, it includes only two toothed pulleys (crankshaft and camshaft), a pump gear, a tension roller and the belt itself.
All this is located on the side of the engine, not inside. But to prevent the ingress of dirt and technical fluids that could harm the belt, all elements are covered with protective shields.
But this describes the design of a gas distribution mechanism with 8 valves, which is driven by only one camshaft.
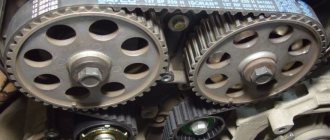
But some Lada Granta models are equipped with engines with a 16-valve timing mechanism and two camshafts. But because of this, the drive design does not change much.
Unlike the 8-valve, there is not one, but camshafts and, accordingly, two toothed pulleys, and another roller has been added to the design - a bypass roller, also known as a support roller. That's where all the differences ended.
Which kit to buy
In addition to the toothed belt, a tension roller and a coolant pump are purchased. The main supplier of rubber products is the RTI plant in Balakovo. Products from GATES, BOSCH, DAYCO, CONTITECH have proven themselves well. If the pump in the engine cooling system is replaced, antifreeze will be needed to top it up.
The gas distribution mechanism is one of the most important systems of an internal combustion engine. The timing belt controls the engine valves, ensuring the normal functioning of intake and exhaust. During intake, the fuel-air mixture enters the combustion chambers as a result of the opening of the intake valve. The next phase opens the exhaust valve, and the gas distribution mechanism removes exhaust gases from the combustion chamber. The VAZ 2190 uses a standard gas distribution unit, differing only in the number of engine valves.
Checking condition and tension
As already noted, so that a belt break does not lead to serious problems, it is necessary to periodically check its condition and tension.
Checking the condition of the belt is quite simple and you can do it yourself.
To do this, you need to unscrew and remove the protective drive covers, jack up the front right wheel, engage a higher gear and spin the wheel.
The engaged gear will ensure rotation of the crankshaft and timing drive through the gearbox.
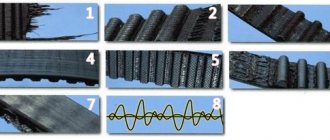
When rotating, you must carefully inspect the belt. If any defects or signs of wear are noticed on it - torn teeth, peeling of rubber from threads, cracks, significant abrasions, then the belt must be changed regardless of the mileage.
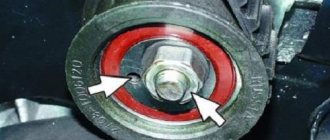
Additionally, when checking the condition of the drive, its tension should also be assessed.
Although the Grant uses a roller with automatic tension, you cannot rely on the fact that it works normally and it is better to check the tension, especially since it is very simple to do.
The belt must be taken with two fingers in the middle of the area opposite the tension roller, that is, on the span between the shaft pulleys and turned clockwise.
Moreover, if even with significant force it is impossible to twist it at an angle greater than 90 degrees, then the belt is tensioned normally. If it twists at a larger angle, then it is necessary to adjust its tension.
Reviews
And you can decide which timing belt for the Grant is right for you based on reviews from the owners of this car.
Oleg: after running into a Boshev counterfeit, I prefer products from a domestic manufacturer. This is the second time I have bought a BRT belt. It runs the required 75 thousand without any problems. I recently changed the tension roller. I installed the Vologda one, let's see how it performs
Vitaly: I prefer not to skimp on spare parts, so I only install from the German manufacturer Gates. You can feel calm with it even on a long trip.
Slava: the most reliable and proven option is the manufacturer Contitech. Although it is more expensive than Bosch, the quality is many times better. My friend (his Kalina) and I bought it at the same time. He took something cheaper, made in Russia. The salespeople talked me into talking about Contitech. I'm very pleased, because my friend threw his away a long time ago, and I still drive it. Although it looks like new, I’m thinking of changing it, it’s already done more than 130 thousand. I'll take the same one.
What you need to replace the belt
Next, let's look at how to replace the timing drive on a Lada Granta car. The complete sequence of work will be described for an 8-valve engine. For the 16-valve engine, we will indicate only the nuances.
So, to perform the work you will need the following tools and devices:
- A set of open-end and ring wrenches of the most common sizes;
- Set of hexagons;
- Powerful screwdriver or mounting blade, pry bar;
- A special wrench for tightening the tension roller or at least pliers for removing the locking rings;
- Marker;
- Rags.
Naturally, you will need a new belt of the appropriate size, as well as a new tension pulley, since it must be replaced along with the belt. Having prepared all this, you can start disassembling.
Changing the timing belt on a Grant with your own hands
When we check the condition of the belt or are going to change it, it is necessary that the engine cools down after the trip. The optimal temperature for replacement is about 20 degrees. According to AvtoVAZ, replacement is critically necessary at the 75th thousand mileage, but, according to drivers, it is necessary to change more often. To replace, we need a standard set of tools and a special key for tightening the roller.
If you have all this, let's get to work.
The Lada Granta liftback is equipped by default with one of four types of engines with a gasoline power system:
- 82 hp / 8th grade
- 87 hp / 8th grade
- 98 hp / 16 grades
- 106 hp/16 cl.
On the Grant with a 16-valve mechanism, two camshafts are pre-installed, and an additional roller is a tensioner. In the 8-valve design, the listed mechanisms are included in a single configuration.
At the stage of selecting a timing belt, many inexperienced motorists make one significant mistake - the catalog part number does not correspond to the actual one. As a result, the belt is either shorter or longer than the required size.
Disassembly
The sequence of work is as follows:
- We place the car on a level surface, or in a garage. The negative terminal is removed from the battery;
- We jack up the right front wheel and remove it from the car. Disconnect the wiring from the crankshaft position sensor. If there are protective pads on the fender liner that interfere with access to the crankshaft pulley, we also remove them. In general, we remove everything that may interfere with access;
- Use a 5mm hex to unscrew the bolts securing the upper protective cover of the timing drive and remove it. We loosen the fastening and tension of the generator, move it towards the engine and remove the drive belt;
- In order to better see the marks on the camshaft pulley, we apply an additional mark on it with a marker;
- Using the generator drive pulley mounting bolt, rotate the crankshaft until the mark on the camshaft toothed pulley aligns with the mark on the cylinder head protrusion. After this, remove the rubber plug of the inspection hatch located on the flywheel housing. There are also marks on the special protrusion and the flywheel itself. And if, after aligning the marks on the camshaft pulley through the hatch, it is noticeable that they also coincide on the flywheel, then further work can be continued, since this indicates that the piston of the 1st cylinder was installed at TDC.
But if the marks on the flywheel do not match, it is necessary to turn the crankshaft another 2 turns, the main thing is that all the installation marks are aligned; - Unscrew the bolt securing the generator drive pulley. In this case, it is important to prevent even the slightest rotation of the crankshaft and displacement of the marks. To unscrew the bolt, you can use a pry bar or a powerful screwdriver.
We drive it into the inspection hatch between the flywheel teeth and rest against the crankcase, thereby blocking the crankshaft. You can do it differently: ask an assistant to turn on gearbox 4 or 5, and also release the brake pedal, thereby using the transmission to prevent the crankshaft from turning while unscrewing the bolt; - After completely unscrewing the bolt, carefully remove the generator drive pulley and the washer installed under it;
- Use a hexagon to unscrew the bolts securing the lower protective cover. Providing full access to the belt;
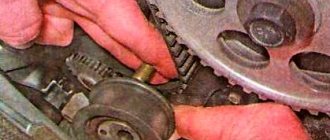
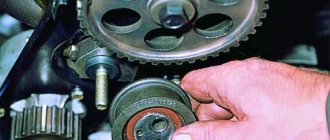
- Use a wrench to loosen the bolt securing the tension roller, after which it will release the belt tension. Before removing it, we once again check that all installation marks match;
- Carefully remove the belt first from the tension roller, and then from the teeth of the camshaft, pump and crankshaft. After this, completely unscrew the tension roller mount and remove it. This completes the disassembly.
Diagnostics
Diagnostics must be carried out every 20,000 km of the vehicle. To do this, remove the protective cover and inspect the belt. The belt should not have chips, tears or cracks. Also, it should not have unraveling threads, etc. After inspecting the belt, it is necessary to inspect the rollers and listen to them with the engine running for noise.
Old cracked timing belt
It is necessary to inspect the alignment of the belt relative to the camshaft pulley, crankshaft, pump and rollers.
Features of disassembling a 16-valve engine
As for the 16-valve engine, the sequential disassembly is completely identical to that described, with the exception of one point - installing the marks. Since this engine uses two camshafts, the marks must be aligned on both, and do not forget about the marks on the flywheel.
Also, during disassembly, in addition to the tension roller, you will also have to dismantle the bypass roller, since it also needs to be replaced.
After removing the belt, you should also check the play of the bearings on the pump. If it is significant, then it is better to replace it immediately. Otherwise, it may quickly fail after replacing the belt and the need to re-disassemble the drive, since the pump is replaced only after dismantling the drive.
Note that after removing the belt, it is important to ensure that you do not accidentally turn one of the shafts while installing a new one.
How to choose a quality spare part
The Lada Granta timing belt plays a primary role in engine operation, so you need to choose it carefully. During movement, this part can withstand enormous loads, and it must be of the highest quality. Today, there are several proven manufacturers whose products deserve high marks. The most famous and good timing belts for Granta brands: • Contitech • Gates • Dayco • Bosch Among domestic manufacturers, one can highlight the BalakovoRezinotekhnika (BRT) company, which provides Granta timing belt life and an affordable price.
For ease of selection for a 16-valve Grant, you can use the following table:
| Brand | Catalog number |
| BRT | 2112-61006040 |
| Lynx | 137FL22 |
| Conti | CT1137 |
| Bosch | 1987949662 |
| Gates | 5631XS |
| Contitech | CT1137 |
| Dayco | KTB944 |
When purchasing products from a well-known company, every driver thinks about which timing belt is best for Grant. But besides this, the car owner must be careful not to fall for a fake. It is necessary to check the presence of holograms and other identification marks used by a particular company, as well as the coincidence of the original part number and the inscription on the box.
You should buy spare parts only from trusted retail outlets, which bear full responsibility for the quality of the products sold.
Sources
- https://autorn.ru/lada/granta/396-zamena-remnya-grm-lada-granta.html
- https://AutoTopik.ru/vaz/1082-zamena-remnya-grm-lada-granta.html
- https://srr-nsk.ru/strahovka/zamena-grm-lada-granta-8-klapanov-shema-i-metki-podrobnaya-instruktsiya.html
- https://AvtoKart.ru/dvigateli/lada-granta-zamena-grm.html
- https://lanister.ru/avto-sovety/remen-grm-granta-8-klapannaya.html
[collapse]
Assembly, testing
The drive assembly is performed in the reverse order, but with certain nuances observed. First, we put the tension roller in place and tighten the bolt securing it, but do not tighten it.
In a 16-valve engine, before putting on the belt, we put both rollers in place, but unlike the tensioner, the bypass roller can be tightened immediately.
The belt is worn from bottom to top. That is, first the belt teeth are installed on the crankshaft toothed pulley, then it is put on the pump, then wound by the rollers, and only then put on the camshaft pulley.
After installing the belt, tension it. To do this, a special wrench or pliers are installed in special holes in the outer race of the tension roller, after which it is turned clockwise until the cutout on this race aligns with the rectangular notch on the inner sleeve.
Holding the roller in this position, tighten the bolt securing it.
Having finished tightening, we install the lower protective cover, washer and generator drive pulley in place. After this, we check that the work was completed correctly.
To do this, first check that all the marks match, then turn the crankshaft several turns, after which we align all the marks again. If they converge, the replacement work has been completed correctly and you can continue assembly. Here we note that a slight deviation on any marks is allowed, but not more than a couple of millimeters.
When checking the alignment of the marks on a 16-valve engine, more attention must be paid to this action, since there are two camshafts, and a mismatch of marks on any of them can lead to significant interruptions in the operation of the engine.
And only after such a check, everything is assembled further - the generator drive, the upper protective cover, and the wiring of the crankshaft position sensor are installed.
Stages of self-repair
We begin independent work on replacing the timing belt on a Lada Granta by placing the car in a spacious room. Having carefully studied the instructions on how to repair the car, we perform the following steps:
- We turn off the on-board power supply by removing the terminals from the battery
- Using a jack, lift the front right wheel, remove it and also dismantle the plastic fender liner
- We find the crankshaft sensor (DPKV) located at the bottom of the engine crankcase, unfasten the connector from it and unscrew the fastening bolt, carefully remove it (this will help avoid accidental damage to it).
- We begin to remove the old generator drive belt, for which we loosen the fastening of the tension bar and use a pry bar to move the generator to the engine crankcase, after which the belt can be freely removed.
- We remove the protective plastic casing of the gas distribution system by unscrewing the four screws that secure it located on the sides and set the marks on the upper and lower gears until they completely coincide with the marks on the motor housing.
- Having set the marks, we use a screwdriver to fix the correct position of the crankshaft, this is done through a special hole on the engine flywheel housing after removing the plug, and then unscrew the 17 mm front pulley. key.
- Using a 15 mm spanner, loosen the central bolt of the tensioning mechanism, remove the old timing belt, unscrew all the roller mounting bolts and remove it.
- We begin to dismantle the old water pump (this process does not need to be carried out, but experts recommend replacing the pump along with the gear drive in order to avoid its early failure), for which we unscrew the three mounting bolts with a 13 mm wrench.
- Instead of the old tensioner roller and pump, we install new parts, then check the previously set marks on the crankshaft and camshaft gears, which may have shifted slightly during the dismantling process, and put a new gear drive on them.
- We put on a new belt. We take out the screwdriver that fixes the crankshaft from the flywheel housing, and slightly turn the lower gear clockwise (about 2 - 3 mm), thereby removing the tension slack. Next, using a specialized wrench, we bring the tension roller to the required position, otherwise the gas distribution mechanism drive may be over-tightened, which will lead to its rapid breakage.
- At the last stage, we assemble all the components in the reverse order, pour antifreeze into the engine, remove the car from the jack and start it, listening to the engine, which should run smoothly and not make any extraneous noise.
Also watch the video, which shows in more detail how to replace the timing belt on a Lada Garanta:
Possible malfunctions of VAZ 11183 1.6
The VAZ 11183 engine is an improved version of the VAZ 21083. Most of the possible malfunctions for these engines are similar:
Flow sensor
For cars, a number of VAZ models, including Lada Kalina and Lada Granta, stopping the engine while driving is popular. Experienced drivers know that the culprit of the breakdown is the sensor responsible for mass fuel consumption. When replacing this sensor, the engine will start without problems.
Oil leaking
A popular problem is engine lubricant leaks. Oil can leak through the valve cover gasket, gaskets and seals. Sometimes a leak can be so critical that complex repairs cannot be avoided. Critical failures include oil leakage through the crankshaft seals.
Overheat
Overheating of the VAZ 11183 power unit occurs due to the thermostat. Unfortunately, the quality of domestic spare parts leaves much to be desired. A newly installed thermostat may not work. The motor may overheat, or on the contrary, it may not heat up.
Engine knock
Knocks in the power unit are a real problem for many VAZ cars. It is necessary to take into account the fact that the engine knocks when cold. If the engine has already warmed up and the valve clearances have been adjusted, the problem may be more serious. To determine the problem, you will need to diagnose the internal combustion engine.
ECU
The control electronics on the VAZ 11183 1.6 engine is one of the sore spots. Most drivers have encountered its replacement. There may be several reasons for this. For example: increased fuel consumption, the engine cannot develop full power, idle speed failure.
Engine tripping
If the engine starts to stall, you need to check the spark plugs. If the spark plugs are OK, then the ignition coil has failed. Very rarely a valve can burn out.
The revolutions are floating
If the engine speed fluctuates, then with a high probability it can be said that a dirty throttle valve is to blame. Often the cause may be a failed electronic sensor.
Crankshaft bearings
If, when accelerating, you can hear the sound of metal in the engine, then there is a high probability that the crankshaft liners are rattling. Further operation of the vehicle is not advisable until the problem is resolved. Otherwise, scuffs may form on the crankshaft journals.
As can be seen from everything described above, the VAZ 11183 power unit has many weak points and possible malfunctions. However, given the simplicity of the engine design, drivers fix most internal combustion engine problems themselves. Here, it must be said that spare parts for the VAZ 11183 are low in cost. Thanks to these circumstances, many domestic drivers fell in love with this engine. They consider it a reliable, easily repaired power unit.