To replace, we will need: a cylinder head, a jack, a flat-head screwdriver, a socket wrench, pliers (preferably 2 pcs.) and a bolt.
First, you need to place the car on a flat surface so that it cannot roll away without assistance. Do not use the handbrake, only “park”.
Place stops, for example stones, under the front and rear wheels of the front wheel (on the side opposite to the one where we are replacing the pads, that is, if we change the pads on the right side, then put the stops on the left, and then change them)
What is the mileage before replacement on a Toyota Corolla?
The pads should be replaced if diagnostics show extreme clutch wear (less than 2 mm) or if you notice a noticeable increase in braking distance.
Another sign is a loud squeaking noise when braking. The average service life of the front pads of foreign cars is 25-30 thousand km. The hind limbs walk twice as much. But you should always keep an eye on the current status. Average delivery times may vary significantly depending on driving style or quality of parts. Ignoring obvious signs of replacement is fraught with failure of the entire brake system at the most crucial moment. Brake fluid leakage, wheel wedge, failure of an expensive caliper - this is an incomplete list of possible complications.
Replacing electrodes in pairs, even if the resource of one of them has not yet been exhausted
Which ones to choose?
Today there are many different manufacturers. The highest quality pads are produced by Germany, France, Spain and Japan. In addition to the manufacturer, it is important to choose the right size pads for your wheel caliper. Like any spare part, they are divided into: original and non-original. It's your choice here. The original lasts significantly longer than the non-original. The price of such pads is usually twice as high. In general, as always, it’s up to you to decide whether to choose the quality or cost of the product.
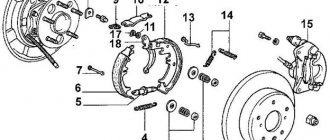
Brake system Toyota Corolla
In this car it is a dual-circuit hydraulic system, with a brake pump and two expansion tanks that supply the entire circuit with brake fluid. This system applies to the rear and front wheels. As for the brakes, in this model they come in two types:
- Disk installed at the front.
- The disc drum is mounted at the rear.
The adjustment occurs automatically, which depends on how worn the pads are. Drum disc brakes also act as a handbrake, which has an adjustable mechanism and is activated when the handbrake is set to the up position.
We install new pads and put everything back together
Now we put the new pads in place. First, we hook up the handbrake cable. It hooks on the same principle as unhooks. But the spring should not fall into the gap, otherwise further installation will be difficult.
We install this block in place. The locking rod must fit into the hole opposite which this notch on the block is located.
You can’t just hook the washer with your fingers, so we clamp it with pliers. Holding the rod from the reverse side (as when removing it), we put a spring on it, then put on the washer (here you will have to apply some force) and turn it (only it, the rod must remain motionless) 90 degrees so that the rod is fixed in the recess on the washer.
Now we hook a spring from below, we hook a second block to it and install the spring.
The spring should be behind the limiter; if it is in front of it, the pads will simply jam. We fix the second block in the same way as the first.
Now install the spacer sleeve. First you need to twist it to the minimum length. The thread here is reversed, so to twist it, you need to twist it counterclockwise rather than clockwise. The bushing is installed in a strictly defined manner.
When installing, the green mark should rest against the lever in the dream marked with a green circle, the red mark with a red circle, the blue mark with a blue one, and the protrusion marked with purple should be behind the block.
Now we engage the bushing spring from the side of the red mark. We check that the pads fit into the slots on the pistons (green ovals). Now we hook the spring from the second side.
We rest our thumb against the block (as in the photo), clamp the spring with pliers (in the same place as when removing it) and begin to stretch it until it is in front of the hole (circled in red). We hook the spring to the block and the main part of the installation is completed.
Now you need to separate the pads. We clamp the protrusion of the expansion plate with pliers and lower it down. This plate rests against the gear on the bushing and prevents it from spinning.
We rotate the hub so that the notch on it is opposite the gear.
Using pliers (as in the photo), or using a flat-head screwdriver, we turn the gear (remember that the thread on it is reversed) until the pads are separated a sufficient distance.
It will become sufficient when the drum is placed tightly on the pads. You must remember to put the plate back in place. It shouldn't stay like this. So you need to install it like this. At the same time, you can check the racks, for example, mine leaked.
That's it, put the drum in place, tighten the wheel. And don’t forget that the nuts need to be screwed crosswise.
Naturally, it doesn’t matter which nut to start with, but the nut screwed on second should be screwed opposite the first, the third opposite the fourth. The second side is similar. That's it, we lower the car and go check the brakes.
Good luck with the repair, I hope everything is clear.
Useful tips
- If the cylinder is very poorly compressed, remove the brake fluid reservoir cap. This will reduce the pressure in the system.
- If the drum does not “want” to unscrew, tap it evenly with a hammer. Be sure to use a wooden spacer (block, board) to avoid damaging the disc. Joint oil WD-40 will also help.
- If the caliper guides do not move well, lubricate them with graphite lubricant.
Using these instructions, you will independently replace the pads on a Toyota Corolla with any type of brake system. With a battery, of course, you need to put in more effort, but you need to do it less often. The main thing is to take your time and thoroughly clean all parts of the brake system during the replacement process.
Step-by-step instructions for replacing pads
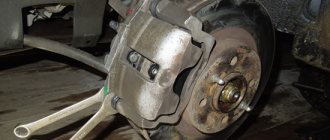
Before starting work, you need to prepare your workplace - this is necessary if you are afraid of getting dirty. Place a blanket in front of the wheel and wash the disc. After this, you need to lift the car from the side where we will change the block. We unscrew the wheel we need and start working directly with the brake system.
First of all, we need to unscrew the caliper mounting bolt with a suitable wrench. The photo clearly shows the position of the bolt that needs to be turned.
Having unscrewed the bolt holding the caliper, lift it up and, for convenience, tie it to the body with a thread. The photo shows how everything needs to be done.
Then you need to press the brake piston. This must be done first when applying heat-resistant grease. For this we used a clamp. In the photo below everything is visible and clear.
After the piston is pressed, we need to press out the brackets with a screwdriver. We perform the following actions: tighten the bracket - pull the block towards you.
So we got this. We pay attention to how it looks and what components it is made of. The photographs will show a general view, as well as an disassembled view of the unit. Brackets will also be shown. Photos are signed.
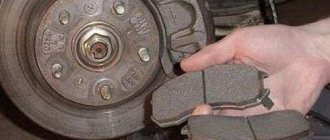
Having taken it apart, we'll see how worn it is. The block we pulled out could travel another 20,000 km. Below is a photo showing two of them: new and old.
- Having compared them, we take a new one, lubricate it with heat-resistant paste - exactly as shown in the picture, and also lubricate the cylinder and brackets.
We collect everything in place and put everything in its place. We assemble the caliper and install the wheel in its place. Work with one wheel is completed - you can move on to the next one.
What is the mileage before replacement on a Toyota Corolla?
The pads should be replaced if diagnostics show extreme clutch wear (less than 2 mm) or if you notice a noticeable increase in braking distance. Another sign is a loud squeaking noise when braking. The average service life of the front pads of foreign cars is 25-30 thousand km. The hind limbs walk twice as much. But you should always keep an eye on the current status. Average delivery times may vary significantly depending on driving style or quality of parts.
Ignoring obvious signs of replacement is fraught with failure of the entire brake system at the most crucial moment. Brake fluid leakage, wheel wedge, failure of an expensive caliper - this is an incomplete list of possible complications.
Replacing electrodes in pairs, even if the resource of one of them has not yet been exhausted
We disassemble the wheel and remove the old pads
After preparing the car for replacing the pads, loosen the nuts on the wheel.
Raise the car on a jack . To prevent the car from standing only on a jack during replacement (after all, this is not a very stable support), I advise you to place bricks under the car.
There are protruding ribs running under the bottom (something like stiffening ribs), so I put bricks under them.
Then I lower the car so that it rests on the bricks (but I don’t remove the jack completely, it will serve as additional support) and now you don’t have to worry about the car falling.
Unscrew the nuts completely and remove the wheel. Now you need to remove the drum. This is why we need a bolt. It must have an M8 thread
Screw the bolt into any of the two holes on the drum. To twist it, we need a socket wrench. I had it at 12, but it depends on what kind of bolt you have.
We screw it in until the drum noticeably moves away from the support disk (the round cup that is located behind the drum and to which all the drum brake mechanisms are attached).
Now we unscrew the bolt (otherwise the drum will not be removed due to skew), if the drum cannot be removed, then screw the bolt into the second hole. After removing the drum, the bolt (if it is still screwed in) can be unscrewed immediately; here we will no longer need it.
Now you need to remove the spacer spring. This is easier to do in the place where the spring sticks out. For the right side it is on the left (if you look at the brake mechanism), for the left side it is on the right (again, if you look at the brake mechanism). I removed the right pads.
In order to unhook the spring, we clamp it with pliers, as in the figure. Then we stretch the spring (using pliers, of course) in the direction shown by the arrow. When the spring comes out of engagement with the block (as in the figure), pull it towards you, but do not let it compress again until we pull it out of the hole.
Then we return the spring to a compressed state, without releasing it from the pliers (if you throw it, it will shoot out and can damage the piston boot). On the second side it will come off easily, because it will already dangle freely.
Now remove the pad clamps. You can remove the lock washer by hand. To begin, press with your finger (on the back of the support disk) the rod on which the spring and the lock washer are held. You can see a slot on the washer (red rectangle in the photo above).
You need to hold the rod and turn the washer 90 degrees so that the protrusions of the rod fall into the slot of the washer. If everything is done correctly, the washer and spring can be easily removed. We put them aside (we don’t throw them on the ground, because they can simply be trampled, and this is a very important detail).
Here is the rod itself. Here is the spring and washer. We remove the lock from the second block in the same way. That's it, the pads can be removed. They are connected from below by such a spring
It doesn’t interfere at all with removing the pads, but it can easily get lost, so we put it aside towards the latches.
Now one of the pads no longer holds on to anything. Let's see if the new pad has such a spring and such an expansion plate. This spring and plate together with a gear wheel on a spacer sleeve. This wheel forms a mechanism for distributing the pads.
If there is none of this (and when I bought the pads, I didn’t have any of this on them), then everything needs to be rearranged. There is nothing complicated here. Unhook the spring from the plate and pins, and remove the plate from the trunnion (the rod on which it sits).
We put everything on the new block in the same way. All pads are different, the pads for the right side are different from the pads for the left, so before installing the plate you need to make sure that this is really the right pad.
Now the second block. It is still attached to the handbrake cable. In order to unhook it from the cable, you need to hold the block in one hand and compress the spring with the other in the direction of the red arrow.
When the spring is sufficiently compressed, turn the lever in the direction of the green arrow and remove the cable. Here is the actual cable without the block. And here is the block.
The lever must also be moved to the new block (if it does not have one). we turn the block over, and we see something like a washer there, with the help of which the lever pin is fixed
Unscrew it with a screwdriver and remove it. We move the lever to the new block and install the washer. To prevent it from falling out, we clamp it with pliers.
Signs that your e 150 needs to be replaced
You can understand that the disks need to be replaced by the presence of the following signs:
- The wheels begin to beat.
- When braking, the car begins to deviate from the straight line.
- When braking, you hear a knocking or extraneous noise.
The official manufacturer recommends changing brake discs after the second replacement of the pads, but, as a rule, Toyota Corolla front brake discs are changed between 100-130 thousand kilometers. It is also advisable to take measurements before changing them, which should be:
- At least 23 millimeters in front.
- At the back it's about 8mm.
After measuring, you can decide to replace the access point.
Operating principle
To understand why they wear out, you need to know how the pads work. Brakes are cylinders that, when the pedal of the same name is pressed, press the pad against the wheel. The greater the pressure in the cylinder, the stronger the device is pressed.
However, during frequent sharp braking, the rubber wears off and the springs wear out. Therefore, old pads must be removed.
Replacing the rear brake pads of a Toyota Corolla can be done with your own hands without visiting a service center. To do this procedure correctly, just read and follow the following instructions.
Description of replacing calipers on Corolla 150
you can replace the calipers on your Corolla 150 by following the instructions below.
- Raise the car.
- We remove the wheel.
View after removing the wheel
- Turn the steering wheel fully. This will make removing the caliper easier.
- Clamp the brake line hose to prevent fluid leakage and ventilate the system.
- Unscrew the caliper holder.
- Install in the reverse order of removal.
Sources
- https://motorltd.ru/kak-samostoyatelno-smenit-kolodki-na-toyote-korolle/
- https://g-light-auto.ru/shiny/kolodki-i-diski-na-toiota-korolla-150-zamena.html
- https://sis26.ru/zamena-perednih-tormoznyh-kolodok-toyota-corolla/
- https://razborov.net/toyota/kolodki-diski-supporta-toyota-corolla-150-3.html
- https://VmyatynNet.ru/korolla/zamena-perednih-kolodok-tojota.html
- https://LocalCargo.ru/servis-i-tyuning/zamena-perednih-kolodok-tojota-korolla.html
- https://CarForDrive.ru/ford-fokus-2/tormoznaya-sistema/zamena-tormoznyh-diskov-na-tojota-korolla
- https://zapchasti.expert/toyota/corolla-150/kolodki-diski-supporta.html
- https://igor-somov.ru/otzyvy/tormoznye-diski-tojota-korolla-2014.html
- https://toyota-navi.ru/toyota-corolla/zamena-perednih-tormoznyh-kolodok-tojota-korolla-150.html
- https://moto163.ru/ts-i-tyuning/zamena-kolodok-korolla-150.html
How to change the front ones
- The front brake pads are very easy to change. The second time, the procedure will take you no more than 10 minutes per wheel. We install chocks under the wheels and put the car on the handbrake. Turn the wheel on which you will change the pads outward, this will make it easier to work with the caliper. Step 3 Step 2 Step 1
- Using a 12-mm open-end wrench or socket, loosen the top bolt and completely unscrew the bottom one. Now you can “open” the caliper upwards and gain access to the pads.
Open the caliper
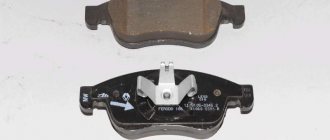
- To remove the cover, push it to the side and then pull it towards you. Installing it backwards should not cause any problems; there are special clamps there.
Clamps will help with adjustment
They do not allow the overlays to be placed incorrectly.
New consumables in place
- To get the caliper into place, press out the brake cylinder using a wrench or pry bar. On some machines this can even be done by hand.
Release the brake cylinder
- All that remains is to tighten the two mounting bolts, put on the wheel, and you are good to go.
If you have any questions, watch the video.
How to replace: video guide
As you can see, disc brakes are much easier to change than drum brakes. Their braking efficiency is relatively the same, but drum brakes are prone to overheating (but their service life is 2-3 times longer).
Brake discs for front axle
| Disc manufacturer | vendor code | Diameter | Min. thickness | Thickness | Type | Holes | Height | Hub diameter | Treatment | Weight |
| BOSCH | 0 986 479 R45 | 272.9 mm | 24 mm | 26 mm | Internal ventilation | 5 | 49.2 mm | 62 mm | High carbon | 6.3 kg |
| BOSCH | 0 986 479 S16 | 272.8 mm | 23 mm | 26 mm | Internal ventilation | 5 | 49.1 mm | 62 mm | 6.55 kg | |
| Remsa (Spain) | 61122.10 | 274 mm | 22 mm | Ventilated | 5 | 46 mm | ||||
| Italy | DBB668V | 273 mm | 24 mm | 26 mm | Ventilated | 5 | 62 mm | 6.78 kg | ||
| Italy | DBB789V | 275 mm | 22 mm | Ventilated | 5 | 62 mm | ||||
| Advics | A6F127 | 275 mm | 22 mm | 55.2 mm | 62 mm | |||||
| FERODO | DDF1668 | 273 mm | 24 mm | 26 mm | Ventilated | 5 | 49 mm | 62 mm | 13.55 kg |
Pads for all Toyota cars
Recommendations
Original: AKEBONO, ADVICS
Alternative: HSB GOLD, HI-Q
Toyota brake pads: understanding the drum system
Replacing brake pads is quite a responsible undertaking. All cars, one way or another, are similar in the main elements of their design, however, each brand may have certain characteristic features that are important to know before carrying out technical work. Replacing Toyota pads usually always starts with identifying the model, age and region where the car was manufactured. The brake systems of so-called “European” and “American” cars can differ significantly. It's all about the type of shoe brakes installed, which are divided into drum and disc. In this article, we will examine in more detail the characteristic features of replacing the brake pads of the drum system, which, due to its practicality, is still used in the design of a number of popular Toyota models.
Brake discs for rear axle
| Disc manufacturer | vendor code | Diameter | Min. thickness | Thickness | Type | Holes | Height | Centering diameter | Weight | Chamfers |
| MAXGEAR | 192467 | 259 mm | 7.5 mm | 9 mm | Full | 05/07 | 30.4 mm | 62 mm | 114.3 mm | |
| Roadhouse | 06700.00 | 280 mm | 9 mm | 10 mm | Double-sided non-ventilated | 5 | 55.80 mm | 55 mm | 4.56 kg | |
| MAXGEAR | 191869 | 270 mm | 8 mm | 9.9 mm | Full | 5 | 62 mm | |||
| Advics | A6R081 | 259 mm | 9 mm | 5 | 62 mm | |||||
| ATE | 24.0109-0155.1 | 259 mm | 7.5 mm | 9 | Full coated | 5x14.8 mm | 30.5 mm | 62 mm | 114.3 mm | |
| FERODO | DDF1645 | 268 mm | 8 mm | 10 mm | Full | 5 | 35 mm | 108 mm | 7.88 kg | 114.3 mm |
| ABS | 17830 | 270 mm | 9 mm | 10 mm | Full coated | 5 | 37 mm | 62 mm | 3.64 kg | 114.3 mm |
Advics brake discs
Particular attention should be paid to Advics brake discs. The concern is working on the development of various components of brake systems. An integrated approach to the matter allows us to find the best solutions, including for disks. The company has experience in cooperation with major automakers.
Advics wheels are available in a wide range for Korean cars. The parts are made from gray cast iron of primary smelting. No recycled materials! The surface of the components is subjected to special treatment, which helps to extend their service life. The discs are very resistant to overheating.
The letter at the beginning of the marking indicates what brand of car the disc is intended for. The letter “A” indicates the Toyota model. If there is a “B” at the end of the part number, it means the disc is clear spray painted.
Since Advics' priority is making conveyor products, there are no slot holes in the discs to improve ventilation and braking effect. This is also due to the fact that such components do not work equally well with all pads.
The braking quality with Advics discs is much softer compared to the factory mechanism.
Roadhouse brake discs
The Roadhouse brand specializes in the development of friction materials and brake discs. Now the company operates under the supervision of the German concern TRW.
All products undergo multiple quality controls and are certified. It complies with the international standards ECE R-90 and ISO 9001.
When to replace
Replacement is carried out as wear occurs: if the thickness of the lining has reached 2–3 mm or, in some cases, 5 mm. If this indicator decreases even more, then it is worth replacing worn parts. When worn, brake fluid consumption increases, but braking efficiency decreases.
Manufacturers of pads set the maximum possible service life, which is 40–60 thousand kilometers. But you should understand that wear depends on factors such as driving style, type of road surface, frequency of use of the car and even climatic conditions.