Home » Domestic auto industry
Reading time: 7 minutes. Updated 08/04/2019
Often, lovers of domestic cars encounter problematic bodies. For example, you bought a used VAZ 2109. At first glance, everything seems to be fine, but when it comes to the body, you understand that not everything is so smooth, you even think about replacing the entire body. But don't be afraid of this problem.
With the right tools and steady hands, you can get rid of a rotten arch, bottom or threshold. In this article we will describe the step-by-step process of body repair.
The problem of domestic cars
Car body repair begins with the selection of tools. I’ll say right away that the list will be quite large, because the work is labor-intensive and requires a large number of devices, including electronic and gas models. We will need at least three types of hammers of different sizes, a flap wheel and a sanding wheel (it removes paint and light rust well).
VAZ 2109
A grinder will also come in handy, a 10 cubic meter carbon dioxide cylinder, a welding machine with a maximum current of 150 amperes, several chisels, and a set of metal drills. You can’t do without a jack here either; it’s better to have two of them.
Stock up on cutting wheels of approximately 1-2 millimeters and one cleaning wheel. Any type of jigsaw will do. Brush with rust converter, fiber disc (can be replaced with a simple budget brush). Standard driver's set, 2mm cord and plumb line. It seems that I have listed everything that is needed. It's time to get to work.
What you need to pay attention to at the preparatory stage:
-firstly, it is necessary to place the machine so that it is convenient to work, that is, so that there is comfortable access to it both from below and from the door;
-it is also recommended to cover the instrument panel and seats with film so that dust does not fall on them when you need to cut out a piece of the floor. After this, you will need to purchase or, if possible, get a free piece of iron in order to cut out “a part of the required size for the floor.”
You will also need a front jack and a sill connector for the repair. What materials are suitable for processing? The bottom will need to be coated with Body 930, and the floor, after welding, will need to be filled with Body 992 anti-corrosion primer.
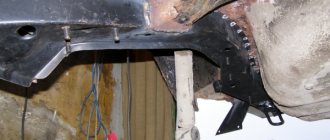
What else awaits the craftsmen during their work? You will have to lift the support (pictured below), under which you will most likely find rust. The joint of the new metal will go underneath it.
How to lift it? It is necessary to drill out points that will later help you navigate, or you can set other marks for yourself.
You definitely need to get to the very place where it stood, otherwise there will be problems with installing the seat. At the top of the threshold, you need to focus on the area where the paint is preserved, and it is along the edge of this area that you need to cut out the rusted piece of flooring.
As for the door, it is better to remove it. This will help create more comfortable working conditions. Of course, it will take a little longer to repair, but in the future it will not interfere with restoration work.
If you look at the threshold, you can see that it itself is quite suitable, only the edge is wrinkled.
What can be done is to place a thick plate in place of the amplifier in the appropriate place (pictured below) and fasten it by welding in the right places.
What to pay attention to: before starting work, you need to cover the interior (to prevent dust from getting on the seats and dashboard, disconnect the battery terminals).
In this particular case, a semi-automatic machine and CO2 gas will be used for welding.
At the initial stage of work, you need to drill out the base. The points are marked, then you will need to put it in place.
As you can see, the support was removed for good reason; there is a lot of rust underneath, which must be removed, as well as the boundaries of the new plank must be marked.
Now let's move on to the spar. If it is in good condition, it can be left, as in our case. The floor is welded to it in spots. They hold the threshold connection and the floor itself.
The photo shows the spar and the threshold connection.
It will also be necessary to change the jack.
You should also take into account one more important nuance: welding will be carried out in the places indicated in the photo.
As a result, the anticorrosive material will burn under the arch. To install a new one, you will need to remove the wheel and fender liner. However, first, when these elements are removed, you need to cut out the rusted section of the floor. In places where you can find points, you will simply need to drill them out; where they cannot be found, you will need to cut off the metal. As one of the options for reducing dust in the cabin, you can pour water over the treatment area and cut on an already wetted surface. Once the area of the rusted floor has been cut out, you can move on to the next step.
Do not forget that under the area shown in the photo there are brake and fuel pipes. Therefore, you need to disconnect them, make a spacer so that they are as far away from the metal as possible.
After this, you can cut off the old floor. Where the points are visible, it’s a little easier; in these places they can be drilled out and the metal separated.
In places where they are not visible (like on a spar), you can cut off the edges or even make a cut in the middle and, by prying up the cut area, find these points. The main idea is to leave the spar, which after cleaning will be in good, working condition.
In addition, as you can see from the photo, in place of the base plank, where there used to be quite a lot of rust, there is now an almost clean place. All you need to do is sand the area down, treat it with a rust converter, cover the area with primer and there is no need to cut it off.
Next we need to cut out the front jack, as it is quite rusty, and we also have a new one. As for the threshold connector, it is still in good condition and there is no need to do the extra work of cutting it out and replacing it with a new one.
What should you do next? Everything is very simple: a piece of floor that was obtained is installed in its place, excess parts are cut off, careful fitting and welding are performed.
Once the floor is welded, a cross member will need to be welded on top.
It is necessary to weld the front jack, install the threshold connections, coat the new piece of flooring on top with a primer, and cover the bottom with lubricant, Body 930 will do.
Removing rotten parts
We begin repairs by removing rotten, rusty and deformed parts. I will describe the process using the example of a car, a VAZ 2109, which I was tasked with repairing. First, I’ll give you my problem areas in the car. The front floor of the car is completely rotten with all the jacks and reinforcements. And the jack could only be used with a sub-engine beam. The rear floor was also rotted. Corrosion also affected the car doors. In general, the bottom was almost absent. The wings were not in the best condition.
The front hood was noticeably rusty, all the floor connectors and the floor of the gas tank and spare tire were missing. The same fate befell the reflectors of almost all headlights. The front spar burst in the gearbox area. And above the muffler, in the floor of the trunk, there was a huge hole. The corners of the door were “eaten” by corrosion.
I describe in detail the condition of my car so that car enthusiasts can identify similar faults in theirs and draw the right conclusions. Once the necessary tools for car body repair are at hand, we begin installation.
Algorithm for carrying out body work on the “nine” in general terms
Let's get acquainted with the work process so far in general terms:
- First of all, it will be necessary to remove those areas of the body that are rotten or deformed;
- On the “nine”, over time, the front floor with sills and reinforcements, the bottom in the rear, doors and fenders rot most quickly.
Note. It may even be impossible to install a jack, since the area provided by the manufacturer for it (the jack) becomes unusable. To work in this place, the car can be raised using an engine support beam instead of a support.
- The hood of the “nine” also cannot “boast” of endurance. In the place where the battery is located, it becomes covered with rust;
- The floor of the fuel tank is also considered a noticeable problem on the “nine”;
- The same fate befalls optics reflectors, muffler and other parts over time.
What the different modifications have in common
The metal frame 2109 is a supporting structure of the hatchback type with five doors. The unified body was created on the basis of the VAZ 2108, but most of the parts have different sizes. Both models have solid frames and attachments.
The body parts of 2109 are connected by spot welding, and areas of high load are reinforced by electric arc welding. For their production, sheet steel with a thickness of 0.7–1 mm is used. Small parts are stamped from thicker steel.
The body structure of the VAZ 2108 is all-metal welded, three-door type. Available in passenger and cargo-passenger versions. The “nine” has a five-door body, the internal and external side panels are equipped with openings for doors. Otherwise, the 2109 frame does not differ from the 2108.
Checkpoints
Measuring the distances between body control points is the most common way to check the condition of a car. After taking measurements, you need to check them with the passport data.
The check is performed as follows:
Check Point
Passport sizes
Tolerance (+/-)
Diagonal of the front doorway from the edge of the lower threshold to the middle of the roof
Diagonal of the front door opening from the lowest point of the windshield to the middle of the lower threshold
Distance between front door hinges and pillar in a straight line
Diagonal of the rear door opening from the point where the lower sill joins the central door pillar to the roof
Diagonal of the rear door opening from the top of the B-pillar to the lower threshold
Long diagonal rear side window frame
Short diagonal rear side window frame
Distance from the middle of the windshield to the middle of the hood
The weakest link
The frame of VAZ 2109, 2108 cars has several weak points that are most susceptible to corrosion.
Rear beam mountings
The rear beam is attached to triangular brackets on both sides of the body with rubber-metal hinges. The brackets are secured with studs welded to the rear spar reinforcement. Foci of corrosion appear around the fasteners, destroying the thresholds, amplifier. If the damage is severe, the beam can be torn out of the body, which leads to loss of control. The bottom of the 2109 is repaired in the early stages of corrosion.
Fastening the brace brackets
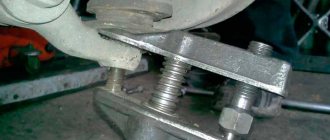
The radiator frame in these places is reinforced with thick metal, which is subject to corrosion. The VAZ 2109 bottom repair insert is sold in specialized stores. The spare part is welded into place of the destroyed one, respecting the geometric dimensions of the body.
Suspension strut cups
Dirt accumulated in the wheel arches destroys mudguards and suspension cups. Cracks appear in the places where nuts and studs are attached due to high vibration load. Defects are eliminated by overcooking the glasses. For preventive purposes, it is recommended to use fender liners and renew the protective coating of the arches.
Thresholds
The most common problem with “nines”, which reduces body rigidity. Corrosion spreads under the plastic covers. It is impossible to change the thresholds without restoring the floor. Either the part is replaced completely, or the most damaged elements - amplifiers, lower part, outer lining.
Dismantling
To dismantle the box, we recommend that you rely on the instructions, strictly follow the sequence and reinforce your skills with visual videos.
- Disconnect the negative terminal from the battery and drain the oil from the gearbox system.
- Unscrew the bolts that hold the crankcase guard in place and remove it.
- Disconnect the ground (wire) from the clutch housing.
- At the end of the clutch cable, loosen the tension on the nuts slightly.
- Remove the cable end from the clutch lever.
- Disconnect the block from the traction relay.
- Disconnect the wire going to the starter traction relay.
- Dismantle the starter itself directly.
- Disconnect the drive rod from the joint tip. We are talking about traction, which switches gears.
- Disconnect the cable from the car's speedometer drive.
- Unscrew the tie rod ball joint.
- Remove and press the steering rod hinge pin out of the strut swing arm.
- The shank of the inner CV joint of the front wheel drive should be pressed out and moved to the side.
- Disconnect the second CV joint.
- Remove the clutch housing shield.
- Release the gearbox from the fasteners holding it to the engine.
- Remove the box.
Carefully remove the gearbox
Be sure to move it horizontally away from the engine before directly removing the gearbox. Then disengage the input shaft. Be careful not to damage the clutch spring petals.
Tools
Body repair of a VAZ 2109, including replacing the bottom yourself, begins with the selection of tools. Restoration work requires specific equipment:
- hammers of different sizes for straightening work;
- grinder, set of discs for removing rust and paintwork;
- carbon dioxide cylinder;
- welding machine;
- metal drills, chisels with a hardened tip;
- two jacks, a lift;
- metal brush;
- standard set of tools - screwdrivers, wrenches.
Useful tips
To repair the underbody of a car with your own hands, experts recommend using semi-automatic machines. The additive is supplied at a fixed speed, the burner provides uniform heating. The seam is of high quality and even. When working with electrodes, an inverter with additional functions that support constant operation is convenient. They reduce the risk of electrode sticking.
Before cutting a sheet of metal, the exact dimensions of the defect zone are determined. The patch must be suitable in size and adhere to the geometry. To deform, the sheet is not heated for a long time - the strength characteristics of the alloys decrease and they become friable. Movements of the hand with the holder or attachment should be uniform, without jerking. Large sections are connected with a continuous seam, leaving gaps of up to 3 cm. Such connections better withstand dynamic loads and increase the strength parameters of the body. Such connections require a durable insulating coating. Mastic prevents moisture from getting into microscopic gaps.
Protective fluxes are used to work with galvanized iron; they preserve the coating from boiling and burning. Knowing the intricacies of the process, making the connection is not difficult. The main thing is to take your time and carefully prepare the surfaces before work. Anti-corrosion work should not be neglected. The bottom is subjected to heavy chemical load during operation. Protective compounds are applied in an even layer.
Source: svarkaprosto.ru
Where to start and where to end
Repair work begins with dismantling the deformed, rotten parts of the “nine”:
- Disassembling the engine compartment, draining coolant and antifreeze.
- Removing the doors.
- Dismantling the amplifier - “TV”.
- Rusty areas are cut off with a grinder.
- The holes will have to be repaired or patched.
- Problem areas are strengthened with iron.
- Mudguards are reinforced with spot welding.
- Spare parts are adjusted in accordance with the geometry of the car.
- Thresholds and wings are fastened with bolts followed by electric welding.
- New arches are installed, and if necessary, the bottom is completely changed.
To prevent the occurrence of corrosion, vulnerable areas are coated with special compounds based on bitumen, resin, and oil. The surface is pre-polished, removing a layer of paint and varnish, increasing adhesion to the applied product.
Welding materials
When working with a welding machine, consumables are required. When choosing them, they are guided by two points:
- Thin steel is more difficult to weld and requires proper selection of temperature conditions.
- Thick ones are more difficult to process.
In the lessons, experts advise using metal 1–2 mm thick for patches. The car is inspected on an overpass or pit in good lighting. The strength of the metal is checked with a hammer, which is used to tap the damaged areas.
For further restoration work, you will need soundproofing materials, anti-corrosion compounds, a metal primer, a rust converter, and a degreaser.
Preparatory stage
If the bottom is severely damaged, it is more profitable to replace it than to install metal patches. Large defects are cut out during preparatory work, small ones are cleaned from corrosion. Hard-to-reach areas are treated with gas welding. The seams on patches and repair inserts are coated with a rust converter, cleaned, degreased, and coated with anti-corrosion compounds.
Welding process
The fuel tank must be dismantled before starting work. The patch on the damaged area is welded at 3-4 points, then scalded. For minor defects, small seams up to 3 cm are applied. There should be no gaps - they increase the risk of corrosion. To increase the strength of the seams, they are hammered. If necessary, all parts can be digested. Restored areas are cleaned after inspection.
Application of metal patches
Welding the bottom begins with disconnecting the battery. The welding process will require the presence of an assistant. One fixes the patch, the other scalds it from below, carefully with a distance of several centimeters. If the patch is applied to a flat surface, it can be fixed using a semi-automatic welding machine.
The geometry of the body is constantly checked to avoid problems with doors not closing after repairs. The final seam is made continuous.
Bending the metal to weld the rotten bottom is done using gas welding. The softened metal quickly takes on the desired configuration. You can also use a special device for bending metal blanks. The seams on the surface are cleaned with a grinder and coated with anti-corrosion compounds.
Complete replacement
In case of severe damage from corrosion or metal obsolescence, the bottom of the “nine” is completely replaced. This requires:
To repair the “nine”, you can use one second of the bottom of the 2108 cabin.
Preparatory work
Before replacement, doors, fenders, and sills are dismantled. If there are traces of corrosion, the cover plate and connector are replaced. Installing braces for rigidity increases the accuracy of the work. Using a chisel, the old metal is removed down to the undamaged body. The internal surfaces of thresholds and cavities are treated with zinc chromate primer GF-073 before replacing the floor.
Along the lines connecting the threshold with the trim, holes with a diameter of 5 mm are drilled at a distance of 40–50 mm. The geometry is checked by installing doors in the openings, maintaining gaps of no more than 3 mm. The doors are then removed.
The threshold is welded to the trim with electric rivets through stitched holes, to the side of the body, to the central pillar - with a continuous seam. After completion of the work, the welding areas are cleaned with a grinding machine, primed, and coated with an anti-corrosion compound.
Cold methods of sealing holes in metal
There are two ways to repair holes in the underbody of a car without using hot work.
- Using composite materials - various types of polymer resins in combination with a reinforcing filler and a curing reaction accelerator. With high-quality surface treatment, in addition to restoring mechanical strength, they play the role of inhibitors - retarders of chemical and electrochemical corrosion reactions;
- Installing sheet material patches onto rivets.
General technological rules
Holes in the bottom are usually discovered from the outside, when inspecting the car on a pit or lift. Signs of through corrosion are local swellings, which, when you try to pick them out, crumble into dust.
If you find such troubles, you need to open and remove the pie of heat, noise and waterproofing on the floor in the cabin in the entire area where the sheet of iron forming the floor is welded to the power elements of the body - thresholds, tunnel and others. Then you will see the whole picture of the damage and will be able to take preventive measures in those places where corrosion has not yet become through.
Before the process of sealing the holes itself, you need to take measures to slow down the corrosion process (stopping it is an unattainable ideal to strive for). To do this, all iron rags are removed, and the edges that have residual strength are treated with sandpaper and a wire brush until shiny. The cleaned surface is treated with rust converters. For example, the “Tsinkar” composition. Work is being carried out inside and outside.
After completion of the work, the surface of the unprotected metal is covered with bitumen mastics, putty (acrylic, epoxy), paint or gun fat.
The work makes sense if the total surface of through holes does not exceed 15% of the floor area.
Fixing pinholes
If the source of through corrosion has a diameter of no more than 1 centimeter, it can simply be covered with a two-component polymer composition. Poxipol glue or a cold welding kit similar to plasticine gives good results.
A small hole makes it possible to use so-called cathodic electrochemical protection. Find an aluminum rod, make a rivet out of it and fill the hole with it. Within a radius of 20 cm from it, corrosion will stop. True, the rivet will gradually collapse on its own. But this may take five years.
Repairing large-scale damage
In this case, you will have to take care to restore mechanical strength. If the hole is on a flat area, then there is no point in messing around with epoxy and fiberglass.
A truly durable composite material is obtained only with absolutely precise adherence to technology - mixing proportions, drying mode and much more. Use ready-made material of this kind, for example, textolite. Having a thickness of 3 mm, it is not inferior in strength to sheet iron. The plate can only be installed with epoxy glue, but it is better to use a combined connection using rivets. The latter should be made of aluminum, then they will play the role of cathodic protection.
Post-weld treatment
The first stage is polishing the bottom with coarse pastes with mechanical additives. Pastes without abrasive substances are applied after washing and drying the car. All work is carried out using a polishing wheel, which processes each part separately.
Primers
They cover clean surfaces of the car according to the instructions. The primer provides adhesion to anti-corrosion compounds. Manufacturers offer different formulations:
- Tectyl is available in three types. Classic creates an organic microfilm on steel; zinc provides an additional coating that neutralizes salts; Tectyl HT zinc is intended for vehicles operating in urban environments.
- Movil is an economical composition that is in demand in auto repair shops.
- Bitumen mastic based on polymers, rubber, mineral shale.
- Dinitrol based on polymer rubber.
After restoration of body parts, sound insulation must be installed. The bottom can be coated with Prim, which simultaneously acts as an anti-corrosion agent.
Corrosion protection
To protect the body from rust, two methods of anti-corrosion treatment are used.
ML oils
The method, invented in Scandinavia, involves pouring special oils into the technical cavities of the body through factory drains. The compositions impregnate the welding seams, covering the internal surfaces with a film, isolating them from contact with air. The bottom is coated on the outside with similar oils.
The inhibitors included in ML oils allow them to be applied over rust. They slow down the spread of corrosion, but for maximum effect, it is advisable to wash the body of the “nine”.
The disadvantage of the ML method is its low mechanical strength. Oils wear off quickly in open areas, but remain for years in closed spaces.
Bitumen compounds
Open bottom panels and wheel arches are coated with protective bitumen. The method places high demands on the preparatory work. External elements must be thoroughly washed, otherwise the bitumen composition will quickly be washed away.
The advantage of such coatings is their high mechanical strength. They protect the VAZ 2109 body from external influences for a long time. Bitumen compounds can be used as additional sound insulation: a film applied in several layers reduces the level of vibration of the panels.
Bitumen coatings can be applied to traces of corrosion, but with some reservations. Surface rust is pre-impregnated with ML oils, after which solid compounds are applied. For deep damage, this method will not help control the development of corrosion, since bitumen products, unlike ML compounds, are opaque. Because of this, when inspecting a car, the technician assesses the level of rust damage and decides whether to apply bitumen compounds on top.
Cold methods of sealing holes in metal
There are two ways to repair holes in the underbody of a car without using hot work.
- Using composite materials - various types of polymer resins in combination with a reinforcing filler and a curing reaction accelerator. With high-quality surface treatment, in addition to restoring mechanical strength, they play the role of inhibitors - retarders of chemical and electrochemical corrosion reactions;
- Installing sheet material patches onto rivets.
General technological rules
Holes in the bottom are usually discovered from the outside, when inspecting the car on a pit or lift. Signs of through corrosion are local swellings, which, when you try to pick them out, crumble into dust.
If you find such troubles, you need to open and remove the pie of heat, noise and waterproofing on the floor in the cabin in the entire area where the sheet of iron forming the floor is welded to the power elements of the body - thresholds, tunnel and others. Then you will see the whole picture of the damage and will be able to take preventive measures in those places where corrosion has not yet become through.
Before the process of sealing the holes itself, you need to take measures to slow down the corrosion process (stopping it is an unattainable ideal to strive for). To do this, all iron rags are removed, and the edges that have residual strength are treated with sandpaper and a wire brush until shiny. The cleaned surface is treated with rust converters. For example, the “Tsinkar” composition. Work is being carried out inside and outside.
After completion of the work, the surface of the unprotected metal is covered with bitumen mastics, putty (acrylic, epoxy), paint or gun fat.
The work makes sense if the total surface of through holes does not exceed 15% of the floor area.
Fixing pinholes
If the source of through corrosion has a diameter of no more than 1 centimeter, it can simply be covered with a two-component polymer composition. Poxipol glue or a cold welding kit similar to plasticine gives good results.
A small hole makes it possible to use so-called cathodic electrochemical protection. Find an aluminum rod, make a rivet out of it and fill the hole with it. Within a radius of 20 cm from it, corrosion will stop. True, the rivet will gradually collapse on its own. But this may take five years.
Repairing large-scale damage
In this case, you will have to take care to restore mechanical strength. If the hole is on a flat area, then there is no point in messing around with epoxy and fiberglass.
A truly durable composite material is obtained only with absolutely precise adherence to technology - mixing proportions, drying mode and much more. Use ready-made material of this kind, for example, textolite. Having a thickness of 3 mm, it is not inferior in strength to sheet iron. The plate can only be installed with epoxy glue, but it is better to use a combined connection using rivets. The latter should be made of aluminum, then they will play the role of cathodic protection.
Long holes at the joints with power elements are eliminated with patches made of sheet iron or aluminum. They need to be bent according to the shape of the joint so that the width of the contact zone with the still living material is at least 2 cm. They are installed on aluminum rivets; the use of an epoxy compound would be useful. Especially if sheet metal is used. After all, you cannot know exactly its composition and in which direction electrochemical corrosion will go - whether it will destroy the patch or the body. The polymer resin will act as an inhibitor.
The final sealing of cracks and holes is carried out using, for example, the Novol Plus 710 kit. In addition to the epoxy filler and hardener, it includes a piece of fiberglass.
How much will the repair cost?
Restoring the worn out bottom of a “nine” or “eight” costs a significant amount - from 5 to 29 thousand rubles. The price of overcooking in car services varies depending on several points taken into account by the craftsmen:
- size of damage, depth of corrosion;
- possibility of carrying out repair work;
- difficulty of recovery;
- order fulfillment time;
- car service pricing policy;
- place of work.
The cost of overcooking the bottom of 2109 when purchasing the cheapest repair kit will be 5–8 thousand rubles. Purchasing consumables in specialized auto stores will cost 11–12 thousand rubles. For the work of a service technician, you will have to pay from 20 to 30 thousand rubles, depending on the assessment of the damage, the volume performed, and the complexity of the restoration.
How to repair the body of a VAZ 2109 with your own hands - a workshop in your garage
Fans of domestic cars often come across a problem with the body. For example, we purchased a used VAZ 2109 car. Externally, the car looks quite decent, but if you take a closer look at the body, it becomes clear to you that it is rusty. And the body is the main part of the car; everything actually rests on it. However, repairing the body yourself is not a difficult task. With a minimum of necessary tools and skills, you can replace a rotten arch, bottom or threshold yourself and without replacing the entire body. Our detailed instructions describe the DIY body repair of a VAZ 2109 step by step.
Model VAZ 2109
Technical condition assessment
Before repairing the body of a VAZ 21099, it is necessary to assess its technical condition and decide what body work needs to be done and whether it is advisable to carry it out from an economic point of view.
To do this, visually inspect the surface of the body for:
- dents;
- chips;
- scratches;
- peeling of the paint layer;
- presence of rust (pay special attention to the sills, wheel arches and bottom).
The problem with any Tolyatti-assembled car, including the VAZ 21099, is the poor quality of the metal, the low, insufficient level of anti-corrosion treatment of the main elements of the body structure.
If the car has been in an accident, the geometry of the body is checked. It is impossible to do this with your own hands; you need a special stand, which is available only at specialized service stations, after which the factory geometry of the load-bearing elements is restored.
Then we decide on a budget. Body repairs can be major or local, partial. For VAZ 21099, when rust appears and the paint layer peels off, a major body repair is recommended, because local repair is a temporary solution, a deferment of the sentence. It’s better to invest once and do everything yourself, including with your own hands, than to restore it gradually, which leads to a decrease in the performance characteristics of the car, the appearance of hidden defects and more significant financial costs in the end. After all, the build quality of domestic cars is extremely low, and the attempt to create a sedan based on a station wagon was a very dubious design decision, which is confirmed by the practice of operating the VAZ 21099.
Where to start body repair of VAZ 2109
Rotten threshold of VAZ 2109
Car body repair begins with a selection of tools. The list is quite impressive. The work is quite labor-intensive and will require a considerable number of measuring instruments. Including electronic and gas. You will also need at least three types of hammers of different sizes. Stripper and flap and wheel (The flap wheel is excellent for removing light rust and paint). You can’t do without an angle grinder either. You need a cylinder filled with about ten cubic meters of carbon dioxide, a carbon dioxide welding machine with a current of at least 150 amperes, a set of chisels and metal drills. At least one jack, preferably two. Buy a pack of cutting wheels 1-2mm thick and one cleaning wheel. Rust converter and brush, fiber disc (or metal brush) Standard driver's kit, two-millimeter cord and plumb bob. This car occupies a special place among the models; the presence of a corner platform allows it to be classified (based on body type) as a hatchback car. Design features suggest the presence of three doors in the body. The body itself is a single all-metal frame made of stamped elements. It is a frameless structure, the elements of which are connected using spot welding, which facilitates its construction and gives the body sporty characteristics. We take into account that the front-wheel drive car body is equipped with removable elements:
- Doors;
- Rear trunk lid;
- The front fenders are also removable.
Car painting
Repairing the body of cars assembled in Togliatti, including the VAZ 21099, is not complete without restoring the paint layer. Car painting can be:
- complete (involves removing old varnish and paint, applying new ones);
- partial (the paint layer is restored only in places where chips, scratches or peelings occur).
The choice of the necessary tool is determined based on the total volume and specifics of the work.
Painting a car can include various stages:
- grinding and cleaning (various abrasive materials are used, such as sandpaper or an abrasive wheel);
- applying a primer followed by sanding;
- coloring;
- applying varnish;
- polishing
Painting a car, including the VAZ 21099, can be done either in your own garage with your own hands, or at a service station, in a special chamber. Everything directly depends on the budget allocated for body repairs.
Often, lovers of domestic cars encounter problematic bodies. For example, you bought a used VAZ 2109. At first glance, everything seems to be fine, but when it comes to the body, you understand that not everything is so smooth, you even think about replacing the entire body. But don't be afraid of this problem.
With the right tools and steady hands, you can get rid of a rotten arch, bottom or threshold. In this article we will describe the step-by-step process of body repair.
Removing rotten parts
We begin the repair by dismantling rotten, deformed and rusty parts.
Problem areas in the car:
- Our car (which we are repairing in this article) has a completely rotten floor, along with jacks and stiffeners. The jack had to be installed under the engine beam.
- The floor in the back was also rotten. The bottom was practically absent. The wings also required replacement.
- The front hood is covered with rust, all floor and gas tank mounts and spare wheel mount are missing. The front spar burst in the gearbox area. And a huge hole appeared in the trunk floor above the muffler.
- The doors were corroded at the corners.
We have prepared the tools necessary for body repair, and we begin installation.
When is it no longer possible to drive?
It is much worse when the bases of the roof pillars or the power structure of the sills, the cups of the struts or the side members in the engine compartment have completely rusted. All these places belong to the load-bearing elements of the body. If the rust has penetrated a third of the thickness of the metal, then driving such a car is already dangerous.
It's easy to spot serious problems. When driving over artificial bumps, the body flexes excessively under load. If you climb one wheel onto a stone or curb and stop, then the “rotten” body may have problems opening the doors or trunk. The body bends, deforms and pinches moving elements. There is nothing good about this anymore. In the event of an accident, such a body will not be able to resist the impact impulse and will collapse like a house of cards.
Metal cups also sometimes rust through. Their damage is indicated by knocking in the suspension and noticeable problems with handling.
It is no longer possible to drive with such damage due to the risk of a serious accident. It is impossible to fix them, although some garage mechanics, of course, weld patches onto the side members or try to restore lost suspension fastenings, but it is no longer possible to restore the body’s former strength.
The repair itself
Stage 1
- We start with the engine compartment: drain the coolant, then remove the radiator. We take out the “TV”, if it is completely rotten, then you can tear it off and then cut off the flanges to which the TV was welded with an angle grinder.
- We completely cut off the rear panel and fenders. Using welding and patches, we weld holes in the mudguards (if there are any), insert flanges made of new metal, to which we will subsequently weld the “TV”.
You can watch the body repair in more detail by searching for a VAZ 2109 body repair video.
Stage 2
We install and weld new reinforcements for the mudguards, using roofing iron for this purpose. Next we adjust new parts: front and rear fenders, TV, threshold and hood. We attach these elements using self-tapping screws. This is where a set of drills comes in handy. Now comes the welding process. We start welding after all the parts (TV, wings) are installed on the screws.
Tip: I advise you to paint the TV in advance; after fixing it in place, it will not be possible to paint it properly.
Stage 3
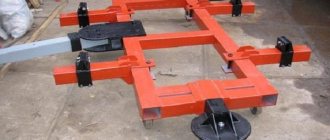
We restore the geometry of the car body. To do this, we drive the car onto a machine - a tipper. The procedure is carried out using a slipway on which the car is attached. Special fastenings ensure reliability, and power racks provide special force for alignment. It is recommended that this part be done at a workshop.
Stage 4
Let's move on to the bottom:
- We weld the patches onto the front and rear floors using a welding machine. We digest all the jacks, connections and underbody reinforcements.
- Using a mopping machine, we coat the car cavities with an anti-corrosion mixture.
The photo shows the overcooked bottom of a VAZ 2109
Stage 5
In our case, the arches were completely rotten. Experts recommend not to suffer, but simply to purchase and install new arches.
But it is also quite possible to make repairs. Resin mixed with used oil is an excellent coating for arches, but in the future rust will get under it. The choice of anti-corrosion mixture depends on your budget and experience with the material. VAZ 2109 video (body repair) will show you in detail how the polishing processes proceed, using various means, the list of which is determined by the age of your car. Considering that all machines in use today are more than 6 years old, polishing is carried out in two stages.
Wings of the "nine"
The fixation of the front wings on the “nine” was done quite well, if we mean ease of removal. Just a few bolts hold them in place. Therefore, no welding is required to dismantle them; you just need to arm yourself with a pair of good shaped screwdrivers and an 8-size socket with an extension.
- Remove the fender liners, which are held on by self-tapping screws;
- The fender bolt holding the body element from below at the threshold is unscrewed;
- Two more bolts hold the wing on the inside;
- You will have to completely dismantle the bumper or unscrew its side fastenings, and then move it to the side to gain access to another bolt securing the wing;
- Finally, it remains to remove a few bolts securing the wing from above.
It is also not customary to tinker with a wing if it is deformed. You can easily replace it with a new one, especially since it is inexpensive - 1200 rubles. If you use auto-disassembly, you can buy the part even at half the price.
If, however, the wing has received minor deformations or there are traces of rust on it, then it is easy to repair the part. Again, it can be removed and then finished to perfection on a garage workbench.
If you don’t want to remove the wing, you can repair it directly on the car using straightening hammers, pliers and a jack.