The VAZ 2110 car is built on the basis of the VAZ 2108 hatchback, the first experimental copy was designed in 1985, serial production of the front-wheel drive four-door sedan began in 1995, the first sales started in August 1996.
Production of the model was completed in 2014, the last car rolled off the production line, which operated under an AvtoVAZ license. Over 18 years of production, four modifications were produced: the 2110 sedan, the 2111 hatchback, the 21123 coupe and the 2112 station wagon.
Description of design
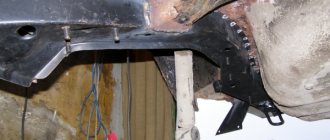
The bottom of the VAZ 2110 has the same design for all cars in the line and is made of rolled steel with additional stiffening ribs. The metal frame of the car is a type of frameless body; the entire load from the mounted units falls on the floor and side members, which act as a frame and ensure the massiveness of the entire structure.
Repairing the underbody of a VAZ 2110 in 90% of cases begins with checking the side members and involves the use of welding. The welding points that hold the body structures together are torn apart by vibrations, bolted connections become loose, and the solidity of the structure weakens.
Are there any differences between the bottom of 2110, 2111 and 2112
The wheelbase size for all cars in the generation is the same and is 2492 mm, while the cars have different lengths, heights and number of doors, depending on the model:
- Sedan (2110); dimensions 4265x1680x1420 mm.
- Coupe (21123); 4193x1680x1435 mm.
- Hatchback (2112); 4170x1680x1435 mm.
- Station wagon (2111); 4285x1680x1480 mm.
The body layout of each configuration has design differences, but these differences do not affect the central bottom. The bottom of the VAZ 2110 has average prices of 3,000 rubles. and is suitable for installation on the entire line. The part is made of ferrous or rolled metal, without protective galvanization, and therefore always needs to be treated with anti-corrosion agents.
Bent iron
The design and principle of operation of the front suspension of VAZ 2110, 2112, 2111
The word is also the answer to the questions:
- Carpenter's "clip"
- Step on the pipe.
- Fastener for logs.
- How is shaft diameter measured?
- A detail that prevents the log house from falling apart.
- Log clip.
- Locksmith letter P.
- Chest handle.
- Iron strip for fastening.
- Measuring tool.
- Tool for checking external dimensions.
- A metal part for fastening the wooden parts of a building.
- Horseshoe-shaped tool for measuring machine parts.
- A metal strip that serves as a handle on doors and chests.
- Iron strip for fastening wooden parts of a building.
- Detail “hired for work” as a handle on doors and chests
- Iron strip bent at an angle for fastening wooden parts of a building
- A metal strip curved in a semicircle that serves as a door handle
- Metal part for fastening wooden parts of a building
- Screw tensioner
- Horseshoe measuring tool
- The simplest measuring tool
- Fastening element in construction
- Measuring tool
- Log fastener
- carpenter's "clip"
- A part that prevents the log from falling apart
- Log clip
- Locksmith letter "P"
- Chest handle
- Iron strip for fastening
- Tool for checking external dimensions
- Iron bent into an arc
- Rotary handle
- "shell" for a stapler
- Curved iron
- Pipe step and chest handle
- Step on boiler room pipe
- Curved Iron Strip
- The best hardware product
- Step on the pipe
- Horseshoe
- "cartridge" for stapler
- Fastener
- Curved plate
- Iron bow
- What prevents the log house from falling apart?
- Curved plate
- Iron fasteners
- Chest handle as a detail
- Steel shackle
- "fish-eating" bird
- Pipe step or chest handle
- Pictures for the word “Bracket”
When repairs are required
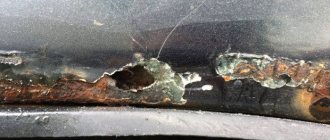
For all VAZ models, a mandatory condition is periodic inspection of the body for corrosion. Already from the factory, automotive hardware must be additionally protected from rust. The first VAZ 2110 began to become covered with corrosion from the area of the windshield frame. The paintwork peeled off quickly; after 6 months the first rusty plaques could be seen under the paint layer.
Cooking a rotten car body if the degree of metal destruction exceeds 70% is expensive and impractical. To protect the car from corrosion, once every 6 months it is necessary to carry out preventive maintenance and replace the old used metal.
The main reasons for rapid wear:
- The car is over 7 years old. The bottom is checked in the inspection hole: if there is minor corrosion, metal patches can be used.
- Accidents and driving on bad roads. Any deformation of the metal after an accident leads to the fact that the protective layer of anti-corrosion in places where it is broken is destroyed, and the metal begins to wear out faster. The same applies to frequent trips on bad roads.
- Car parking on the street. VAZ cars need a warm and dry garage. Considering that the car body is not treated with zinc, just one winter outside can cause corrosion of the sills and bottom. Moisture penetrates through the protective layer and destroys the metal of the seal, the outer part of the bottom.
- Water in the cabin. The liquid that has accumulated under the rubber mat quickly penetrates the bottom skin and contributes to the rapid rotting of the metal unprotected by anticorrosive.
A complete bottom repair will be required in the following cases:
- It is impossible to put the car on a jack; the jack falls through.
- It is clearly visible that the floor in the cabin has become uneven - the bottom is 60% rotten.
- It is impossible to adjust the driver's seat due to the skew of the bottom.
- Under the threshold, under a layer of putty, rust appeared. It is checked with an awl if the anticorrosive layer has peeled off.
- The appearance of rust on the inner surfaces of the sills in the interior and arches.
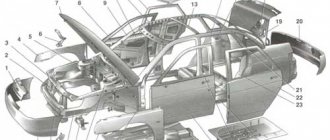
↑ Front suspension design of VAZ 2110
1 – ball joint, 2 – hub, 3 – brake disc, 4 – protective cover, 5 – swing arm, 6 – lower support cup, 7 – suspension spring, 8 – telescopic strut protective cover, 9 – compression buffer, 10 – upper support cup, 11 – upper support bearing, 12 – upper strut support, 13 – rod nut, 14 – rod, 15 – compression buffer support, 16 – telescopic strut, 17 – nut, 18 – eccentric bolt, 9 – steering knuckle, 20 – front wheel drive shaft, 21 – joint protective cover, 22 – outer shaft joint, 23 – lower arm
Preparation for repair
When choosing to repair the bottom yourself, you need to prepare tools and materials. For experienced craftsmen, a complete replacement of a part takes at least 3-4 days; the cost of work at a service station averages 45–50 thousand rubles. To work you will need:
- Bulgarian. Using an angle grinder, the corrosion plaque is removed from the bottom, parts of the patches are adjusted, cut off, and welding seams are aligned.
- Welding machine. It is recommended to boil the iron body and bottom, in particular. Semi-automatic welding with wire and carbon dioxide is suitable. You can use gas welding and 3 mm electrodes, provided you are skilled in such work.
- Electric drill for drilling spot welds.
- It is not recommended to carry out underbody repairs in a pit - it is inconvenient; it is better to use stands, a lift or skids; in some cases, the car is turned over on its side.
- Sound insulation sheets.
- Anti-corrosion set: mastic, R-80 sandpaper, primer, auto enamel.
Preparatory work step by step:
- Disconnect the negative terminal from the battery or remove the battery.
- Drain the fuel from the tank.
- Disconnect the electrical wiring from the door power windows.
- Remove the doors, marking the fastener locations on the body.
Before dismantling the doors, it is necessary to insert iron spacers into the openings or weld a channel, this will ensure that the geometry of the body is preserved if the center pillar reinforcement is rotten and there is a possibility that the roof will fall or bend in half.
Dismantling the interior
Replacing the underbody involves work inside the cabin and under the car. Dismantling the interior is carried out in steps:
- Pull out the seats.
- Remove the interior trim by unscrewing the moldings.
- Pull out floor coverings and carpets.
- Remove air vents.
- Remove the sound insulation layer and additional anti-vibration pads.
- Disconnect all internal wiring, twist the cables into a bundle, and remove the fasteners.
- Remove the dashboard to open access to the engine compartment if you plan to completely replace the bottom.
If you are an inexperienced tinsmith and electrician, it is better to distribute all fasteners into separate packages and sign them. When installing the interior, this will help you avoid getting confused with the parts.
VAZ 21099 Engine and its systems
1.Unscrew the fastening bolts and remove the crankcase protection.
2. Remove the muffler exhaust pipe (see subsection 11.6.1.). 3. Remove the air filter (see subsection 11.2.).
4. Loosen the clamp and disconnect the brake booster vacuum hose from the engine inlet pipe. 5. Unscrew the bolt and disconnect the ground wire from the clutch housing. 6. Loosen the clamps and disconnect the hoses from the thermostat.
7. Disconnect the high-voltage wire from the central terminal of the ignition distributor cover. 8. Use a screwdriver to press out the spring clip and disconnect the block with low-voltage wires from the ignition distributor terminal.
9. Loosen the clamp and disconnect the fuel supply hose from the fuel pump.
10. Loosen the nuts on the end of the clutch release cable. 11. Remove the cable end from the clutch release lever. 12. Disconnect the block with the wire from the starter traction relay terminal.
13. Unscrew the fastening nut and disconnect the wire from the contact bolt of the starter traction relay. 14. Disconnect the block with the wire from the generator terminal. 15. Unscrew the nut and disconnect the wires from the generator terminal.
16. Disconnect the connector with the wire from the carburetor shut-off solenoid valve terminal. 17. Loosen the clamp and disconnect the fuel return hose from the carburetor. Remove the hose from the plastic clamp. 18. Loosen the bolt securing the choke rod to the choke control lever.
19. Loosen the bolt securing the air damper drive rod shell to the bracket and disconnect the cable. 20. Remove the spring clamp of the accelerator drive cable from the throttle valve drive sector. 21. Remove the throttle actuator return spring.
22. Remove the accelerator drive cable from the throttle valve drive sector. 23. Unscrew the fastening nut and remove the accelerator cable bracket from the valve cover. 24. Disconnect the block with the wire from the limit switch of the forced idle economizer (EFH).
25. Disconnect the wire from the coolant temperature sensor. 26. Disconnect the wire from the oil pressure sensor. 27. Loosen the clamp and disconnect the heater supply hose.
28. Loosen the clamp and disconnect the heater outlet hose. 29. Loosen the clamp and disconnect the gear shift rod from the joint tip. 30. Unscrew the fastening nut and disconnect the cable from the speedometer drive.
31. Disconnect the block with the wire from the reverse light switch on the gearbox. 32. Loosen the nuts securing the left and right braces to the suspension arms. 33. Unscrew the three bolts securing the brace bracket to the body and move the left and right braces to a position so that they do not interfere with the removal of the power unit.
34. Remove the cotter pin from the tie rod ball joint nut to the swing arm. 35. Unscrew the nut securing the steering rod ball joint. 36. Press the steering rod ball joint pin out of the strut swing arm using a special puller.
37. Remove the two bolts and disconnect the ball joint of the suspension arm from the steering knuckle. 38. Using a pry bar, press the shank of one of the inner CV joints of the drive shafts out of the gearbox and move it to the side. 39. Insert a technological mandrel (for example, an old internal CV joint) instead of the hinge so that the side gear does not turn. After this, disconnect the second CV joint in the same way as the first.
40. Unscrew the three mounting bolts and remove the clutch housing shield. The operations specified in paragraphs 40 and 41 are performed to facilitate work on the removed engine with the gearbox. 41. Loosen the three bolts and nuts securing the clutch housing to the cylinder block. 42. Hook the engine onto the eyelets and tighten the hoist cables.
43. Unscrew the two nuts securing the rear support of the power unit to the body. 44. Unscrew the nut, slightly lift the engine and remove the bolt of the right front power unit support. 45. Unscrew the nut and remove the bolt of the left front support of the power unit.
46. Lower the engine onto stands, lift the car and remove the engine from under it.
Before lowering the engine, check that all wires and hoses are disconnected from the engine.
Welding work
Welding will be required both to replace the entire floor and during repairs, when the rotten part of the bottom is cut out and a patch is welded. The iron for the patch is cut out in advance; the size of the patch should be 2 cm larger than the hole around the perimeter. There is an option to use the original part of the bottom instead of a patch, which is sold separately.
Replacement of car underbody elements
After the car interior is cleared, a full inspection of the underbody is carried out. In some cases, you can limit yourself to a partial replacement—boil only the corroded areas. Rotting of the floor begins from the thresholds of the car; these elements are inspected first. Replacing the body also begins with reinstalling the thresholds.
The bottom of the VAZ 2110 consists of the main elements:
- support platform;
- bottom panels;
- threshold extension;
- side member amplifier;
- crossbars;
- connectors.
It is necessary to check the condition of the panels under the driver's feet, side member reinforcements, jacks or support platforms. If the overall condition of the bottom is satisfactory, you can limit yourself to installing a patch on the damaged area or replacing the bottom element from the repair kit:
- A drill is used to drill the spot welding points with which the element is installed on the structure.
- The element is cut out with a grinder.
Under the bottom of the car on the driver's side there are tunnels for the fuel line and brake system. Removing the system on a VAZ 2110 is quite problematic; it is recommended to cut off the old lines and install new parts after repairing the bottom.
- A metal patch is cut out.
- The bottom is sanded and a patch is welded.
- Welding seams are cut off with a grinder and cleaned.
- The element is primed, sanded, and treated with anticorrosive.
Final processing
After welding work, it is necessary to clean the seams with a grinder, carry out anti-corrosion treatment, and install new sound insulation panels. The bottom of the VAZ 2110 must be treated with anti-corrosion agent both from the outside and from the inside. Bottom finishing:
- The welds are cleaned until they shine, a grinder is used, and at the final stage, sandpaper R-80 is used.
- The seams are covered with bitumen-based mastic.
- The bottom surface is primed outside and inside the cabin.
- An oil-based anti-corrosion agent is applied to the inner surface. The composition penetrates into all hidden grooves and pockets.
- The outer part of the body is treated with anti-gravel protection.
- Sound insulation panels are cut to the required size, heated with a hair dryer, and placed on the bottom inside the cabin.
- Doors are being installed.
The work on replacing the bottom is completed, all that remains is to mount the interior, install the trim elements, and connect the electrical wiring.
What's next?
Then we apply primer and paint. We treat the metal on both sides with bitumen mastic or gun lard. Due to their greasy consistency, these compounds will repel water and prevent it from penetrating inside the metal.
Additionally, you can apply an anti-gravel coating (if the metal is treated with mastic and not lard). After the composition has dried, we soundproof the interior. Sheets with vibroplast must be laid on a clean surface. It doesn't stick to dirt. But it will adhere fully to sticky mastic. Additionally, we roll the sheet with a special roller or with our hands through a rag. Then you can safely assemble the interior and install the seats.
How to extend the life of the bottom
The body on all VAZ models is not a high-strength unit. To maximize the life of the main part of the car, it is recommended to systematically carry out preventive maintenance. It is impossible to completely eliminate the aging process of metal, but every driver can increase the service life of a new underbody.
- Prevent water from entering the cabin through depressurized moldings on the windshield and side doors.
- Systematically remove the rubber mats under the driver's seat and check the floor for dryness. Systematically clean drains in thresholds and doors. Particular attention is paid to the area under the battery: under the influence of the electrolyte, the drainage holes on the platform become coked.
- If the first rust is found on the bottom of the interior, clean it, fill it with epoxy resin, and treat it with an anti-corrosive agent with the effect of preserving corrosion areas.
- Clean chips and renew the paintwork on the sills immediately after detection: the sills and fenders begin to rot first.
- It is necessary to lift the car with a jack only with the doors closed.
Causes of rust and preventive measures
Among the reasons for the acceleration of corrosion processes on the bottom of the model with index 2112 are:
- storing the car outside during temperature changes and high humidity;
- operating a vehicle in difficult road conditions;
- water getting under the interior trim.
Almost any car over 7 years old is monitored for corrosion.
How to choose a part: average prices
To weld the bottom of a car at a car service center, the minimum price is 25,000 rubles. This applies to minor floor defects in all customer materials. A complete overhaul and update can cost up to half the cost of a car. Considering that the price of a VAZ is minimal, such repairs are not profitable for most drivers.
Many people prefer to carry out repairs and replacements on their own, buying a solid bottom. The repair kit is produced by AvtoVAZ, the element is suitable for models 2110, 2111, 2112, 2170, 2171, 2172. The cost does not exceed 4,000 rubles. Cold-rolled steel 0.8 mm thick is used in production.
There are options on the market to buy bottom elements: panels, amplifiers, connectors and cross members. The cost of each element is from 900 rubles. Parts of the bottom are chosen instead of metal patches if local repairs are necessary without welding out the entire bottom.
Best answers
Natalya Maslova: If a girl knows how to open the hood, she is a priori a Master!
Ilfat: Ha! Where!
Madness_of_female_logic: The engine, for example, at least)
Irina Ryabinina: All sorts of things...
Scorpio: They guess. For example - motor
Knopkina button: I know)))
I came to my senses...: Do we need this?! Oh yes, to bend over and make you feel good!
Yulchik: I know :)))
Yulia Sbitneva: Tell me?
Mystique: Engine...
BEZOOM-ZOOMEN: Better than you think
...: For example, a motor! This is enough for me)))
Oksana Frolova: mostly only approximately. Well, check the oil and top up the antifreeze, they can even do that.
Pavlinka new: We know! But we won’t tell!))))))))))
Valentina Izvekova: Of course we know. Don't you know what's under the hood?? ? We can tell and show.
Fanthom: I think they guess, UZBEKS!!!
User deleted: they still think there are live horses there
Italianka: Engine! And there are some other candles there. And there is also a little thing where they pour oil into! That's how much I know!!! xDDDD
Daria Guseva: yes. Under the hood of a car is what makes the car work.
Uncle Sasha: they open the hood and want to see a big mirror