Tell me, who thought of placing the starter bushing in the clutch housing?!
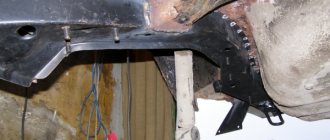
It all started on a frosty morning when I was trying to start the car. On the 3-4th start of the engine I heard a terrible grinding noise. He used a screwdriver to bend the timing case, put a passerby behind the wheel and asked him to turn the starter. The belt moved slightly and stood still, and the grinding noise came from the starter area. So far it hasn't told me anything. I didn’t torture the car further, but called my friend, who lives on the floor below, and asked me to ride me on a cable to the nearest service station, where his friends worked. The guys there turned out to be smart, Okushki didn’t get scared (as in most car repair shops in Yekaterinburg), but immediately removed the starter and showed me the reason for the grinding noise:
We removed the bushing fragments by removing the casing from below. Then they inserted a new bushing, which went in too easily, and the repair one (larger in size) did not go in at all. Therefore, we decided to put this one on cold welding.
We warmed it up with a special hairdryer and put the starter in place. A couple of attempts to start the engine, and voila! We hear the familiar grinding noise again. It was too late. There was no time to poke around any further, so the guys helped me push it, and I drove to the house. The next day, after disassembling the starter at home, I saw a miserable picture. The shaft itself was walking along its axis, there was crumpled cardboard and dirt inside. When I tried to clean everything and reassemble it, the play disappeared, but the next time I tried to insert the turned repair bushing and this starter into place, it did not produce any results. Bendix hit the hub with force and cracked it again.
I saw only one way out - buy a new starter and not suffer. Moreover, from all subsequent experiments, the already broken clutch housing, the price of which reaches 6,000 rubles, could have suffered. I started it again from the pushrod and went to Olmi, where I bought a brand new gear starter.
Since the hole in the crankcase was oval, I had to carefully file the repair sleeve so that the outside would be shaped like a hole and fit tightly into place. I installed the new starter and started the engine! I didn’t regret buying a starter, because it spun the flywheel so powerfully that it now started the engine in 1.5-2 seconds. At intervals I turned off the car and started it again. No grinding was heard, but some extraneous sound was sometimes heard. Just for fun, I removed the starter and looked at what was wrong with the bushing:
The bushing was slightly chipped, but it stayed firmly in place. Now there's another problem. To the left you can see that a tooth has been torn off on the flywheel crown! I planned the repair for this weekend, but for now I’m driving like this. I heard the grinding sound only once, when the extracted tooth stood right next to the bushing. To start, I pushed the car into gear. The “sick” tooth went to the side, and I started up calmly from the starter.
The starter cost 2600, the rest I spent on bushings + 200 rubles. to the guys from the service.
See the further adventures of the stupid bushing soon in my logbook. I'm also looking for advice in the comments, thanks in advance
There are quite a lot of weak points in the engine of the OKA car. Because of them, some parts require some improvement or significant design changes. One of them is the front OKA starter bushing, pressed into the gearbox housing. It is a support that supports the front toe of the rotor.
Its main problem is that it is made using technology taken from powder metallurgy. In fact, it consists of chips of graphite and bronze that have been pressed. Of course, manufacturers came to this technology solely to reduce the cost of production.
But, unfortunately, such an OKA starter bushing is incredibly fragile, which is why it lasts a very short time, constantly breaking. The worst consequence of such a breakdown is that because of this the entire mechanism is deprived of support and then fails.
Another problem is the weakening of the diameter of the hole that is in the crankcase. It even happens that on new cars this part is simply inserted into the hole by hand. Of course, in such a situation, the car is not immune to the fact that the tension weakens significantly over time, gradually it spins and begins to crumble into small pieces.
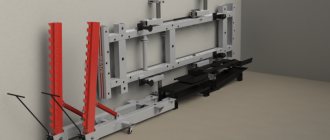
If it is necessary to replace the OKA starter bushing, you must purchase a special repair model, the diameter of which is 14 mm (by the way, the diameter of the standard part is 13.03 mm). This fact indicates that correct installation of a repair part is impossible without special equipment.
The special equipment that must be used in this case is designed to turn the hole in the desired direction. It is worth noting that it is almost impossible to buy such equipment, because it is only available in catalogs of tools intended for engine repair.
Models, characteristics, location
The designers did not borrow a starter from other VAZ models, but made a new one - for Oka engines. The impossibility of unifying starters for owners of this small car often results in problems, since the “native” starter is not a particularly reliable unit.
It is noteworthy that Oka’s power electric motors were produced by several manufacturers. The most common is the unit with the factory index 39.3708 (KZATE Samara plant), which we will consider in the future. Also, the VAZ-1111 was equipped with Belarusian-made components (1111-3708010-5) and Slovenian ones - AZE-1517.
The main characteristics of model 39.3708 are as follows:
- Power – 0.9 kW;
- Current consumption – 230A;
- Weight – 5 kg;
This unit is mounted on the left side of the engine (in the direction of travel) above the gearbox, and the thermostat housing is located above it. Fixation is carried out with only two fasteners - a bolt and a nut, with which the starter is attracted to the clutch housing. This arrangement is convenient because you can dismantle the unit from the car without removing anything additional.
Design
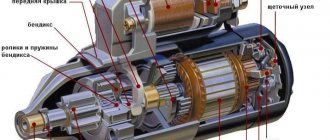
The starter on the Oka is a commutator electric DC motor. Its main components are:
- Stator with field windings;
- Brush holder (brush assembly) with 4 graphite brushes;
- Anchor;
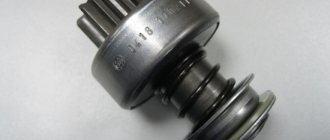
- Bendix (drive gear with freewheel);
- Solenoid relay with drive plug;
- Lids;
Related link:
How to remove the engine from an Oka
All elements are assembled into a single structure and secured with coupling bolts.
The stator due to the passage of electrical energy through its windings, ensures the emergence of an electromagnetic field. The second magnetic field is created by the armature winding. Electric current is supplied to it through graphite brushes to the commutator, to the plates of which the ends of the armature winding are soldered. The magnetic fields generated around the windings lead to the rotational movement of the armature.
On one side of the armature shaft there are splines on which a bendix is mounted, consisting of a gear and an overrunning clutch. Bendix has the ability to move along the shaft, and due to the spline connection, rotation is transmitted to it.
The Bendix gear is designed to engage with the crankshaft flywheel and transmit rotational motion to it. By default, the gear is not engaged with the flywheel and there is no interaction between the engine and the power electric motor.
The task of the overrunning clutch is to interrupt the transmission of rotation after starting the power unit. Even at minimum speeds, the rotation speed of the crankshaft is higher than the starter speed, so after starting the engine, reverse rotation is transmitted - from the flywheel to the electric motor. engine (until the gear is disengaged), which significantly reduces the service life of the starter. To prevent this negative effect, the gear interacts with the armature shaft not directly, but through a roller clutch, consisting of two cages and rollers placed between them.
The essence of the clutch is this: while the rotation speed of the starter armature is higher than that of the flywheel (the engine is not running), the rollers “jam” the cages among themselves, thereby transmitting rotation to the gear. As soon as the engine starts and the flywheel accelerates, one of the races moves relative to the second and the rollers “wedging” occurs, due to which the transmission of rotation from the gear to the armature is interrupted.
The movement of the bendix along the shaft splines is carried out by a retractor relay installed on the starter housing. This unit is also “responsible” for supplying electricity to the electric motor windings.
Related link:
Electrical equipment Oka
The peculiarity of the starter is that the gear is first engaged, and only after that the electric motor is turned on. And all this is provided by the retractor relay.
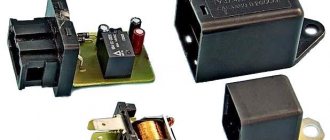
Solenoid relay - located on the starter
The relay consists of a housing with windings located inside, a contact disk and power contacts (“nickels”), as well as an armature that engages with a fork that interacts with the bendix.
What is the design of the gear-six starter?
The VAZ 2106, produced after the 1980s, has a starter with an end manifold model 35.3708. Earlier cars from the Volzhsky plant had a different gear mechanism installed - ST-221, which was equipped with a cylindrical manifold. Their structure is approximately the same, so they are completely interchangeable.
The difference between these starters is as follows: 35.3708 has three serial and one shunt coils, while the old model has two coils of these types.
Let's take a closer look at the design of the mechanisms that interest us, using model 35.3708 as an example. The “six” gear starter consists of the following main parts:
- field winding (i.e. stator) and housing;
- electric drive with anchor;
- three special covers;
- electromagnetic traction relay with two windings (one of them is retracting, the other is holding).
Using bolts, the starter housing is secured into one block with three covers. The armature of the mechanism we are interested in has a core, a commutator and a shaft. The last of these elements rotates in metal-ceramic bushings (there are two of them structurally provided). These bushings are pressed into the covers and must be impregnated with a lubricant. The starter drive is located at the end of the shaft. It includes a gear and a roller clutch, which is necessary to transmit torque to the flywheel.
On the front cover there is a relay consisting of a yoke, several flanges and a core. When the gear mechanism is turned on, two processes occur simultaneously: the armature is retracted, and the drive and gear mesh with the flywheel; a special contact plate closes the bolts. The result of these processes is the start of power supply to the windings of the device we are considering. As you can see, the circuit for switching on and operating the “six” starter is quite simple.
Connection diagram. Principle of operation
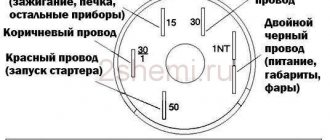
The starter is powered from the on-board network as follows: a large cross-section wire is laid from the “positive” terminal of the battery to one of the contacts of the solenoid relay. From the second contact of the relay there is a bus to the brush holder and stator windings. This circuit is the main one for powering the electric motor, but there is a break in the relay, which prevents the constant supply of current to the windings.
From the same “positive” terminal there is another wire, passing through the additional relay, the ignition switch and leading to the solenoid relay. The task of this circuit is to power the relay windings.
To turn on the starter, the driver must set the key in the lock to position “2”. Thus, it closes the power circuit of the solenoid relay, and current flows to its windings. As a result, a magnetic field arises, which leads to the movement of the relay armature - it is “pulled” into the housing.
Article on the topic - OKA electrical equipment: circuits and maintenance
Moving inside the body, the anchor pulls the fork along with it, and it moves the Bendix along the splines of the armature shaft, engaging the gear with the flywheel.
At the same time, the anchor pushes the rod on which the contact disk is fixed. Having reached the stop, this disk is pressed against the “nickels” of the power contacts, as a result of which the electrical power supply circuit is closed. engine, and it begins to rotate, and the gear will already be engaged.
After starting the Oka motor, the clutch is activated, preventing reverse rotation.
Related link:
How to start a VAZ engine in winter
By returning the key to position “1”, the driver opens the relay power circuit, the return spring “pushes” the armature. Moving back, it stops acting on the rod of the contact disk, due to which the electrical power supply circuit is opened. engine. At the same time, the anchor pushes the fork, and it disengages the bendix.
Main malfunctions and why the starter does not turn?
Malfunctions of the Oka starter, as well as the power electric motors of cars, are divided into two categories - mechanical and electrical. The first includes:
- Wear of armature support bushings;
- Damage to gear teeth;
- Jamming of the retractor relay armature;
- Development of splines for the armature shaft;
The most common mechanical failure is wear of the support bushings, which subsequently becomes the cause of other breakdowns. Due to significant wear of the bushings, the position of the armature and, accordingly, the bendix are disrupted. As a result, it is more difficult for the gear to engage, the wear rate of the teeth increases, and they may crumble.
Electrical faults include:
- Breakage of stator windings, armature, solenoid relay;
- Heavy wear of collector plates;
- Critical wear of brushes;
- Closing the windings;
- Burning of “nickels” of power contacts;
To this category of breakdowns you can also add problems with the power circuits of the electric motor and relay.
Malfunctions of the Oka starter manifest themselves in different ways:
- The starter does not turn on, there are no additional sounds;
- You can hear the activation of the solenoid relay, but the electric motor does not turn;
- The starter rotates, but picks up speed;
- Extraneous sounds are heard when turned on (crunching, grinding);
If such signs occur, the unit should be repaired.
Diagnostics
The first stage of repair is to determine where the breakdown occurred - in the power circuit or the unit itself. This is done simply:
- We immobilize the car with the handbrake, set the gearbox to “neutral”;
- Open the hood. From the thermostat side we find the starter;
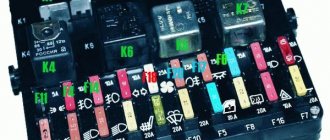
- On the solenoid relay we find power contacts (two studs with nuts to which the wiring fits);
- We take a screwdriver with an insulated handle and close the contacts with each other;
Related link:
Ignition of the Eye
If after a short circuit the electric motor starts to turn, the fault should be sought in the solenoid relay and its power supply circuit. If, after the described procedure, the electric motor does not start or will work, but without developing speed, or when triggered, extraneous sounds will occur, the unit will have to be removed from the car.
Unit dismantling, disassembly
Removing the starter on an Oka is not a difficult operation due to its relatively convenient location. The work algorithm is as follows:
- Remove one of the terminals from the battery;
- We unscrew the nuts of the power contacts to remove the wiring from the studs (you should use 2 keys - one to hold the inner nut, and the second to unscrew the outer one);
- Remove the wire ends;
- We unscrew the starter fasteners (it is fixed with the 1st bolt and 1st nut on the stud);
- Remove the starter;
Next, the unit is disassembled and diagnosed.
First, the retractor relay housing is dismantled, for which you need to unscrew two nuts. When dismantling the housing, the relay armature will remain in place, since it is hooked onto the fork with an eye. If necessary, we also remove the anchor.
To disassemble the electric motor itself, unscrew the two coupling bolts, after which you will be able to remove the back cover and pull the brush holder off the commutator. After this, you can remove the stator housing with the winding.
For further disassembly, remove the retaining ring from the front of the armature shaft and pull out the armature. All that remains is to pull out the fork axle and remove it along with the bendix.
Mechanical faults can be identified visually by carefully inspecting each component part. If signs of severe wear or damage are detected, the part should be replaced.
As for electrical faults, they can only be identified by testing the windings. For such a check, it is better to contact an experienced electrician.
After repair, the starter is assembled in the reverse order. Before installing it on a car, it is advisable to check the unit. To do this, connect it directly to the battery.
Related link:
Oka lubrication system
How to change the VAZ 2109 starter bushings yourself?
Follow these steps:
- remove the terminal from the negative terminal of the battery, and then disconnect the wire from the terminal of the solenoid relay;
- unscrew the nut from the power contact and remove the wire that comes from the battery;
- remove the starter protection. After this, you will have access to 3 fastening nuts, which should be unscrewed. To unscrew one of them you will need to crawl under the car;
- remove the starter.
Place the dismantled part on the workbench and remove all dirt from it.
During car production, the bushing is pressed into the crankcase, which complicates the procedure for removing the element from the socket. To remove it, you will need to use a special puller, or a correctly selected tap, which is screwed into the bushing and presses it.
You can also simply knock out the bushing with a chisel, although there is a risk of damaging the socket, which will cause the new part to wobble.
After removing the worn element, press in a new one.
Be sure to take into account the dimensions of the VAZ 2109 starter bushing . If the part fits into the socket tightly, do not press on it under any circumstances, otherwise the lid will burst.
Starter for OKU: what cars is it suitable for?
One of the significant disadvantages of the Oka starter is the absence of the so-called “dome”. In those nodes where it is present, the “dome” acts as a second reference point for the anchor. In Oka, due to the absence of this component, the second support for the shaft is a recess in the engine block. The support sleeve is also installed in it. Therefore, if the bushings wear out - and this is the most common malfunction - replacing them becomes a serious problem for the owner.
OKA starter catalog number: 391.3708 - if you decide to install the same one.
One of the options for solving problems with bushings is to install a starter from another car on the Oka. As a replacement, you can use the VAZ-2110 starter, which has a “dome”.
But in order to install a “ten” starter, you will have to make certain modifications to the unit itself, as well as the clutch housing, for which you will have to remove not only the starter itself from the car, but also disassemble the transmission - remove the gearbox, clutch and dismantle the clutch housing.
Article on the topic - Features of gearboxes and dismantling
To install the VAZ-2110 starter on the Oka, you need to use a grinder. machine to grind the surface of the “dome”, thereby reducing its diameter. You will also have to cut the mounting lugs.
In the crankcase, you need to cut out the partition from the inside and grind the surfaces adjacent to the mounting hole.
All these modifications are aimed at ensuring that the new unit fully “fits” into the crankcase hole.
Some craftsmen, instead of the “native” starter on the Oka, even installed a unit from a VAZ of the classic family, the same VAZ-2106. But in this case, the improvements were significant, since the starter from the “classic” is larger. The installation issue in this case was resolved by using an adapter plate.
Related link:
Brake system "Oka"
How to replace the starter bushing?
Recently I was treated for such a problem. The starter didn't turn well. Especially on the first start after an overnight stay. I looked at the bushing, poked the rotor there, Polpation showed that everything was fine. But still I decided to replace it and pulled it out with a tap. The tap plays the role of a puller. It turned out that the bushing was worn unevenly. The hole looks a little like an oval, but when inserting the rotor it is not noticeable. Bushings are available for sale, but as a rule they are repair size. I had to sharpen the outside a little. I sharpened it with a flat velvet file, holding the sleeve in an electric drill.. It is necessary that the sleeve fit tightly into the socket. Getting the bushing into the crankcase is difficult IMHO. Since she is focused. When I pressed the bushing in, the starter shaft did not fit into the bushing.