Review of Manufacturer Prices
Technical parameters of the main radiator: length 560 x width 306 mm x height 20 mm.
| Name | Price, rub.) |
| Original 21901-1300008-11 | From 5500 |
| 21903-1300008-14 | From 4500 – 4800 |
| 21903-1301010-14 | —/— |
| 150925A2020 | —/— |
| 21900-1301010-14 | —/— |
| 21900130001004 | —/— |
| Lada Granta LUZAR 2190-1301012-01 | From 4600 |
| VAZ-2190 AvtoVAZ OJSC 546532532 | —/— |
| AvtoVAZ 21900-1301012-82 | —/— |
| RSO VAZ-2190 Lada Granta SB with electric fans and AvtoVAZ pipes | From 10100 |
| VAZ-2190,91,92,94 LUZAR universal 25643542 | From 6200 |
| VAZ-2190, 91, 92, 94 LUZAR 48454234 | From 4900 |
Related link:
How to buy a Lada Granta on credit
*prices are current as of November 19, 2018.
Radiator dismantling in Kalina
To remove the designated assembly and related components, you will need to use the following tools:
- wrench "10" (socket type);
- pliers with thinned grips;
- Phillips screwdriver;
- If the Lada Kalina is equipped with an air conditioning system, then we additionally stock up on a set of Torx (star profile).
- Disconnect the power connector from the system fan.
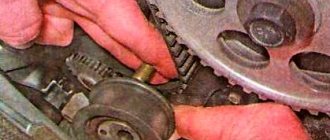
- Let's dismantle this unit. It is held on the radiator with 4 bolts. To unscrew them, you will need to use a “10” key. Extraction is carried out in the upward direction.
- Next, we move on to removing the pipes from the radiator fittings. We loosen the clamps using pliers or a screwdriver. We use the same wrench to unscrew the two nuts that hold the radiator assembly in the seat.
- Now we tilt the product slightly towards the engine and lift it up.
When dismantling the unit on a Lada Kalina equipped with air conditioning, you will need to resort to removing additional components that are directly attached to the radiator. To carry out this activity, you should stock up on a key with an asterisk profile.
Recommendations for the selection of parts and components
The range is represented by domestic manufacturers, originals and high-quality analogues. The final choice is up to the owner of the technical device.
Service center technicians strongly recommend purchasing original parts. The service life and manufacturing quality of factory components are an order of magnitude higher than their analogues.
Before purchasing, carefully check the spare part catalog numbers with the actual data in the instruction manual. If necessary, get free consultations from service station specialists.
Lately it has become popular to order parts for subsequent installation directly in workshops. There are many advantages of this choice: prompt delivery, professional installation, quality guarantee.
Eliminating air jams
The design of the cooling system in the VAZ-1118 has one unpleasant drawback - the tendency for the circuit to become airy. This can lead to overheating and engine damage. Here we recommend resorting to minor system upgrades. You need to act when the liquid is drained.
- First we replace the thermostat. Instead of a standard product with five holes, we install a component with six such holes.
- We add a refrigerant filter to the circuit.
- We install a shut-off valve on the pipe leading to the stove.
These actions are not capable of radically transforming the system. Experienced owners of LADA Kalina have moved further in this matter. They add steam exhaust pipes, install a forced fan activation button, etc. To install the designated outlet, the diagram looks like this: we cut a tee into the pipe leading to the expansion tank. It is connected through a separate hose to the pipe of the throttle body heating unit. We place the second tee in the return from the radiator of the heating system and connect it with an expansion tank. Now you know how to remove, as well as how to change the radiator, and fix other problems yourself.
Temperature sensor malfunction
Often signs of such a malfunction are:
- Stopping the flow of warm air into the car interior, which occurs due to the cessation of fluid flow into the heater.
- Dark, almost black smoke comes out of the exhaust pipe. This indicates engine detonation, which was a result of overheating.
- Engine power drops sharply.
Many drivers quickly stop the car when it overheats and turn off the engine. In fact, an immediate stop of the machine is required only if the tightness of the system is broken and liquid pours out of it
- turn on the heating to maximum so that the fluid temperature drops and the engine cools down quickly;
- drive smoothly to the side of the road;
- Let the engine idle for 2-3 minutes with the heating system on.
After this, the engine must be turned off and allowed to cool for 20 minutes. After this, you need to measure the fluid level in the cooling system and add it if necessary. Immediately after the engine is turned off, you cannot open the radiator cap, as you can get burned from contact with the liquid. If the fluid level is normal, then the cause of overheating must be determined by diagnostics. To do this you will have to visit a car service center.
Source
Communities › Lada Priora Club › Blog › The temperature arrow is at the red mark!
Good day to all. Today I was stuck in a traffic jam during the day for about an hour and a half, the air conditioner was working, and I saw that the temperature had exceeded the red zone, and I heard that the car beeped 5-6 times (it sounded like a door was open). The question is: will the machine turn off? Will any sensor work? is there such a thing? Has anyone had this? I forgot! Priora car.)))
The ECU does not focus on the tidy at all, it only shows what it shows. He takes the sensor readings digitally. Comparing with the State readings, the tidy lies up to 40 degrees. Especially at the beginning.
The system has 2 temperature sensors - one for the dash, the second for the ECU.
So what happens?! Can you safely minus 7-10 degrees from the readings on the tidy?)))))
Check the antifreeze level. The tank cap on the Priora is already normal, this is a 10-kilometer problem. In a traffic jam, the temperature rises, this often occurs. Idiot designers set the fan turn-on temperature to 107 degrees. There are two ways - reflash the ECU - it’s fixed there, or as I did - install StateX1 for 700 rubles and set the switching temperature to 95 degrees. I never squeaked in any traffic jams again.
It was such nonsense, I replaced the thermostat and everything went away.
If the antifreeze is more than 3 years old, then it can be changed (
110 rubles kg), and at the same time you can clean the system - I personally was convinced of the sufficient effectiveness of this procedure. My lid valve jammed and the supply pipe burst, I took it to my garage, washed it with water, then systematically stirred citric acid and so on 5 times. Previously, it warmed up to 110 in the city, especially in traffic jams = after flushing the needle, it was mostly about 90,100... very rarely in traffic jams it reaches 110 and the fan turns on. In other words, there is an effect. 146%
Be sure to check the thermostat, fan activation and coolant temperature sensor. In any case, you also need to clean the valve of the expansion tank cap))) otherwise, you know, passengers faint when you go 160 along the highway and suddenly, unexpectedly, BANG and white smoke from under the hood
Today I'll take it for diagnostics, then I'll report back. thanks for the info ;)
If the antifreeze is more than 3 years old, then it can be changed (
110 rubles kg), and at the same time you can clean the system - I personally was convinced of the sufficient effectiveness of this procedure. My lid valve jammed and the supply pipe burst, I took it to my garage, washed it with water, then systematically stirred citric acid and so on 5 times. Previously, it warmed up to 110 in the city, especially in traffic jams = after flushing the needle, it was mostly about 90,100... very rarely in traffic jams it reaches 110 and the fan turns on. In other words, there is an effect. 146%
Be sure to check the thermostat, fan activation and coolant temperature sensor. In any case, you also need to clean the valve of the expansion tank cap))) otherwise, you know, passengers faint when you go 160 along the highway and suddenly, unexpectedly, BANG and white smoke from under the hood
why does your fan come on so late, huh?
If the antifreeze is more than 3 years old, then it can be changed (
110 rubles kg), and at the same time you can clean the system - I personally was convinced of the sufficient effectiveness of this procedure. My lid valve jammed and the supply pipe burst, I took it to my garage, washed it with water, then systematically stirred citric acid and so on 5 times. Previously, it warmed up to 110 in the city, especially in traffic jams = after flushing the needle, it was mostly about 90,100... very rarely in traffic jams it reaches 110 and the fan turns on. In other words, there is an effect. 146%
Be sure to check the thermostat, fan activation and coolant temperature sensor. In any case, you also need to clean the valve of the expansion tank cap))) otherwise, you know, passengers faint when you go 160 along the highway and suddenly, unexpectedly, BANG and white smoke from under the hood
I’m also wondering why the fan at 110 turns on? I also seem to be at 110 on the tidy (the last white line), but according to the diagnostic. the scanner is 100. i.e. temperature scale is broken
Source
Refinement of the cooling system
Domestic cars are far from perfect, that's a fact. Lada Priora was no exception in this regard, having inherited many shortcomings from the legendary “ten”. One of them is an unfinished cooling system.
There are several ways to quickly and without financial costs modify the SOD on Priora.
- Installing a 6-hole thermostat (stable maintenance of coolant temperature).
- The use of Kalina SOD on Priora will reduce the pressure in the system and provide quick warm-up at subzero temperatures.
- Installing a larger or additional water pump to improve coolant circulation efficiency.
- Use of multi-speed and silent forced cooling fan.
- Changing the firmware of the control unit so that the fan operates at a lower temperature.
Refining the cooling system of the Lada Priora is a feasible task even for novice car enthusiasts. The SOD has a simple design with a minimal set of components. Thanks to this, the system is relatively reliable.
Source
Design features of the LADA Priora engine cooling system
The LADA Priora engine cooling system is liquid, closed type, with forced circulation. Consists of an engine cooling jacket, a radiator with an electric fan, a thermostat, a pump, an expansion tank and connecting hoses.
Design of the LADA Priora cooling system
Cooling system: 1 — expansion tank; 2 — radiator outlet hose; 3 - inlet hose; 4 - radiator; 5 — steam exhaust hose; b — radiator supply hose; 7 — electric fan; 8 — electric fan casing; 9 — coolant temperature sensor; 10 — coolant temperature indicator sensor; 11 — throttle assembly; 12 — bracket for the coolant pump pipe; 13 — coolant pump; 14 — coolant pump pipe; 15 — heater radiator supply hose; 16 — heater radiator outlet hose; 17 — exhaust pipe; 18 — coolant pump pipe hose; 19 — thermostat housing
| Expansion tank. Coolant is poured into the system through the expansion tank. It is made of translucent plastic, which allows you to visually monitor the liquid level. To do this, the marks “MAX” and “MIN” are marked on the wall of the tank. In the upper part of the tank there are two pipes for connecting the steam removal hoses of the cooling system radiator and the heater radiator, in the lower part there is a pipe for connecting the cooling system inlet hose |
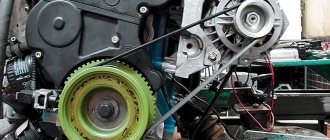
| Coolant pump - circulates coolant. It is bladed, centrifugal type, driven from the crankshaft pulley by a timing belt. It consists of a housing, a bearing assembly with a seal, an impeller and a toothed pulley. There is a control hole in the pump housing to detect fluid leakage when the pump seal fails. The pump should be replaced as an assembly. |
Comment
| Jamming of the pump pulley due to failure of its bearing assembly or due to freezing of highly diluted coolant will lead to breakage of the timing belt and, as a result, to expensive engine repairs. |
The liquid enters the pump through a supply pipe located on the rear wall of the cylinder block under the catenary collector. From the pump, liquid under pressure is supplied to the engine cooling jacket, and from there to the thermostat housing.
The cooling system consists of two so-called circulation circles:
- The small circle does not include the engine radiator, and the fluid washes only the cylinder block and cylinder head, and also flows through the throttle body channel and the heater core.
- When moving in a large circle, the coolant passes through the engine radiator, where it is cooled by the incoming air flow. The thermostat controls the direction of fluid flow in the engine cooling system.
Thermostat. Two thermostat valves - main and bypass - redistribute fluid flows in the cooling system. You will find the thermostat opening and closing temperatures below.
The heater radiator is built into the engine cooling system and is designed to heat the passenger compartment by circulating hot coolant through it.
| The radiator consists of two vertical plastic tanks (the left one with a baffle) and two horizontal rows of round aluminum tubes passing through the cooling plates. The bases of the tubes are connected to the tanks through rubber gaskets. The liquid is supplied through the upper pipe and discharged through the lower. Above the inlet pipe there is a thin pipe for the steam removal hose. There is a drain plug at the bottom of the right tank. A plastic casing with an electric fan is attached to the radiator. |
| The fan maintains the thermal operating mode of the engine and is switched on via a relay based on a signal from the engine control system controller. To monitor the coolant temperature, a temperature gauge sensor is screwed into the engine cylinder head in the instrument cluster. |
How to replace a radiator on a grant with air conditioning
Removing the air conditioner radiator on a Lada Granta car is carried out to replace it with a new one or repair it, in most cases to restore the tightness of the system.
To carry out repair work, you will need a Phillips screwdriver, eight-size wrenches and a ten-socket socket. It is most convenient to carry out repairs on a vehicle mounted on an inspection pit or lifts. Do the following sequence of actions:
- De-energize the vehicle by disconnecting the negative terminal from the battery.
- Remove refrigerant from the system.
- Then remove the front bumper.
- We disconnect the connector with the power wires from the electric radiator fan of the air conditioner.
- We disconnect the flanges of the high and low pressure pipelines from the radiator. Immediately after disconnecting, plug the holes to prevent dirt from getting into them.
- We press the clamps and pull out the bracket with the radiator from the holders on the engine cooling radiator. Let's take it off.
- Replace it, then install it in the reverse order, removing the pipeline plugs directly when connecting the pipes. Be sure to replace the O-rings with new ones and lubricate them with oil used for the air conditioning system.
Tools (for 8 valve engines):
- Medium Phillips screwdriver
- Ratchet wrench
- Extension
- 5 mm hex bit
- 8 mm head
- 10 mm head
- 13 mm head
- Narrow nose pliers
- Funnel
- Compressor
Tools (for 16 valve engines):
- Medium Phillips screwdriver
- Ratchet wrench
- Extension
- 8 mm head
- 10 mm head
- Open-end wrench 10 mm
- 13 mm straight box spanner
- Narrow nose pliers
- Funnel
Parts and consumables:
- Technical capacity
- Coolant 8 l
- Radiator (if necessary)
- Radiator cushions (if necessary)
- Rubber radiator bushings (if necessary)
- Rags
Remove the radiator to check it for leaks (if a leak is suspected) or replace it if damaged. Be sure to remove the radiator from the vehicle only when the engine is cold.
1. Remove the air filter housing and air intake as described here.
2. Drain the cooling system as described here (for 8-valve engines) or here (for 16-valve engines).
3. Unscrew and move the ignition coil aside as described here.
This item is only for 8 valve engines.
4. Remove the radiator fan by disconnecting its power plugs and mounting bolts as described here.
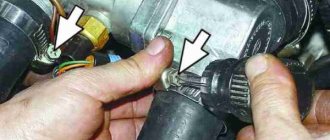
5. Loosen the clamp screw securing the lower pipe clamp, as shown in the photo below.
6. Disconnect the pipe and drain any remaining coolant if it remains in the system.
7. Similarly, remove the hose from the upper radiator pipe.
8. Using narrow-nose pliers, loosen the clamp securing the hose from the expansion tank to the radiator.
9. Unscrew the two nuts securing the radiator to the upper cross member of the radiator frame.
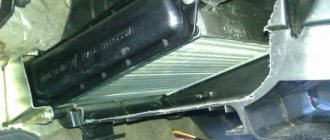
10. Tilt the radiator slightly forward towards the engine, thereby disengaging it from above.
11. Remove the radiator from the engine compartment.
12. Remove the two lower mounting pads from the radiator if they are still on the radiator mounting pins, or remove them from the holes in the lower radiator frame cross member if they are still on the body.
Replace torn or loose radiator cushions.
13. Remove the rubber-to-metal bushings from the radiator brackets.
Replace torn or loose rubber bushings.
14. Rinse the outside of the radiator with running water and dry.
If cracks appear on the plastic radiator tanks, replace the radiator on the car.
15. Check the tightness of the radiator by plugging its pipes and lowering it into a container of water, supplying air to it under a pressure of 0.1 MPa (1 kgf/cm2). No air bubbles should appear from the radiator for at least 30 seconds.
If the radiator does not fit completely into the container, check it sequentially from all sides.
16. Install the radiator on the car in the reverse order of removal, first placing the lower mounting pads on the radiator pins and inserting the upper mounting bushings into the brackets.
17. Install the electric fan and all removed parts on the Lada Granta car in the reverse order of removal.
18. Add coolant as described here (for 8-valve engines) or here (for 16-valve engines).
When the owner of a Lada Kalina notices an antifreeze leak from the cooling circuit in the radiator area, immediate dismantling of this unit will be required in order to determine the causes of the malfunction. A fairly common option for eliminating leaks is to add a special sealant to the system. This is a simple method that does not imply the need to dismantle the radiator, is ineffective and can harm many components. Also, repairing the product will not be an effective measure, since it is not possible to restore the full functionality of an aluminum radiator in most situations. This is confirmed by the specialists of specialized services. As a result, the most effective action will be to replace the cooling radiator. We will tell you further about how to remove it correctly and how to change the radiator.
The principle of operation of the cooling system
The main task of the cooling system is to ensure optimal temperature conditions for the Priora engine. The vehicle is equipped with a system with forced circulation of coolant. Its main element is the cooling jacket through which the liquid circulates.
To maintain the integrity of the shirt, you should constantly monitor:
- quantity
- quality of the liquid (for example, Antifreeze).
If its amount is too low, the system will not be able to properly maintain the thermal regime of the power plant, and it will overheat. Antifreeze heavily diluted with water will not have adequate frost resistance, and in winter the shirt may freeze.
Another important element of the system is the liquid pump. The purpose of the pump is to ensure the circulation of Antifreeze throughout the system. The Priora pump is belt driven from the crankshaft. The condition of the pump also needs to be constantly monitored. If the bearing in it starts to fail, it will jam. The result of wedging will be:
- inability to maintain optimal temperature;
- the likelihood of a timing belt break.
This, in turn, will damage the gas distribution mechanism.
Until the engine reaches the desired temperature, the liquid circulates in a small circle, that is, it moves only along the jacket. When the temperature approaches normal, the liquid will begin to move in a large circle. In addition to the cooling jacket, it also includes a radiator with a fan installed on it. The cooler starts working only when the liquid temperature begins to exceed the permissible limit. For monitoring, a temperature sensor is built into the cooling jacket, also known as a fan switch on sensor.
The thermostat is responsible for which circle the Tosol moves in. Incorrect operation of the thermostat or its jamming will either lead to overheating of the unit or to the fact that it will not be able to reach the optimal thermal conditions.
This system works on a Priora like this: while the power plant is cold, the thermostat is in a position that blocks the channel going to the radiator. The liquid, thanks to the pump, circulates through the cooling jacket. As it warms up, the thermostat begins to open the channel slightly, and liquid begins to flow into the radiator to reduce the temperature of the liquid itself.
In the summer, when idling in a traffic jam, the air flow passing through the radiator is insufficient, and the temperature continues to rise. The fan switch-on sensor monitors this indicator, and if it begins to exceed the permissible limit, it turns on forced cooling of the radiator, which additionally creates an air flow to ensure cooling of the Antifreeze.
Source
Work resource
The manufacturer states that the 126 by 16 valve engine can operate stably for 200 thousand kilometers. After this limit, the power plant requires major overhaul. But do not forget that AvtoVAZ is a real lottery; for some Priora owners, the engine caught a wedge at 2 thousand. But if you take care of your Lada car, regularly perform maintenance and replace damaged components, then you can safely count on a service life of 150-200 thousand km.
The resource of the power plant is influenced by many factors, here are some of them:
- Overheat. Running the engine on a Priora at elevated temperatures significantly reduces its service life. The operating temperature, which we will talk about in the next section, must be maintained at the same level.
- Fuel. The instruction manual indicates what kind of gasoline should be poured into engine number 126 with 16 valves. It is also recommended to visit only trusted gas stations that will not fill you with diluted fuel.
- Engine oil. Everything is simple here - change the lubricant in a timely manner and buy high-quality oils, then the service life will be 150-200 thousand km. For the 16 valve unit 126, semi-synthetics (Lada recommendation) and synthetics are suitable. The oil needs to be changed once a year or every 15 thousand kilometers; as you can see, the fluid does not have a long service life.
Characteristics and features of DTOZH on Priora
Many motorists confuse the DTOZH with a cabin or ambient temperature sensor, but this is completely wrong. The purpose of the DTOZH is to monitor the temperature of the refrigerant in the cooling system.
There are two regulators in Lada Priora cars:
- One of them is installed on the cylinder head and its purpose is to display information about the engine temperature on the dashboard. Essentially, this is a pointer.
- The thermostat housing contains the DTOZH, which plays a more important role. This device transmits pulses to the control unit to activate the ventilation device. In addition, it plays an important role in the formation of the combustible mixture during startup of the power unit.
DTOZH for Priora
As for the principle of operation, it is as follows. The main regulator is located in the thermostat housing, which allows for the highest pulse accuracy. Since the DTOZH in any case comes into contact with consumables, that is, antifreeze, it instantly detects changes in temperature and sends corresponding signals to the ECU. The latter, based on the information received, adjusts the operation of the engine and changes the composition of the air-fuel mixture. If there is no or too low level of consumable fluid in the system, the controller will provide incorrect data.
Lada Granta car engine
The first Lada Granta sedan cars had 2 configurations - standard and norm. Under the hood of the grant, an 8-valve engine with a volume of 1.6 liters is installed. There are two modifications of it - 80 hp. and about 90 hp. This power unit accelerates the Grant to 100 km/h in 12 seconds, which is not bad for a budget car. Combined cycle consumption is no more than 7.3 liters per 100 km. In the suburban cycle, consumption drops to 5.5-6 liters. at a cruising speed of 100-110 km/h. With all this, the engine complies with the Euro-4 eco-standard, and work on the development of Euro-5 is gradually beginning. With the appearance of the “Lux” configuration on the Grant, a version of the engine from Renault coupled with an automatic transmission will be available. Such an engine will have a power of 98 hp.
Engine operating temperature on the VAZ-2110 - is there a difference?
Despite the fact that 8 and 16-valve VAZ engines have a slight difference in the design of the cooling system, the operating temperature for both engines is the same.
Engine operating temperature on the instrument panel.
The factory provides a normal engine operating temperature ranging from 87 to 103 degrees. Maintaining the temperature within these limits can be greatly influenced by certain issues related to the performance and quality of the cooling system elements. Let's look at each of them briefly.
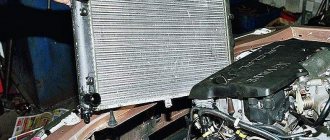
Cooling radiator
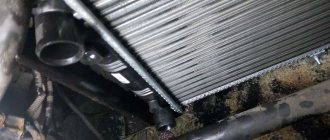
Boiling of the coolant can be caused by a clogged cooling radiator, and it can become clogged both inside and outside.
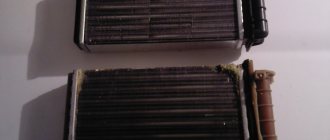
Clogged honeycombs of the engine cooling radiator.
Cleaning the radiator regularly will ensure normal engine operation and will help prevent antifreeze from boiling.
When checking the condition of the radiator, we pay special attention to the presence of leaks and the integrity of the honeycombs, the absence of cracks in the tanks and the condition of the pipes
The water pump is responsible for the complete circulation of coolant through the cooling and heating system.
Antifreeze leaking from under the pump.
Maintaining the normal operating temperature of the antifreeze also depends on the efficiency of the pump. The main pump malfunctions include bearing failure, leakage and destruction of the pump impeller.
This can occur as a result of both physical damage to the impeller and destruction as a result of cavitation processes. Cavitation is most often caused by the use of low-quality antifreeze or untimely replacement.
Most of the complaints are made specifically to the thermostat, the bypass valve, which directs the coolant in a full or small circle, depending on the degree of heating.
Thermostat location under the hood.
For example, the engine may not warm up to the legal 87–90 degrees due to a stuck valve. However, most often thermostat malfunctions occur due to the quality of the thermoelement. Despite the fact that each thermostat is marked on the body, which indicates the valve response temperature, the indicated temperature does not always correspond to reality.
So, at the specified operating temperature of 85 degrees, the thermostat can pass liquid in a large circle already when warming up to 75–80 degrees. As a result, the temperature will not correspond to the norm, the engine will not be able to warm up to the optimal value. The only solution is to test the thermostat before installation. To do this, the thermostat body is placed in a vessel with water and heated to the specified temperature, periodically checking the condition of the valve. A discrepancy between the thermostat response temperature, even by 3–5 degrees, will not allow you to obtain the optimal operating temperature while driving.
Sensors, ECU firmware and fan
The accuracy of the coolant temperature sensor also greatly affects operating temperature.
The temperature sensor is located near the thermostat housing.
The sensor sends an electrical impulse to the electronic control unit, which in turn gives a command to start the cooling fan. The normal temperature at which the fan should start is 105 degrees. If the sensor readings are incorrect, the fan will start earlier (in this case the antifreeze will not warm up to normal) or later
Then the engine may overheat and the antifreeze may boil, especially antifreeze of poor quality.
If the fan does not turn on
If the RTD has risen to 100 degrees and the indicator needle has entered the red part of the scale, this indicates overheating. Perhaps this phenomenon occurred due to the fact that the fan did not work. If you find that when it overheats, the fan does not start working and the temperature does not drop, you need to check the serviceability of the fan itself. It is necessary to determine whether the switch-on sensor is triggered when the normal RTD is exceeded? First, start the engine and disconnect the wires from the temperature sensor that is installed on the engine. When the wires are disconnected, forced cooling should work. If this does not happen, most likely the fault lies in the electric motor of the device. How to check the operation of the fan, watch the video.
This malfunction is quite easy to fix: you just need to replace the sensor. After replacing it, check if the fan turns on. To do this, start the engine. When the RTD reaches normal levels, do not turn off the engine until the temperature exceeds the norm. As soon as this happens, the fan should be activated. If the fan operates at a temperature above 97 degrees, but less than 100 degrees, then the system is functioning properly.
Reviews
| № | Positive |
| 1. | Mikhail: I have run over 80,000 km on my car, there are no complaints, the cooling system is working as normal. I follow the manufacturer's instructions - replace antifreeze every 75,000 km. |
| 2. | Vladimir: in two years of active driving, I replaced the thermostat once. I don’t consider this a significant breakdown, since this is a normal occurrence for domestic cars. |
| 3. | Kirill: The car is a year and a half old, I bought it at a dealership. There are no complaints, all mechanisms work as usual. Breakdowns happen, but they are not so significant and can be easily fixed on your own. |
| 4. | Gennady: after buying the car from the dealership, I immediately replaced the antifreeze with a new, imported one. Domestic is of low quality and quickly loses its properties. |
| 5. | Vasily: I am satisfied with the quality of assembly and manufacturing of the Lada Granta (16 valves). As for a domestic manufacturer, this is very good, it cannot be compared with Kalina, Priora. I fix minor damage myself. |
| 6. | Konstantin: within a year and a half of using the car, I replaced two clamps on the cooling system pipe. I don’t consider this a defect; it’s normal for Lada. |
| 7. | Victor: I’ve heard negative reviews about Granta, I think they are unfounded. You should always follow the instructions in the instruction manual, then everything will be fine. |
| Negative | |
| 1. | Alexander: the radiator leaked at 39,000, corrosion formed, luckily I replaced it with a new one under warranty. After 15,000 km. The thermostat has failed. Lots of trouble with the Grant, it’s better to pay a few tens of thousands extra and buy a Renault Logan. |
| 2. | Vladislav: Two years have passed since I bought the car, and I have already had unscheduled repairs at a service station several times. The build quality is crude, many defects are not eliminated from generation to generation. |
| 3. | Igor: many components and assemblies do not maintain their service life and wear out prematurely. |