The stable and smooth functioning of the electronic components of the VAZ-2110 largely depends on the performance of the autogenerator. It supplies power to all components of the car and also assists in starting the engine. For this reason, the owner of the car must periodically monitor its performance, and in case of failure, understand how to check the diode bridge of the VAZ-2110 generator with a multimeter.
Testing of the diode bridge (DM) is included in the set of tests for the generator on the VAZ-2110 in case of malfunctions. DM failure is not the only reason for a generator not working. This also includes: voltage regulator, brushes, capacitor, electric stator and rotor windings. All these components can be checked with a regular household multimeter, saving money and time on visiting a car service center.
How to test a car alternator with a multimeter
Stable and correct operation of the car’s electronics largely depends on the serviceability of the generator. It provides power to all devices and also helps start the engine. In this regard, it is important to monitor its serviceability, and if necessary, know how to check a car generator with a multimeter.
This element is directly connected to the battery, which also often causes problems. And if it is necessary to connect new devices and various devices to the standard on-board network, you should check the serviceability of the generator, since it is the source of the standard current. In other words, this is one of those parts that needs to be checked regularly.
Beginning of work
To start checking, no special preparations are required. You just need to prepare the multimeter itself. It is also advisable to check the generator - inspect the generator stator, diode bridge, voltage regulator, etc. This makes it possible to identify faults at an early stage. In addition, an external inspection of other elements of the vehicle's electrical circuit should be carried out. No further work may be required.
So, the verification includes several stages:
- Inspection of the relay regulator.
- Checking the diode bridge.
- Checking the stator.
- Checking the rotor.
Relay regulator
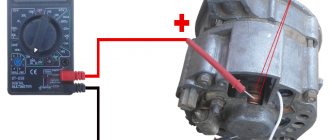
The relay regulator maintains the optimal voltage value in the standard electrical circuit. In fact, it is precisely this that prevents the voltage from increasing to critical values. To carry out the test, start the engine, connect the multimeter and set the “voltage measurement” value.
After this, it is necessary to measure the power supply of the on-board network directly at the battery terminals or at the contacts of the generator itself. The values should be between 14–14.2 V.
Then you need to press the accelerator and take the measurement again.
Note! The readings should not change by more than 0.5 V. Otherwise, this will indicate incorrect operation.
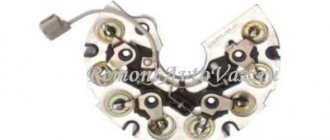
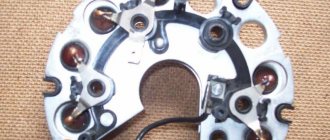
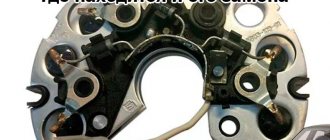
Diode bridge
The diode bridge consists of six separate diodes: half of them are positive, the other half are negative. It is necessary to select the “Dial” mode on the multimeter. After this, as soon as the contacts on the tester close, a soft beeping sound will be heard. You need to check in both directions. If a squeak is heard in both cases, then this indicates a breakdown of the diode. Therefore, it needs to be replaced.
We call the diode bridge
When the multimeter probes are positioned as in the following photos, the resistance should be infinite; if the probes are swapped, it should be within 700 Ohms.
Procedure for checking negative diodes
Checking the positive diodes
Now the auxiliary diodes
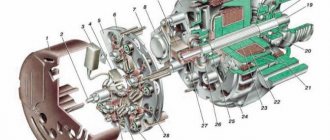
Generator rotor
The rotor is a rod made of metal with an excitation winding. If you look at one of its ends, you can see special contact rings with sliding brushes.
First of all, it is necessary to remove the rod and conduct an external inspection of the winding, as well as the bearings. In some cases, the problem is damage. If everything is in order, then you should proceed to checking with a multimeter.
The device should be set to “Resistance measurement” mode. It should be checked between the slip rings. This value should not be too large - this indicates the serviceability and integrity of the winding.
Note! It is quite difficult to carry out detailed diagnostics of the rotor on your own, so if you suspect any problems, you should contact a car repair shop.
Bearing check
It is also worth checking the bearings, the condition of which determines the life of the future generator. Bad bearings can lead to increased wear of the relay-regulator brushes. If there is something wrong with the bearing, this is usually indicated by an increased hum from the generator or it begins to make noticeable noise. Bearings are checked by external inspection for defects, distortions or contamination. If there are suspicions about their serviceability, then it is better to remove them and meticulously check for the absence of play or wear. The generator usually has two bearings: the first is located in its cover, and the second in its rear part.
Generator stator
The stator looks like a small cylinder with a winding inside it.
Before checking, the stator itself must be disconnected from the diode bridge. First of all, you should carefully inspect the stator, as well as its individual elements, for any damage. Particular attention should be paid to signs of possible burning. Next, you can check with a multimeter by setting the “Resistance measurement” mode. With its help, winding breakdowns are detected. To do this, one contact should be connected to the body, and the other to the winding terminal.
Note! In this case, the resistance must be very high; in fact, it tends to infinite values. If the readings are less than 50 kOhm, then this most likely indicates a malfunction of the stator and the entire generator.
General Tips
Before starting the test, you should always find out in advance which generator set is on the car. For example, depending on the model of the machine, the relay regulator can support different values in the range from 13.6–14.2 V. You need to know this in advance, since in the end all this affects the final result of the test.
Otherwise, there are no particular difficulties, so it is quite possible to identify malfunctions or other problems that happen from time to time with the generator and other elements of the on-board electrical circuit on your own.
If you find an error, please select a piece of text and press Ctrl+Enter.
Source
Diagnostic methods
As practice shows, diode bridges periodically fail on any vehicle, regardless of make and model
It is also not fundamentally important whether you use diode bridges from Valeo, Bosch or any other manufacturer
Most often, one or several diodes burn out in a DM. As for the reasons, here we can highlight:
- dust ingress;
- negative impact of dirt;
- contact of diodes with oil;
- accumulation of moisture in the generator;
- polarity error when lighting;
- incorrect battery connection;
- overload in the electrical network;
- errors in the installation of electrical equipment;
- factory defects, etc.
If you set a goal, the bridge can be checked in normal garage conditions. For such tasks, use a light bulb or a multimeter.
Before starting work, remove the protective casing from the DM, and also do not forget to disconnect the terminals on the regulator. Remember that all bridges are positive, that is, positive diodes are equipped with red wires, and negative ones are black. Don't get confused.
Now in more detail about each of the methods.
Multimeter
If you decide to use a multimeter to check the bridge, you will need to perform several sequential procedures.
The whole process looks like this:
- the bridge is dismantled from the generator (no other way);
- each diode will need to be checked separately;
- the beeper mode is selected on the measuring device;
- This setting will allow you to hear a signal when the probe is shorted;
- if this mode is not available, select the 1kOhm position;
- the probes are brought to the edges of the diode;
- a measurement is made;
- the probes are swapped.
Now regarding the measurement results. Everything is fine with the diode, if in one position you see an infinity sign on the screen, in the second it gives a value in the range from 500 to 700 Ohms.
If the device shows a lower resistance value, or there is an infinity sign in two positions, you have found a faulty diode.
Bulb
Now let's see how the procedure is carried out using a regular light bulb. This is a good alternative for those cases when you don’t have a multimeter.
The most ordinary 12 V lamp will do the job.
- The DM housing is connected to the negative of your battery;
- the plate must fit tightly to the car generator;
- one end of the lamp is connected to the minus of the generator;
- the second to the positive terminal 30 through the battery;
- if the lamp is on, then one or several diodes have failed;
- check negative diodes;
- the minus of the lamp goes to the body of the autogenerator;
- plus to the axle mounting bolt;
- if the lamp lights up or starts blinking, the problem is with the negative diodes;
- Next, the positive diodes are checked;
- the plus goes to terminal 30, and the minus also goes to the mounting bolt;
- when the lamp is on, we conclude that the problem is with this group of diodes;
- additional bridge diodes also need to be tested;
- the minus remains in its place, and the plus goes to terminal 61;
- if the lamp is on, the problem is diagnosed again.
Possible faults
Complete or partial jamming of bearings. Symptoms – belt break, incomplete charge of the battery (detected by a warning lamp on the instrument panel, a measuring tester, a load fork).
- visually with the engine running;
- Turn off the engine, remove the belt, and turn the pulley by hand. Failure to rotate freely and evenly indicates the need for repair.
Malfunctions of the stator, rotor. The device is operated in an aggressive environment; dirt and caustic liquids may enter. The insulation of the winding wires is destroyed, causing interturn short circuits to the housing.
Signs – cessation of generation, dim lamp light, indicator light is on, extraneous sounds in the generator. It is checked with the VAZ 2110 generator removed using a multimeter.
The graphite brushes have worn out. Symptoms are the same as in the previous paragraph. Checking and replacement are carried out without removing the equipment. Takes 10 – 15 minutes.
The voltage regulator is not working. Signs:
- Battery charging is insufficient, mains voltage is too low, light bulbs are dim;
- overcharging of the battery, bright light, high voltage, drips of dried electrolyte.
It is tested by measuring the voltage at the battery terminals.
How to install an additional diode?
This is another way to modify the generator set to increase the battery charging voltage. This method is somewhat more complicated, since it will require complete disassembly of the generator. The modification consists of changing the connection of terminal D of the relay regulator.
The diagram in red indicates an additional diode that needs to be installed. 2D219B device is well suited for such a semiconductor device.
, but you can choose a similar one with similar parameters.
You need to find about half a meter more of two-core wire, two terminals “male” and “female” number 4, as well as a heat-shrinkable casing. At one end of the wire, terminals are soldered and insulated with heat shrink. The free ends of the wire must be soldered to the diode, the “mother” is soldered to the cathode, and the “male” is intended for the anode. Now you need to connect the “mother” to the RN
, and the standard wire is connected to the “male”. At this point the modification is completed, all that remains is to assemble the device, install it on the car and carry out tests.
As you can see, the alteration is not so difficult. Modification of the VAZ 2110 generator (installation of a diode) will allow fans of loud music and additional lighting effects not to think that the battery is not charging enough.
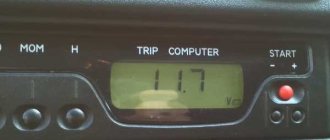
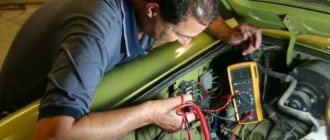
Checking the VAZ 2110 generator with a multimeter on a car
To check the electrical parameters of the car, you will need a combination meter that allows you to set the switch:
- constant voltage within 0 - 30 volts;
- resistance 0 – 5 Ohm, 0 – 200 Ohm, 0 – 2 MOhm.
Step-by-step diagnostic instructions
- Set the switch to DC voltage measurement mode. Use the red probe to touch the positive contacts.
- Measure the battery voltage with the ignition off. The norm is in the range of 12.5 - 12.7 volts.
- Start the engine. Idle speed. Devices and lights are turned off. A value of 13.8 - 14.5 volts is considered normal.
- Turn on power consumers (low beam, fog lights, multimedia devices).
If the equipment is in good working order, the tester will show 13.7 - 14 volts. An on-board voltage below 13V indicates a malfunction of the generator unit. Pressing the gas pedal to increase engine speed should not raise the voltage by more than half a volt. A reading above 15 volts indicates a malfunction of the relay regulator.
Lada 2112 White Bird › Logbook › Gene faults and their elimination (article from the Internet)
Malfunctions of vehicle electrical equipment are very common and occupy one of the leading places in the list of breakdowns. They can be roughly divided into faults of power sources (batteries, generators) and faults of consumers (optics, ignition, climate, etc.). The main sources of power for a vehicle are batteries and generators. The malfunction of each of them leads to a general malfunction of the car and its operation in abnormal modes, or even immobilization of the car.
In the electrical equipment of a car, the battery and generator work in an inextricable tandem. If one fails, after a while the other will also fail. For example, a damaged battery leads to an increase in the charging current of the generator. And this entails a malfunction of the rectifier (diode bridge). In turn, if the voltage regulator supplied from the generator malfunctions, the charging current may increase, which will inevitably lead to systematic recharging of the battery, “boil-off” of the electrolyte and rapid destruction.
Common battery problems:
short circuit of battery electrodes/plates; mechanical or chemical damage to the battery plates; violation of the tightness of battery cans - cracks in the battery case as a result of impacts or improper installation; chemical oxidation of battery terminals. The main causes of these malfunctions are: gross violations of operating rules; expiration of the product's service life; various manufacturing defects. Of course, the design of a generator is more complex than a battery. It is quite reasonable that there are many times more generator malfunctions, and their diagnosis is much more difficult. Common generator problems include:
▶ wear or damage to the pulley; ▶ wear of current collecting brushes; ▶ wear of the commutator (slip rings); ▶ damage to the voltage regulator; ▶ short circuit of the stator winding turns; ▶ wear or destruction of the bearing; ▶ damage to the rectifier (diode bridge); ▶ damage to the charging circuit wires.
It is very desirable for a motorist to know the main causes of generator malfunctions, how to eliminate them, as well as preventive measures to prevent breakdowns.
All generators are divided into alternating and direct current generators. Modern passenger vehicles are equipped with alternating current generators with a built-in diode bridge (rectifier). The latter is necessary to convert current into direct current, on which the vehicle's electrical consumers operate. The rectifier, as a rule, is located in the cover or housing of the generator and is integral with the latter. All electrical appliances of the car are designed for a strictly defined operating voltage range. As a rule, operating voltages are in the range of 13.8–14.7 V. Due to the fact that the generator is “tied” with a belt to the engine crankshaft, it will work differently depending on the speed and speed of the vehicle. It is for smoothing and regulating the output current that the relay-voltage regulator is designed, playing the role of a stabilizer and preventing both surges and dips in the operating voltage. Modern generators are equipped with built-in integrated voltage regulators, colloquially referred to as “chocolate” or “tablet”.
It is already clear that any generator is a rather complex unit, extremely important for any car.