© AutoService | Online store, Ekaterinburg
Air recirculation is a mode that blocks air from entering the cabin from outside. Thanks to this, it becomes possible to warm up the interior much faster, as well as protect the driver and passengers from dust entering the car (when driving on dirt roads), unpleasant odors and exhaust gases (when in city traffic jams). The recirculation system is a component of the climate system. Turning off the fan will also facilitate the penetration of outside air into the cabin, but the recirculation damper copes with this much more effectively.
In cars of the VAZ "ten" family, the recirculation system was installed until 2001; starting from 2002, VAZ abandoned this, leaving the actual mode button on the dashboard. This means that if you want to equip your car with this functionality it will not be difficult - recirculation can be mounted on the interior heater of dozens of models.
Features of the VAZ-2110 air recirculation system
When you press the recirculation button, an electro-pneumatic valve is activated, which extends the damper located in the area of the intake pipe, thereby blocking the flow of outside air into the cooling system. Like the air conditioning system, recirculation only works when the engine is running. The coordinated functioning of the VAZ-2110 recirculation valve and the damper will ensure the operation of the circulation mode while the fan is on, while the air flow circuit will be limited by the stove air duct.
How to determine whether this mode is present in a particular car?
As a rule, the recirculation button is almost always present in the VAZ-2110 family. The second necessary condition for the presence of a CP is the presence of a chip: when the ignition and recirculation key are turned on, voltage must be supplied to the chip, which can be checked using a tester. It is also necessary to check whether the machine has an electro-pneumatic valve that closes the damper. If not, there is no recirculation mode, and to prevent exhaust gases and dust from entering the cabin, the fan should be turned off. In this case, external air is not forced into the VAZ-2110, but some of it will still enter the cabin by gravity. Using the recirculation mode guarantees better protection.
Stories from our readers
“Fucking basin. "
Hi all! My name is Mikhail, now I’ll tell you a story about how I managed to exchange my two-wheeler for a 2010 Camry. It all started with the fact that I began to be wildly irritated by the breakdowns of the two-wheeler, it seemed like nothing serious was broken, but damn it, there were so many little things that really started to irritate me. This is where the idea arose that it was time to change the car to a foreign car. The choice fell on the melting Camry of the tenth years.
Yes, I had matured morally, but financially I just couldn’t handle it. I’ll say right away that I am against loans and taking a car, especially not a new one, on credit is unreasonable. My salary is 24k a month, so collecting 600-700 thousand is almost impossible for me. I started looking for different ways to make money on the Internet. You can’t imagine how many scams there are, what I haven’t tried: sports betting, network marketing, and even the volcano casino, where I successfully lost about 10 thousand ((The only direction in which it seemed to me that I could make money was currency trading on the stock exchange, they call it Forex. But when I started delving into it, I realized that it was very difficult for me. I continued to dig further and came across binary options. The essence is the same as in Forex, but it’s much easier to understand. I started reading forums, studying trading strategies. I tried it on a demo account, then opened a real account. To be honest, I didn’t manage to start earning money right away, until I understood all the mechanics of options, I lost about 3,000 rubles, but as it turned out, it was a precious experience. Now I earn 5-7 thousand rubles a day. I managed to get the car buy after half a year, but in my opinion this is a good result, and it’s not about the car, my life has changed, I naturally quit my job, I have more free time for myself and my family. You’ll laugh, but I work directly on the phone)) If If you want to change your life like me, then here’s what I advise you to do right now: 1. Register on the site 2. Practice on a Demo account (it’s free). 3. As soon as you get something on the Demo account, top up your REAL ACCOUNT and go to REAL MONEY! I also advise you to download the application to your phone, it’s much more convenient to work from your phone. Download here.
Diagnosis of recirculation system malfunctions
If outside air continues to flow when the button is pressed, there is a problem with the system. You can determine the cause of the breakdown by diagnosing the cooling system, which involves performing the following actions:
- turning on the ignition, starting the power unit;
- setting the maximum fan speed mode;
- pressing the recirculation key.
This triggers the valve and closes the damper. If the car is moving at a constant speed and the damper is completely closed for several seconds, the system is working properly. If there are suspicious sounds (clicks, pops) and the damper moves jerkily, we can talk about problems.
Troubleshooting
Standard situation: the fan operates in all provided modes, but the heater only blows cold or hot air. In this case, you can conduct a fairly simple test. Turn on the ignition, turn off the heating fan and move the interior temperature control knob to the extreme left (minimum) or extreme right (maximum) position. In this case, you can determine by ear whether the micro-gearbox is working.
If it works, the heater fan is turned on at its fastest speed, and the temperature control is again moved to the far left and far right positions, allowing it to run in each of them for a few seconds. In this case, the sound of the air flow should change; if this is not the case, then this indicates a mechanical break in the connection between the electric motor and the damper or its jamming in one position. This will require further disassembly of the system and restoration of the functionality of the damper.
In a situation where during testing you cannot hear the operation of the micromotor-gearbox, you need to carry out other checks that will help you figure out why the stove temperature regulator is not working. Its handle must be set to the middle position. After this, remove it from its seat on the panel. Without disconnecting the pads, the controller should be turned towards you as much as possible.
We test the supply voltage to the control unit. To do this, you need to take a 12 V test lamp, connect one clamp contact in a small screwdriver, which is inserted into contact 3, with a black wire coming out of it. Insert the second contact into pin 6, which is located under pin 3 and the blue wire comes out of it. If the control lights up when the ignition is turned on, it means that power is supplied to the control unit, and the VAZ 2110 heater regulator stopped working for this reason. For diagnostics to proceed normally, the battery and on-board voltage must be at least 12.5 V.
If power is supplied to the controller, you need to turn off the ignition and disconnect the large X1 block with 13 connectors. Next, you need to take two conductors with contacts that can be connected to the controller plugs. One wire attaches to pin #2 in this connector, it will be the first one on the right in the top row when looking directly at the connector. The second end of the conductor is connected to the positive connector of the multimeter. The other wire connects to connector No. 8, which is located in the top row in 4th place, if you count from the right. The conductor is connected to the negative terminal of the multimeter.
To carry out further measurements, the multimeter is set to voltmeter mode at direct current, with measurement limits up to 20 V. We turn the controller towards ourselves and set the temperature regulator to the middle position. After this you need to turn on the ignition. Small readings in the range of hundredths of a volt may appear on the multimeter; these can be ignored.
The temperature control is turned to the extreme right position (maximum heat). A voltage in the range of 10-11 V should appear on the multimeter screen, which is applied for 10-14 s, after which it disappears.
After this, the regulator is moved to the extreme left position (minimum heat). The same readings should appear on the device in the range of 10-11 V, in the same time period, but with a minus sign. It indicates that the polarity of the connection at the output of the controller has been reversed.
When checking controller 13333854, where the temperature of the VAZ-2110-12 stove is adjusted automatically, you need to know that its polarity at the outputs will be the opposite. That is, in the extreme right position, the multimeter readings will have a minus sign, and in the extreme left position without a sign in front of the readings. Otherwise, its testing is similar.
Thus, repairing the VAZ-2110 stove regulator does not require special skills and tools, and the only complex equipment you will need is a multimeter, which many car enthusiasts have. You can check and troubleshoot problems yourself, including in cases where the damper jams, which will be signaled by one of the control system tests. If a sensor or micro-reducer fails, you can easily change them yourself, since access to them is quite simple. The only serious problem is the failure of the control unit itself, which is practically beyond repair, since it is based on an integrated circuit, so it is easier to replace.
Advantages and disadvantages
Note that the recirculation mode is useful only in certain cases. It has a number of disadvantages, due to which blocking access to outside air is allowed for a short time:
- rapid fogging of windows, especially when there are several passengers in the cabin;
- lack of air exchange, leading to a decrease in the amount of oxygen in the cabin;
- installation of an air conditioning system is required if it is not available;
- you will have to incur additional costs for maintenance/repair of the system (valve, damper drive mechanism).
At the same time, air recirculation in a VAZ-2110 car allows you to reduce the temperature inside the car much faster, since the air circulation circuit is limited by climate control ducts, where the temperature is obviously lower than outside. From an economical point of view, using this mode at the initial stage of movement is more profitable, since the energy costs for driving the damper are significantly lower than when the compressor operates with the damper open.
Diagnostics of serviceability and dismantling of the stove control unit
The SAUO module is located on the center console of the car and is responsible for proper heating of the interior. Repairing the VAZ-2110 stove control unit requires certain knowledge in electronics, so before you begin repairing the part, you need to determine whether the problem is really in the electronic module itself.
To do this, you must initially dismantle the unit and install a known-good part in its place. Take the SAUO unit from friends or at a service center to diagnose the heating system of your car.
Before performing any work on the vehicle that involves electronics or wiring, turn off power to the battery to avoid shorting or burning out the electronic components.
Then you can proceed directly to removing the unit through which the functionality of the stove is coordinated. To do this, the buttons that are located on the sides of the stove are initially dismantled. The heater controls must be switched to zero positions. Only then can the module be pulled out. This must be done very carefully, since the power plugs are connected to the back of the unit. As soon as you see them, they must be carefully disconnected so as not to damage the contacts. At this point, dismantling can be considered complete.
The working unit is installed on the standard seat, and the operation of the vehicle’s heating system is checked. If the stove functions correctly with the new unit, then the fault is in the ACS unit itself. Otherwise, it is necessary to diagnose other elements of the heating system.
Installation of a recirculation system
What should those car owners who only have a button do? There is no need to be upset - you can install the VAZ-2110 air recirculation system yourself. For this you will need:
- electromagnetic/pneumoelectric valve (article 2105-1127010.02);
- silicone hose (white, present in most modern cars) 0.5 m long, two pieces;
- electrical wire 2 x 0.5 (about 5 meters will be needed);
- check valve (part number 2110-8119110, although you can take any one, for example, used in aquarium compressors).
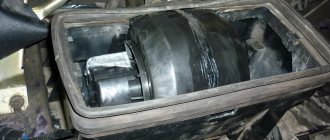
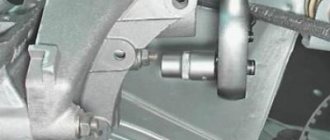
- We provide access to the heater (by sliding the glove compartment up). We take out the stove, turning it counterclockwise, remove the casing, clean the stove, casing and other components from dirt and debris. We install the old-style cabin filter in its regular place, if it is not there. We install the VAZ-2110 recirculation damper, attaching it to the pneumatic valve rod, and assemble everything in the reverse order.
- Let's see where we can install the solenoid valve. It is usually attached to the bolt that secures the sound insulation on the front of the car. This is not entirely convenient, because if you need to change the filter or fix a leak in the radiator or pipes, you will have to remove the valve. But the place near the adsorber is quite suitable, since nothing interferes with anything, and both the receiver and the pneumatic valve are located relatively close. To secure the valve, you can use a bracket by drilling holes with a diameter of 8.5 mm in it. It is desirable that the bracket be stiffer - otherwise, due to shaking, the valve may begin to vibrate at a resonant frequency with the chassis, which will cause unpleasant rattling.
- The next step is connecting the hoses. The first should connect the heater damper actuator (pneumatic valve) to the output of the solenoid valve, located at an angle of 45 degrees relative to the central pipe. The second hose will connect the power unit receiver to the central pipe of the solenoid valve (connection to the receiver can be made using a tee, and if the additional output of the motor is not used, it is plugged with the same silicone hose). It is important not to confuse the connection of the hoses to the solenoid valve, since this will cause air to leak from outside when the power unit is running through the switched off solenoid valve. The check valve can be installed in any of the hoses. The main thing is to ensure that the air flow can move to the receiver. The check valve is needed to ensure that the damper opens when the engine stops (provided that voltage was applied to the valve before this).
- Let's move on to connecting the electrical wiring. If you follow the electrical diagram of the “tens” exactly, then the solenoid valve should be controlled by the negative wire coming from the VAZ-2110 recirculation switch. We take the positive wire from the backlight of the same button. To do this, we remove the key from its regular place, connect our wires to the terminals, the other end of which we pull to the valve behind the instrument panel, then towards the “black box”, through the plug between the passenger compartment and the engine compartment, behind the battery in the direction of the left headlight, there we turn to the right and connect to the valve. The positive wire must be connected to the fuse.
As you can see, you will have to tinker a little, but you will get full air recirculation of the VAZ-2110. It can and should be used when warming up the car in winter, when driving on dirt roads, in a traffic jam, when cleaning windows with a bad-smelling “anti-freeze”.
Differences in design
The VAZ 2110 was equipped with stoves of the so-called new or old model. Both systems, including those on the VAZ, which have an injector instead of a carburetor, are not particularly structurally different.
So, the differences are direct:
- The main difference between the new model and the old stove is the design of the heater radiator. Therefore, if you are repairing a heating system and decide to install a new model instead of an old radiator, then take into account some nuances;
- Moreover, even the controller from SAUO is not quite the same. 4- or 5-position regulators produced before the fall of 2003 have already been discontinued and are not suitable for new heater models;
- Micro gearboxes are also different from the September 2003 issue. They have different resistors (shaft position sensors), so you need to check if the resistor is interchangeable in the MMR model you purchased.
The block responsible for temperature
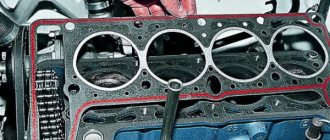
The central link in the furnace system is the heating element. Its main function is direct heating of the interior. This block is organized as follows. An electric motor with fan blades pumps hot air, three dampers perform the function of recirculation and closing / opening of channels. There is also a radiator. In modern new generation systems, heat exchangers do not have a valve.
Application
Quick warming up of the car, protection from harmful gases, pollen and burning, in the VAZ 2110 is carried out by the recirculation button. In a VAZ car, two different methods of air intake are used:
- from the street;
- from the salon.
Recirculation button VAZ 2110
In the article we will consider in detail the second item on the list. Recirculation was installed selectively on VAZ 2110 cars; cars of 2001 were equipped with it, but since 2002 only the button remained. In such cars, the recirculation system required additional installation and was installed independently, at the request of car enthusiasts.
Dismantling procedure
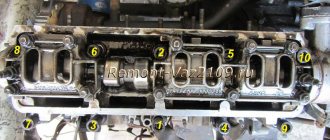
To remove the VAZ 2110 heater, you must:
- Disconnect the minus on the battery;
- Free the windshield frame from the cladding, sound insulation upholstery, lining;
- Remove the stove fan;
- Disconnect the vacuum hose;
- It’s good if you get creative and remove the front air intake housing, which is not at all easy to do. If you can't get to its screws, you may have to remove the dashboard. After that, the screws securing the heater are unscrewed, it rises, and it becomes possible to remove the air intake housing;
- Separate the hoses from the fittings;
- Remove the rear heater casing;
- After unscrewing the heater mounting screws (you can easily find three of them, and the fourth is under the soundproofing upholstery on the left), remove the heater, moving it towards the engine.
This article will tell you what to do if the stove does not heat well:
Mechanism of operation
When the recirculation button is in the pressed (on) position, the electro-pneumatic valve opens, then a flap in the area of the intake pipe extends and blocks the access of outside air to the vehicle interior.
The circulation system starts only when the engine is running and functions due to the coordinated operation of the valve-flap complex. Circulation in the car will continue as long as the fan is turned on, in which case the air flow passes through the heater ducts.
To determine the presence of this device in the car, first of all, there must be chips and a button in the cabin. When the ignition and recirculation button are turned on, there should be voltage on the chips.
Air conditioning system diagram
Then, it is worth checking whether the damper control valve and the electro-pneumatic valve are present. If this system is absent, you can block exhaust gases and smoke using a fan, but the damper isolates the car from the outside air much more effectively.
To regulate the level of humidity in the car and solve the problem of glass fogging, it is recommended to have an air conditioner in the VAZ model 2110.
Adjusting the stove controller
The manufacturing plant provides for heating the interior to the specified temperature in fifteen minutes with a deviation of up to two degrees. Use the controller knob to set a comfortable temperature in the car interior.
To check the proper functioning of the stove, use a regular mercury room thermometer. If after fifteen minutes the interior has not warmed up to the required temperature, the controller must be adjusted.
To do this, pull the heater control module back out and rotate the temperature regulator, first to the maximum value, then in the opposite direction. After carrying out such actions, install the unit in place and check the operation of the stove again.
At the same time, it is necessary to check the operation of the heater dampers. If there are extraneous sounds when switching temperature modes, then you need to check the condition of the dampers. If cold air flows well, but hot air hardly flows in, then the lower damper is faulty. If there is no normal flow of cold air but there is a good flow of hot air, there is a problem with the upper damper. The reason may be deformation of the dampers under the influence of air of different temperatures. In this case, it is better to replace the standard plastic dampers with aluminum analogues, which are more resistant to temperature changes.
Fault diagnosis
If the device breaks down, experts recommend diagnostics in the following sequence:
- the ignition and engine are turned on;
- the maximum fan speed is set;
- the recirculation button is pressed;
- the valve-flap mechanism starts.
If the movement is uniform and if the damper stops at the end point, in the first 2-3 seconds, this indicates the serviceability of the complex.
But pops, uneven movement, and clicks indicate a malfunction.
To extend the service life of the complex, it is necessary to install a stabilizer. Due to the operation of the stabilizer, where the damper is located, the torque of the electric drive is reduced. To eliminate the possibility of damage to the damper for the time before purchasing a stabilizer, the damper is disconnected from the electric drive by a wire.
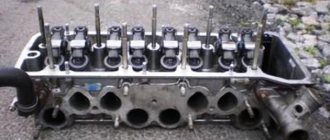
SAUO repair
Before repairing the SAUO VAZ 2110 unit, you should make sure that the problems with the stove are associated with it. To do this, you should connect a known working heater control unit (borrow from a friend or from a store). If there are no problems with the stove with the working unit of the automatic control system, then we try to find out what the reason is. If the obviously working unit of the automatic control system did not help, then the problem with the stove is somewhere else.
Remove the buttons next to the SAUO block. We take out the stove control unit. Set the controls to position 0 and remove, and then remove the front cover and glass from the latches. Unscrew 2 screws in front and 1 in back. We remove the board from the plastic case and check the integrity of all tracks, jumpers and resistors. In this example, a broken jumper was found. We solder it on one side and the other. Reassemble in reverse order. Now all speeds of the SAUO block work .
FAQ on the operation of the VAZ 2110 stove
1st oven speed does not work
- All heater fan speeds (except the last one) are connected through an additional heater resistor, which is located under the frill (wind flap). One of the reasons when the first speed of the heater does not work is a malfunction of this resistor. Depending on the ACS unit, this additional resistor varies:
RDO 2108-8101081 is used on the oldest SAUO units, which have only 2 speeds. (0 A 1 2).
RDO 2110-8118022-01 is installed on a modified heater until September 2003, the SAUO unit has 3 speeds (0 A 1 2 3). The most common malfunction in this resistance is that all stove speeds stop working, except maximum 3. The reason is that the thermal fuse is unsoldered (indicated by a red arrow), and is treated by soldering it in place. But if it is unsoldered later, you need to look in the direction of the motor, the motor takes a very large current (not lubricated, wear on the brush assembly, etc.).
RDO 2123-2118022 has been installed on the latest heaters since September 2003, the SAUO unit has 4 speeds and does not have an auto mode (0 1 2 3 4).
- In addition to a malfunction of the additional heater resistor, the problem may also be in the contacts of the heater control unit board. Often, due to high temperatures, the board becomes very hot and the contact is soldered off. Carefully examine all contacts on the boards, especially at the power supply points.
- Clean contacts.
Heater speed 2 doesn't work
- The reason is exactly the same as in the case when the first heater speed does not work.
3rd speed heater doesn't work
- If the 3rd speed is the last, then it works without resistance (directly). And the problem may be in the contacts of the ACS unit (stripped/crimped), or in the contacts on the board of the ACS unit.
- If you have a stove control unit with 4 fan speeds (0 1 2 3 4), then look for problems with the 1st stove speed.
4th oven speed does not work
- The reason is exactly the same as in the case when the third heater speed does not work.
The stove blows equally at speeds 1 and 2, that is, there is almost no difference between the first speeds, but at speed 3 it blows much stronger
- The reason is the additional heater resistor, it needs to be replaced.
The temperature on the heater control unit is not regulated or the heater fan does not work. Disassemble the ACS unit and carefully examine all tracks and contacts. If there are no visible defects, then you need to look for the cause in the part indicated in the photo.
- Another reason could be poor contact in the fuse box. On the back of the block there is a 6-terminal chip, the blue wire on it is to the fan. Perhaps it was burnt in this connector at the connection point. It is necessary to replace the chip and crimp the new connector. Remove the block, disassemble and solder the leg (perhaps it melted and became unsoldered due to heating).
ps If there are other solutions to problems with the operation of the stove , then leave comments, we will supplement the FAQ on the operation of the SAUO unit . By the way, malfunctions in the heater can be caused by other reasons.
What most often failed in the stove of your “ten”?