Hint of replacement
Elementary wear of a part - the handbrake cable may rust, break or become loose so that it cannot be tightened - this is the most common reason for replacement. The two rear wheels seem to hint that the parking brake is connected to the wheels in the form of two cables. Almost always one of the cables fails. This does not mean that one needs to be changed. Buy a set and change both. The price for a VAZ 2114 parking brake cable varies from 200 to 1000 rubles (depending on the manufacturer and place of purchase). Otherwise, the cable that turns out to be older will definitely fly in the near future, and you will simply pay double the price.
Symptoms of a cable failure are usually as follows:
- The handbrake does not hold the required traction
- brake drums get hot
- when pulling the handbrake, the cable may not respond to the action
- the cable sheath is worn out
It’s easy to check if something is wrong with the cable: put the car on the handbrake, get out of it and try to give it a good push – it will roll a little if the cable is dead.
How to remove the handbrake cable on the fourteenth?
Before changing the handbrake cable on a VAZ 2114, it must be removed. Fortunately, it is clearly visible and cannot be confused with anything. You need to work in a hole or on an overpass under the bottom of the car. It’s good if the car is clean, because all the nuts and fasteners need to be found and unscrewed (you can also spray them with WD for a smooth fastening movement); dirty ones will take longer to work with. Before replacing, move the handbrake all the way down.
- We start with the locknut and the adjusting nut, loosen them and remove them from the handbrake rod (now you can remove the washers and cable leveler, or you can do this after jacking up the car, before removing the wheels).
- Jack up the rear of the car, unscrew the wheel bolts and remove the wheels.
- To remove the brake drums, tap the locking pins to dislodge them from the shoes.
- Remove the brake pad.
- We disconnect the tip of the first and second cables from the equalizer (the clamps can be removed with simple pliers).
- Remove the cable loop from the hook of the shifted spacer lever of each wheel.
- We remove the cable sheath from the entire rear suspension, having first unscrewed the fastening bolt.
- Pull the cable out of the holes in the brake flaps.
Adjusting the handbrake tension
Replacing the VAZ 2114 parking brake cable is the same as removing it, only in reverse order. We start by threading the new cables into the washers, attaching the loops (many people make special clamps at the end of the loop - bosses - so that the cable sits even more tightly in place), and assembling the entire wheel hub. They laid each cable along the suspension and secured it. In the end, you will need to tighten the handbrake in the cabin itself.
Dismantling and replacement
It is difficult to confuse the cable from the handbrake with anything else under the bottom of your VAZ 2114, which greatly simplifies the repair and replacement procedure.
Dismantling works
We provide detailed instructions for replacement, and additionally recommend watching the video.
- We advise you to get the car in order in terms of cleanliness in advance. This will make it easier for you to find all the nuts and fasteners.
- Additionally, treat the nuts with the almighty WD40. This will make it much easier for you to unscrew the sometimes sticking and rusting nuts.
- Place the handbrake lever all the way down.
- Start with the adjusting nut and locknut that you used recently to try to tighten a loose cable. In this situation, you should loosen the nuts and remove them from the handbrake rod.
- Remove the washers and cable equalizer. Although this can be done after you jack up the car. But be sure to do it before removing the wheels.
- Raise the rear of the car with a jack, unscrew the wheel bolts and remove them.
- Tap the brake drum locking pins. This will allow them to be removed from the brake pads.
- Remove the block.
- You now need to disconnect the ends of the two cables from the equalizer. The fasteners can be removed from their places with the simplest pliers, so don’t bother.
- The shifted spacer lever has hooks from which the cable loop can be removed.
- The cable sheath must be removed from the entire suspension of the rear of the car. To do this, the mounting bolts are first unscrewed.
- Pull the cable out of the holes through the brake flaps.
- We got rid of the old cable, so all that remains is to replace the old one with a new element. The procedure is performed exactly in reverse order.
- Thread the new cables through the washers and hook the loops. You can additionally make bosses - this is a special clamp that allows you to fix the cable even more tightly.
- Reassemble the entire disassembled wheel structure.
- Route the cable along the suspension through the sheath and secure the bolts.
- Pull the handbrake in the cabin.
- Check the correct tension and operation of the new hand brake, or rather the cable.
It is not uncommon for the parking brake to cause an unpleasant squeaking noise from the rear. By changing the cable, you can get rid of this problem at the same time. To do this, rubber seals are installed under the cable fasteners on the body frames.
Functionality check
After replacing the cable, check its operation.
- Place the car on a hill and turn on the handbrake. If the car starts to roll, the new cable needs adjustment.
- Loosen the parking brake lock nut in the handbrake, tighten the adjusting nut, and then pull the cable using the lever.
- The optimal lever stroke should include 2-4 strokes. If this happens, tighten the locknut and check it again.
- We drive up a hill and turn on the handbrake. Now the car should definitely stand still. Unless the cable turned out to be fake or an error was made during the assembly stage.
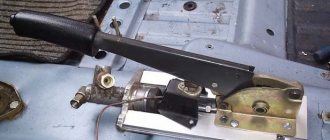
Disassembled handbrake
Before frost, it is recommended to lubricate the parking cable, which will significantly extend its service life. Under the influence of negative temperatures, the cable breaks down faster. The tips, axle and rod of the equalizer should be lubricated.
Tightening and replacing the handbrake cable is not a difficult task. Even if you don't have a lot of experience working on cars, you will be able to do this job.
But if you are not confident in your own abilities or simply do not have time to do such things on your own, contact a service station. A lift will cost about 500-700 rubles, but for a replacement they will ask for at least 1,500 rubles.
cableThe role of the car’s braking system in ensuring safety is unlikely to be disputed by anyone, but the importance of the “handbrake” is still underestimated by many. Some motorists are negligent about its technical condition, believing that in extreme cases they will be able to lock the car in the parking lot by engaging the gear. At the same time, they do not take into account that a tightened handbrake will also help in a critical situation on the road. Therefore, it is better to monitor its condition from the first days and make timely repairs to the system.
When is cable drive repair needed?
While operating the vehicle, it is important to determine the moment when replacing the handbrake cable becomes absolutely necessary. When stopped by a traffic police inspector, the defect is equated to a technical malfunction and is punishable by a fine. A simple check of the functionality of the handbrake is to park the car on a slope with the brake applied. If the car rolls, it's time to start repairing it.
The main symptoms of problems with the cable mechanism are as follows:
- Excessive heating of brake drums.
- Lack of response when tensioning the cable transmission.
- Worn cable sheath.
- The tension adjustment of the mechanism is broken.
If the last point can be solved with a simple adjustment, then other manifestations of the malfunction require drastic methods. In this case, you need to understand the reasons for the situation:
- cable breakage or stretching;
- moisture entering the shell, especially in winter;
- souring of the cable inside the sheath due to insufficient lubricant.
Sometimes you can do without replacing the cable or other elements of the handbrake - just restore the lubrication. Practice shows that such a procedure, carried out once a year, significantly increases the service life of parts.
Malfunctions and their symptoms
Determining that a cable needs adjustment or replacement is quite simple. Signs of a faulty mechanism appear as follows:
- The handbrake is pressed effortlessly - the cable is loose, you need to tighten it.
- The mechanism does not respond to pressing the lever - the drive is torn or flew out, or the reason may be the wear of the rear pads.
- If the handbrake is stuck, the drive is damaged and needs to be replaced.
Read more: Replacing the VAZ fuel filter
Having taken out the main element, you can visually determine its condition. Replacement is required in the following cases:
- Up to 2% are damaged or torn.
- The cable moves with difficulty even after applying lubricant.
- The drive tips have grooves.
Preparatory activities
replacing the cable Novice VAZ 2114 drivers usually do not risk starting to repair the cable unit on their own, preferring the services of auto repair shops, and, it must be said, in vain. Finding the handbrake drive under the bottom of the car is not difficult, and with minimal skills and a small set of tools, the issue will be resolved within 3-4 hours. For repair you will need:
- Overpass or inspection hole.
- Open-end wrench set to "10".
- Two keys for "13".
- Pliers.
- Plastic clamps.
- Large flathead screwdriver.
- WD-40 lubricant.
To make your work more comfortable, you should clean the bottom of the car from dirt and lubricate all threaded units with WD-40.
Tension
So, having understood the diagram, you can begin the procedure of tightening the handbrake cables.
Stretch
The tensioning procedure is as follows.
- Place the car on an overpass or pit. If you don’t have a garage and you have the opportunity or desire to carry out the procedure at a service station, use a jack. The rear of the car is raised on a jack. The most extreme option is a curb onto which the car is driven and all you have to do is crawl under it.
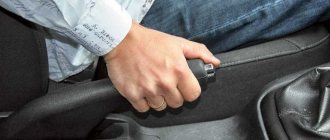
- Engage the gearbox in first gear and put the car on the handbrake by pulling the lever up.
- The ideal number of handbrake clicks is from 2 to 5. If there are fewer or more clicks, it is easier to take appropriate measures to tension the cable.
- If there are less than 2 clicks, then the cable will need to be lengthened. If there are more than five clicks, then the cables are shortened.
- Lengthening the cable means relaxing it. To do this, unscrew the locknut. When tightening the cable, the locknut must be tightened in reverse.
- Before you start looking for the required nut on the bottom of the car, release the handbrake lever all the way.
- Take a 13mm wrench under the car and head down.
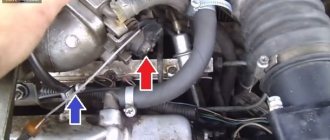
- Find the handbrake cable equalizer. This is the same element from which the main handbrake cable is divided into two cables.
- In some cases, it is simply not possible to gain access to the equalizer, since the muffler holders made of rubber are in the way. In such a situation, it is better to remove them. This is not difficult to do, but working with the handbrake will be much easier.
- Now there are two nuts in front of you. One is a simple nut and the other is a lock nut. Having two keys in your hands, fix the nut with the first one, and with the second one begin to unscrew or tighten the locking nut. Be careful that the nut does not start to turn.
- Taking into account the condition of the handbrake and the need to loosen or tighten the lever, turn the locknut in the appropriate direction. Remember what is the optimal number of clicks.
- Tighten or unscrew the locknut to obtain the required degree of tension.
The procedure for replacing a faulty handbrake cable on a VAZ 2114
Having placed the car on an overpass or inspection hole, you need to release the handbrake lever all the way and secure the wheels with shoes. It won't hurt to dismantle the muffler can - this will make the work much easier. The process then proceeds as follows:
- Unscrew the adjusting and locking nut using keys “13” and remove them from the rod.
- Loosen the wheel bolts with a wheel wrench, jack up the rear of the car and remove the rear wheels.
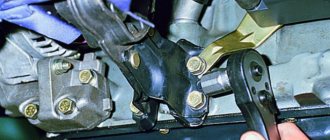
- Using a hammer and a wooden extension or long bolts, remove the brake drums and knock out the locking pins.
- Remove the brake pads.
- Disconnect the cable ends from the equalizer and remove the clamps using pliers.
- Before replacing faulty handbrake cables, the loops of both cables must be removed from the spacer lever.
- After unscrewing the fastening bolt, remove the cable sheath from the rear suspension.
- Pull the cable mechanism out of the holes in the brake flaps.
- Install the new element in the reverse order, first pulling it through the washers and loops on the hooks of the lever.
If the device shell is damaged, it must be replaced. Since the design of the parking brake on the VAZ 2114 involves the use of two cables, regardless of their condition, both need to be changed.
It happens that fastening parts become corroded and are no longer suitable for further use. In this case, the use of plastic clamps as clamps is justified. All that remains is to check the functionality of the system by setting the car on an incline and tightening the handbrake. If it rolls, then you need to adjust the tension of the cable mechanism.
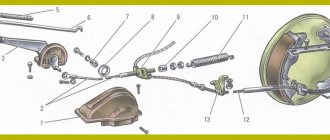
Design
Many people mistakenly believe that the handbrake is a simple lever located near the gearbox, on the right hand of the driver. In fact, it is a whole system of elements that are connected to each other.
When the hand brake fails, in 90% of cases the culprit is a cable or a pair of cables that go to the rear brake pads from the equalizer.
To determine the reasons for the failure of the handbrake, it is necessary to understand the circuit diagram of the device and its components.
The device includes a number of structural elements. Namely:
- Lever arm;
- Traction;
- Springs;
- Lever button;
- Main cable axis;
- Bolts;
- Washers;
- Drive unit;
- Equalizer;
- Case;
- Locknuts;
- Cotter pins;
- Right and left lever;
- Expansion left and right strip;
- Lock washer, etc.
Adjusting the parking brake on a VAZ 2114
Incorrect adjustment is reflected not only in unsatisfactory vehicle holding. A characteristic creaking noise coming from the rear wheel area indicates that the cable is too tight. Setting up the handbrake is quite simple:
- Remove the muffler from the special mountings.
- Unscrew the locknut securing the cable mechanism.
- Depending on the situation, loosen or tighten the nut.
- After checking, tighten the locknut.
The optimal stroke of the handbrake drive lever after replacing the cable is considered to be 2-4 clicks until it is completely locked. If the result is not achieved, then you need to repeat the setup procedure.
Lada 2114
› Logbook › 067: Replacing handbrake (parking brake) cables Part 1
First, a little digression))
If I had known how much nerves and effort it would take me to replace the cables, then I would certainly have trusted it to the servicemen)) I think, first of all, this applies to those who have not climbed for 100 years, neither tightened the cable, nor removed the rear drums and who has this whole thing quite sour)) Well, or if you, like your plumbing skills, are zero))) Okay, I couldn’t help but say)) Otherwise, God knows how much blood I’ve had from these cables and rear drums))
Something else. I divided the entry into two parts, because everything fits into one entry in a very compressed form, and I would like to describe in more detail all the stages of the replacement, maybe it will be useful for someone)) I myself did it according to vague instructions found on the Internet, I will say right away that it helped she's not enough for me))
So, first of all, I recommend to everyone that before purchasing cables, make sure that it will not cost you the usual tightening of the handbrake rod, and also, before purchasing cables, be sure to find out which cables you have on your car)) I also highly recommend having WD-40 in stock))
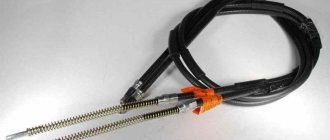
I didn't know about this and bought the cables in advance. Parking brake cable VAZ 2109, price 270 rub. for a couple.
And when I reached under the car to unscrew the handbrake linkage, I realized that I had a linkage not for these cables, but from a VAZ 2110)) As a result, I had to go back to the city (fortunately not very far) to buy this evil linkage))
Here it is, the VAZ-2108 hand brake drive rod. Price: 120 rub.
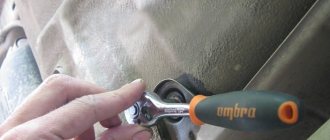
Having finished with all this fuss and running around, I crawled under the car to unscrew the old handbrake rod)) The handbrake must be completely lowered before this.
There is one nut and one lock nut, both 13, it takes a very long time to unscrew, about 1/16 of a turn) Also, the place is not very convenient, right above the muffler pipe) It would be nice if there was a ratchet with a long head for 13)
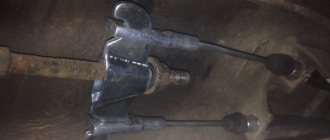
Unscrew the nuts and remove the cables.
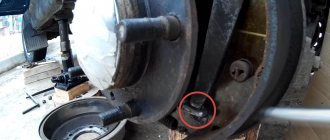
Then we remove the cable from each fastening along the way to the rear drums)
Carefully unscrew the nut by 10 (to be honest, I forgot, maybe by 8...=), after having generously sprinkled it with VDeshka.
conclusions
High-quality repair of the brake system is possible not only in a car service center, but also in your own garage. This is not only financial savings, but also an understanding of one’s own importance, which novice car enthusiasts so lack.
The fact of taking preventive measures is important. In the pre-winter period, it is recommended to lubricate the cables, which extends their service life and optimizes the operation of the entire system. The axles, tips and rod of the equalizer are also treated with lubricant. Periodic inspection and adjustment will ensure the safety of not only the driver and passengers, but also other road users.