How to change steering tips on a VAZ 2109
There is absolutely nothing pleasant about breaking tie rod ends. Therefore, if such a malfunction is detected, it is necessary to take immediate action to eliminate it.
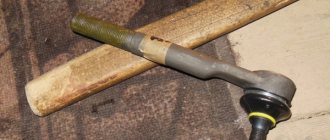
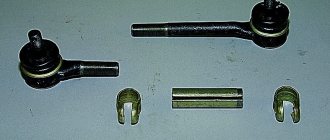
Appearance of elements
It is important to note that the tie rod ends of the VAZ 2109 are in many ways similar to the designs of other representatives of the AvtoVAZ model range. But if we compare, for example, with the VAZ 2110, where the tip is screwed onto the rod, then the VAZ 2109 has the opposite - the tip is screwed into the rod, that is, it has an internal thread.
Symptoms of a problem
Having discovered the primary signs of a breakdown of the steering link ends, you will be able to finally decide for yourself whether to hesitate any longer is dangerous for you and surrounding road users.
Signs of a malfunction of this unit include:
- When turning the steering wheel, the play increases noticeably;
- There is a constant knocking noise coming from the front of the car;
- The car handles quite poorly on the road, even if it is perfectly level;
- The anthers of the rods are torn. This leads to an even greater rate of wear of the element.
Condition assessment
Causes
There are three main reasons that lead to the need for such an event as replacing tie rod ends.
Cause
Peculiarities
Time spares no one, therefore, as the operating life, diluted by far from ideal road conditions, ends, the tip wears out. It rotates constantly, and wear and tear on rotating, moving elements is completely natural. Therefore, when you know that the service life of your old tips is coming to an end, we recommend that you monitor them more closely. They can refuse at any time
Just like in the case of a ball joint, the tie rod ends of domestic nines are enclosed in a protective boot. During operation, this protective casing often breaks, which sometimes leads to quite sad consequences. For example, if dirt, dust, or debris gets inside the boot, this will cause even faster wear of the parts. Therefore, the tips will definitely not last their entire lifespan.
Insufficient amount of lubricant
What does friction lead to when there is no lubrication? That's right, no good. Therefore, if the tips had a small amount of lubricant, very soon it will be used up and will no longer be able to perform its functions. As a result, the steering system elements wear out and require urgent replacement.
Whatever one may say, under any circumstances, replacing tie rod end switches is a matter of time. To extend this time between replacements, purchase only quality products.
Checking status
To make sure that all the signs mentioned are caused by the tips, this fact should be checked.
So, let's check if the tips are really to blame. For this:
- Drive the car onto an overpass or place it in a viewing hole;
- Apply the handbrake and install chocks under the wheels. Security measures have not yet been canceled;
- Go under the car and grab the steering rod with your hands. It needs to be pulled up and down with quite impressive force;
- If the element is really worn out, this can be determined with the naked eye, since the play in the hinge will be significant;
- Do not forget to carry out the same operation with the second steering rod end.
When changing rod ends, purchase a pair at once. Leaving one new and one old element in the work is a big mistake that can lead to the most unpredictable consequences.
Nuts - they're everywhere
Step-by-step instructions for removing and installing the VAZ-2109 steering rack
Sequencing:
- First of all, you need to remove the protection. To do this, you will need to unscrew the fastening nuts that are on it at the top and bottom.
- Remove the tread element completely, otherwise it will interfere with your further work.
- To get rid of the tie rods, unscrew a couple of bolts in the center of the rack. Only then will you be able to disconnect without interference.
- The clamps of all rails are secured with nuts on both sides - they also need to be unscrewed. After this, you will be able to move the element to the side.
- To completely remove the part, you will need to get rid of the coupling bolt, which is located on the interior side, at the very bottom of the steering shaft.
- You are unlikely to be able to remove the rack easily - you will have to rip it off the shaft. If that doesn't work, use a pry bar to pry it from the outside.
If the part needs to be repaired, do everything necessary to do so. If replacement is necessary, you will need to buy a new rail. On average, a new steering rack costs from 1,500 to 2,200 rubles. The price depends on the place of purchase and the manufacturer of the mechanism. Installation of a repaired or new element occurs in the reverse order of dismantling work.
Tips for replacing old rack parts
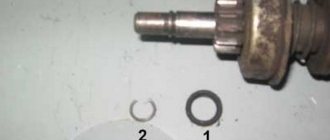
- Damping rings are placed on the new backing plate so that the thin edges of the rubber elements are in the middle of the cutout of the plate. After purchasing a repair kit for the steering rack, you will find in it two rubber bands needed for this purpose.
- The protrusions of the bushing will help you install it correctly in place, after which you need to carefully get rid of the thin rubber bands using a blade.
- The support ring is removed from the gear shaft with special pliers, and then the bearing is dismantled.
- Don't forget to wash the steering gear housing so you can insert a new needle bearing later.
Replacement
Well, now let's proceed directly to the replacement procedure. The work cannot be called difficult, but without a certain set of tools you will not be able to achieve the desired result.
When there is no special puller
Therefore, you should have:
- Reliable jack;
- Balloon wrench;
- Pliers;
- Socket wrenches or open-end wrenches (the first option is better);
- Puller for tie rod ends;
- The Almighty WD40 Rust Remover;
- Hammer;
- Brush for working on metal.
Replacement process
Is everything ready? Begin.
- Place the car on an overpass or inspection hole, install anti-roll bars under the wheels, engage the handbrake and gear. Safety comes first.
- Using a wheel wrench or a suitable socket with a long wrench, unscrew the wheel bolts, but do not completely unscrew them.
- Properly position the jack and lift the vehicle, lifting the wheels off the ground. To increase reliability and stability, it is better to place something like bricks, a stump or other similar support under the car. Having one jack is not enough; it is very dangerous.
- Now you can completely unscrew the bolts and remove the wheels.
- Turn the steering wheel to the side all the way, which will provide you with fairly comfortable access to the place of work.
- Using a metal brush, clean the threads of the tip, and then be sure to treat the area with a rust killer - WD40. Both threads should be processed - the thread where the tip is screwed into the rod and the thread on the finger.
- Wait a while for the product to react. After this, take pliers or pliers, with which you need to unpin the tie rod end connection.
- Using a spanner wrench, unscrew the fastening nuts of the damaged, failed tip. If problems arise when unscrewing, the fasteners do not want to come off, treat with a wedge again, wait and try again. Take a larger lever, which will make the task easier.
- After removing the nut, you need to remove the tip pin from the stand. This is where a tie rod end puller will come in handy. You can buy it or borrow it from friends. But many people don’t have such a puller. Therefore, craftsmen found a way out of this situation.
- To remove it you will need a hammer, physical strength and a pry bar.
- Screw the nut onto the tie rod end pin so that the pin does not stick out.
- Use the pry bar to rest against the protrusion of the stand and begin to pry the rod upwards.
- With precise straight blows using a hammer, begin to knock the tip up. The blows are applied at the junction.
- With this artisanal method of dismantling, the most important thing is your accuracy when striking. Hit as accurately as possible so as not to damage other suspension components of your VAZ 2109.
- When the finger is finally removed, you can proceed to further steps.
- Unscrew the lever from the steering rod. But before that, be sure to measure the screw-in distance of the tip. This way you can more accurately install the new element at the toe angles.
- Measuring the distance is often done by eye, relying on marks from the old tip. Apply a mark or simply use a ruler or tape measure.
- Unscrew your damaged end from the rod. Here you can already do everything manually.
Replacing tips
Now let's move on directly to the process of replacing tie rod ends on a VAZ 2109 and similar cars.
Removal
We start by removing the tip, which has already served its purpose:
Replacing the tie rod end of a VAZ 2109 using a special puller
- The car should be installed on an inspection hole or overpass.
- We install wheel chocks, put the car in handbrake and gear.
- We take a cylinder head or a suitable head with a longer knob and unscrew the wheel bolts. Do not twist them completely!
- Next, install a stable jack and lift the car so that the wheel comes off the ground. Next, you need to place a stump or something similar under the side of the car.
Remember! Do not work with a car suspended on a jack - it is dangerous for health and life!
- We completely remove the wheel and turn the steering wheel to the side to ensure good access to the workspace.
- Use a metal brush to clean the threads of the tip and spray it with WD-40. Both threads should be cleaned and sprayed - both the thread on the pin and the one that is screwed into the steering rod.
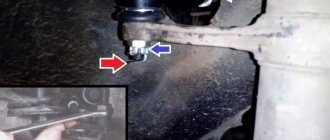
- Next, using pliers (pliers), we uncotter the connection of the steering tip.
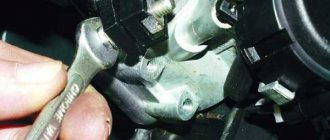
- Next, take a spanner and unscrew the nut securing the tip. If it is difficult to unscrew, you need to add WD and apply a larger lever.
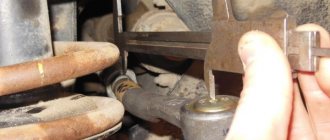
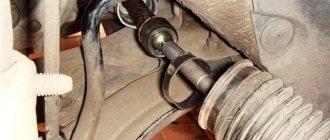
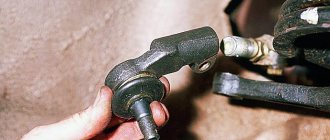
- After the nut has been successfully twisted, we begin to remove the tip pin from the shock absorber strut. To do this, we use a special steering tip puller.
- Place the end of the puller behind the shock absorber strut and screw in the pusher until the pin disengages.
Often the average driver does not have such a puller. What to do in this case? There is an exit:
- Without a puller, the tip can be removed as follows. All you need is a hammer, a pry bar and a little effort.
- Screw the nut onto the steering tip pin so that the pin does not stick out.
- Using a pry bar, we rest against the protrusion of the rack and move the steering rod upward.
- Next, with direct blows of a hammer at the joint, we knock the tip up (see photo).
- The most important thing in this process is accuracy. Hit accurately so as not to damage other suspension parts of your favorite car during the repair process.
The finger is out of engagement, and we continue the repair:
- Now you need to unscrew the lever from the steering rod.
- Before doing this, it is important to measure the distance to which the tip was screwed in. This is done to more accurately install the new tip at the wheel alignment angles.
- You can measure the distance by eye, using residual marks on the old tip, putting a mark, or measuring it with a measuring device, if you have one.
- Next, the tip is simply unscrewed from the rod with your own hands.
Installation
VAZ 2109 steering tips must be lubricated
- It is also advisable to put a mark on the new tip indicating how far it will need to be screwed.
- Check the amount of lubricant and add more if necessary.
- We screw the tip into the steering rod until the desired moment.
- We insert the tip pin into the hole in the shock absorber strut.
- We tighten the nut securing the steering tip.
- Install the cotter pin.
- Put the wheel back on and tighten the bolts.
- We lower the car onto its wheels.
That's all - one tip has been changed!
VAZ 2109: replacing the steering tip is easy
VAZ 2109 replacement of steering tips
Starting to lose control on your favorite nine? Has the steering wheel become loose, less controllable, or vibrates? Perhaps the time has come to replace the tie rod ends and please your car with fresh parts? This detailed instruction will accurately describe the details of the tip replacement process, as well as the causes of failure, diagnosis of failure and other tips. A training video will help you see the process with your own eyes. So let's get started. The task is to replace steering tips on a VAZ 2109.
- Causes of tip breakage
- Types of steering faults
- Tools for work
- Replacing tips
- Removal
- Installation
- Conclusion
Consequences of a malfunction
The steering end screws onto the long steering rack arm. This achieves a movable connection between the rack and the steering knuckle, but at the same time it is quite rigid. Long trips with a faulty tip will lead to serious problems with steering and more. Tires are most often affected.
During long trips with faulty joints, wheel alignment is disrupted. This causes increased wear of the rubber. But this is far from the only consequence of problems with the tip. In fact, this hinge should protect the steering rack from impacts and shocks. If there is a malfunction, this function is lost; if you continue to drive further, the risk of damaging the rack becomes quite large.
The work process itself is not complicated. In addition to the basic tools, you will need a special ball puller. Without it, removing the finger from the steering knuckle will be problematic. In principle, if you don’t have a puller, you can get by with a pry bar. A few hours before work, clean the threaded connections from dirt with a wire brush and treat them with liquid wrench. Replacement is carried out in the following order:
- First, jack up the car and remove the wheel. The steering knuckle is turned to its maximum position;
- Using pliers, remove the cotter pin from the castle nut, after which it is unscrewed;
- Lightly tap the pin fastening with a hammer. Use a puller to remove it from the steering knuckle. If this action is performed using a mount, you will have to tinker a little. To remove it, you need to press the tip with the mounting tool. At the same time tapping the steering knuckle mount with a hammer. The most difficult thing is to rip the hinge out of place;
- Next, use a caliper to measure the distance from the middle of the ball to the rod. This will help avoid problems with wheel alignment. If uneven wear of the rubber has been observed, then you don’t have to bother with measurements. You will still have to go to a service center to check and install the angles;
- Loosen the locknut and twist the tip;
- Before installation, lubricate the threaded connection of the rod and the tip with grease. Lithol is good for this;
- Screw the end onto the rod. Don't forget to set it to the previously measured distance. After this, tighten the locknut;
- Press the pin into the mounting ear of the steering knuckle. Next, lubricant is also applied to it, and the nut is screwed on. After tightening it, the connection is pinned.
This completes the work of replacing the steering tips. Experienced car enthusiasts still recommend checking the wheel alignment angles. This will help ensure you avoid problems.
Conclusion
. As a rule, every 15,000-20,000 kilometers, owners of domestic cars are faced with the need to repair the steering and chassis. Therefore, the question of how to replace steering tips on VAZ 2109 and 21099 is not uncommon. This work in itself is not difficult. It does not require special knowledge or tools. You should not delay its implementation.
Causes of tip breakage
Steering nozzles are not such a complex mechanism as, for example, an internal combustion engine or gearbox. Therefore, there are not so many reasons for its failure, but now we will list them.
Replacing steering tips for VAZ 2109
- The first is wear and tear over time. The way the tip is designed is that it works constantly rotating. And here it is that people break from such a life, that tips. Constant friction contributes to rapid wear of parts and, as a result, failure of the working condition.
- It is impossible to completely prevent this process. The only way out is to buy high-quality tie rod ends. But, again, sooner or later they still need to be changed.
- The second reason is a torn boot. Like the ball joint, on the VAZ 2109 the tie rod end is equipped with a protective boot. During the operation of the car, it breaks and entails bad consequences. Which? Dust and sand get inside the connection, which increases wear on the parts and leads to faster wear.
- The third reason is insufficient lubrication. As you know, friction without lubrication does not bring anything good. As a result of the lack of sufficient lubricant, the tip fails faster.
As you can see, with all the desire, replacing steering tips on a VAZ 2109 is an inevitable process in any case. One thing is good - the price of the tips remains acceptable.
Advice! When purchasing tips, listen to the sellers, as well as other car owners. Take quality tips!
Types of steering faults
Now let's diagnose the steering control of the VAZ 2109. Let's try to determine what is the reason for the poor quality of driving - the tip, or something else? So:
- If the steering wheel begins to play more and more, then the tip may not be the reason. The cause of the play may also be the rack - it may need to be tightened, repaired or even replaced.
The steering rack may need to be replaced or repaired.
- Of course, steering tips are one of the first reasons for the deterioration in the quality of driving. How are they diagnosed? This does not require much expense or intelligence.
- To diagnose, it is enough to drive the car into an inspection hole or overpass and carry out several operations.
- On the installed car, set the parking brake and wheel chocks, just in case.
- When you go under the car, you need to grab the steering rod with your hands and pull it up and down with sufficient force.
- If it’s time to change the tip, then the play in its hinge will be noticeable and even visible to the naked eye.
- The same operation must be done on the other tip.
Remember! If, after all, the tips are in good condition, do not stop, but inspect the steering rack for play. Read other articles or contact the service station.
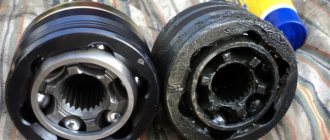
Replacing tie rod boots for VAZ 2113, 2114, 2115
Task: install boots on the engine compartment of steering rods on a VAZ 2115
Problem: the tie rod boot burst on a VAZ 2115
BURST, AND THE LIVING TIP WAS NOTICED IN TIME, OTHERWISE IT WOULD HAVE GOT ON THE TIPS
It was decided to change the tie rod boot on the VAZ 2115
And in one go, install the engine compartment boots. We hang out and remove the wheel from the side of the boot being replaced. Turn the steering wheel all the way in the opposite direction and remove the tip.
remove the cotter pin
REMOVE THE NUT WITH A 19MM WRENCH
If there is no puller, unscrew the nut not completely, insert the mounting bracket between the steering rod and the strut arm, and hit the end of the strut arm with a hammer.
knock out
When the tip is knocked out, we replace the old boot with a new one.
REMOVE THE LOWER STOPPER RING
REMOVE THE UPPER STOP RING
FILLING THE NEW BOOT WITH LITHOL
When the new boot has been installed in the reverse order as it was removed, we install the boots of the steering wheel's engine compartment and put the wheel back
NEW BOOT AND ENGINE COMPARTMENT BOOT STAYS IN PLACE
We do the same on the other side.
AS IT WAS
HOW IT BECAME
I MADE SLOTS SO THAT THE BOOT DOES NOT TURN OUT WHEN YOU TURN IT ALL THE WAY
It was possible to cut it, but... I changed the steering linkage boot, then installed the whole one.
Result: I drove and turned the steering wheel in different directions. Even up to the stop, the engine compartment boots remained in place and did not fly out or touch anything. Work on installing steering rod boots and the engine compartment on the VAZ 2115 has been completed.
https://www.drive2.ru/l/4899916394579315013/
next article:
Tools for work
Replacing the tie rod ends of a VAZ 2109, although not a complicated process, is not done with bare hands. Here's what you need to have to successfully complete the tip replacement:
- Jack
- Balonnik
- Pliers
- Spanners (heads); extreme case - open-end wrenches
- Rust cleaner (WD-40 or equivalent)
- Puller for tie rod ends (preferable, but can be done without)
Replacing the steering end of a VAZ 2109 is more convenient with a puller
- Hammer
- Metal brush
Diagnostics
Replacement of steering tips on VAZ 2109 and 21099 is required if there are obvious signs of malfunction. You should consider replacing tips in the following cases:
- Knocks in the suspension when driving over uneven surfaces and when turning;
- Control problems. The car can wander along the road. But this is not a mandatory indicator. The same symptom may occur with other suspension problems;
- Uneven wear of rubber.
To clarify the diagnosis, you will have to drive the car into an inspection hole and inspect the suspension. A sign of a problem is damaged anthers. If they have cracks or are deformed, then it makes sense to change the tips. Check them for play. To do this, try moving them with a pry bar. This will not work on working tips. If there is play, then it is better to replace the part immediately. Even in the absence of other signs.
Signs of a malfunction of the VAZ-2109 control unit
Most often, steering ends fail. To check them, you will need to drive the car onto an overpass or into a garage, and also invite an assistant.
- Drive the car into the inspection hole so that you have access to its bottom. You can install the car on a jack and supports, but this option is not very reliable, and it will not be easy to inspect the rods.
- Use a rag to remove deposits from the rods and steering ends and inspect them for damage. Carefully check all connections and fasteners.
- Inspect the boot to identify any cracks.
- Ask an assistant to turn the steering wheel to the right first, and then smoothly continue its movement in the opposite direction. Pay close attention to the displacement of each tip - if there is play, they move along the finger by 1.5 mm or more.
- Check the second side also. All faulty elements of the steering system must be replaced as soon as possible.
The service life of steering tips expires after 40 thousand kilometers. They can last longer on a VAZ-2109 only when driving on perfectly smooth roads. In any case, after passing this mark, it is recommended to replace these spare parts. Repairs should be carried out without waiting for the service life to expire if you notice:
- the wheels do not follow steering commands (check only at low speed);
- feedback to the steering wheel while driving;
- extraneous sounds (knocking, creaking, howling).
VAZ-2109 owners are recommended to periodically diagnose and inspect their car in an inspection pit.
Replacement frequency
On average, on a VAZ-2109, replacement of steering tips occurs, as already noted, approximately every 20-40 thousand kilometers. The only way they can have a longer service life is if the car constantly drives on perfectly smooth roads, without holes or potholes. It is advisable to carry out repairs, regardless of when the tips were replaced, if one of the following diagnoses is present:
- Failure to obey wheel steering commands.
- Strong feedback to the steering wheel when driving.
- The presence of knocks, creaks, howling.
It is extremely important to drive the car onto an inspection pit or lift from time to time in order to diagnose the steering. In the event that the grease evaporates from under the boot, you can improve the situation a little
Using a syringe with a needle, pour a little engine oil under the boot.
What is needed for replacement
First of all, you will need to purchase the tips themselves. Car enthusiasts and car service specialists recommend buying these parts from one of the brands:
- AvtoVAZ stock production;
- "Track Champion";
- "Belmag".
“Original” auto parts are the most popular, as they have a long service life. Despite their low price, competent mechanics recommend installing stock on the VAZ-2109. However, it is important to purchase parts from trusted places, from authorized dealers. In markets and small shops they can sell you refurbished components that will not last even a month. In addition to the tips, you will need to replace the boots immediately.
Additionally, you will need to purchase a special puller for hinge joints. If it is not there, then there is a risk of damaging the rods. Prepare the usual tools - a set of spanners and pliers.
Replacement Operations
When repairing the rotating mechanism of a car, the mechanics of the S-MOTORS car service:
- install the machine on strong supports or lift it with a hydraulic lift;
- dismantle the wheel;
- pull out the cotter pin, unscrew the nut on the pin;
- unscrew the locking bolt;
- use a special puller to press the finger out of the fist;
- twist the hinge from the thread of the rod;
- install a spare part;
- tighten the nut, bolt, pin the connection;
- check and fill the traction boot with lubricant.
It is forbidden to knock out the hinge pin with a hammer or sledgehammer. Damage to the knuckle leads to complex repairs to the chassis. After assembling the trapezoid, automakers recommend adjusting the wheel alignment.
If you notice signs of a breakdown of the vehicle controls, call the S-MOTORS car service dispatcher and submit a request to the website. Our auto mechanics will dismantle and reassemble the rotary mechanism in the shortest possible time, using the correct technology.
How is the replacement carried out?
Prepare jacks for both front wheels. It's best to lift both sides rather than just one side at a time so you have more space to work with. Repairs are carried out in accordance with the following instructions:
- Raise the front axle using jacks and secure it firmly. Remove the wheels.
- Remove the cotter pins holding the nuts with pliers.
- Once the nuts have been released, unscrew them with a spanner.
- Difficulty may arise in disconnecting the tip from the rod. Take a 27 wrench and try to unscrew the retaining nut.
- A special puller will help you remove the steering ends from the mounting hole. With its help they are pressed out of their places. Usually there are no problems at this stage.
- As you unscrew the tip, count the number of turns. This will help you make an approximate alignment adjustment so that after repair you can get to the service station without any problems.
- Install the steering tips and boots. When screwing in new spare parts, you need to make the same number of turns as when disassembling.
- Carry out assembly carefully.
But the replacement is not finished yet; after the repair is completed, you need to contact the nearest car service center. Capable of performing computerized wheel alignment adjustments. This is a very important part to complete the control unit repair.
You can try to make this adjustment yourself, but only if you have the most level area possible. Slightly loosen the tie rods and use a telescopic pin to measure the distance between the wheels of the front and rear suspension. You need to adjust the rods so that these values are the same. If you do the adjustment yourself, then be prepared for the fact that the wheel alignment will take a lot of time. It is best not to skimp and go to specialists for this procedure.
Replacing steering parts along with tuning will cost you about 1,500 rubles. Service center specialists will charge approximately twice as much for this work. If you want to save money, but are hesitant to carry out repairs according to the description, watch the video instructions.
Replacing tie rod ends on a Priora with your own hands
1. First of all, remove the wheel bolts and lift the front of the car with a jack.
2. Apply penetrating lubricant to all threaded connections:
3. Now, using pliers, we align and pull out the cotter pin from the tip pin, as is clearly shown in the photo below.
4. Now loosen the coupling bolt that presses the tip to the rod:
5. Then, using a puller or a pry bar with a hammer, you need to press the tip out of the hole in the rack.
The result of this action is shown clearly below.
6. Next, you need to unscrew the steering tip, twisting it from the rod. To do this, you may need an additional lever, for example, a small piece of pipe or a deep socket
It is worth noting that the left tip unscrews clockwise, and the right one counterclockwise. The photo below shows everything using the left side as an example:
The result can be seen below.
7. If you want to maintain the alignment of the front wheels, at least at approximately the desired angle, you need to count the number of revolutions made when unscrewing the tip. The new one should be wound at the same number of revolutions.
8. After replacing the tip, screw on all the nuts and bolts, and also install the cotter pin in place.
9. We do the same with the second side. Of course, the ideal option is to definitely go to a service station after replacement and have the front wheels wheel aligned. There is no need to save money on this procedure; it may cost more if the wheel angles are disturbed after the repair.
If there are any unclear points, the video below will tell you everything more clearly! The price of new tips for Priora is from 700 rubles per pair, of course, from 350 rubles. a piece.