Home » Repair
08/23/2019 Category: Repair
Yesterday one of our regular customers came to us with a recently purchased second-generation Kalina to replace the timing belt, roller and pump, plus all the fluids, but more on that in another article. This engine was also installed on the Grant, so this article will be relevant for it as well. The speedometer shows 60,000 and I believe that for this engine this is the optimal replacement interval, even though all reference books say about 75,000.
Let’s make a reservation right away that when the timing belt breaks on this car, the valves bend. It is recommended to check the condition of the belt every 15,000 kilometers.
To work, we will need a set of keys and sockets, as well as a 5-point hex and a key for the tension roller. The entire procedure takes approximately one and a half hours.
The engine is similar to the eighth.
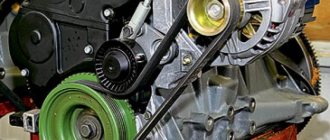
First, remove the protection, drain the antifreeze, and for convenience you can remove the right front wheel. Next, loosen the locknut of the generator belt tensioning mechanism. Using a 10mm socket, unscrew the tensioner pin and remove the belt.
We unscrew the four bolts with a 5mm hexagon and remove the upper protective cover of the timing belt.
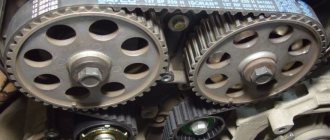
Set top dead center (TDC). We turn the crankshaft by the pulley mounting bolt clockwise until the mark on the camshaft sprocket and the timing belt protective casing coincide.
Unscrew the crankshaft pulley bolt. We block the wheels with stops, tighten the handbrake, engage fifth gear and, with a slight movement of the wrench and a one and a half meter pipe extension, unscrew this bolt.
Next, use the same 5mm hexagon to unscrew the bolts securing the lower timing case cover and remove it.
Remove the protective washer.
The marks on the crankshaft sprockets should be aligned with the oil pump casting.
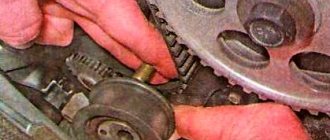
Praise be to the designers of AvtoVAZ, finally rollers with a tension indicator appeared on the engines, now you don’t need to tighten them by eye and check the tension by twisting the belt, not even thirty years have passed since the invention of such a design. We unscrew the tension roller bolt and dismantle the latter; we also remove the old timing belt. The photo shows that the belt has stretched out because the tension marks have diverged; when checking the condition of the timing belt, if you see this, you will just need to tighten it.
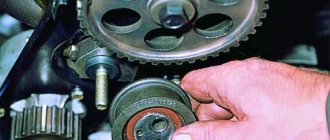
To replace the pump, we need to remove the camshaft sprocket, and also unscrew several bolts of the inner casing and remove it.
Three bolts out and the pump replaced. The green arrow indicates the hole for the tension roller bolt.
Having replaced the water pump, we proceed to install a new timing belt.
We put the casing and camshaft sprocket in place. We check that all the marks match, as discussed above. We install the tension roller, but do not tighten the bolt. We put on a new belt, observing the direction of rotation, first on the crankshaft sprocket, camshaft, tension roller and pump, the latter can be swapped. We tighten the timing belt. Use a special key to turn the roller counterclockwise, as indicated on its body...
...until the marks on it coincide and tighten the bolt.
We turn the crankshaft two turns and again check the alignment of the marks and the belt tension.
We install all the parts in the reverse order of removal, fill in antifreeze and start it. It couldn't be simpler. Good luck on the roads. Neither nail nor rod
Timing belt Lada Granta: general characteristics and problems
The timing belt on Grant is a ring-shaped product with special teeth, the number of which is strictly defined. A product with a rubber base, reinforced with nylon threads, ensures the transmission of torque from the crankshaft gear to the camshaft.
The timing belt of a Lada Granta with an 8-valve internal combustion engine should have 113 teeth and a width of 17mm. The performance of the gas distribution mechanism, which is responsible for valve timing, depends on the condition of the timing belt. According to the regulations for scheduled vehicle maintenance, the Grant timing belt is replaced every 60-75 thousand kilometers.
If we consider the Lada Granta model, the Granta timing belt is very important for the operation of the internal combustion engine on this car, as it ensures an uninterrupted operation cycle of the intake and exhaust valves. In the event of failures or malfunctions, the entire cycle is disrupted.
The main faults associated with the timing belt:
- If the timing belt of the Lada Granta 8 valves breaks, it will cause the car’s internal combustion engine to stop, but will not damage the valves and pistons (on the 8-valve internal combustion engines Granta 11183 of the first generations, the design allows the pistons and valves not to hit when the belt breaks). However, other engines on this model (for example, 11186) can no longer boast of this and bend the valves.
- The Grant 8-valve timing belt, as well as on other modifications, begins to slip if oil and other working fluids get on the surface. The same thing will happen if the belt tension is poor. As a result, a shift in the phases and angle of rotation of the camshaft occurs, which leads to disruption of the internal combustion engine, overheating occurs, power drops, etc.
Replacement frequency
The manufacturer's technical documentation states that the timing belt on the Lada Granta must be replaced every 60 thousand kilometers.
But here it is worth noting that this is a limit value and it is better to replace it before reaching such a mileage, approximately 50 thousand km, but there are cases when the drive requires replacement at 40, or even 30 thousand km, it all depends on the quality of the belt and its working conditions.
In any case, it is better to periodically check the condition of the drive (recommended every 15 thousand km) and if signs of wear are detected, replace it immediately.
If this is not done, then it may break, which is fraught with serious consequences - the engine pistons will collide with open valves, leading to their damage and subsequent expensive repairs.
Checking the timing belt
According to the documents that come with the car, the belt synchronizing the movement of the shafts has a service life of 45 thousand kilometers. However, it may fail even earlier due to increased load or insufficient attention to the car engine.
A performance check should be performed every 15 thousand kilometers. To do this, you need to remove the cover from the timing belt drive.
- First of all, check the belt tension adjustment tab: the cutout of the inner roller disk should coincide with the tab located on its rectangular plug. Even if the differences are minor, this consumable must be replaced.
- Then inspect the external part of this Lada Grant component. Make sure there are no signs of wear, oil, sludge, threads.
- At the end, the belt must be integral, without any separation into layers and fibers.
The Lada Granta has an eight-valve engine with 87 horsepower installed in the elevator housing. When the timing belt is damaged on this engine, the valves on the pistons are bent, putting you at risk for difficult engine repairs.
When purchasing the component, please note that Grant uses a 113 tooth belt that is 17 millimeters wide. Replacement. a faulty component with the proper selection will not be needed anytime soon, so please examine the new part carefully before purchasing
a faulty component with the proper selection won't be needed anytime soon, so examine the new part carefully before purchasing.
Automotive enthusiasts recommend purchasing Gates spare parts from the USA. The good thing is that official support can tell you the address of the nearest store where they sell high-quality spare parts. The price of a repair kit (belt and roller) is about 3,000 rubles. At the same time, you will receive a high-quality product, the resource of which is approximately twice as long as that of stock one (about 80 thousand kilometers).
How to check it yourself
There is an easy way to diagnose a water pump. There is no need to remove the product from the engine. To check the pump on the vast majority of car models, you must:
- Start the engine, warm it up to normal operating temperature (usually this indicator varies from 87 to 100 degrees).
- After this, pinch the upper pipe that comes from the radiator with a gloved hand. If the pump is working properly, you will immediately feel the antifreeze pressure inside the pipe. If the pipe is pressed without difficulty, there is no circulation in the cooling system, that is, the pump does not work.
You can check the functionality of the pump in a minute, especially if under the hood is clean and there are no liquid leaks
Explanatory video on where to look for tags
The gas distribution mechanism is one of the most important systems of an internal combustion engine. The timing belt controls the engine valves, ensuring the normal functioning of intake and exhaust. During intake, the fuel-air mixture enters the combustion chambers as a result of the opening of the intake valve. The next phase opens the exhaust valve, and the gas distribution mechanism removes exhaust gases from the combustion chamber. The VAZ 2190 uses a standard gas distribution unit, differing only in the number of engine valves.
Factory regulations for timing of timing belt replacement
Each vehicle manufacturer specifies the timing of maintenance and other routine maintenance. According to this document, replacing the timing belt on a Lada Granta car should be done when the car has driven no more than 75 thousand km. In fact, this figure does not always correspond to reality; there are a number of reasons for this. The service life of a timing belt will depend on:
- The quality of the product used.
- Vehicle operating conditions.
- Technical condition of the engine.
- "Age" of the timing belt.
Much attention is paid to the manufacturing quality of rubber products, but the quality of parts from different manufacturers varies greatly. The main supplier for VAZ is the RTI plant, which is located in Balakovo. In addition to it, engines can be equipped with products from other companies such as Gates, ContiTech, Trialli, Bosch, and some others. You should carefully consider the product you are purchasing, since you can buy a fake under the guise of products from well-known manufacturers.
The operating conditions of the vehicle, especially its engine, also affect the service life of the timing drive. In 16 valve modifications, the load on the belt teeth increases, so it requires more attention. Fuel and technical fluids are not allowed to enter the operating area of the timing mechanism drive. They soften the body of rubber products, make the material pliable, and the teeth are easily cut off. At the slightest manifestation of leaks in the operating area of the timing drive, they must be eliminated immediately.
The teeth of the crankshaft gears and camshafts gradually wear out, and the height of the teeth decreases. This means that the contact area with the belt becomes smaller, making it easier to tear off the toothed belt comb. The coolant pump can also become a source of trouble for the timing drive. Sometimes it jams, and since the pump is rotated by a toothed belt, its teeth are cut off.
With a relatively small annual mileage of the car, you should also carefully monitor the condition of the timing mechanism parts. The belt ages even if the engine is not running, so it is inspected at every maintenance. If even small cracks are noticed, the delamination changes. The optimal time to replace the timing belt in the timing mechanism drive will be a mileage of 50–60 thousand km.
Recommendations from Lada Granta owners
You can find a lot of material on this car model on the Internet. Lada Granta owners (call themselves grant owners) talk about their cars and give recommendations on how to properly recommend a car. Drivers of 16 valve Grant recommend not to wait until the mileage is 50–60 thousand km, but to change the drive earlier. On the Grant 8 valve, if the drive in the “83” engine breaks, no damage to the valves occurs; for other modifications of the power unit, this can result in an expensive engine overhaul. You should not skimp on replacing the tension roller or coolant pump; they are the ones that most often damage the belt teeth.
Conclusion
Despite the simplicity of the algorithm for replacing the timing mechanism on an eight-valve engine, it is still better to contact a service station for professional installation. The timing belt is not a mechanism that you can skimp on the quality of tuning.
Subject to the manufacturer's recommendations and moderate driving style, the timing service life is more than 80,000 km.
Frequent breakdowns that occur are due to the fault of the owners of the technical equipment, as a result of violation of the rules for using the machine.
Replacing the timing belt
Make sure the engine flywheel has been correctly installed and secured (see above). Then, using a “17” or “19” wrench (ICE 11183), unscrew the screw holding the generator drive pulley. The pulley itself and the protective washer are then removed. The pulley should not interfere
Now you need to weaken the downforce in the tension roller: 11186/21116 - using a “15” round key, unscrew the fastening bolt 2-3 turns. The roller will “release” the belt automatically;
Automation will work to weaken11183
– use a 17mm wrench to loosen the fastening nut. Then the roller itself is rotated clockwise. All that remains is to replace it: a new part is installed in place of the old timing belt, and that’s it. Installation of the remaining parts is carried out in the reverse order.
Basic replacement operation
To increase downforce, the outer roller assembly is rotated counterclockwise. For engines 11186/21116, an additional requirement must be met: the two rectangular marks must coincide.
Mandatory requirement for motors 11186/21116
Upon completion of installation, the marks AB and CD should also match. The drawing for them is given above.
Tightening torques
To perform installation correctly, you need a wrench with a force regulator. The value on it is set depending on the type of part: Tension roller mounting screw (11186/21116) – 17-27 N*m; Roller fastening nut (11183) – 30–36 N*m; Generator pulley fastening – 105–110 N*m. First, the tension is adjusted on the roller, and then the fastening nut or bolt is tightened. Parts from the VAZ catalog
Let's immediately look at the list of VAZ components and special tools: Tensioner roller for internal combustion engine 11183 - 2108-1006120, nut for it - 00001-0021647-21; Timing belt (11183) – 2108-1006040-10; Automatic tension roller – 21116-1006226; Timing belt (11186/21116) – 21116-1006040; Key for automatic roller – 67.7812.9573-01; Key for roller VAZ-11183 – 67.7834.9525. The tension roller of the "2108" family has two slots on one side. These slots should look “up”, that is, away from the engine.
The slots were made for special tools. It is designated by the numbers “67.7834.9525” (see list). And for automatic rollers, the key is designated differently - “67.7812.9573”. What it looks like is shown below.
The automatic roller can also be adjusted
It remains to list how the fastening bolts, washers, and so on are designated: Three bolts for the VAZ-11183 cover - 00001-0009024-11, washers - 00001-0026406-01; Timing drive cover (11183) – 21080-1006146-10; Bolts for VAZ-21116 covers – 2108-1003286-00, spring washers – 00001-0011977-73; Top cover – 21116-1006226-00, bottom cover – 21116-1006218-00. We hope no questions arise here. Imported analogues
To replace the “2108-1006040-10” belts, different components are suitable: GATES – 5521 or 5521XS; BOSCH – 1 987 949 095; DAYCO – 94089; CONTITECH – CT527; Finwhale - 2108-1006040. The timing belt “21116-1006040” can be replaced with another part: GATES – 5670XS; CONTITECH – CT1164; QUARTZ (Germany) – QZ-5670XS. Usually the choice is made in favor of GATES products. The letters "XS" in its catalog mean "reinforced".
Attention! Components from GATES (England) are most often counterfeited! From the photo you can understand what the main difference is. Beware of fakes
How to install and tension the timing belt
- Place the timing belt on the crankshaft pulley.
- By tensioning both branches of the belt, we put the rear branch on the pump pulley and wind it behind the tension roller.
- We put the front branch on the camshaft pulley.
- Tension the timing belt by turning the tension roller counterclockwise and inserting a screwdriver (as in the photo).
- Tighten the bolt securing the generator drive pulley and turn the crankshaft by the bolt 2 turns clockwise.
- We check the coincidence of the crankshaft and camshaft marks. If the marks do not match, repeat the operation to install the belt.
Risk of a faulty timing belt for the engine
A timing drive failure can have serious consequences. At the very least, the engine will fail. And the best way to fix this problem is to contact a car service center.
The severity of the consequences of this failure depends on whether such a case is provided for by the engine manufacturer. On some models, when the belt breaks, the valves collide with the pistons in the combustion chamber. These elements are destroyed, after which the engine may become unsuitable for repair.
Some manufacturers make recesses in the pistons for valves or make a specially shaped combustion chamber in case of a belt break. In such motors, “meeting” does not occur. And all that is needed is to install a new belt and adjust the valve timing correctly.
The Auto-Master car service center (gate No. 5) will replace the faulty timing belt on your car with a written guarantee of the quality of the work performed! Make an appointment with us by phone or using the form below.
The timing belt of any modern engine is usually designed for a short service life. On average, it operates for 50-100 thousand kilometers, after which it requires replacement along with the tension rollers, and often also the water pump and pulleys. The timing of replacement of this important part is strictly regulated and specified in the operating instructions for each specific vehicle. However, by blindly following the manufacturer’s recommendations, you may not notice the impending disaster and run into serious and expensive engine repairs. There are several signs that the timing belt urgently needs to be replaced with a new one.
Why do you need to change the timing belt?
First, let's figure out what a timing belt is and why it needs to be changed. This inexpensive and uncomplicated, at first glance, part is needed in order to synchronize the operation of the ignition system with the stroke of the pistons and valves. The timing belt rotates on the crankshaft and camshaft (or camshaft) pulleys, simultaneously driving the water pump. It has a multi-layer reinforced structure and consists of rubber and nylon base. The correct belt tension is set by a special roller. When the timing belt breaks on most modern cars, the intake and exhaust valves meet the pistons. A serious breakdown occurs that is incompatible with further movement and requires complex, expensive repairs.
The timing of replacement of rubber products and related components depends not only on the make and model of a particular car, but also on operating conditions, which in our country are very harsh. However, this does not prevent some brands from installing prohibitive timing belt service life on their products. For example, on domestic Ladas this operation should be carried out once every 180 thousand km. This figure looks, to put it mildly, too high. For comparison, on Renault cars, even the highest quality belts from the world’s best manufacturers last 60 thousand km in Russia and 120 thousand km in Europe. Experiments with non-compliance with this regulation are fraught with big troubles.
Signs of timing belt wear
The main problem that prevents you from noticing impending trouble in a timely manner and preventing the timing drive from breaking is difficult access to the part: unlike the belt of mounted units, this belt is carefully covered with all kinds of casings. To perform an inspection, partial disassembly of the engine is often required, which most car owners are not able to perform. However, in addition to tears and cracks that are visible visually, there are other symptoms of impending disaster. We will try to list the most common ones.
1. Belt is old
Basically, the service life of a timing belt is determined by the mileage of the vehicle. After several tens of thousands of kilometers, it must be replaced. However, there is one “but”: age is also critical for this part - on average, the belt retains its properties for no more than five years, after which it begins to lose elasticity and crack, regardless of mileage. Drivers who drive a car relatively rarely should pay close attention to this point. The belt consists of materials that are subject to rapid aging, which means you shouldn’t joke with its age. For the same reason, we recommend that you change the timing belt on purchased used cars without fail - no one guarantees that the previous owner complied with the regulations and used high-quality components.
2. Uncertain engine start and loss of power
Imported analogues
Various components are suitable for replacing belts “2108-1006040-10”:
- GATES – 5521 or 5521XS;
- BOSCH – 1 987 949 095;
- DAYCO – 94089;
- CONTITECH – CT527;
- Finwhale - 2108-1006040.
The timing belt “21116-1006040” can be replaced with another part:
- GATES – 5670XS;
- CONTITECH – CT1164;
- QUARTZ (Germany) – QZ-5670XS.
Usually the choice is made in favor of GATES products. The letters "XS" in its catalog mean "reinforced". Grantovods have already told us in detail about the timing of replacing the timing belt, its selection, and signs of wear in the material:.
Original timing belt and fake
Attention! Components from GATES (England) are most often counterfeited! From the photo you can understand what the main difference is. Beware of fakes.
When to change and how much does it cost?
Replacing the belt drive in a timely manner is important. It transmits rotation from the crankshaft to the gas distribution mechanism. The shafts of this device distribute the gases and fuel mixture.
Factory specialists have established the frequency of replacing the drive after 180 thousand km. But in practice, car service workers advise not to wait for this time, but to replace the belt when the mileage is 100 thousand km or less. This is due to the insufficient quality of the part, as there are many counterfeit parts.
If the belt slips, gas mileage will increase and power will decrease. Particularly serious consequences can be caused by its breakage, which will immediately lead to damage to the valves and pistons. This occurs due to them meeting each other and bending the valves. Repairs after such a malfunction will be expensive.
The drive must be replaced in a timely manner. Such work in a car service costs approximately 6,000 rubles and more. Therefore, it makes sense to replace the timing belt with your own hands, following the operating technology. To do this you will need a set of tools.
Reviews
| № | Positive |
| 1. | Alexander: in two years of using the car I have never changed anything. I carry out prevention systematically, as prescribed by the instructions. I believe that a moderate driving style, high-quality oil, and original parts can work wonders. |
| 2. | Kirill: at 65,000 km I tightened one rod because it started to click when it was “cold”. I haven't changed anything until now. Everything is original installed. |
| 3. | Vasily: I replaced the timing belt in a year and a half. I thought it would be difficult, but it turned out to be the opposite. I recommend that motorists carry out preventive maintenance on their own. |
| 4. | Gennady: adjusting the valve clearances on Grant is not easy, but I was able to do it myself, without outside help. Instructions and video tutorials on the Internet are always at hand. |
| 5. | Ignat: after a year of using the car, the valves began to knock. At the service station the technician said that there was no need to change it, they limited themselves to tightening it. I still ride, no complaints. |
| 6. | Vladislav: for three years of using the car, I installed all the spare parts myself and did not contact the service center. Which is what I recommend to other Grantmakers. There were no major breakdowns, they were so insignificant. Fuel and oil filters don't count. |
| Negative | |
| 1. | Victor: My timing belt fell off within the first year after purchase, which turned out to be unexpected. I installed the new one myself, the process is not complicated. |
| 2. | Ivan: at 45,000 the valves began to knock, so I took it to the service station. The master said that the second and third valves were defective. Replaced with new ones. Buy Lada Granta in 16 cl. |
| 3. | Vasily: at the second service, I replaced the timing belt at the service center. Three teeth suddenly broke off, the quality is poor. |
Engines Lada Granta
Lada Granta cars are equipped with several types of VAZ power plants. There are 5 of them in total, these are:
- 11183-50;
- 11186;
- 21126;
- 21127;
- 21126-77.
In almost all modifications of the Lada Granta internal combustion engine, if the timing belt suddenly breaks, the valves will bend.
This does not happen only on the eight-valve engine with serial number: 11183-50, which was installed on the standard Granta from the very beginning of its production. However, here, too, everything depends on the engine speed at the moment the belt drive fails. There have been cases when serious problems appeared on this unit after it broke. Another 8-valve engine, which received the index 11186, not only bends the valve when the timing belt breaks, but can also cause damage to the pistons and connecting rods. In the best case, if the belt drive breaks on this installation, the intake valves bend.
The sixteen-valve engine 21126 is a modified version of one of the most popular internal combustion engines from VAZ - 21124, and many experts consider it the best of all that are equipped with Granta, but it also bends the valves due to the lack of recesses for the pistons.
The modified unit 21126, which received the factory index - 21127, was also not without the problem of valve bending, however, like the engine 21126-77 (installed in the Lada Granta Sport). How long is the timing belt life expectancy on Grant models?
Which belt is better to buy for a Grant and for which engine?
Gates belts are installed from the factory on all VAZ engines.
.
The replacement kit for 8-valve heads is part number K015670XS
.
We have dwelt in some detail on the topic of choosing the best timing belts for VAZ and VAZ engines, so there is no point in repeating ourselves. There you can also find out how to distinguish a fake from a good quality kit for replacing a timing belt, as well as all the necessary part numbers to search on local sites selling VAZ spare parts. The Italian-Chinese brand Trialli with article number GD 790 received good reviews from owners
More good belts. Which one fits the 8-valve Granta?
As for our Granta, the difficulty in choosing belts for an eight-valve engine is that the ancient but reliable eight-valve VAZ 11183
, analogue of VAZ 21083. This engine is good because the valves in it do not bend if the belt breaks.
For it you need to buy a belt
with catalog number
2108-1006040-10
, and a tension
roller 2108-1006120
.
New Gates belt
For two other Grant engines with 8-valve block preparation (these are VAZ 11186 and VAZ 21116
) we buy the following replacement parts:
- camshaft drive belt 21116-1006040
; - tension roller 21116-1006226
; - If you wish, you can buy a special key for the convenience of adjusting the belt tension 67.7812.9573-01
.
Belt from Continental
Of course, for this motor there are analogues from other manufacturers and there are quite a lot of them. Most Popular:
- GATES – 5670XS, like the original, but in its original box;
- Trialli GD 790, Italian brand, Chinese assembly;
- CONTITECH – CT1164, an excellent belt from Continental, if not a fake;
- QUARTZ with catalog number QZ-5670XS, German belts of good quality;
- INA 530053610, one of the highest quality and most expensive kits;
- DAYCO KTB944, a good Italian kit;
- Set manufactured by BOSCH 1987 948 286.
It is important that the belt corresponds to the geometric parameters - belt length 1305 mm, number of teeth 113, belt width 17 mm.
Review of Manufacturer Prices
Technical parameters of the roller:
- hole diameter for nut - 10 mm;
- width - 27 mm;
- height - 55 mm.
| Manufacturer | Price, rub.) | Resource (thousand km) |
| 1118-104102013 original Lada Granta | From 520 | 25 – 30 |
| GATES T42042 | From 450 | —/— |
| GATES T43228 | —/— | —/— |
| GATES T43147 | —/— | —/— |
| LYNXauto PB-1027 | From 480 | —/— |
| LYNXauto PB-1029 | —/— | —/— |
*prices are current as of October 26, 2018.
Cost of purchasing components separately:
- video: 450 – 500 rub.;
- belt: from 300 rub.;
- bracket: 430 RUR;
- axle: 85 RUR;
- tensioner: 380 – 400 rub.;
- studs, bushings: 300;
- bracket - adapter for generator: 2200 rub.
Total: 3800 - 4000 rubles.
Preparatory operations, all engines
First, remember a simple rule: the 11183 engine cannot bend its valves, so you can rotate the crankshaft and camshaft pulley separately. For motors 11186 and 21116 this would be unacceptable! Read more about engine 21116 in this material.
Before carrying out any work, disconnect the battery terminal (key 10), as well as the DPKV sensor. But first you need to remove the protective cover.
Unscrew the 4 bolts and remove the protection
To remove protection you need:
- 11186/21116 - using a “5-point hexagon”, unscrew the 4 bolts on the upper part, which is then removed. And the lower part is also dismantled;
- 11183 – use a 10mm wrench to unscrew the 3 fastening bolts.
It will not be difficult to cope with what is said above.
Disconnect the connector, unscrew one screw
The crankshaft position sensor (CPS) is disconnected from the connector (see photo). Then the fastening screw is unscrewed with a “10” wrench. The sensor itself must be removed.
Installation of all shafts according to marks
First check that the gear is in neutral. There is a rubber cover on the crankcase body closer to the clutch assembly. It needs to be removed.
Inspection window and rubber plug
The point is to achieve alignment of the marks on the flywheel and in the scale slot. When this is done, fix the flywheel with a screwdriver.
Flywheel fixed
Of course, it is easier to perform such an operation with two people. Know that the desired position of the shaft corresponds to the alignment of marks AB and CD (see figure).
Timing drive in 8-valve engines
The crankshaft itself must be rotated to the right using a 17 or 19 key (motor 11183). The meaning of this is illustrated in the photo.
You need to turn the generator drive pulley
The alternator belt needs to be removed
The alternator belt blocks access to the timing drive parts. You will have to loosen the fastening and remove this belt.
More about this:
- We change the alternator belt on a Lada Granta with air conditioning;
- We change the alternator belt without tensioner on the Lada Granta.
Generator mounting, 13 bolts
Use a 13mm wrench to loosen the lower mounting bolt. Then unscrew the upper fastening nut and remove the bolt. The generator casing is pressed against the engine and the structure is secured with wire. The belt can now be removed.
Installation of the alternator belt is carried out in the following sequence:
- Secure the generator;
- Throw the belt over the pulleys, as shown in the photo;
Installation of the alternator belt, first step - Having engaged 5th gear, roll the car back.
How is the replacement made?
So, you have discovered a defect or time for a planned repair. Replacement
carried out step by step only when the engine is cooled:
- Disconnect the battery from your Lada Grant.
- Remove the crankshaft position sensor. Place the sensor in a clean place, such as a shelf, that is free of steel filings or oil.
- With the piston on the first cylinder, place it at top dead center.
- Rotate the crankshaft until the mark on the crankshaft pulley aligns with the protrusion on the drive cover.
- Remove the yoke from the inspection window (located on the coupling body) and check the shaft position. If you did everything correctly, a sign will appear in the field and will be in front of the slot. Stop the flywheel using a screwdriver (it must be installed between its teeth).
- Unscrew the generator drive pulley, remove it from the shaft and remove the washer.
- Remove the camshaft cover.
- Loosen the tension roller (it should turn).
- Remove the belt from all pulleys and pull out.
- If you need, in addition to installing the timing belt, remove the tension roller and replace it with a new one, unscrew the mounting bolt, and then remove the roller directly from it.
- Before submitting a new video, check to see if a replacement
. To do this, take the metal middle of this mechanism and rotate the plastic part. When the accessory is working, it moves smoothly without jamming. - Inspect the pump and begin reinstalling the gas distribution mechanism. Place the roller in the top hole on the cylinder block, but do not turn the bolt that secures this part of the drive all the way.
- Install the belt so that it operates correctly on all pulleys and rollers. To install the belt correctly, after laying it on the crankshaft pulley (it must be installed in its place), pull both parts of the part. Try to distribute the load evenly.
- The farthest part belt
should lie on the pump pulley and go behind the tension roller (check the chain at this stage), and the closer it should lie neatly on the camshaft gear. - Pull the camshaft slightly (in the direction of the lower stroke) until the teeth on the belt
align with the notches on it. Use a special wrench to turn the tension roller counterclockwise.
After the replacement
, check the tension of the timing belt. Excessive voltage in it on Grant Lade is fraught with failure of the cooling system pump. In addition, if the belt is over-tensioned, it can quickly trip.
A loose belt can lead to poor valve timing. Turn the crankshaft to the right until the alignment marks line up. After this, turn over the alternator pulley assembly. Remember that when removing the belt
It is strictly forbidden to turn the shafts on a Lada Grant model car.
The adjustment is only made when the replacement
has already been completed.
There is a special offer on our website. You can get a free consultation with our corporate lawyer by simply submitting your question in the form below.
Complexity
Tool
3 - 6 hours
Tools:
- 5 mm hex key
- Screw jack
- Wheel key
- Ratchet wrench
- 8 mm head
- 10 mm head
- 13 mm head
- Medium flat screwdriver
- Driver for socket attachment
- 17mm wrench attachment
- Open-end wrench 19 mm
- 15 mm straight box spanner
- 8mm curved box spanner
- Torque wrench
- Special wrench for turning the tension roller (or circlip remover)
Parts and consumables:
- Timing belt (part no. 21116-1006040)
- Timing Belt Tensioner Roller
- Shoe - 2 pcs.
Notes:
We check the condition of the timing belt on a cold engine (15-35°C) every 15 thousand kilometers.
Replace the timing belt in accordance with every 75 thousand kilometers or if defects are found on the belt.
Checking the condition of the timing belt
1.
Using a 5 mm hex key, unscrew the four screws (on the VAZ 11183 engine there are three bolts) securing the front upper timing cover and remove it.
Note:
In the VAZ-11183 engine, wire holders are also attached to the side cover bolts.
2.
Engage fifth gear in the gearbox and place wheel chocks (“chocks”) under the car wheels.
3.
Use a jack to lift the right front wheel.
4.
Rotate the wheel clockwise, turn the engine crankshaft and inspect the timing belt. With normal belt tension, cutout 1 of the outer disk of the tension roller should coincide with the rectangular protrusion 2 of its inner sleeve.
5.
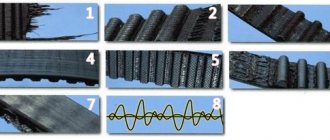
Check the condition of the timing belt. The surface of the toothed part of the belt should not have folds, cracks, undercuts of teeth and separation of fabric from rubber. The reverse side of the belt should not have wear, exposing the cord threads, or signs of burning. There should be no delamination or fraying on the end surfaces of the belt. If defects are found on the belt or there is a significant discrepancy between the belt tension control elements (pictured above), replace the belt. You should also replace the belt with a new one if traces of engine oil are found on it (before installing a new belt, the cause of oil getting on the belt must be eliminated) or when replacing the coolant pump.
Note:
Failure of the timing belt (breakage and cutting of teeth) can lead to valves sticking into the pistons due to mismatch of the rotation angles of the crankshaft and camshaft and, as a result, to expensive engine repairs.
Removing the timing belt and installing the piston of the 1st cylinder to the TDC position
1.
Remove the right front wheel using a jack, wheel wrench and screwdriver.
2.
Remove the alternator drive belt as described in the second half.
3.
Disconnect the wiring harness from the crankshaft position sensor connector.
4.
Using a 10 mm socket, unscrew the sensor mounting bolt and remove the sensor itself.
5.
Before dismantling the belt, be sure to check the engine valve timing - set the piston of the 1st cylinder to the TDC (top dead center) position of the compression stroke. To do this, use a wrench with a 17 mm socket to turn the crankshaft clockwise by the bolt securing the generator drive pulley until mark 1 on the camshaft timing pulley aligns with boss 2 on the rear timing cover.
Note:
Although the described method is the most accurate, turning the crankshaft by the bolt securing the pulley to it is very inconvenient. You can do this in two alternative ways:
1. Engage any gear (preferably 4th or 5th) and slowly roll the car until the marks on the camshaft pulleys match the mark on the rear cover of the camshaft drive belt;
2. Engage any gear and lift one of the front wheels. Then turn the hanging wheel until the mark on the camshaft pulley matches the mark on the rear cover of the camshaft drive belt (this method is described in paragraphs 2-4 at the beginning of this article).
6.
To ensure that the crankshaft is in the correct position, remove the rubber inspection window plug on the top of the clutch housing.
7.
Look through the inspection window: mark 2 on the flywheel should be located opposite the slot 1 of the scale on the top cover of the clutch housing.
8.
Before unscrewing the bolt securing the generator drive pulley, ask an assistant to secure the crankshaft from turning by inserting a screwdriver through the window in the clutch housing between the flywheel teeth.
9.
Using a socket with a 17 mm socket, unscrew the bolt securing the generator drive pulley and remove it.
10.
Then remove the washer behind the removed generator drive pulley.
11.
Using a 5 mm hex key, remove the three screws securing the front lower timing cover and remove the cover.
12.
Using a 15 mm spanner, loosen the bolt securing the tension roller. At the same time, the tension roller will rotate and the belt tension will weaken.
13.
Remove the timing belt from the crankshaft and camshaft pulleys and remove it from the engine compartment.
Note:
After removing the timing belt, the crankshaft and camshafts must not be rotated to avoid the pistons from pressing into the valves.
The marking of the timing belt (width 17 mm, number of teeth 113) looks as shown below.
Installing the timing belt and replacing the tension roller
1.
To remove the belt tension roller, unscrew the bolt securing it with a 15 mm spanner and remove the roller itself.
2.
Assess the condition of the tension roller bearing: rotate the plastic holder of the roller while holding it by the eccentric. The roller should rotate silently, evenly and without jamming. Otherwise, the roller must be replaced.
3.
Install the tension roller in place without completely tightening the bolt that secures it. For different engine modifications, the cylinder head has two threaded holes for the tension roller mounting bolt. In this case, screw the roller mounting bolt into the upper hole of the cylinder head.
4.
Install the timing belt in reverse order. Before installing the belt, make sure the timing marks of the crankshaft and camshaft are aligned. Place the belt on the crankshaft timing pulley, then, while tensioning both branches of the belt, put the rear branch on the coolant pump pulley and place it behind the tension roller, and put the front branch on the camshaft pulley.
5.
If necessary, turn the camshaft pulley in the direction of the smallest stroke until the belt teeth coincide with the grooves of the pulley. To tension the belt, turn the tension roller counterclockwise. To do this, insert rods (∅4 mm, distance between rods 18 mm) of a special key into the grooves of the outer disk of the roller. You can also use a circlip puller (shown on the removed roller for clarity).
6.
Tension the belt by turning the belt tension roller counterclockwise until the cutout 1 of the outer disk of the roller coincides with the rectangular protrusion of its inner sleeve 2. Tighten the roller mounting bolt to the required torque.
Note:
Excessive belt tension will reduce the life of the belt, as well as the coolant pump bearings and tension pulley. Insufficient belt tension also leads to premature failure and can cause irregular valve timing.
7.
Turn the crankshaft two turns clockwise. Check the belt tension and alignment of the timing marks of the crankshaft and camshaft. With the generator drive pulley removed, it is convenient to control the correct position of the crankshaft by aligning mark 1 on the crankshaft toothed pulley with rib 2 of the oil pump cover.
8.
If necessary, repeat adjusting the valve timing (section 5-7 “Removing the timing belt”) and tensioning the timing belt.
9.
Reassemble everything in reverse order.
Note:
For proper installation and tension of the generator drive belt, use the information described or (depending on the presence or absence of the generator belt tension roller in the design).
The article is missing:
- Photo of the instrument
Replacing the timing belt of Lada Granta 8 valves is required once every 75 thousand kilometers. If you ignore the scheduled replacement of the belt, tension roller and sometimes the pump (coolant pump), you may end up with serious repairs to the Lada Granta engine. After all, a broken timing belt almost always leads to damage to valves, valve seats and even pistons. Therefore, the timing drive must be treated very carefully. Every 15 thousand it is necessary to inspect the belt for breaks, cracks, peeling or oiling.
The advice applies to VAZ, 11186 and 21116 engines. All of them are 8-valve and are installed in Grant cars. Let's consider replacement steps.
First, remember a simple rule: the 11183 engine cannot bend its valves, so you can rotate the crankshaft and camshaft pulley separately. For motors 11186 and 21116 this would be unacceptable!
Replacement procedure
Many owners of this car prefer to carry out this operation in specialized workshops, but some do it themselves. There is nothing overly complicated in this procedure; there is no need to purchase special equipment or devices. You can replace the timing belt yourself in the garage. You will need to prepare a set of wrenches, a mounting shovel, a jack, a stand for the body, wheel chocks, gloves, and rags. Round nose pliers with curved ends are suitable as a key for adjusting the tension roller.
Replacing the timing belt on a Lada Grante is performed in approximately the following sequence:
- The car is placed above the inspection hole or on a flat surface, the handbrake cable is tightened, and wheel chocks are installed under the rear wheels.
- Open the engine compartment hood and disconnect the terminals from the battery.
- The generator set drive belt will interfere with work, so it is removed.
- Now, using the hex number “5”, remove the four screws that secure the front protective cover of the gas distribution mechanism drive.
- To avoid accidentally damaging the crankshaft position sensor, it should be removed from the cylinder head and set aside. Do not allow metal filings to come into contact with the sensor; they may further distort its readings.
- Next, you need to set the piston of the first cylinder to the top dead center position.
- Removal of the toothed belt is hampered by the generator drive pulley on the crankshaft, which must be removed. To do this, tear off the wheel bolts of the right front wheel and raise the body with a car jack.
- A stand is installed under the body, the wheel is removed, and the protective shield is on the mudguard.
- An assistant is needed to remove the crankshaft pulley. Ask him to engage fifth gear and press the brake pedal hard. Some experts insert a powerful screwdriver into the hatch on the transmission housing between the teeth of the flywheel.
- Applying some force to the head “17”, unscrew the bolt and remove the pulley from the crankshaft.
- You will again need the fifth hexagon number, with which you need to unscrew the three screws of the lower protective casing of the timing mechanism, after which you can remove the protection.
- Now you need to loosen the tension roller fixing bolt; a 15 mm spanner is best suited for this. After this, the roller will rotate and release the tension of the drive belt, which is easily removed from the gears and taken out of the engine compartment.
Important! After this, you cannot turn the engine crankshaft to prevent the pistons from meeting the valves.
Typically, the belt is replaced together with the tension roller and coolant pump, so they must be removed from the cylinder block. There is an adjusting washer under the roller, which is installed back during assembly. When removing the pump, pour a certain amount of antifreeze into a previously prepared container. Installing a new timing belt is carried out in the reverse order.
Please note that you need to check the position of all installation marks on the crankshaft and camshaft, cylinder block and timing case.
Setting marks
This is an important procedure when replacing the timing belt, so it must be taken seriously. This engine has four timing marks in the timing drive. Two on the crankshaft and camshaft gears, one on the cylinder block in the crankshaft area, the last one is on the metal protective casing. Two more marks are located on the flywheel and gearbox housing. They will be clearly visible when the rubber plug is removed. It is the marks of the flywheel and the box casing that will indicate the position of the piston of the first cylinder at top dead center.
Turn the crankshaft with a key to “19” clockwise until all the marks of the mechanism coincide. The camshaft pulley mark in the form of a conical recess or boss will be in a horizontal position and coincide with the protrusion on the protective casing. The mark on the crankshaft pulley will look strictly vertical and coincide with the mark on the cylinder block.
The installed new timing belt must be tensioned to the required parameters. Before doing this, be sure to check the position of the installation marks again; if everything is in order with them, you can tension the drive. To do this, you need to turn the tension roller counterclockwise until the marks on it match. There is one mark in the form of a cutout on the outer frame, the second on the inner one in the form of a protrusion. You can turn the tension roller with a special wrench or pliers.
We change the belt ourselves
Replacing the timing belt after a specified period on 16 and 8 cl Lada Granta engines is a simple process and even a novice car enthusiast can do it with his own hands. The main thing is to carefully follow all the instructions and not miss anything.
Required Tools
- keys for 10 and 17;
- mounting spatula;
- roller tension wrench;
- jack;
- set of TORX (sprockets) and heads;
- forceps.
Roller tensioner
Stages of work
- First, remove the negative terminal of the battery.
- Remove the generator belt drive.
- We fix the car using stops; decide for yourself which ones are best suited for this.
- When we lift the car with a jack, remove the right front wheel.
- Remove the gas distribution mechanism cover.
- The piston of the 1st cylinder should be set at the highest point.
- We loosen the belt tension using a tension roller or bolt.
- Loosen the tension roller nut.
Tension rollers - Unscrew the bolt securing the generator pulley. If difficulties arise, you need to open the plug in the crankcase. Using a mounting spatula, it is necessary to fix the flywheel teeth; this will keep the crankshaft from turning arbitrarily.
- Remove the generator drive pulley.
- Remove the bottom cover by first unscrewing the three bolts.
- We remove the timing belt drive from the camshaft and crankshaft pulley.
- If necessary, remove the timing belt tension roller.
- We carefully examine it, and if we find that its condition is unsatisfactory, we change it.
- We also inspect and, if necessary, replace the belt.
- Assembly of all other components proceeds in the reverse order.
The next important stage is the correct tension of the timing belt drive of the Lada Granta with 16 cl and 8 cl units.
- First of all, you need to warm up the engine, the coolant temperature should be 20-25° - this is a certain norm. This temperature must be exactly so that the roller marks coincide. If you warm it up to 80-90°, the mark will shift by 5-6 millimeters. Important! Use rollers that are recommended for a Lada Granta 8 or 16 cl, otherwise the results may be different, even the belt may break.
- Next, you need to align the marks of the camshaft pulley and the marks located on the rear cover.
- We fix the pulleys with the device described earlier.
Fixing pulleys
- We align the marks on the crankshaft pulley and on the oil pump cover.
- We turn the crankshaft with a wrench in the shortest angular direction.
- We tighten the bolt securing the auto tensioner.
- We put the belt drive on the support roller, pulleys and auto-tensioner.
- We install a special key for tensioning the belt in the grooves of the auto-tensioner support plate.
Belt tensioner - Turn it counterclockwise until the first and second marks coincide.
- Tighten the bolt securing the tensioner. The tightening torque should be approximately 2.4/3.5 kgf. m.
- Remove the crankshaft lock and turn it a couple of turns.
- If the first and second marks do not match, you will have to re-tension.
Attention! The tension roller should not move or deviate, no matter how much in one direction or another, this will be proof that it is in good condition and working correctly. This means that its breakage is excluded.