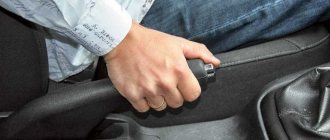
The parking brake cable is the device that interacts with the brakes of the rear wheels. The well-known handbrake is now little used when stopping at an intersection, but on a manual VAZ-2114, for example, it is very convenient to use it on a steep descent.
When making turns, using the handbrake correctly can significantly reduce the turning radius. And if you have to jack up the car, it’s hard without a handbrake.
The handbrake should keep the car on the slope. To check, you need to park the car on level ground, put it on the handbrake and push it hard. If it starts to roll, then it’s time to change the cable.
Tension
So, having understood the diagram, you can begin the procedure of tightening the handbrake cables.
Stretch
The tensioning procedure is as follows.
- Place the car on an overpass or pit. If you don’t have a garage and you have the opportunity or desire to carry out the procedure at a service station, use a jack. The rear of the car is raised on a jack. The most extreme option is a curb onto which the car is driven and all you have to do is crawl under it.
- Engage the gearbox in first gear and put the car on the handbrake by pulling the lever up.
- The ideal number of handbrake clicks is from 2 to 5. If there are fewer or more clicks, it is easier to take appropriate measures to tension the cable.
- If there are less than 2 clicks, then the cable will need to be lengthened. If there are more than five clicks, then the cables are shortened.
- Lengthening the cable means relaxing it. To do this, unscrew the locknut. When tightening the cable, the locknut must be tightened in reverse.
- Before you start looking for the required nut on the bottom of the car, release the handbrake lever all the way.
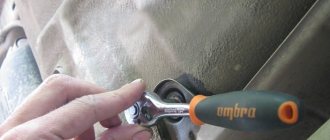
- Take a 13mm wrench under the car and head down.
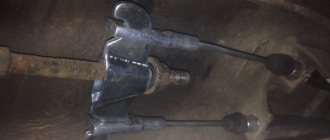
- Find the handbrake cable equalizer. This is the same element from which the main handbrake cable is divided into two cables.
- In some cases, it is simply not possible to gain access to the equalizer, since the muffler holders made of rubber are in the way. In such a situation, it is better to remove them. This is not difficult to do, but working with the handbrake will be much easier.
- Now there are two nuts in front of you. One is a simple nut and the other is a lock nut. Having two keys in your hands, fix the nut with the first one, and with the second one begin to unscrew or tighten the locking nut. Be careful that the nut does not start to turn.
- Taking into account the condition of the handbrake and the need to loosen or tighten the lever, turn the locknut in the appropriate direction. Remember what is the optimal number of clicks.
- Tighten or unscrew the locknut to obtain the required degree of tension.
Examination
But if you twisted the nuts there, this is not a guarantee that the handbrake now works perfectly. This needs to be clearly verified.
To do this, it is enough to go through a successive stage of verification activities.
| Stage | Explanation |
| Spin the wheels after tensioning is completed | The wheels are lifted one by one on a jack. When the handbrake lever is turned off, they should rotate freely without obstacles. By squeezing the brake, the wheels should lock. |
| Drive up a slight slope, stop and engage the handbrake | The fact that the wheels do not spin when suspended is good. But you need to make sure that the handbrake holds the car even when exposed to gravity. |
If the check shows that the handbrake still does not hold, even if the cable was tensioned exactly according to the instructions, the handbrake is probably simply worn out and the cable needs to be replaced.
Signs that replacement is needed
It is not uncommon for the VAZ 2114 handbrake cable to rust, as a result of which it breaks or weakens so much that no tightening can restore its previous functionality.
At the first sign of cable wear, you should consider replacing it. This problem may manifest itself as follows:
- The handbrake is not able to withstand the required traction;
- Drum brakes overheat;
- When you pull the parking brake lever, the cable does not respond to your actions;
- The cable sheath is seriously worn.
To check the operation of the handbrake, it is enough to perform one simple action. Place the car on a level surface, apply the handbrake, get out of the car and try to push it hard. If movement begins, the cable is dead and needs urgent replacement.
We recommend: The best inexpensive winter studded tires
Pull up the handbrake
Replacing the rear brake pads of VAZ 2113, 2114, 2115
But if you really know how to tighten the handbrake on a Lada Granta “standard” configuration, this procedure will not take you much time and effort. The only thing that is required for its implementation is a jack or an inspection hole, because access to adjustable components and assemblies occurs from below and you will have to work under the car. To tighten (adjust) the handbrake you will need 3 tools:
- two open-end wrenches for 13, one of them is preferably a socket one;
- one key head for 8;
- a faithful assistant (although in desperate situations you can get by alone).
The process of directly adjusting the manual braking system of a Lada Granta car is carried out in nine main stages:
- We lower the handbrake lever inside the car.
- We climb under the car, unscrew the rubber cushions (brackets) from the resonator, and remove the muffler from its attachment to the body.
- We remove the protective screen of the parking brake adjustment mechanism. To do this, use a socket wrench to unscrew the 4 nuts from the fastening bolts.
- We remove the protective screen or move it to the side behind the muffler - in this case, the necessary space for work is also quite enough. In this case, the muffler can be pulled back with something, for example, by pushing a block of wood under it.
- We take two 13mm wrenches - the first one is to slightly loosen the locknut, holding the adjusting nut. Then vice versa - hold it, and secondly turn (also loosening) the adjusting nut.
- Actually, we adjust the hand brake as follows: tighten the handbrake cable, for which we tighten the adjusting nut (move the key clockwise).
- Next, you should check the travel of the handbrake lever - this is why you need a partner, or you will have to do it yourself. The lock nut can be tightened when the handbrake stroke is 2-4 clicks (see above).
- Then we test the operation of the parking brake mechanism as a whole. To do this, lift the rear wheels and check how freely they rotate when the handbrake is lowered and how completely they lock when fully raised (in this case they should not rotate at all!).
- If the handbrake is working properly, tighten the locknut and replace the protective screen and muffler. The handbrake adjustment is complete!
As the mileage and life of the vehicle increases, the handbrake becomes less and less adjustable. It happens that even after adjustment, the manual braking system does not work properly and does not “hold” the car. This indicates that the wear on the brake pads is too high or the cable stretch is irreversible.
Tools:
- Ratchet wrench
- Extension
- 10 mm head
- 13 mm high head
- Open-end wrench 13 mm
Parts and consumables:
Aerosol lubricant type WD-40
Notes:
The parking brake should hold the vehicle on a 23% grade. The full travel of the parking brake lever should be from 2 to 4 teeth (clicks) of the lever ratchet device.
1. To adjust the parking brake, place the vehicle on an inspection ditch or overpass and lower the parking brake lever.
2. Using a 10 mm socket, unscrew the four nuts securing the rear heat shield of the additional muffler, having previously treated them with WD-40 lubricant.
3. Remove the rubber cushion from the front suspension bracket of the additional muffler.
4. Slide the heat shield forward to expose the parking brake adjustment assembly.
5. Holding the adjusting nut of the cable end with a 13 mm wrench, use a socket of the same size to unscrew the lock nut.
6. Turn the adjusting nut clockwise to tighten the cables.
Note:
It is convenient to adjust the tension of the cables with a high head with a ratchet and an extension. In this case, do not unscrew the lock nut completely, but, aligning its edges with the edges of the adjusting nut, put on a 13 mm high socket and rotate both nuts at once.
7. Use the locknut to secure the adjusting nut. When the lever is lowered, the suspended rear wheels should rotate freely.
The article is missing:
Photos of parts and consumables
Adjusting the handbrake lever on the Lada Grant is necessary if its stroke is more than 6 clicks. The optimal stroke is 2-4 clicks, but during operation it is allowed to increase its stroke to 8 clicks.
An increase in the travel of the parking brake lever occurs for several reasons, the main ones being stretching of the handbrake cable and wear of the brake pads.
HOW TO ADJUST THE HANDBRAKE
Sometimes, after replacing the cable, it becomes necessary to adjust the brake. It's easy to check whether adjustments are needed. We put the car on the handbrake down the slope. If it moves, then it needs to be adjusted.
Incorrect operation of the handbrake is expressed not only in poor fixation of the car when using the parking brake. A creaking sound near the rear wheels also indicates that the cable tension needs to be loosened.
Adjusting the hand brake of the VAZ 2114 is quite simple:
- It is necessary to remove the muffler from its mountings
- Unscrew the parking brake lock nut
- Tighten or loosen the nut, depending on the situation (if it doesn’t hold, tighten it, if it creaks, then loosen it).
The lever travel should be in the range of two to four clicks until it is completely locked. After this procedure, you need to check the car again on a hill.
How to tighten the handbrake on a VAZ 2114
During operation, many elements of the brake system wear out. The cables suffer the most. They may be subject to deformation. They also stretch over time. What needs to be done and how to tighten the handbrake of a VAZ 2114?
To repair the handbrake, do the following:
- The car needs to be driven onto an overpass. As an alternative, a regular inspection hole is also suitable. A jack should be used for repairs.
- After this is done, you need to set the gear lever to 1st gear.
- When this is done, you need to release the handbrake.
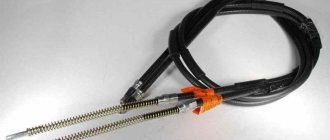
- Now it's time to find the most important tool. We are talking about a key for 13. You will need 2 copies.
Keys for 13
- After this, you should go under the car and find the muffler. It will be easier to do this if you study the location of this unit in advance according to the instructions.
- The next step is to remove the muffler mounts as carefully as possible. When this is done, the manifold mounts must also be removed. If this is not done, then further repair steps will be much more difficult.
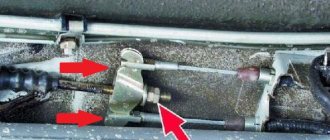
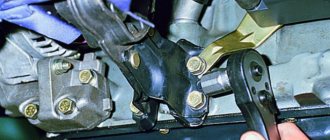
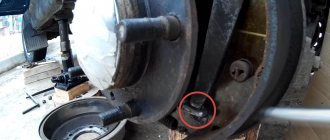
Handbrake linkage equalizer
- You need to find a cable equalizer. When this unit is found, you need to loosen the locknut using the first wrench. A second wrench will be needed to hold the nut. If this is not done, scrolling may occur.
- Now it’s time to adjust the lever travel. Tightening the nut reduces the stroke of the lever, and loosening the nut increases the stroke of the lever. A stroke of two to six clicks is considered normal.
Adjusting the parking brake
- After this is done, all that remains is to raise the rear of the car using a jack. You need to get the car in such a position that the wheels are hanging. After this, you can begin checking the brake pads. The wheels must be secured as securely as possible, otherwise an emergency situation may occur.
- At the last stage, you need to tighten the nut back. After this, you should check the handbrake for functionality.
Checking the hand brake
Dismantling and replacement
It is difficult to confuse the cable from the handbrake with anything else under the bottom of your VAZ 2114, which greatly simplifies the repair and replacement procedure.
Dismantling works
We provide detailed instructions for replacement, and additionally recommend watching the video.
- We advise you to get the car in order in terms of cleanliness in advance. This will make it easier for you to find all the nuts and fasteners.
- Additionally, treat the nuts with the almighty WD40. This will make it much easier for you to unscrew the sometimes sticking and rusting nuts.
- Place the handbrake lever all the way down.
- Start with the adjusting nut and locknut that you used recently to try to tighten a loose cable. In this situation, you should loosen the nuts and remove them from the handbrake rod.
- Remove the washers and cable equalizer. Although this can be done after you jack up the car. But be sure to do it before removing the wheels.
- Raise the rear of the car with a jack, unscrew the wheel bolts and remove them.
- Tap the brake drum locking pins. This will allow them to be removed from the brake pads.
- Remove the block.
- You now need to disconnect the ends of the two cables from the equalizer. The fasteners can be removed from their places with the simplest pliers, so don’t bother.
- The shifted spacer lever has hooks from which the cable loop can be removed.
- The cable sheath must be removed from the entire suspension of the rear of the car. To do this, the mounting bolts are first unscrewed.
- Pull the cable out of the holes through the brake flaps.
- We got rid of the old cable, so all that remains is to replace the old one with a new element. The procedure is performed exactly in reverse order.
- Thread the new cables through the washers and hook the loops. You can additionally make bosses - this is a special clamp that allows you to fix the cable even more tightly.
- Reassemble the entire disassembled wheel structure.
- Route the cable along the suspension through the sheath and secure the bolts.
- Pull the handbrake in the cabin.
- Check the correct tension and operation of the new hand brake, or rather the cable.
It is not uncommon for the parking brake to cause an unpleasant squeaking noise from the rear. By changing the cable, you can get rid of this problem at the same time. To do this, rubber seals are installed under the cable fasteners on the body frames.
Functionality check
After replacing the cable, check its operation.
- Place the car on a hill and turn on the handbrake. If the car starts to roll, the new cable needs adjustment.
- Loosen the parking brake lock nut in the handbrake, tighten the adjusting nut, and then pull the cable using the lever.
- The optimal lever stroke should include 2-4 strokes. If this happens, tighten the locknut and check it again.
- We drive up a hill and turn on the handbrake. Now the car should definitely stand still. Unless the cable turned out to be fake or an error was made during the assembly stage.
Disassembled handbrake
Before frost, it is recommended to lubricate the parking cable, which will significantly extend its service life. Under the influence of negative temperatures, the cable breaks down faster. The tips, axle and rod of the equalizer should be lubricated.
Tightening and replacing the handbrake cable is not a difficult task. Even if you don't have a lot of experience working on cars, you will be able to do this job.
But if you are not confident in your own abilities or simply do not have time to do such things on your own, contact a service station. A lift will cost about 500-700 rubles, but for a replacement they will ask for at least 1,500 rubles.
cableThe role of the car’s braking system in ensuring safety is unlikely to be disputed by anyone, but the importance of the “handbrake” is still underestimated by many. Some motorists are negligent about its technical condition, believing that in extreme cases they will be able to lock the car in the parking lot by engaging the gear. At the same time, they do not take into account that a tightened handbrake will also help in a critical situation on the road. Therefore, it is better to monitor its condition from the first days and make timely repairs to the system.
We recommend: Why did antifreeze turn brown?
Handbrake on rear disc brakes
In order to pay more attention to the adjustment process and not go into the intricacies of the operating principle of a mechanically driven parking brake on disc brakes, we will list only the main types of device.
- The brake disc is held by an additional pad, which, when the handbrake is raised, is pressed against the working surface of the disc by means of a rocker arm.
- The brake disc design allows individual brake pads to be placed in the internal cavity. The operating principle is similar to that of drum brakes.
- Design with mechanical support of the working piston. In the cavity of the brake piston there is a ratchet (for automatically bringing the pads together), into which a pin with a trapezoidal thread rests. The curved rod drives the pin by turning the shaft with a concentric groove.
Adjustment
In the case of the most common drum type of design, the handbrake can be adjusted by rotating the adjusting pawl. The regulator itself can be located on the side or bottom of the brake mechanism. Access to it is through a technological hole in the shield, which must be covered with a plug.
In some types of construction, the regulator may be locked by a spring element, so it will have to be bent to release and rotate the “pawl”. The handbrake design on the rear disc brakes and the adjustment mechanism are perfectly shown in the video.
One of the elements of the braking system of a car is the parking brake; in motorist circles it is called the handbrake. The mechanism is needed to ensure that the car remains in place while parked (especially on slopes). Every self-respecting motorist simply must know how to tighten the handbrake.
Replacement
It is not difficult to independently replace the VAZ-2114 parking brake cable.
To replace you need the following tool:
- key to “10”;
- two keys to “13”;
- a large screwdriver and WD-40 for smooth fastening.
Replacement is carried out on an inspection hole or overpass.
- The handbrake must be lowered all the way down.
- All parking brake nuts need to be cleaned. Don't forget about the leveling bar.
- The locknut must be loosened and removed from the rod. The same is done with the adjusting nut.
- Now they begin to remove the wheels. First loosen the wheel bolts. The rear part is lifted with a jack. Don't forget about the supports! Once they are aligned, you can remove the rear wheels.
- Remove the brake drums using a hammer and a wooden spacer. You need to knock the locking pins off the pads.
- The end of the parking brake cable of a VAZ-2114 car is attached to the rear brake shoe lever. First you need to remove the block, and then the cable end.
- Unscrew the fastening bolt and disconnect the cable sheath.
- A cable is pulled out from the holes in the brake flaps on each side.
- Then they take out the cable sheath from the fastenings on the body.
Why the handbrake does not work on the VAZ 2107
Like any other part or mechanism, the handbrake cable tends to wear out and become unusable. The parking brake on the VAZ 2107 is activated using a lever located in the middle part of the car between the driver and passenger seats.
Periodically, the handbrake cable should be tightened, as it becomes weakened, which leads to a decrease in the efficiency of the device. The reasons why the handbrake on the “seven” may not function are due to the following factors:
- Excessive cable stretch.
- Damage to the cable.
- Malfunction of the brake mechanism in the rear wheel drums.
During prolonged use of the car, when the handbrake is constantly used, owners are faced with the need to periodically restore the cable tension. Over time, the device in question stretches, and there is nowhere to tighten it. The only way out of the situation is to exchange the product for a new one. It is recommended to carry out work on replacing the handbrake cable in an inspection hole, but you can do without it.
Changing the handbrake cable
Replacing the handbrake cable on a VAZ 2107 car begins with the fact that it is first necessary to dismantle the brake drums of the rear wheels
After dismantling the brake drums, you should pay attention to the condition of the rear brake pads and working cylinders. The presence of traces of fluid leakage will indicate that the mechanisms also need repair
Each owner of his car decides individually when it is necessary to change the handbrake cable. It all depends on the degree of wear of the cable. The procedure for replacing the parking brake cable is divided into 2 stages: dismantling and installation, as well as adjusting the tension.
The replacement algorithm is as follows:
- After the rear wheels and brake drums are removed, you need to go down into the inspection hole and find the tension adjusting rod. This rod is equipped with a spring, which must be removed using a screwdriver.
- Both nuts are unscrewed, after which the adjustment bar is removed. Next, the rear and front handbrake cables are dismantled.
- Using a wrench, you need to unscrew the two nuts securing the two brackets. These brackets prevent the cable from falling. There are screws under the nuts that prevent them from unscrewing on their own.
- After this, you should remove the rear brake drums and remove the springs that secure the brake pads. The pads can also be replaced if they show excessive wear.
- Next, you need to pull the cable to disengage it from the bracket against which it rests.
- The brake pads are removed. There is no need to remove both pads on the wheel. To replace the rear cable, you only need to remove one rear brake pad.
- Now you should unscrew two fixing bolts from the back of the brake shield of both wheels. With their help, the cable tip is fixed. After unscrewing these two bolts, you should pull the cable, as shown in the photo below.
- Using a 10mm wrench, you need to unscrew the front cable mounting brackets. After unscrewing the bolt, carefully remove the roller. To remove the roller, you need to roll it forward in the direction of the tip.
- To remove the front part of the device, you need to pull on the product to remove it from the bracket and intermediate support structure.
- After this, you need to get out of the hole and go into the car interior. When performing work, the handbrake must be in its lowest position. Inside, unscrew the two screws securing the handle trim.
- There are 4 bolts under the cladding that need to be unscrewed. After unscrewing them, you will need to remove the handle along with the front cable.
- To disconnect the cable mount from the handle, you will need to use pliers to remove the small cotter pin that secures the device to the handbrake handle.
- After this, the device can be completely removed from the car and a new cable installed in its place. The installation process of both products is carried out in the reverse order of removal. After this, you should secure them and begin the tension adjustment procedure.
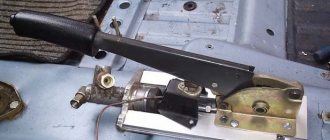
Design
Many people mistakenly believe that the handbrake is a simple lever located near the gearbox, on the right hand of the driver. In fact, it is a whole system of elements that are connected to each other.
When the hand brake fails, in 90% of cases the culprit is a cable or a pair of cables that go to the rear brake pads from the equalizer.
To determine the reasons for the failure of the handbrake, it is necessary to understand the circuit diagram of the device and its components.
Handbrake diagram
The device includes a number of structural elements. Namely:
- Lever arm;
- Traction;
- Springs;
- Lever button;
- Main cable axis;
- Bolts;
- Washers;
- Drive unit;
- Equalizer;
- Case;
- Locknuts;
- Cotter pins;
- Right and left lever;
- Expansion left and right strip;
- Lock washer, etc.
REPLACEMENT AT CAR SERVICE
Why shouldn't you contact a car service? The answer is simple - not economically, and not always of high quality. It seems that the procedure is not complicated, but the cost of the work is daunting. In addition, at most service stations they try to slip in their own cable, which is also not cheap. The average price in a store will be 200 rubles, while the service can rip off 500 just for a part. The cost of the handbrake cable varies depending on the manufacturer.
By making the replacement yourself, you will know exactly how well the work was done. Replacing the handbrake cable of a VAZ 2114 is a responsible matter. If you do everything according to the instructions, then there should be no problems. The main thing is not to forget about safety precautions.
Replacing the handbrake cable with your own hands is not a difficult task
How to remove the parking brake cable?
- Removing the wheels
- Removing the brake drums
- Remove the rubber cushions (holders) of the muffler and manifold.
- Loosen the locknut of the handbrake adjusting nut on the cable equalizer.
- Using keys “13”, unscrew both nuts and remove them.
- We remove the equalizer and disconnect the cable ends from it.
- From the rear wheels, use a large slotted screwdriver to move the spacer lever forward and remove the cable eyelet from the hook of the spacer lever.
- Using a “10” wrench, unscrew the nut securing the cable to the rear suspension arms.
- Remove the cable end from the hole in the body bracket.
- Next, having removed the additional holding mechanisms, we take the cable out of the hole in the support shield of the rear brake mechanism and remove it.
Cable eyelet on the hook of the spacer lever
Adjusting the hand brake VAZ 2114
A handbrake failure is not a rare event. This kind of malfunction occurs everywhere. In some cases, after tightening the handbrake, the handbrake still remains inoperative. What are the main reasons for this malfunction?
The structure of the parking brake is quite complex.
Most often the problem is:
- Worn out brakes.
- Rope rupture or complete deformation.
- Drum wear.
Parking brake cable
The fastest way to repair the handbrake is to contact a service center. If you have no desire to go there, then you can try an alternative option. It consists of tightening the handbrake yourself.
HANDBRAKE CABLE REPLACEMENT PROCEDURE
The moving parts of the brake system tend to wear out. The working condition of such parts must be diligently monitored, since brakes are an extremely important part of the car. Timely repairs and diagnostics will help protect yourself and your car from unforeseen situations. The most unpleasant breakdown is a broken parking brake cable.
If the cable breaks, it must be replaced immediately. We'll look at how to replace the handbrake cable below.
As in any other case, DIY repairs require some tools. First, you need to find a car overpass or a hole (as a last resort, you can use a jack, which we will need anyway). You also need to prepare certain tools, such as thirteen wrenches (preferably 2), pliers, a hammer, plastic clamps and gloves. And the actual new hand brake cable for the VAZ.
When everything you need is prepared, you can start working. Replacing the handbrake of a vase takes place in stages:
- First of all, we put the car on an overpass or a pit, or jack it up and climb under the car;
- By removing the muffler can from the mounts, we will greatly simplify our work. If this is not done, it will be difficult to unscrew the cable tension nut;
- Unscrew the locknut and the adjusting nut of the handbrake. This concludes the work on the overpass for now;
- We drive the car onto a flat surface and jack up the rear;
- Remove the wheels;
- We knock down the locking pins from the pads;
- Remove the brake pads;
- Now you need to disconnect the cable ends from the equalizer. This is where pliers come in handy; you can use them to remove the clamps;
- You need to remove the cable loops from the hooks of the spacer lever;
- Unscrew the bolt securing the cable sheath and remove it;
- You can pull out the parking brake cable of the VAZ 2114.
We recommend: How to care for car paint in winter?
Pulling a new cable will no longer be a problem. Similar to the removal procedure, we do everything in reverse order. We start by pulling through the washers and loops on the hooks of the lever, and finish by tightening the handbrake in the cabin. The cable sheath also needs to be replaced sometimes, as it is also subject to wear. You can secure it after replacement with ordinary plastic clamps. This is how the VAZ 2114 parking brake cable is replaced.
Replacement is carried out in a similar way on VAZ 2115 and VAZ 2113 cars. These models have an absolutely identical brake system, so there can be no differences in repairs. An exception may be “amateur tuning” or unscrupulous repairs inherited from the previous owner.
All ground mounting points for the VAZ of the tenth family
| If the electrics in the car start to malfunction, then one of the reasons for this ailment may be poor fastening of the battery mass. Ten have features of mass fastenings depending on the engine and year of manufacture of the car. We check all the attachment points of the negative wire: |
Location of masses in the car interior
| 1 - fuse block.2 - near the driver’s right foot there is a shield, which is attached with a couple of screws, removing it, you will see that everything is like in the picture.3 - in principle, the situation is similar to the point described above, except that the shield is located next to with the left leg of the navigator. |
| The stud in the dashboard behind the mounting block, in order to find it, you need to bend in a certain way. The headlight hydraulic corrector is shown there for reference; the ground pin is located above and to the left of it. Through this mass, the windshield wipers, heater fan (21124) and door lock activators are powered. |
| The console is on the right side, from here it is more convenient to check the very important ground pin, through which the bracket under the ECU is connected to the car body, and accordingly the reliability of the ground of the ECM and the cooling fan depends - this nut also holds the corner that supports the far part of the left panel of the console. |
| ECM harness mass crimps in the console. The connector was removed from the ECU and pulled out onto the driver’s mat, it’s more convenient. I bit the fan ground wire out of the ignition circuit crimp (left in the photo), extended it, put the tip on and connected it separately to the bracket. I soldered all connections for reliability. |
| Weight of the Electric Fuel Pump (EFP) module and fuel level indicator. A black and white wire is attached to the left rear handbrake lever mounting bolt under the floor tunnel. The fuel pump is powered through this mass, and the accuracy of the fuel level reading also depends on it. |
| The ground is on the stud of the fuel pump flange; this wire most likely connects the pump housing to the fuel filter bracket and this was done for safety reasons to equalize the potentials of these two devices. |
It is easy to find the ground of the electric fuel pump module without removing the tunnel; just fold back the mat, slightly bend or carefully trim the carpet of the floor behind the driver's seat below the ashtray of the rear passengers, without damaging the ground wire itself. Then the carpet easily falls into place and the cut is almost invisible.
Location of masses under the hood of a car
The battery terminal is large and thick with a large cross-section wire (approximately 16 sq. mm). Its thick part, about the thickness of a little finger, connects the negative battery and the engine. If the contact of this wire is unreliable, there may be a deterioration in the battery charge, a decrease in the starter rotation speed when starting, as well as problems in the ECM system, because the minus comes from the engine, from the studs on which the ignition distributor hung on carburetor cars.
| The thin wire connecting the minus battery and the car body is the main connection for all electricity consumers in the car, and in carburetor modifications also for the engine. Through this connection, all the car's lighting equipment, radio and other devices are powered, depending on the year of manufacture of the car. |
| The connection point for the negative terminal of the battery to the engine block is connected to the upper stud of the thermostat, if you look behind the air filter. The cross-section of the wire was chosen based on the large current consumption of the starter; this wire can easily be traced by hand if it is led from the battery. The starter current flows through this wire, charging the battery, some sensors screwed into the engine block are connected through it |
| Nearby there is another ground connection point to the engine block, it is slightly higher and to the left. The 2112 engine has two brown wires connected to this place - this is the mass of the ECM, that is, the mass of the sensors, ignition module, ECU and cooling fan. The arrow below shows the engine (starter) ground wire from the battery. |
| The mass point under the adsorber - Miha suggested that this is the mass of the right headlight and the mass of the right fog lamp. |
How to remove the handbrake cable on the fourteenth?
Before changing the handbrake cable on a VAZ 2114, it must be removed. Fortunately, it is clearly visible and cannot be confused with anything. You need to work in a hole or on an overpass under the bottom of the car. It’s good if the car is clean, because all the nuts and fasteners need to be found and unscrewed (you can also spray them with WD for a smooth fastening movement); dirty ones will take longer to work with. Before replacing, move the handbrake all the way down.
- We start with the locknut and the adjusting nut, loosen them and remove them from the handbrake rod (now you can remove the washers and cable leveler, or you can do this after jacking up the car, before removing the wheels).
- Jack up the rear of the car, unscrew the wheel bolts and remove the wheels.
- To remove the brake drums, tap the locking pins to dislodge them from the shoes.
- Remove the brake pad.
- We disconnect the tip of the first and second cables from the equalizer (the clamps can be removed with simple pliers).
- Remove the cable loop from the hook of the shifted spacer lever of each wheel.
- We remove the cable sheath from the entire rear suspension, having first unscrewed the fastening bolt.
- Pull the cable out of the holes in the brake flaps.
Replacing the VAZ 2114 parking brake cable is the same as removing it, only in reverse order. We start by threading the new cables into the washers, attaching the loops (many people make special clamps at the end of the loop - bosses - so that the cable sits even more tightly in place), and assembling the entire wheel hub. They laid each cable along the suspension and secured it. In the end, you will need to tighten the handbrake in the cabin itself.
By the way, the parking brake is the cause of the unpleasant squeaking sound in the rear of the cabin. Replacing the VAZ 2114 parking brake cable is a good reason to get rid of it for one thing: you should come up with a rubber seal for attaching the cable to the body frames.
After replacing the old cable with a new one, we check how it works. Just put your fourteenth on the hill on the handbrake, if it moves, you need to adjust it:
- We loosen the lock nut of the tension device in the handbrake, and tighten the adjusting nut, then pull the cable with a lever.
- The lever should move 2-4 strokes (this is the working stroke of the handbrake), if it works, tighten the lock nut.
- We drive up the hill again, put the handbrake on, check how it holds.
Before frost, you should always remove and lubricate the handbrake cable; you will increase its service life, protecting it from the adverse effects of low temperatures. Thus, you will ensure stable operation of the entire brake system of the car. It is worth lubricating the axle itself, the tips and the equalizer rod.
One more point: the handbrake cable does not always need to be changed, excluding, of course, an obvious rupture or wear of the mechanism. Most often it just needs to be tightened. And your handbrake will be back to normal. Tightening also means that the cable gradually becomes unusable, and it will soon have to be replaced with a new one. Also, the brake pads may be acting up. Very often, especially after tightening, drivers sin on the handbrake cable, buy a new one, change it, but there is zero effect. Look at the pads, they also tend to run out.
Cable faults
- Over time, the cable stretches. Doesn't hold the car even after being pulled up.
- The cable threads begin to break.
- The cable itself broke.
- Even after lubrication, the cable has difficulty moving in the sheath.
- The cable becomes sour.
The parking brake can often be restored to normal function by lubricating the cable. If you carry out this procedure regularly once a year (usually this is done before frost), then you can forget about situations when the handbrake fails.
The cable will last longer as it will be well protected from freezing. The brake system will work stably. You need to lubricate the axle, equalizer rod and tips.
Please note that there are two cables going to the wheels; it is recommended to replace them at the same time. Otherwise, the old one will fail earlier and you will have to do double work, which we will discuss below.
Why change
- If you notice problems with the handbrake but continue to use it, you may be in for an unpleasant surprise when the car suddenly rolls downhill.
- It is also possible that the pads will not return to their original position. This already threatens to heat up the brake discs and wear out the pads. As a result, the wheel may jam. The effect will be the same as driving with a handbrake.
Rope price
The cable itself costs from 200 to 1000 rubles. The price depends on the manufacturer and place of purchase. Replacement at a car service center will cost on average from 400 to 1000 rubles, depending on the region.