How to adapt the throttle valve on Kalina
This topic can be debated for a very long time. But you will have to rinse it anyway, since its class changes, and everyone will determine for themselves how to do this.. =) Unfortunately, I also had to buy five minutes.. And somehow we have completely moved away from the topic about e-gas =)
Mus8666
, well, did resetting the terminal help?
I reset the terminal for about 3-4 minutes, after which, yes, the pedal began to respond more smoothly again. By the way, after resetting the terminal, the car did not start immediately, even after waiting 30 seconds before starting (adaptation of the zero position of the remote control). I had to turn the starter for 7 seconds, then it just started, the revs fluctuated for 30 seconds and only then it became normal. In general, of course, we need to look at how the pedal should be trained on foreign cars, what AvtoVAZ wrote in its letter - to brake 6 times from 4 to 1 thousand seems to be nonsense. Here's an example from the Nissan forum: Before training XX, the following conditions must be met: - battery voltage is more than 12.9V (with the engine not running); — coolant temperature should be 70-99 degrees; — gearbox is warmed up; — if the gearbox is automatic, put it on P or N; — steering wheel in neutral (zero) position; — the car is in a position close to horizontal; — all electrical consumers are set to OFF. If it doesn’t work, then before repeating it is necessary for the car to drive for at least 10 minutes. It is also recommended (I did) to train the accelerator pedal and throttle before learning XX.
LEARNING the accelerator pedal to the released position is an operation necessary to control the output signal of the accelerator pedal position sensor. This must be performed whenever the accelerator pedal position sensor or ECM cable has been disconnected. Make sure the accelerator pedal is fully released. 1. Turn the ignition key to the “ON” position and wait at least 2 seconds. 2. Turn off the ignition, wait at least 10 seconds. 3. Turn the ignition key to the “ON” position and wait at least 2 seconds. 4. Turn off the ignition, wait at least 10 seconds.
LEARNING the throttle valve closed is an operation necessary to control the output signal of the throttle position sensor. This must be performed whenever the electric throttle actuator or ECM cable has been disconnected. 1.Turn the ignition key to the “ON” position. 2.Turn off the ignition, wait at least 10 seconds. Make sure that the throttle valve closes within the above 10 seconds, confirmed by a specific sound (chirping, buzzing). I had this sound at the beginning. HZ!
Now, in fact, the procedure itself for teaching DZ XX. It will require a watch with a stopwatch; all time intervals described below must be performed very accurately! For the first time it's better to do it together. So: 1) turn off the ignition (turn off the engine) after all warm-ups for at least 10 seconds. 2) after making sure that the gas pedal is released, turn on the ignition (the key is in the ON position, do not start the engine and wait 3 seconds. 3) within 5 seconds, quickly press (all the way!) and release the gas pedal 5 times. 4) after 7 seconds, press all the way down and hold the gas pedal until the yellow CHECK ENGINE light starts flashing(
10sec)* and will not light up continuously(
20 sec)**. 5) 3 seconds (this interval is IMPORTANT) after the lamp constantly lights up, release the gas pedal. 6) start the engine (if it stalls, repeat the start) and wait 20 seconds - accelerate 2-3 times and make sure that the engine returns to normal idle (700-+50). For me it looks like this: start it at -1000 rpm. After 5 seconds, a type of tripping occurs and the speed rises to 700.
*) - blinking of the lamp is a transition to diagnostic mode. To read the self-diagnosis codes, release the gas pedal while blinking. After this we read the codes. If there are several of them, they are displayed sequentially. If everything is in order, the lamp will blink 40 times equally and at equal intervals - 0000. **) - if, after the lamp constantly lights up, the gas pedal is not released for more than 10 seconds, then the ECM memory is reset (possible errors are reset, but also possible individual settings). This is not troubleshooting! This is just an error reset. After starting the engine, it will most likely appear and sign up there again. BUT! if an error is present, then training XX WILL NOT TAKE PLACE
DIY throttle tuning
The price of MD tuning at a service station is from 3,000 to 7,000 rubles. As the experience of VAZ and LADA owners shows, it is possible to correctly modify the throttle assembly (CS) yourself, without having any special knowledge or precisely verified drawings. The only special tools you need are a 6 mm spherical cutter and a drill.
- Remove the throttle assembly.
- Make two recesses around the damper (approximately 2-3 mm, no more than 5 mm), as shown in the drawing (great accuracy does not matter).
- Remove burrs with fine sandpaper.
The process is also shown in the video:
The process itself is not complicated and will not take much time. The advantage of MD tuning is that there is no need to flash the electronic engine control unit.
Flushing the remote control
In this article we will describe two types of DS cleaning:
- Surface.
- Full.
They differ in the degree of complexity and, accordingly, in quality.
Superficial cleaning
Its essence is that we will not completely disassemble the entire remote control, but will go over the damper with a cloth and remove surface dirt.
For work we will need:
- Any cleaning agent: carburetor cleaner, alcohol, thinner, gasoline, wd-40. They differ in the degree of “removability” of dirt.
- Rag.
- Brush.
First of all, we remove the air filter corrugation from the air filter, take our cleaning agent and spray it inside. We begin to clean the surface with a rag and brush. Also, do not forget to open the damper itself and clean it from the back. At this point the process is completed, we install the filter pipe back, and that’s it. But with this cleaning method, we will not be able to completely clean all the insides of the remote control, blow out all the holes and channels, so it is better to use a complete cleaning.
Troubleshooting Methods
Typically, all problems with the throttle body are solved by cleaning the throttle body. To clean the air filter, you can usually simply disconnect the air filter pipe. After this, you need to spray the engine protection with an aerosol to clean carburetors or injectors. This substance will dissolve plaque. And after this, the plaque can be removed with a simple rag or paper napkin.
To solve more serious problems, you need to remove the throttle valve assembly.
, then remove the rubber seals and spray again with the same aerosol. If the remote control is mechanical and does not have built-in electronics, then it would be wise to put it in a container with gasoline overnight.
At any service station you can clean the engine protection quite quickly and relatively inexpensively. The cost of the work may depend on its complexity and the degree of contamination of the system.
If the problem with the throttle concerns not the mechanical control, but the electronic one, then the problems are solved after diagnostics; perhaps the throttle malfunction will be solved after adjusting or replacing the throttle position sensor.
Subscribe
to our channel in Yandex.Zen
Even more useful tips in a convenient format
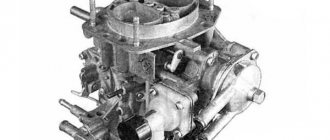
Chokes / Receivers / Carburetors
In this section we will introduce you to the range of intake receivers, throttle valves, compressor-type superchargers, modified carburetors, fuel system components and zero-resistance filters.
Briefly about the components:.
The modified throttle body pipe serves to increase the air supply to the intake receiver. During modification, the damper assembly itself is changed and the flow area of the pipe is bored. We use components from DAAZ.
Cleaning the throttle
The throttle valve must be cleaned every 50-70 thousand km of the vehicle. Because due to its design, the throttle often becomes dirty, which leads to uneven idling and other problems associated with engine speed.
To clean the throttle, it must be removed from the vehicle.
- To do this, unscrew all the pipes and hoses suitable for it;
- We remove the connectors from the sensors if it is a mechanical throttle;
- We unscrew the nuts securing the throttle to the receiver: electronic remote control – 3 nuts, mechanical – 2 nuts;
- We take out the throttle;
Attention! On an electronic throttle, it is prohibited to press on the valve, as this may damage the mechanism.
- Flushing consists of cleaning the throttle walls and flap from carbon deposits; for this it is best to use a carburetor cleaner;
- On a mechanical throttle, it is also necessary to flush the IAC channels; to do this, it must be removed;
- After washing the remote control, we install it in place, not forgetting to replace the gasket, if it is torn, between the remote control and the receiver.
Cleaning video
Throttle valve VAZ 2110 - improving the “weak link” of the car
According to statistics, one of the main problems of VAZ 2110 owners is frequent breakdowns of the throttle valve. Even with careful operation of the car, such an important part has to be modified or completely changed. Fortunately, doing this yourself is not as difficult as it might seem at first glance.
- Modification of the VAZ throttle by shifting the ventilation circuit
- Flushing the throttle "tens"
- Replacing the throttle valve on a VAZ 2110
1 Modification of the VAZ throttle by shifting the ventilation circuit
- Wynn's injector flushing
- Throttle valve VAZ 2112
- Throttle valve - DIY tuning
- Auto scanner for self-diagnosis of any car
At the beginning of the operation, you will need to plug the old entrance of the large ventilation circuit. To do this, we use a plug with a diameter of 16 mm. After this, we drill a hole with a diameter of approximately 13 mm on the damper pipe. Carefully insert a corner of a copper tube into it, the width of which should be at least 12 mm. In this case, the standard rubber tube must be lengthened by about 1 cm.
The final stage of adjustment will be to increase the initial opening angle of the damper itself. To do this, we cut a tin strip 1 mm thick and attach it to the throttle lever.
Thus, in about 1 hour we completed modifications to the throttle valve of the “tens”. After this, the “idle” speed of the car will not increase, since the regulator responsible for this adapts after each start of the car’s engine.
2 Flushing the throttle “tens”
- when you release the gas pedal, the engine does not immediately switch to low speed;
- the engine is difficult to start in severe frost;
- after starting, the engine vibrates for a few minutes;
- The engine jerks regularly at low crankshaft speeds.
The part itself must be cleaned using aerosol products such as Wynn's or WD-40. The procedure for washing the part should be repeated with a short pause of 15 minutes. At the first stage, we treat the part with an aerosol and wipe it with a damp cloth. The second time, an aerosol is also needed, only you need to wipe the part with a dry piece of cloth. During the cleaning process, it is strictly forbidden to use brushes for working with metal, as they severely damage the surface of the throttle assembly.
When cleaning the throttle valve, you should also pay great attention to the crankcase ventilation duct. This part of the assembly is most susceptible to contamination.
To wash the internal channels of the damper itself, unscrew the idle speed sensor. If you find play during the process of dismantling the sensor, then the part should be replaced
You also need to pay attention to the condition of the gasket in the throttle assembly. It's best if you replace that too.
3 Replacing the throttle valve on a VAZ 2110
Every motorist should have a universal device for diagnosing his car.
You can read, reset, analyze all sensors and configure the car’s on-board computer yourself using a special scanner...
Read more.. "
We will begin work on removing the damper by disconnecting the battery terminals. Thus, we will de-energize the engine's electrical network. After this, disconnect the connectors from the damper position sensor. This must be done very carefully so as not to damage the small device. In addition to the sensor, you also need to disable the idle speed control and remove the cable from the throttle opening drive.
All coolant present in the structure must be drained. After this, loosen the clamps holding the throttle pipe and the crankcase gas hose. Then remove the crankcase ventilation hose.
At the final stage of dismantling, unscrew the fastening nuts holding the damper and remove the broken part. Then all that remains is to take a new damper and assemble the entire structure in reverse order.
Thus, in 30–40 minutes we adjusted the air supply to the fuel system of the VAZ 2110, spending only on a new throttle valve.
Do you still think that diagnosing a car is difficult?
If you are reading these lines, it means you are interested in doing something in the car yourself and really saving money, because you already know that:
- Service stations charge a lot of money for simple computer diagnostics
- To find out the error you need to go to specialists
- The services use simple impact wrenches, but you can’t find a good specialist
And of course you are tired of throwing money down the drain, and driving around the service station all the time is out of the question, then you need a simple CAR SCANNER ELM327, which connects to any car and through a regular smartphone you will always find the problem, turn off CHECK and save a lot of money! !!
tuningkod.ru
Life hack: electronic gas pedal of a Lada Vesta car, modification
This is no longer just a piece of hardware with a cable, it is a separate device. The gas pedal of the Lada Vesta car is electronic. AvtoVAZ began installing such pedals on its cars in the early 2010s, and since then it has continued to adjust its development. Until now, the pedal sometimes does not work correctly, because the factory is constantly adjusting the firmware of the ECU unit to bring the system to an ideal state. Adaptation is an electronic modification of the gas pedal to the required firmware parameters.
Vibration of the gas pedal is not entirely normal behavior of a car, no matter what anyone says. Just like untimely throttle response, this is a problem that needs to be diagnosed and corrected.
Car service nuances
It's no secret that many car owners prefer repairs at service stations. There are many reasons for this.
If you need to clean your throttle body, you won't have to pay a lot of money for it. Today such a service costs about 500 rubles.
But there are several nuances that should be taken into account when visiting a service station.
In addition to cleaning the damper, the technicians will begin to assure you that additional cleaning of a number of components is required, as if without this the repair will not be complete and the effect will not be achieved. All this is a banal attempt to charge you more money for unnecessary work. They may start telling you that the damper is cleaned every 15, or even 10 thousand kilometers, they will offer their services, maybe even provide a discount as a regular customer. Again, the simplest trick. This figure is completely untrue. The frequency of cleaning the throttle valve on a VAZ 2114 car recommended by the manufacturer is 60-70 thousand kilometers. But in practice it turns out to be about 50-60 thousand kilometers.
You just need to monitor the condition of the unit and pay attention to the symptoms of contamination that we have already introduced you to today.
https://youtube.com/watch?v=Xh9LUV37tiE
Whether to do the work yourself or have it done at a car service center is entirely up to you. The most important thing is not to let the problem get worse, as it can result in really expensive repairs.
Loading …
How to check and replace TPS?
The VAZ throttle position sensor (TPS) is part of the engine throttle assembly. Therefore, when checking the TPS, check the IAC at the same time (see the article How to check the IAC (Idling Air Sensor)?. Because in certain situations they have similar symptoms of a malfunction:
- uneven idle speed;
- Unstable engine operation (the engine stalls after releasing the gas);
- no idle speed;
- the car moves jerkily when the gas pedal is pressed at a certain level;
- low vehicle dynamics (in addition to a malfunction of the sensor itself, low engine dynamics can be the result of many reasons:
- low compression in the engine (How to measure engine compression correctly?);
- wear of the camshaft cams. or incorrectly aligned timing belt marks;
- cylinder head valves are leaking or burnt out;
- the engine power supply system is faulty;
- the air filter is dirty;
- brake cylinders jam;
- the clutch slips;
- the fuel filter is clogged;
- exhaust system is faulty).
It is worth noting that this sensor is not available on new samara-2 models due to the use of an electronic gas pedal.
How to check TPS?
To check the throttle position sensor, we will need the following tools: a multimeter (ohmmeter, voltmeter), pieces of wire.
- Having opened the hood, we find the sensor we need (we look for it on the throttle assembly next to the IAC).
- Disconnect the wire block from the sensor.
- Take a multimeter and set it to voltmeter mode. Volts negative terminal (on the engine). We connect the positive terminal of the voltmeter to the sensor wire block to terminal “A” (the pin numbering is indicated on this wire block).
- Turn on the ignition and check the voltage: the voltmeter should show a voltage of around 5 volts. If the voltage is not supplied, or it is much lower than 5 volts, then the problem is either an open circuit or a malfunction in the electronic engine control system (in the brains). But if the voltage is normal, then, accordingly, the TPS is faulty.
Conclusion: If the sensor is faulty, then there are two options to solve the problem:
- Repair the sensor (How to repair the TPS?). Most often it is easier to replace the sensor with a new one, because The cause of failure is most often normal wear of the part.
- Replace the sensor with a new one.
How to replace TPS?
To replace the throttle position sensor we will need:
- Unscrew the 2 screws securing the sensor to the throttle assembly (see picture).
- Remove the sensor from the damper axis.
- We install the new sensor on the damper axis so that its leads are directed towards the partition of the engine compartment.
- Rotate the sensor relative to its axis until the mounting holes align.
- We wrap the sensor.
- We regulate TPS.
- We connect the sensor contacts.
- Reset the battery terminals for 5 minutes.
How to adjust TPS?
We open the damper by turning the sensor drive sector or pulling the accelerator cable. If this operation fails, the sensor is not installed correctly. In this case, you need to remove the sensor and reinstall it at an angle of 90 degrees relative to the damper axis.
As for manual adjustment of the damper position, the sensor is not adjustable.
The controller automatically uses the sensor's low idle voltage as a reference point. But it happens that after replacing the sensor, the controller uses the values for the old sensor, which causes the throttle valve to open a few degrees. In this case, you need to reset the controller parameters either through the on-board computer or remove the battery terminal for 5 minutes.
If, even after performing this operation, the damper is open by 1%, then the sensor is rejected, but this can be easily corrected. Read the article How to repair TPS?
Design
The throttle assembly is made of aluminum, and there are many mechanisms inside it, such as a damper actuator and a damper position sensor control drive. The TPS is installed on the same axis with the throttle valve. A little lower than the TPS there is an idle speed controller; this is a worm-type DC motor on the shaft of which there is a valve that blocks or opens the air flow necessary for the engine to idle. For IAC, the remote control has a special channel through which air flows when operating at IAC.
After cleaning the throttle body the speed fluctuates
So, it would seem that the whole procedure is over. The damper was cleaned with a cleaner, the air filter was replaced with a new one, the sensors were reconnected, that is, everything was assembled and tightened. Now you can proceed to starting the engine. If the engine starts after cleaning the throttle valve and then runs normally, then the procedure can be considered successful.
It should be added that this is not always the case. Many people are faced with the fact that after cleaning the throttle valve, high engine speeds remain constant and do not drop. Also, many drivers notice that after cleaning the throttle valve, fuel consumption has increased. A likely cause could be an error in connecting some sensor during reassembly, but this rarely happens.
Most often, after cleaning, the throttle also needs to be additionally calibrated and adjusted, which not everyone knows about or does it incorrectly. In other words, high idle speeds after cleaning the throttle valve are a clear example and at the same time an answer to the common question of whether the throttle valve needs to be trained after cleaning this unit. Let's figure it out.
Let's start with the fact that in some cases a pure throttle valve really needs to be adapted (trained). Typically, throttle valve adaptation is often necessary when the electronic throttle valve has been cleaned before. There are fewer problems with a mechanical damper, but they still exist. In systems with an electronic throttle, the ECU independently sets the throttle position; in mechanical systems, the idle air control is set. To put it simply, after removing the layer of dirt, the position of the cleaned damper changes, but the ECU does not know about this and continues to supply fuel in accordance with the previous parameters before cleaning. To solve the problem, it is necessary to set the idle speed using diagnostic equipment, since it is possible to reset the previous parameters.
You can also try teaching the throttle manually. The simplest way to learn without diagnostic equipment or a scanner for adaptation is to unscrew the negative terminal of the battery from a few seconds to 10 minutes (depending on the make and model of the car). This allows you to reset the settings, that is, the existing adaptation is reset and returned to the factory settings. After connecting the terminal to the battery and restarting the engine, the idle speed should stabilize.
Note that this method works on a limited number of cars. In such a case, you can take advantage of another opportunity to train the throttle assembly without a computer. This method is suitable for a range of vehicles from different manufacturers. Let's consider such an adaptation using the example of a Japanese Nissan car.
- First, the engine must be warmed up to operating temperature, after which the engine should be turned off.
- Next, you will need to wait 5-10 seconds, then turn on the ignition for 3 seconds.
- Now you need to press the gas pedal all the way and immediately release it. This is done 5 times, you need to do it in 5 seconds (one press per second). The interval should be timed using a stopwatch so as not to get lost.
- After the last press, you should wait 7 seconds, after which the gas pedal is again pressed “to the floor” and held in this position until the “check” begins to blink on the dashboard, and then this light comes on constantly.
- After the moment when the check code starts to light up constantly, you need to wait another 3 seconds. Now the gas pedal can be released.
- Next, the engine needs to be started, the idle speed should return to normal.
Article on the topic: Crimping of the cylinder head and block: what is it?
Let us add that during such adaptation of the throttle valve it is important to accurately maintain the timing at each stage, as well as to fit into all time intervals. In this case, we can talk about successful training.
It is also recommended to clarify the features and the possibility of manual adaptation for a specific car model.
Practice. Effect
Unfortunately, I myself forgot to measure the acceleration “before and after”. But on the well-known YouTube site I found a video of one guy who was just doing this procedure. At first he had a completely stock VAZ-2112 coupe. Acceleration from zero to 100 km/h was around 11.9 seconds. Then he installed a larger throttle (56mm) and it turned out that the acceleration from 0 to 100 took one second less than before, namely 10.9 seconds.
So, let's figure out what are the advantages of this tuning. Firstly, there are no difficulties during installation; it is installed in place of the standard one without any modifications. Secondly, the response to the gas pedal has become more responsive. Thirdly, low price. Fourthly, this tuning does not require any sports brains or tuning.
Disadvantages of a large throttle:
- I personally had troubles with XX (idling speed);
- twitching appeared at the “bottoms” (low revs);
- the car begins to respond more sharply to small movements of the accelerator pedal, as a result, comfort in the cabin disappears and fuel consumption increases.
Conclusion: this spare part is needed by those who “chase power.” Who cares about horses under the hood rather than comfort? Such tuning will not appeal to a careful driver who is used to driving quietly and calmly.
Cleaning the throttle body of Lada Granta 8 valve
Tools:
- Medium Phillips screwdriver
- 5 mm hex key
Parts and consumables:
Notes:
The main symptoms of a dirty throttle valve are:
- Floating idle
- Difficulty starting the engine
- Car jerking when driving at minimum speeds
The damper is contaminated by carbon deposits and oil vapor from the crankcase ventilation system, so it is advisable to clean it every 40-50 thousand km.
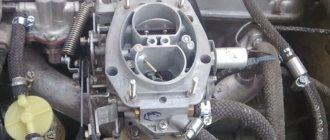
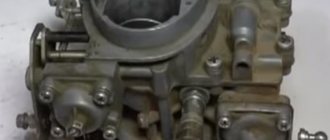
1. Remove the throttle assembly. Contamination is visible on the throttle valve and on the assembly channel.
2. Treat the internal cavity of the throttle assembly, the throttle valve itself, its axis and the walls of the air channel with an aerosol cleaner.
Note:
It is advisable to avoid getting the product on the plastic part of the throttle assembly and the electrical connector.
3. Wipe off heavy dirt with a rag and re-treat with an aerosol.
4. Check the results of cleaning the throttle assembly.
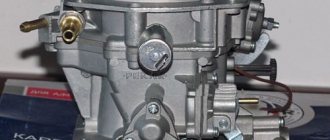
5. The cleaned throttle assembly must be dried and installed back on the vehicle.
Perhaps this is exactly the case when one should not interfere with a properly working mechanism, because... There were no indications for surgical intervention in the Granta throttle assembly.
The engine is running. Idle speed does not float. The throttle response to the electronic accelerator occurs as normal. Occasionally I noticed, standing at a traffic light, that the tachometer needle was trying to unobtrusively change its position, but the electronics quickly eliminated this incident. In early spring, one could refer to some amount of condensation that sometimes appears in the fuel system. Now, May. Warm. But sometimes the arrow still tries to “twitch”.
The situation is not annoying, but the mileage is under 17,000 km. indicates that behind the throttle it is not at all the same as it was in the first hundreds of kilometers.
I did not contact the “dealer” service station, where Grant was under warranty, to clean the throttle. After we “adjusted” the thermal clearances of the valves during maintenance-1, there was no desire to communicate with such “specialists”.
It’s high time for AVTOVAZ to check its dealers and subdealers for high-quality performance of work when undergoing scheduled maintenance of warranty vehicles. There are enough statistics. And those who are negligent will be punished with a ruble so that the desire to run an official car service will no longer exist once and for all.
If adjusting the “valves,” for me, still requires consolidating the experience gained, then with cleaning the throttle valve, everything is much simpler.
What you needed: *A 5mm hex wrench. *Star key T-20. *Brush flute. *Lubricant. *Thread lock. *New bolts with washers, made of stainless steel. *Phillips and slotted screwdriver. *Cheap degreaser. *Spray for cleaning carburetors and chokes. *Cotton rags. lint-free. *Disposable rag on a roll. *Rechargeable cylinders and a hand pump for them. *Garbage bag.
Using the “Open Diag” program, we take screenshots of the throttle position before starting cleaning.
Increased idle speed, dips and jerks when accelerating the car, loss of power - all this indicates problems with the throttle valve, which needs to be removed and cleaned, or replaced, if cleaning does not give the desired result, the unpleasant phenomena persist.
The procedure for removing the throttle assembly on a LADA Granta car
Main objects and methods of regulation
[blok10] Almost each of the systems listed above allows for independent adjustment. The work can be carried out comprehensively, then it is advisable to think through the procedure for adjusting the systems to eliminate their mutual influence, or individually.
When adjustments are made on a car, before making them you need to make sure that all engine systems and components are in full working order, otherwise by compensating, for example, for an incorrect ignition timing with carburetor screws, you can get a deterioration in engine performance, while simultaneously masking an obvious malfunction. Otherwise, adjusting the VAZ-2107 carburetor with your own hands has no special features.
Idling
The idle adjustment should ensure stable engine operation when the gas pedal is released with the lowest possible level of carbon monoxide emissions from the exhaust gases. There is also a slight additional load on the engine in this case, since in real conditions electricity consumers may be turned on. Therefore, it is better if they load the generator during the setup process.
It is necessary to carry out work with the idle system quite often, so many believe that the answer to the question of how to adjust the carburetor on a VAZ-2107 comes down to setting the level of carbon monoxide at low speeds.
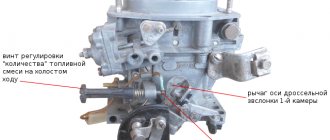
Idle speed is controlled by two screws of the autonomous system, one of which is responsible for the composition of the mixture (quality screw), and the second for the amount of incoming mixture. When each of them rotates, the crankshaft rotation speed and the CO content in the exhaust gases change. After factory adjustment, the screws are equipped with plastic stops that allow only slight rotation. When setting them up, you will most likely have to remove them. [blok11]
High-quality adjustment can only be made if you have an exhaust gas analyzer at your disposal, but acceptable accuracy can be achieved by adjusting the tachometer.
To do this, first the quality screw is set to maximum speed, which provides sufficient enrichment of the mixture. After which the speed is reduced to 1000 rpm . The result is an operating mode on a rich mixture with increased speed. After tightening the quality screw, the speed is reduced to 800–850 , which will ensure an acceptable level of CO.
For finer tuning, for example, before undergoing a technical inspection, you can repeat the procedure, adding rotation speed with the quantity screw, and then reducing it with the quality screw until the engine begins to operate unstably at about 850 . This is the lean limit of the mixture. By unscrewing the quality screw approximately half a turn, we obtain stable operation with minimal emissions of harmful substances. The quantity screw sets the nominal speed to 850 , after which the adjustment can be considered complete.
Fuel level
[blok12] A float mechanism with a needle valve is responsible for the position of the level. It is enough to adjust the moment when the valve begins to close so that the required amount of gasoline is in the float chamber, on which the normal operation of many carburetor systems depends.
To do this, remove the top cover with the float and valve from the carburetor; with the plane of the cover flange in a vertical position, the float is brought to it until the tongue touches the ball at the end of the valve needle, after which the distance from the float to the cover flange with the gasket located on it is measured. It should be 6.5 mm with a deviation of +/- 0.25 mm . The float stroke is set by the second stop and should be about 8 mm .
It is almost impossible to adjust the mechanism with such precision, so the resulting level should become the standard criterion. To check it, the cover is attached to two bolts, the engine starts and turns off after a minute. By quickly removing the cap, you can see the upper edge of the gasoline border, which should be located approximately in the middle of the inclined plane at the bottom of the chamber. Deviations of 1–2 millimeters do not significantly affect the result.
What is a throttle valve
Without a doubt, many people know what this part is and the location of the throttle valve, but what role does it play?
Everything is quite simple, this element is designed to limit or increase incoming flows to enrich the fuel with oxygen.
This happens as follows: when the driver presses the gas pedal, the throttle sensor operates, it opens and air enters the system. Next, oxygen is mixed into the fuel and a fuel-air mixture is obtained, which subsequently burns. The wider the damper opens, the larger the gap opens in the inlet pipe of the air intake system, i.e. A lot depends on its position. But, if this element and the mechanism for closing or opening it are dirty, they need cleaning.
What size should I install the damper then?
By installing a throttle with a diameter of 56 mm on the “stock” motor, we will give the motor the opportunity to process air even more easily, compared to 52 and 54 mm, and even more so 46 mm. After all, with the same pressure on the gas pedal, much more air enters through 56 mm than through 46. But comfort in the cabin will be lost, a jerk will appear at the bottom, and you will also need to work more carefully with the accelerator pedal. In general, without a habit, it will be difficult at first.
52 mm is “neither two nor one and a half.” The effect will be practically unnoticeable! Since the difference with the “stock” one is only 8 mm. Money down the drain, so to speak. It's best to set it to 54 mm, which is what I did. Some kind of golden mean. But this is all theory. Let's move on to practice.