How to install an electric low pressure fuel pump on a carburetor of any brand. Installation diagrams. Flight review and actual operating experience.
Hi all.
Today, I will tell you how to install a low-pressure electric fuel pump HEP-02A, which is suitable for all carburetor cars.
What exactly is HEP-02A?
The pump operates using an electromagnet and actuates a cylinder with a valve. The fuel pump is designed for use on carburetor cars of any brand, which makes it a universal element of the fuel system, regardless of the standard fuel pump. The body is sealed and riveted.
In fact, this is a disposable pump, but with the help of sandpaper you can grind off this edge and disassemble it.
Some craftsmen even repair it. There are 2 common breakdowns. This is a burnt element in the circuit, or damage to the rubber valve. But often they are not repaired, they just buy a new one.
Characteristic
The carburetor was invented quite a long time ago. These devices were mass produced in the 20th century. However, technological progress does not stand still, and the carburetor was replaced by an injection power system. The carburetor is a fairly old mechanism.
Its operation is often supported by mechanical devices. The action of the injection system is electronically controlled. Many owners of carburetor cars come to combine a mechanical carburetor with modern devices. One example of such synthesis is the installation of an electric fuel pump on a carburetor.
Installation of fineness pump and chips
After reading the opinions of people, I came to my conclusion and its setting will be as follows:
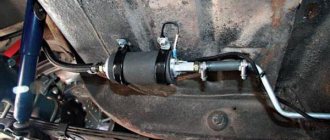
We install the EBN only vertically!
The location of the pump under my hood is as far as possible from the engine, since it also gets hot and it would be desirable for there to be airflow to the pump. I placed the filter in front of it; it is not advisable for debris to remain in the pump. A full return to the tank is also connected. Here, too, people write differently. The fact that it is not needed, since the pump, after filling the float chamber with fuel, begins to work on its own, and with the return line it will constantly oil. Others write that a return line is needed to make it easier for the pump to work, and the carburetor won’t overfill if the needle doesn’t hold well. Theoretically, both versions are correct, but I installed everything backwards.
For installation, we need a soldering iron, a multimeter, wires, a chip for a 4-pin relay and the relay itself, as well as a chip for a fuse, respectively, and the fuse itself is needed for 15A. A fuel pipe and a couple of clamps.
The engine compartment of the M41 is not small, so the space for installing an EBN is quite sufficient.
Fuel pump repair
To replace or repair the pump, it will need to be removed from the engine. Tools you will need:
- 13 mm wrench;
- crosshead screwdriver.
Removing the fuel pump
We dismantle the unit in the following order:
- Wipe the pump with a rag.
- Disconnect both hoses (inlet and outlet) by loosening the clamps with a screwdriver.
- We pull the hoses from the fittings.
If you need to replace the rod, then simply remove it from the heat-insulating spacer and replace it with a new one.
Once a situation arose on my car when engine oil was leaking from the installation site of the fuel pump (in the area of the gaskets). It was not immediately possible to identify the cause. At first I made mistakes on the gaskets between the engine block and the spacer, as well as between it and the fuel pump. I replaced them, but did not achieve a positive result. After dismantling the mechanism again, I examined all the elements more carefully and discovered that the heat-insulating spacer had a crack through which oil was leaking. I had to replace it, after which the problem disappeared. In addition to the described case, there was a similar situation when oil was leaking at the location of the fuel pump. This time the pump itself turned out to be the culprit: oil was oozing from under the axis of the manual fuel pumping lever. There were two options to get out of the situation: accept it or buy a new product. I bought and installed a new pump (DAAZ), which to this day works properly and does not leak.
Disassembly
To disassemble the fuel pump you need to prepare:
- 8 and 10 mm wrench;
- Phillips screwdriver.
The disassembly procedure is as follows:
- Unscrew the bolt holding the top cover.
During assembly, the strainer must be installed so that its hole is above the valve.
Replacing valves
The VAZ 2107 fuel pump valves are included in the repair kit. To replace them, you will need a needle file and suitable attachments for dismantling.
The disassembly sequence is as follows:
- We remove the cores using a needle file.
Installing and adjusting the fuel pump
Installation of the fuel pump on the “seven” is carried out in the reverse order of removal. The process itself does not cause any difficulties. However, attention should be paid to the gaskets, since their thickness has a direct impact on the operation of the mechanism.
Adjustment of the position of the unit must be carried out if, after its removal, the gaskets were replaced or the old seals were strongly pressed in.
The fuel pump is sealed with several gaskets:
- adjustable (thickness 0.7–0.8 mm or 1.1–1.3 mm);
- thermal insulation;
- sealing (0.27–0.33 mm).
The adjusting and sealing gaskets differ only in thickness. There must always be a sealing gasket between the engine block and the heat-insulating element.
The fuel pump is adjusted as follows:
- Install the sealing gasket.
Video: how to adjust the fuel pump on a “classic”
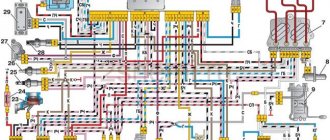
Connection diagram
The circuit is very easy to connect.
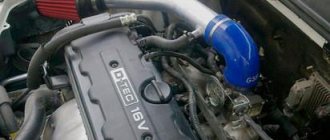
Even if this is your first time connecting a relay, all the contacts are numbered and it is unlikely that you will make a mistake by mixing up the wires. The pump was installed strictly vertically immediately behind the radiator fan.
Since our EBN is vibrating, it makes a loud sound if you don’t put a rubber gasket under it. Initially, I cut out a piece of strip from a bicycle tube, folded it several times, and attached it all with 2 bolts. As a result, the sound of the pump was audible even when the car was moving, very loud. Next, I cut out the gaskets from the fuel pipe and installed it all on the car.
The sound has become quieter, you can’t hear it when moving, but this is not the end result. In the future I will make a rubber cushion of 1 cm or more. For the experiment, I removed the EBN from the mounts and simply hung it behind the hose with a wire and screwed it to the body, so that the pump was not fixed, but simply hung on the fuel hose.
I was surprised by the result. The pump worked almost silently when the ignition was on; when the engine was running, you couldn’t even hear the pump running. I tried attaching springs instead of rubber tubes, after which I simply attached a pump to the springs, but the sound was even louder, so this is the only unpleasant situation with the EBN.
Electric pump for a motor with a carburetor
Such a pump in injection cars is located in the gas tank, where it collects fuel and transports it under pressure to the injectors. The result of this innovation is more stable engine operation regardless of load.
Typically, at factories, cars are equipped with a mechanical fuel pump, which is located under the hood near the carburetor and is driven by the engine. Moreover, the operation of such a unit is less stable compared to more modern versions, and it fails much more often due to the low strength of the membranes.
In both cases, the pump transports fuel to certain dosing systems, which means that the electric pump, unlike its mechanical counterpart, guarantees stable operation of the carburetor and timely supply of gasoline. But with all this, the electric fuel pump can only operate with low pressure, otherwise fuel overflow is inevitable.
Action algorithm
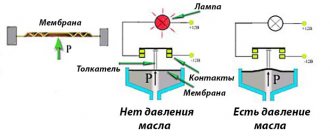
The device works due to the movements of the diaphragm. She moves up and down.
As a result, a vacuum occurs above the diaphragm when moving down and the intake valve opens. Through it, the fuel enters the recess in the diaphragm, having previously passed through the filter. When it moves up, a certain pressure is created and the inlet valve closes. The exhaust then opens and the fuel moves further through the fuel system. Now carburetor engine power systems have begun to be massively equipped with electric pumps. This is easily explained by the mass of advantages that are not found in a mechanical device.
Electric fuel pump installation process
It is worth understanding in advance that installing an electronic pump on a carburetor engine is a rather complicated process, so you cannot do it without minimal knowledge and skills in mechanics and car operation.
First you need to select a pump that is suitable for your type of internal combustion engine and carburetor. In addition to the pump, you will need to purchase a 5-meter hose with a diameter of about 8 millimeters, an additional relay, a drill tip (3-4 millimeters), a fuel filter from injection systems, a fuel carburetor filter, a 25-centimeter steel tube (wall = 0.8 diameter = 12), fuel hose, adapter fitting.
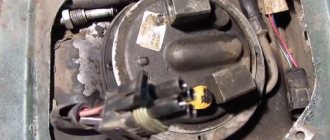
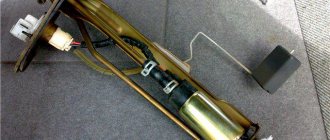
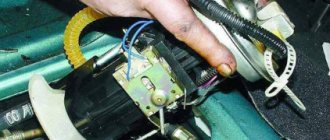
After you have purchased all of the above parts, you can proceed directly to the installation process itself. First, we dismantle the fuel level meter, then drill a small hole on the cover of this sensor. After this, using a soldering iron, solder the tube into the prepared hole, while it is necessary to bend the end of the tube. Now it’s time to install the dismantled sensor in the tank along with the intake and return.
Pros and cons of an electric fuel pump
Positive features include easy engine starting, the load on the battery and starter is significantly reduced. You can also notice how the car smells less like gasoline, this is because its consumption becomes more economical.
The only disadvantages of such equipment are the complexity of the installation process, and some financial resources are also required to purchase the necessary components. Some also include the need to maintain a high charge in the battery, but an experienced driver is unlikely to encounter this problem.
Recommendations for installation and use
Before purchasing the required fuel pump, you should carefully analyze all its characteristics. It is worth remembering that for certain carburetors you need to select a special pump that satisfies it in terms of performance and pressure.
It is advisable, before going to the store, to ask other car enthusiasts: maybe someone has already installed an electric fuel pump on a similar carburetor. To do this, you can visit thematic forums or groups of car enthusiasts.
After completing the above operation to install the pump, the car owner has one responsibility - to carefully monitor the cleanliness and order of the fuel filters. Any debris can negatively affect the performance of the system. The point is this: when the filters are excessively dirty, the load on the pump elements increases, resulting in an increase in the temperature of the part.
Let's sum it up
If you nevertheless decide to take the step of replacing a mechanical pump with an electric one, then upon completion of the work you will feel significant changes: the car’s engine will start in a relatively short period of time, and fuel consumption will also decrease. And in just a couple of minutes you will fully recoup the cost of all the components purchased for this procedure. So, the electric fuel pump is already installed on many cars, install it on yours too, following our simple instructions, and you will immediately feel the result!
Signs of a fuel pump malfunction
An experienced car enthusiast can determine the malfunction of his car by its behavior or by extraneous sounds. This also applies to the fuel pump. If knowledge is not enough, it is worth considering the following characteristic signs indicating problems with the fuel pump:
- the engine does not start;
- the engine stalls almost all the time;
- the power and dynamics of the car decreases.
However, it is worth considering that power may decrease for a number of other reasons: problems with piston rings, valves, etc. If the fuel pump is completely faulty, the engine will not be able to start.
The fuel pump does not pump
There may be several reasons why the device does not supply fuel. Before you start troubleshooting, you need to make sure that there is gasoline in the tank. It happens that the level sensor shows incorrectly and the problem simply comes down to a lack of fuel. You also need to make sure that the filter elements are not clogged, but it is better to replace them, because they are inexpensive. After these steps, you can begin diagnostics.
The causes of problems may be:
- wear due to long mileage;
- diaphragm damage;
- insufficient spring stiffness as a result of stretching;
- valve contamination;
- violation of the tightness of the unit.
If the gas pump on the “seven” does not supply fuel, then there are two ways out of this situation: install a new device or disassemble the old one, carry out diagnostics and replace damaged parts.
On my car, a situation once arose that indicated a lack of fuel for the engine: there was no normal dynamics, the engine periodically stalled and would not start. There was enough gasoline in the tank, the filters were in good condition, but the car did not drive. After lengthy investigations and clarification of the reasons for this phenomenon, the problem was found: the fuel supply hose from the pump to the carburetor was swollen inside, which indicated the poor quality of the product. The internal cross-section has become very small and insufficient to pass the required amount of fuel. After replacing the hose the problem disappeared. In addition, I change fuel filters at least every 5 thousand km. mileage (preferably more often). I have them before and after the fuel pump. As practice shows, even with the installation of two filters, as well as with a mesh in the fuel pump itself and at the carburetor inlet, debris still penetrates into the float chamber. This results in the carburetor having to be cleaned periodically.
Video: VAZ fuel pump does not pump
Stops pumping when hot
One of the problems of classic Zhiguli cars is overheating of the fuel pump, which leads to a disruption in its performance - it simply stops pumping. The problem is caused by the formation of a vapor lock, which blocks the supply of gasoline. There are several ways to solve the problem: water the cooling pump with water or ride with a wet rag on it. These methods are applicable in a critical situation, but not for everyday use. The problem can be eliminated by adjusting the fuel pump using gaskets, replacing the rod, replacing the unit itself, or using higher quality fuel.
Checking the fuel pump
If there are suspicions or characteristic signs of fuel pump problems, the mechanism should be checked. To do this, perform the following steps:
- Loosen the clamp of the hose that supplies gasoline to the carburetor, and then pull the hose off the fitting. Gasoline will leak out of the pipe, so it is better to lower its edge into an empty container.