It is quite possible to replace the handbrake cable on a VAZ 2107 yourself. The serviceability of this device is the key to safety, so it should not be neglected. To replace the cable on the “seven”, you will need to purchase a new part, and then perform the procedure in accordance with the algorithm that will be described in this material.
Replacing the handbrake cable for Lada 2107 (VAZ 2107)
It is quite possible to do repairs such as replacing the parking brake cable of a VAZ 2107 yourself, even without experience in car repairs. The cable on the classics becomes unusable from time to time and needs to be replaced with a new one. In this case, the only good thing is that the new part is very inexpensive, and it won’t take much time to replace it.
Replacing the VAZ 2107 parking brake cable can be done both in a pit and simply in open areas. Of course, in a hole or on an overpass is preferable, because you won’t have to dodge under the bottom of the car. You need to understand that without a good cable there is no way to properly adjust the handbrake, therefore, when adjusting the handbrake, you must always check the condition of the main cable.
When to change the parking brake cable
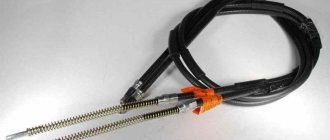
On the classic there are two cables that control the handbrake. The first (short) - connects to the handbrake handle and pulls the main cable (long), which directly presses the brake pads to the drum. A short cable rarely causes any problems and can perform its function properly for many years. But a long cable needs constant attention, and quite often fails, which is what we are talking about on this page.
A long cable often becomes sour or stretched. If the cable is stretched, the adjusting nut can be fully tightened, but the handbrake can barely hold. And if it is soured, then one wheel can hold normally, while the second will not hold, or at all, the cable will not “move” at all, and thus will not move the pads apart.
Some car enthusiasts prefer not to buy a new cable, but to “reanimate” the old one. This is done using machine oil, in which the soured cable must be “cooked”. After such a procedure, a soured cable often begins to work, but the process of restoring it is not the most convenient, so it will be more profitable to buy a new one, especially since it costs no more than 300 rubles.
Required tools and materials for replacement
- New handbrake cable;
- Jack;
- Balloon wrench;
- Supports for the body or stumps. A car with the rear wheels removed will stand on them;
- A set of open-end wrenches and a set of sockets;
- Wheel chocks. It is necessary so that when lifting with a jack the car does not fall, because the handbrake will not be tightened;
- Durable screwdriver. For removing and installing brake drum springs;
- Universal lubricant WD-40. The bolts and nuts that hold the cable in place often become sour. Lubricant will help you unscrew them without breaking them.
- We drive onto a pit/overpass or just a flat area and use a wheel wrench to loosen the bolts of the rear wheels. Jack up the rear wheels one by one and remove them. We place supports/stumps under the body;
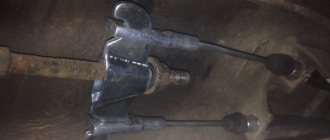
- Approximately in the middle of the bottom there is a threaded rod, on which there are two nuts, with the help of which the cables are tensioned. The rod is fixed by a spring. Remove the spring using a screwdriver. And tighten both nuts completely. We also remove the bar;
- Remove the brake drums from both wheels;
- Use a screwdriver to tighten the springs that hold the pads;
- Each wheel has two brake pads. It is necessary to remove one rear one from each side, in the direction of travel of the car;
- We go under the bottom and head 10 on both sides and unscrew the cable mounting brackets;
- Also, on both sides, closer to the front, the cable is fixed in brackets. It needs to be pulled out of them. If it does not pull out, you need to lightly tap the tips with a wrench;
- Let's move on to the brake shields on each side. Using a 8mm socket, unscrew two bolts on each side that secure the cable to the brake shield;
- The old cable can be pulled out of the holes in the brake shields and removed completely. Dismantling completed;
- The new cable is installed completely in reverse order.
After installing the new cable, the handbrake must be adjusted. To do this, put on the wheels, leaving the car on supports, and tighten the cable using the adjusting nut. The cable must be tensioned so that it can bend if you press on it with your finger. Then we go to one of the rear wheels and try to spin it. It should rotate freely.
Now we go to the salon, tighten the handbrake one click and try to turn the wheel again. It should scroll, but rather tightly, which means that the adjustment has been made correctly and after three clicks the machine will stand “tight.” If with one click the wheel does not tighten at all, you need to tighten the cable a little more. If the cable is fully tensioned, but the handbrake does not hold, this does not mean at all that the replacement of the VAZ 2107 handbrake cable was done incorrectly, it’s just that problems are also present in other elements responsible for the handbrake. Often the handbrake does not hold due to the spacer bars, which can be very worn and, therefore, do not move the pads apart enough. Or the springs at the ends of the cable may be too long and the cable rests on them. In this case, we recommend paying attention to these elements.
Replacing the hand brake cable of a VAZ 2107
To replace the handbrake cable, it is necessary to remove the brake drums of the rear wheels. When removing them, it is possible to check the condition of the brake pads and parts of the brake mechanism, especially the working cylinders. The latter should not have any traces of brake fluid leakage, and the rubber boots should not have cracks or damage.
When removing the brake drum, you can use a sledgehammer or hammer, but the blows must be applied through a wooden block. Without the use of a block, the hammer may crack the aluminum edges of the drum.
To replace the VAZ 2107 parking brake cable, you need to unscrew the two mounting bolts, release the cable and remove it.
Now you know how to repair the VAZ 2107 handbrake.
Reasons why the handbrake does not work
Often the reasons are trivial, and the work itself only takes 10 minutes (more on that a little later), but now I’ll list the main points:
- Wear of rear brake pads . Usually accompanied by a grinding noise when braking. Here, tighten, don’t tighten the cable, nothing will work. First you need to replace the pads, preferably on both wheels at once, because they wear out evenly.
- Incorrectly adjusted parking brake . This also happens, the adjusting bolt is simply loose - you need to tighten it.
- Cable wedge in sheath . This often happens over time, and often appears on 5 year old or older cars. The fact is that moisture gets between the sheath and the cable itself, after which the rust and the cable get stuck in the sheath. There are two ways here, either lubricate it and develop it so that it runs normally. Or you should replace the cables with new ones.
- Broken cable . Sometimes the cable breaks, both from the handle itself and under the car, it needs to be replaced.
- Ice or salt, reagents on the surface of the pads . It happens rarely, but it does happen, especially after driving through deep puddles. It is worth cleaning the pads with gentle pressure when driving short distances. All plaque should be cleared.
- Oil or brake fluid getting on the pads . For example, the working cylinder is leaking, or the rear axle seal may be leaking. Here you first need to remove the cause of the leak, then clean the pads. Of course, they will clean themselves after several braking cycles. If the “oiling” is strong, then you need to replace the pads with new ones, because the surface of the linings can be completely saturated with oil.
I know from experience that these are mainly the first four reasons. For example, on our VAZs, very often the cable in the sheath rusts from time to time, or it breaks, and you need to tighten it in time.
Replacing the handbrake cable on a VAZ 2107. No service stations. Do it yourself "
Replacing the handbrake cable on a VAZ 2107. No service stations. Do it yourself
The reasons for the repair are intuitively clear: in cases where the handbrake does not perform its functions (does not “hold” the car in the parking position); if a cable break or severe deformation (stretching) is detected.
Replacing the handbrake cable on a VAZ 2107 can be done at a car service center - quite quickly and professionally, but due to the simplicity of the procedure, you can do it yourself
.
Required tools: pliers, wrenches, pliers.
- First you need to remove the brake drums - on both sides. The next step is to disconnect the right rear brake pad. The cable tip is removed from it, and then the block itself is removed from the brake shield;
It is necessary to immediately warn novice repairmen: the front brake pad cannot be removed;
In a similar way
The left rear brake pad is removed, after which you need to loosen the lock nut. To prevent it from turning, use a second key to fix the adjusting nut. Then, fixing the tip with pliers, unscrew both nuts;
We disconnect the spring hook from the tip using pliers. Fixing the tip with pliers, remove the spacer sleeve and lock nut from it;
Remove the guide, then unscrew the nuts securing the bracket to the body;
Remove the bracket. We remove the cable from the bracket mount, unscrew the bolts securing the tip (they are located on the brake shield);
- At the final stage,
we remove the tip of the shell from the brake shield. Disconnecting the left branch of the cable, located on the corresponding side of the machine, is carried out in a similar way.
Main causes of failure
The main reason why such an important device may break and need to be replaced is mechanical wear of the handbrake. As you know, the basis of the system is a small cable that transmits forces from the lever to the mechanism. It actually turns on this node.
The operating conditions of the cable are quite complex - the constant load from the force that the driver transmits through the handbrake lever to the system, sooner or later, can damage the device.
However, the cable breaks extremely rarely - most often, the cables simply jump off. Or the tips fixed in the drum are ground with very long wheel bolts. Needs renovation. Also, the parking brake may not work due to wear on the rear drum brakes (as well as abrasion of the pads, depending on the design).
As a result, the unit ceases to perform the functions assigned to it - the handbrake simply does not hold. The parking brake needs to be replaced and subsequently adjusted. But not everything is so simple - in some cases, the device can be damaged during emergency braking of the car - as a result, it will require repair or replacement.
Often the metal is not completely ground, but the steel fibers are stretched and moving in the shell is very difficult. But it doesn’t matter what the reason for the parking brake failure is, why it doesn’t hold. The purpose of our article is to figure out how to solve the problem.
Rolling down a hill or replacing the handbrake cable on a VAZ 2109 and 2110 in a garage. The topic is quite relevant in view of the fact that the degree of fixation of the handbrake has always been of interest to every driver. Whatever one may say, this is an additional guarantee of safety both on the highway and in the parking lot. In some cases, emergency situations occur due to the fact that most drivers neglect the rules for using the handbrake, or deliberately bring it to a faulty state. Let's look at how to use it correctly and what is needed for this below.
Operating principle and replacement algorithm
Replacing the handbrake cable on a VAZ 2109 and 2110 can be done on your own within half an hour, unless of course you are lazy and go to a car service center for repairs. To do this we need the following equipment and tools:
Provided that we have all this ready, we can begin the repairs . So,
- It is necessary to have an overpass or inspection hole, since without them we will not be able to get under the bottom of the car;
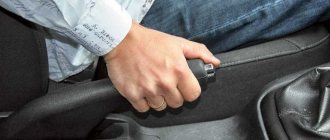
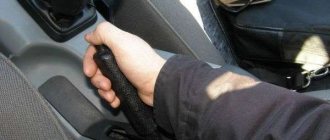
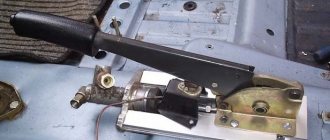
For those who do not fully understand, the handbrake in all cars is located between the two front seats. It can be covered with various drawers - glove compartments, but this is not important. The main purpose is to fix the parking of a car without outside help, even when neutral is turned on and the road is downhill under the wheels, which is a ratio of no more than 1/4.
disassembling and assembling the hand brake of a VAZ 2107
We replace the handbrake cables on a VAZ 2107 car if adjustment is impossible due to their stretching or mechanical damage.
Removing the rear hand brake cable from a VAZ 2107 car
1. We install the VAZ 2107 car on an inspection hole or overpass (see “Preparation of the VAZ 2107 car for maintenance and repair”).
2. Use round nose pliers or pliers to disconnect the release spring from the body bracket of the VAZ 2107 car and the tip of the front hand brake cable. 3. Remove the tension spring.
4. Use a 13 mm wrench to unscrew the lock nut, holding the adjusting nut with a wrench of the same size. 5. Holding the tip of the front handbrake cable with pliers, use a 13 mm wrench to unscrew the adjusting nut and remove it together with the spacer sleeve. 6. Remove the rear handbrake cable guide from the front end and disconnect it from the cable. 7. Remove the hand brake cable ends from the drive levers (see “Brake pads for the rear wheels of a VAZ 2107 car - replacement”) without disconnecting the pad support struts. 8. Using a screwdriver, we remove the tip of the handbrake cable sheath from the hole in the bracket of the VAZ 2107 car body. 9. Using a 10 mm wrench, unscrew the two nuts securing the rear handbrake cable bracket to the VAZ 2107 car body and remove the bracket. 10. Using an 8 mm wrench, unscrew the two bolts securing the handbrake cable sheath holder to the brake shield. 11. Pull out the branch of the handbrake cable from the shield. 12. Similarly, disconnect the handbrake cable branch on the opposite side of the VAZ 2107 car and remove the rear parking brake system drive cable.
Attention The right branch of the handbrake cable differs from the left one in the presence of a rubber tube on the casing.
Replacing the handbrake cable on a VAZ 2107
It is quite possible to replace the handbrake cable on a VAZ 2107 yourself. The serviceability of this device is the key to safety, so it should not be neglected. To replace the cable on the “seven”, you will need to purchase a new part, and then perform the procedure in accordance with the algorithm that will be described in this material.
Why the handbrake does not work on the VAZ 2107
Like any other part or mechanism, the handbrake cable tends to wear out and become unusable. The parking brake on the VAZ 2107 is activated using a lever located in the middle part of the car between the driver and passenger seats.
Periodically, the handbrake cable should be tightened, as it becomes weakened, which leads to a decrease in the efficiency of the device. The reasons why the handbrake on the “seven” may not function are due to the following factors:
During prolonged use of the car, when the handbrake is constantly used, owners are faced with the need to periodically restore the cable tension. Over time, the device in question stretches, and there is nowhere to tighten it. The only way out of the situation is to exchange the product for a new one. It is recommended to carry out work on replacing the handbrake cable in an inspection hole, but you can do without it.
Changing the handbrake cable
Replacing the handbrake cable on a VAZ 2107 car begins with the fact that it is first necessary to dismantle the brake drums of the rear wheels. After dismantling the brake drums, you should pay attention to the condition of the rear brake pads and working cylinders. The presence of traces of fluid leakage will indicate that the mechanisms also need repair.
Each owner of his car decides individually when it is necessary to change the handbrake cable. It all depends on the degree of wear of the cable. The procedure for replacing the parking brake cable is divided into 2 stages: dismantling and installation, as well as adjusting the tension.
The replacement algorithm is as follows:
- After the rear wheels and brake drums are removed, you need to go down into the inspection hole and find the tension adjusting rod. This rod is equipped with a spring, which must be removed using a screwdriver.
- Both nuts are unscrewed, after which the adjustment bar is removed. Next, the rear and front handbrake cables are dismantled.
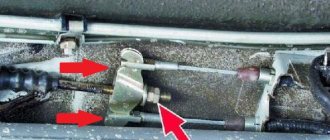
- Using a wrench, you need to unscrew the two nuts securing the two brackets. These brackets prevent the cable from falling. There are screws under the nuts that prevent them from unscrewing on their own.
- After this, you should remove the rear brake drums and remove the springs that secure the brake pads. The pads can also be replaced if they show excessive wear.
- Next, you need to pull the cable to disengage it from the bracket against which it rests.
- The brake pads are removed. There is no need to remove both pads on the wheel. To replace the rear cable, you only need to remove one rear brake pad.
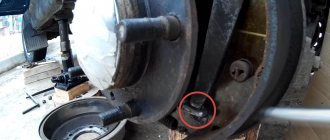
- Now you should unscrew two fixing bolts from the back of the brake shield of both wheels. With their help, the cable tip is fixed. After unscrewing these two bolts, you should pull the cable, as shown in the photo below.
- Using a 10mm wrench, you need to unscrew the front cable mounting brackets. After unscrewing the bolt, carefully remove the roller. To remove the roller, you need to roll it forward in the direction of the tip.
- To remove the front part of the device, you need to pull on the product to remove it from the bracket and intermediate support structure.
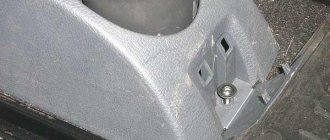
- After this, you need to get out of the hole and go into the car interior. When performing work, the handbrake must be in its lowest position. Inside, unscrew the two screws securing the handle trim.
- There are 4 bolts under the cladding that need to be unscrewed. After unscrewing them, you will need to remove the handle along with the front cable.
- To disconnect the cable mount from the handle, you will need to use pliers to remove the small cotter pin that secures the device to the handbrake handle.
- After this, the device can be completely removed from the car and a new cable installed in its place. The installation process of both products is carried out in the reverse order of removal. After this, you should secure them and begin the tension adjustment procedure.
Replacing the handbrake: instructions
- After dismantling the rear wheels and brake drums, you need to head into the pit and find the tension adjustment rod. This rod is equipped with a spring that must be unscrewed with a screwdriver.
- Next, you need to unscrew the 2 nuts and begin dismantling the adjusting bar. Then the cables (rear and front) of the parking brake are dismantled.
- Use a wrench to unscrew both nuts securing the brackets. The latter just prevent the cable from falling. There are screws under the nuts that prevent them from unscrewing unintentionally.
- The next step is to remove the rear drums and then remove the springs that secure the brake pads. The latter are also timely to be replaced if they are worn out excessively.
- Now you need to pull the cable. This way it will be possible to disengage it with the bracket where it rests.
- Next you need to remove the brake pads. There is no need to remove both elements on the wheel. To replace the rear cable, you only need to remove one rear block.
- On the opposite side of the brake shield of both wheels, you need to unscrew 2 mounting bolts, with which the cable tip is secured. After unscrewing both bolts, pull the cable.
- Using a 10mm wrench, you now need to unscrew the front cable fastening brackets. When the bolt is unscrewed, carefully remove the roller. To do this, you will need to roll it forward in the direction of the tip.
- To remove the front part of the mechanism, pull the device to remove it from the intermediate support and bracket structure.
- Then you can get out of the inspection hole and head to the S7’s interior. The handbrake is kept in the down position throughout the entire process. While in the cabin, you need to unscrew the 2 screws that secure the handle trim.
- So, there are 4 bolts under the cladding. They need to be unscrewed, and then proceed to dismantling the handle with the front cable.
- To disconnect the cable fastener from the handle, use pliers to remove the small cotter pin that clamps the device to the parking brake handle.
- Now the device can be removed from the car and a new cable can be installed. The installation procedure for both mechanisms is carried out in the reverse order of removal. After all, you need to fix them and move on to adjusting the tension.
Note. When installing the rear cable, it is important to remember that this part has both a right and a left side. On the right there is a rubber tube that serves as auxiliary insulation of the braid from the hot pipe of the resonator located nearby.
The procedure for adjusting and replacing the parking brake cable is not as complicated as it seems. Any VAZ-2107 car owner can cope with the task.
Repair of hand brake VAZ 2107
Operating a vehicle with a faulty brake system is prohibited. This also includes cases when the handbrake does not hold the car well or does not work at all. Therefore, repairing the VAZ 2107 handbrake is a job that should be performed immediately. If lifting the lever 5-6 clicks is not enough to lock the car in place, the handbrake requires attention.
How to assess the condition of the parking brake
Before we talk about the parking brake malfunctions, we suggest determining its performance:
If the car with the handbrake activated is stable when stopping on a steep slope, the brake is in good condition.
If the car slows down weakly and continues to move, then adjustment and possibly repair of the parking brake fault is necessary.
There is another way to check the serviceability/failure of the parking brake. The handbrake must be raised all the way, engage first gear, and then smoothly release the clutch. A stalled engine will indicate that the brake is in working order.
If there is no slope or hillock nearby, you can check the condition of the handbrake as follows. Having parked the car on a flat surface, activate the handbrake and engage neutral gear. Then get out of the car and try to push it. If the car does not move, the parking brake does not need any manipulation.
Adjusting the handbrake VAZ 2107
Restoring the handbrake's functionality should begin by checking the cable tension. To tighten the parking brake cable of a VAZ 2107, you will need:
- pliers;
- a pair of keys for 13;
- metal brush;
- WD-40;
- jack.
The adjustment should be made on an inspection pit or a lift. In the latter case, a jack will not be needed.
The procedure is as follows:
- Raise the rear wheels using a jack or lift so that they can be rotated by hand.
- Tighten the handbrake 2-3 clicks (until the locking position).
- Use a wire brush to clean the threads on the adjusting bolt if they are dirty. If corrosion is severe, use WD-40 to remove the nut from the adjusting bolt.
- Using a pair of 13mm wrenches, loosen the locknut;
- Using a 13mm wrench and pliers, adjust the position of the nut so that the wheels are locked.
Note: if even in the extreme position of the nut the VAZ 2107 handbrake is not tightened sufficiently, it is necessary to replace the cable.
- Make sure that the cable is not overtightened and that when the lever is lowered, the wheels are unlocked.
- Tighten the locknut.
- Lubricate the threads of the adjusting bolt with lithol to prevent corrosion.
As you can see, applying the handbrake of the VAZ 2107 is quite simple.
When adjusting the handbrake, it is worth checking the rear wheel bearings. They should rotate easily and smoothly, without noise. The presence of play indicates the need to tighten the bearings.