Normal PT adjustment ensures that the vehicle is held on a slope. This corresponds to 3-8 clicks of the handle on newer nines or 5-7 clicks on a VAZ 2110 released before 1995.
To carry out the test, follow a few simple steps:
- Find a slope that has about 25 degrees;
- Turn the handbrake to the required position;
- If the car starts to roll, the handbrake does not hold, adjustment is required;
- If there is no such slope nearby, the check is carried out in a garage;
- Place the car on a flat surface, raise the handbrake handle all the way;
- Approach from behind and try to push the car with maximum force;
- If the car begins to move, the RT requires adjustment;
- Check the operation of the handbrake at 2 clicks on newer versions of the VAZ 2109 and not reaching 5 clicks on versions before 1995. If the handbrake is working at full strength, the cable will be tightened. It will also need to be adjusted.
Operating a car with a tightened PT cable is also dangerous, as this leads to overheating and wear of the rear brake pads.
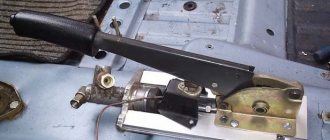
Bottom view
Adjustment
To adjust the PT cable you will need a pit, overpass or lift. Next we proceed according to the following algorithm.
- Raise the handbrake handle 2-3 clicks from the passenger compartment.
- Get under the car and loosen the locking nut of the parking brake cable equalizer. Before doing this, it is better to treat the nut with a wire brush to remove all dirt.
- Then act according to the circumstances. If the cable is overtightened, it must be loosened by appropriate manipulation of the nut. If the cable holds too weakly, the nut must be tightened more tightly.
- If tensioning the cable does not produce any result, then the element is already at the limit of its capabilities. Therefore, the only solution to this situation is replacement.
- When adjusting the degree of tension, be sure to evaluate the adjustment of the cable along the PT lever. As you remember, normally it is 3-8 clicks for more recent versions of the VAZ 2109, or 5-7 clicks for nines that were produced before 1995.
- Check the freedom of rotation of the rear wheels. If you overtighten the cable, the wheels will spin with difficulty and not as freely as they should.
- After making the adjustment, tighten the locking nut back and check the operation of the handbrake again by driving up a slope or pushing the machine with the PT on.
Adjustment process
We recommend: Reasons and process for replacing a Ford Focus fuel pump
If the adjustment did not give a positive result, the cable turned out to be worn out, overtightened and does not allow adjusting the operation of the RT, you will have to change it, thereby repairing the handbrake.
Replacement
In some cases, heavy movement of the cable in the sheath is due to lack of lubrication. To eliminate this defect, fill the shell with transmission or engine oil. Pour until grease flows out of the opposite end of the cable casing. Remember to move the cable while adding lubricant.
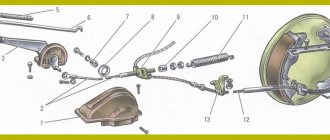
Cable replacement procedure
But lubrication is more of a temporary measure. If signs of cable wear are detected, it is better to replace it with a new one. This is done as follows.
- Loosen the tension on the PT cable locking nut.
- Unscrew the equalizer adjusting nut, which will loosen the handbrake drive cables.
- Raise the rear of your VAZ 2109 using a jack, then remove the brake drum and brake pad.
- Unscrew the drive cable end from the drive arm.
- Disconnect the fastening nut, and then remove the PT cable holder on the rear suspension beam of the vehicle.
- Remove the shell bushing from the hole in the brake shield.
- Pass the end of the PT cable through the hole in the brake shield.
- Remove the PT cable from all holders on the body of your car.
- Disconnect the end of the PT cable from the equalizer.
- Push the cable end out of the bracket to remove the cable.
- Install a new, tested cable, proceeding in the reverse order.
- Do not forget to adjust the cable tension and the performance of the restored RT at the final stage of assembling the unit.
Adjusting the travel of the handbrake cable on a VAZ-2110
The lever should tighten the cable tightly with 2-4 clicks.
- The pads are put in place and the wheels are put on. They should initially rotate freely when the lever is released.
- Then you should drive 1-2 kilometers by car. In this case, you need to brake several times.
- Then you should try the drum by hand. It shouldn't be hot. When it gets hotter, the cable needs to be released a little.
- Repeat the entire procedure until the drum stops heating.
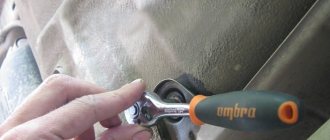
It is much more convenient to twist the handbrake nut with a socket with an extension.
Slope check
You can also check the operation of the handbrake on a slope. To do this, you need to turn off the engine and put the car on the handbrake, turning on the neutral gear. It should not move on its own at a slope of 25%!. When it starts to roll, the cable should be tightened.
Replacement
There is one important condition - you will need an assistant. His task will be to pull the cable tightly, which will allow the equalizer to be installed correctly.
The sequence of work to replace the cable is as follows:
- Lower the handbrake lever as far as possible;
- Remove the brake disc from the wheel where the element is being replaced;
- Remove the muffler from the suspension cushions and the resonator from the rear suspension;
- Lower the exhaust system down;
- Remove the adjusting nut and locknut;
- Remove the equalizer;
- Now remove the cable ends from the equalizer;
- Remove the tip of the equalizer shell from the bracket, which is located on the car body;
- Bend back the brackets that secure the cable;
- Remove the rear brake pad and remove the cable end from the lever;
- Slightly loosen the nut that secures the cable holder to the rear axle;
- Remove the cable from the holder, then from the bracket, and then pull it out through the brake spike;
- Place a new cable in its new location and perform the assembly procedure, following the reverse order of the indicated processes;
- Make sure that the cables in the bracket are positioned crosswise;
- After completing the installation of the new element, adjust the handbrake.
As you can see, the task does have certain nuances, but it is not difficult at all if you have some experience and rely on the VAZ 2110 operating manual. As a rule, everything is spelled out there.
Replacing the handbrake cable on VAZ 2109 and 2110. We can do without a service station
Rolling down a hill or replacing the handbrake cable on a VAZ 2109 and 2110 in a garage. The topic is quite relevant in view of the fact that the degree of fixation of the handbrake has always been of interest to every driver. Whatever one may say, this is an additional guarantee of safety both on the highway and in the parking lot. In some cases, emergency situations occur due to the fact that most drivers neglect the rules for using the handbrake, or deliberately bring it to a faulty state. Let's look at how to use it correctly and what is needed for this below.
Operating principle and replacement algorithm
Replacing the handbrake cable on a VAZ 2109 and 2110 can be done on your own within half an hour, unless of course you are lazy and go to a car service center for repairs. To do this we need the following equipment and tools:
Provided that we have all this ready, we can begin the repairs . So,
- It is necessary to have an overpass or inspection hole, since without them we will not be able to get under the bottom of the car;
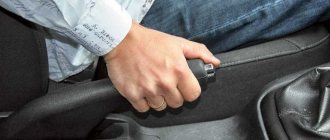
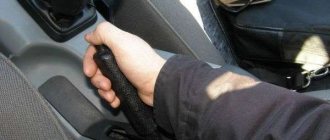
For those who do not fully understand, the handbrake in all cars is located between the two front seats. It can be covered with various drawers - glove compartments, but this is not important. The main purpose is to fix the parking of a car without outside help, even when neutral is turned on and the road is downhill under the wheels, which is a ratio of no more than 1/4.
Modernization
Many modern owners modernize their cars and install so-called hydraulic handbrake here. As a lyrical digression, we note that in this case it is necessary to replace the rear brakes with disc brakes without fail.
Very serious design changes are required - such as installing a hydraulic system in the parking brake. No cables are used here - the parking brake lever is connected to the master cylinder.
After the driver lifts the lever, the brake fluid in the system presses on the cylinders. Most often, hydraulic systems can be found on sports cars - after all, such a brake holds much better.
The main advantages that the hydro system gives:
- Full confidence that the hydraulic handbrake will work;
- There is no need to tighten the cable.
- It is quite difficult to bleed the brakes when replacing the standard cable system and installing a hydraulic handbrake;
- The hydraulic handbrake holds the car for several hours, after which the pressure in the system drops and the car can start moving.
Hello, in this article you will learn how to replace the handbrake cable on a VAZ 2110, 2111, 2112. If you notice that the handbrake no longer holds the car on a slight slope of the road and adjusting the handbrake did not solve this problem, then it is necessary to replace the parking brake cable. The average price is from 200 rubles and above. From the tools we need a wrench for 10 and two wrenches for 13.
So, let's begin. First of all, we remove the car from the handbrake. Then remove the brake drum and unhook the cable from the brake shoe.
In order to get to the cable fastenings, it is necessary to remove the resonator and muffler from the rubber cushions
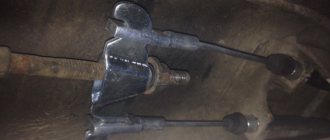
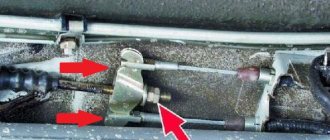
The next step is to unscrew the lock nut (1) and the adjusting nut (2) of the hand brake and remove the equalizer (4) from the rod (3). Unhook the end of the cable
Then unscrew the cable fastenings from the brackets from the car body
Now you need to remove the rear brake pad and unhook the end of the cable from the brake shield and remove it
Less work - longer operation?
Many drivers believe that rare use of the handbrake ensures maximum performance of this unit. In fact, such an attempt to preserve the RT resource gives a completely opposite effect.
The less often you use the handbrake on your car, the less movement the cable makes in its sheath. This leads to loss of efficiency and performance of the cable. Loss of mobility leads to the appearance of breaks when the handbrake is rarely applied. As a result, at the most inopportune moment the car does not stand still as it should.
To prevent problems with the RT, periodically inspect the condition of the unit, and also do not forget to squeeze the parking brake handle when necessary and required by traffic rules.
If the handbrake cable breaks
There are cases when adjusting the parking brake alone is not enough. This happens quite rarely and mainly on older cars - the handbrake cable breaks. The cable wears out over time and is no longer able to withstand the load of the car, and at some point breaks. Sometimes a break occurs on new cars that are subjected to too intense use, for which their braking system is not designed. Most often, the cables simply jump off or the cable ends secured in the drums are chafed by the wheel bolts; this also happens simply due to wear of the rear drum brakes.
The cable should be changed not only as a last resort when it breaks, but also as a preventive measure for its subsequent breakage in the following cases:
- the handbrake cable moves with difficulty in the sheath even after it is lubricated;
- the cable ends are loose (you have to regularly tighten the cable);
- the cable threads began to stretch, which will ultimately lead to its breakage.
Adjustment and checking
- The travel of a properly adjusted handbrake lever should not exceed 8 clicks. The optimal lever stroke is 6-7 clicks (this number varies depending on the car model; details for a specific VAZ model can be found in the operating instructions supplied with the car).
- After installing the new cable, the rear wheels of the car should be jacked up and try to spin them by hand. Rotation must be free.
- Now the brakes should be checked while driving. You need to drive 30-40 meters, then slow down using the parking brake. After braking, you need to get out of the car and touch the rear brake drum. It should not be hot, its temperature should not exceed the ambient temperature. If the drum gets so hot that it burns your hand, this means that the brake cable is too tight and should be loosened.
- To loosen the cable, you should put the car back on the inspection hole, unscrew the lock nut on the outer tip with a 13mm wrench, and then loosen the main fastening nut. After this, the locknut is tightened again.
- If the brake cable is too slack, it needs to be tightened. All steps are listed above, with one exception: the main nut on the tip should be tightened, not unscrewed.
- To independently check the reliability of the parking brake, you should find a slope with a ratio of 1:5 (that is, 1 meter high and 5 meters long), drive the car onto it, turn off the engine, put the car on the parking brake and squeeze the clutch. After these actions, the machine should remain in place and not roll downhill. If the car does roll, you should tighten the brake cable a little more.
As you can see from our article, there is nothing complicated about replacing a brake cable, and even a novice car enthusiast can do this task. The main thing you should pay attention to in this case is compliance with safety regulations. When changing a cable, it is very easy to get injured or get a chemical burn, so it is better not to carry out this operation alone, but to work together with an experienced auto mechanic.
Repair manual
To quickly carry out repairs, you will need the help of a partner. This will significantly save time that will have to be spent on repairs.
Further point by point:
- Step one - remove the VAZ 2110 from the parking brake (we lower the handbrake all the way to the floor - the system for holding the car in place must be turned off);
- Step two - remove the wheel brake drum;
- Step three. Getting to the equalizer is quite difficult. The technician will need to remove the muffler from the suspension cushion and remove the resonator from the rear cushion. We lower the exhaust pipe downwards;
- Step four. To do this, you will have to crawl under the VAZ 2110 - the adjusting nut and locknut are located here. We unscrew them and remove the equalizer from the rod;
- Step five. Remove the cable end from the control;
- Step six. On the body of the VAZ 2110 there is a bracket where the tip of the cable sheath is installed;
- Step seven. The manufacturer secured the cable with brackets - they need to be bent to the sides;
- Step eight. Remove the rear brake pad and disconnect the end of the handbrake cable;
- Step nine. We move on to the rear axle beam and loosen the nuts with which the manufacturer secured the handbrake. Remove the cable from the device holder.