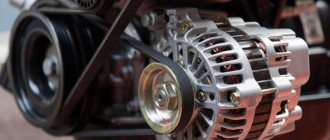
The generator in a car is included in the list of main attachments and is an important element. Among the main functions, one can highlight the fact that a car generator charges the battery and also powers the on-board network after starting the internal combustion engine.
At the same time, although the general design is similar, the design of the generator may differ slightly in different cars. In any case, it is important to be able to promptly identify possible problems, as well as know how to diagnose and repair the generator if necessary.
Next, we will look at how the generator on the VAZ 2114 is structured and works, what features the generator on this model has, what signs indicate that the 2114 generator is out of order, how to repair the generator, etc.
Design of the VAZ 2114 generator set
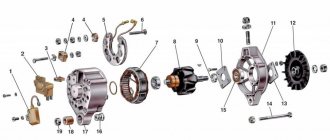
The generator in the VAZ 2114 car is an electrical three-phase device that operates with alternating current. It is equipped with a built-in rectifier unit to convert AC to DC. Among the main parts of the VAZ generator set are the following:
- Front and back cover. They are made of aluminum and have bearing housings. On the body of the back cover there is a terminal for connecting to the battery, and there is also a connector through which voltage is supplied to the excitation winding. On the same back cover there is a capacitor to suppress radio interference. There is a place for mounting and fixing brushes.
- The stator core cylinder in the VAZ 2114 generator is made of transformer iron. Inside there are grooves in which the winding is laid. There are leads for connection to the rectifier unit, and covers are bolted to the stator.
- The rotor shaft has an excitation winding connected to copper contact rings. On the front of the shaft there is a keyway for mounting the drive pulley.
- In the VAZ 2114 generator, the brushes are made in the form of a single unit, combined with an electronic relay. It is hidden in a durable metal case and attached to the brush holder.
- On the inside of the back cover there is a block of diodes consisting of 6 main and 3 additional ones. They are mounted on semicircular aluminum plates, which provide better cooling of semiconductors.
Useful video
You can get additional information on this issue by watching the video below:
- Repair of VAZ 2114 stove: radiator (heater) and other components
- On-board computer VAZ 2114: purpose, functions, main errors
- VAZ 2114 ECU: types, operating principles and diagnostics
One day the car stopped starting from a dead battery, I charged the battery and drove it for 3 days after which it was discharged again. At that time I was still just a novice motorist, so I immediately thought that the battery was faulty, I bought a new one in the store, brought it and installed it, literally 5 days later the car would not start again because the battery was dead. I went to the store and demanded a replacement, after much persuasion from the manager, they finally agreed to replace the battery. Well, history repeated itself, then I realized that I had to go to a car service center; they didn’t tell me about the generator malfunction. This is how I unknowingly killed a lot of nerves and time.
Good day to all!
In general, about two months ago I changed the bearings in the gene, but I didn’t put it in the log book because the process was not photographed, and after this time the bearings began to hum again. After driving like this for several days, I said “Stop putting up with this” and drove to a friend’s garage for pit.
We will need:
***bearings 202 and 302 (I personally have these, BATE generator), if you don’t know which ones you have, then first remove them and go to the store) ***generator bearing puller ***brushes (if you haven’t climbed there for a long time, or not changed them, grab them at the same time, I changed mine recently)
I will describe the process of removing and disassembling the generator (I apologize for the quality of the filming, I filmed it on my phone):
1.Remove the negative terminal from the battery 2.Remove the + and - contacts, we will need a key for 10.
3. Loosen the generator position lock with a 13 key and unscrew the long bolt for adjustment, it is 10
4. You can remove the generator in different ways, I personally remove it together with the fasteners because it takes 2 minutes, there are 15 bolts.
5. Next on the table I remove the mount itself from the generator, there is a long bolt at 13. I remove it together with the fastener because it is this bolt that rests on the spar.
6.Next, we remove the pulley from the generator. It seems like a 22mm head is needed, and it is advisable to have a vice. We insert a screwdriver or something else through the generator, thereby blocking the pulley from turning (just be careful, do not bend the blades). Because the first ones once when I was changing the bearings of the generator, we had a vice, we were able to unscrew it without much difficulty, now the vice was already broken and we just inserted screwdrivers: one held the generator from turning, and I unscrewed the pulley nut.
7. Using a Phillips screwdriver, unscrew the screws securing the front and rear covers of the generator, there are four of them (I advise you to spray it with WD40, and in general, spray everything there, spray the entire generator)))) You will also make marks so that you can put them correctly later.
10.After you have removed the front cover, turn it over and place the 22nd head on the bearing, knock it out with a hammer and immediately drive the new bearing through the old one, this can be done without any problems, just be careful.
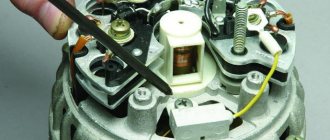
11.Next, remove the back plastic cover (it opens with 3 latches), unscrew the brushes. 12.Pull out the rotor (I got it out without any problems)
13.Take a puller and remove the bearing.
14. Install the new bearing by driving in the old one. New bearing - old one on top - head on top, and carefully drive it in.
And put everything back together in the reverse order, first having a little smoke break))!
I hope you find this useful, thank you all for your attention! =)
Technical characteristics of the VAZ 2114 generator
The generator sets installed in domestic cars of this brand are distinguished by the following main characteristics:
- The voltage on the field winding varies from 13.2 to 14.7 volts.
- The generator produces current up to 80 amperes.
- The belt tension is such that under a weight of 10 kg the deflection should be less than 8 mm.
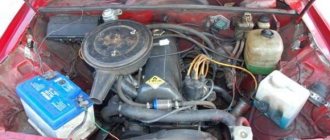
The generator set in the VAZ 2114 is attached to the power unit block on the left in the direction of travel. The rotor rotates to the right due to a drive belt connected to the engine crankshaft.
How to test a generator with a multimeter
In practice, an effective way to check a generator is diagnostics using a multimeter. To do this, the engine must be started. Next you need to measure the voltage at the battery terminals. Then you should create a load (turn on energy consumers, for example, headlights and a radio), press the gas pedal, spinning the engine to 2500-3000 rpm.
At this moment you need to measure the voltage at the battery terminals. Normal - the voltmeter will show 13V. If you turn on power consumers, the voltage should increase to 14.7V. If deviations from the norm are visible, certain conclusions can be drawn.
In the event that the generator does not produce the required voltage, the shortage is compensated by the battery and “drains” the battery. If the voltage is high, this is a dangerous situation that can lead to blown lamps, fuses, or failure of the computer.
By the way, experts do not recommend checking the generator without a multimeter by simply removing the “plus” from the battery. Remember, this can damage the vehicle's electronics. If the cause cannot be determined without removing the generator, then dismantling the unit is necessary.
We also note that it is also necessary to evaluate how the generator operates in terms of noise. If extraneous sounds are heard when the rotor rotates, the culprit may well be the generator bearing, which is loaded by the belt and may fail.
Possible breakdowns of VAZ 2114 generators
All faults associated with the generator set of a domestic car are divided into electrical and mechanical.
Mechanical breakdowns
Such malfunctions can be diagnosed by the appearance of increased noise during operation of the VAZ 2114 generator. In some cases, the device begins to make noise due to wear of the bearings. Most often, the bearing located in the front cover fails. It carries high radial loads and therefore always has a shorter service life. Its wear can be accelerated by tightening the drive belt too much, which will increase the load.
Electrical breakdowns
You can diagnose an electrical breakdown in the VAZ 2114 generator using factors such as:
- the generator does not charge the VAZ 2114;
- reduction of charge voltage;
- increasing the charge voltage.
Without checking with a multimeter, these faults can be determined by the following signs:
- The battery charge light is constantly on or blinking;
- when the engine is running, the headlights shine dimly and the wipers work slowly;
- The battery's electrolyte is boiling, and the headlights are shining too brightly.
A superficial check of the operation of the VAZ 2114 generator can be performed without dismantling the device. You will need a multimeter or DC voltmeter. It is necessary to measure the voltage at the battery terminals with the engine running. If it is equal to 12 volts, the generator does not provide a charge, and if it is below 14.5 with the electrical equipment turned off, the charge is insufficient.
Do not check the operation of the generator by removing the positive terminal from the battery, otherwise the electronic relay-regulator or other electronics may fail.
Symptoms of generator malfunctions, diagnosis and repair
So, problems with the generator are often indicated by the fact that the battery light on the instrument panel lights up. This indicates problems with charging the battery from the generator. Problems can also manifest themselves in the form of a constant discharge of the battery or undercharging of the battery. Also a sign of problems is overcharging the battery (the battery is “boiling”, the electrolyte is boiling away, etc.).
Problems with the generator will also be indicated by dim headlights when the engine is running, voltage surges in the on-board network, and the appearance of extraneous noise in the generator area after starting the internal combustion engine. One way or another, if everything is fine with the battery itself, then you should check the generator.
Briefly, the list of main problems:
- A common problem is the fuse. If it burns out, it needs replacement. It is also important to determine the cause of burnout. To do this, you should check the power circuits, connections of the “zero” to other contacts, etc.
- If the diagnostics do not reveal problems with the wires, terminals and contacts, the generator elements should be checked. Often, the list of main faults includes failure of the generator brushes (severe wear, destruction).
Let us add that if the brushes need to be replaced, then the brush holder also needs to be replaced. In turn, the contact rings do not need to be changed; they just need to be cleaned with a cleaner. Experts also highlight malfunctions of the voltage regulator, breakage or delamination of the generator belt, jammed bearing, etc.
In any case, each of these problems can damage the generator. Moreover, many problems tend to actively progress. Some of the breakdowns, if not repaired in a timely manner, lead to the need to replace the VAZ 2114 generator.
We remove the generator from the VAZ 2114 ourselves
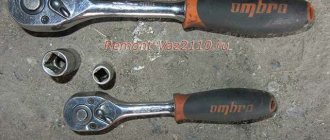
To diagnose a more serious malfunction of the VAZ 2114 generator, it is necessary to dismantle it. The device is held on a special bracket on the engine block. To remove the installation you will need the following tools:
- wrenches 10 and 13;
- open-end wrench 17x19;
- mount;
- head at 15.
You can dismantle the VAZ 2114 generator in different ways by removing the protection of the power unit, but we will tell you about the method of removing the device without touching the protection.
- Remove the terminals from the battery.
- Loosen the belt and remove it, and then remove the tensioning mechanism.
- Disconnect the wires from the generator, covered with a rubber boot, and also disconnect the voltage supply connector to the winding.
- The generator is held in place by a long bolt and nut. It is not easy to pull it out, so first unscrew the 15 bolts that hold the bracket on the block. They are located at the rear of the generator set. Rotate the charger clockwise, which will allow you to remove the axle attached to the bracket.
- Unscrew the nut with a size 19 wrench and pull it out with the bushing.
Using a punch or similar, knock the axle out of the bracket. Pull the generator up and you can start servicing.
Signs of generator failure
There are several signs by which a driver can determine that the VAZ 2114 generator is faulty.
Here are the main ones:
- the corresponding lamp on the instrument panel indicates that the battery is not charging;
- insufficient or overcharging of the battery;
- weak headlights and poor performance of the wipers (with the engine running);
- excessively bright headlights;
- the electrolyte in the battery boils;
- appearance of extraneous noise in the generator set.
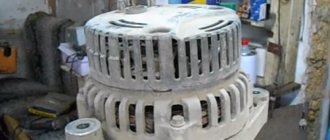
Disassembling the VAZ 2114 generator
To disassemble the generator, you will need a 10 and 19 wrench, as well as a shaped screwdriver. To disassemble the device you need to follow these steps:
- Release the latches and remove the protective plastic cover.
- Mark the location of the covers relative to the stator, which will simplify the assembly process in the future.
- Unscrew the screws securing the brush assembly and remove it.
- Disconnect the wires from the regulator output.
- Unscrew the 4 screws that hold the rectifier unit, and then disconnect the winding terminals and remove it with the capacitor.
- Unscrew the tightening screws and remove the cover from the slip ring side.
- Clamp the rotor shaft in a vice and unscrew the nut that holds the pulley. After this, it can be dismantled along with the thrust washer.
- Remove the cover from the rotor.
After disassembling the VAZ 2114 generator, carefully inspect all components for damage or excessive wear.
Removal and installation instructions
As practice shows, the main reason why a unit fails is the connection of various electronic devices to the car’s on-board network. Many energy consumers need high voltage generators. Therefore, when purchasing a node, you need to consider how many devices will connect to it. If you take a 115A or 120A mechanism, this will be the most reasonable choice for cars “stuffed” with electronics.
Find out more about dismantling and installation below:
- To perform the work, you will need a 13 key. First of all, you need to disconnect the battery.
- In accordance with the operating instructions, dismantle the mechanism drive belt. After this, you can disconnect the wiring block from the D+ connector on the device.
- Then you will need to move the rubber boot and unscrew the nut. Having done this, you can disconnect the wiring from the terminal pin.
- After these steps, unscrew the nut of the screw of the lower clamp of the assembly to the special bracket. The nut itself can be removed with a spacer sleeve.
- Next, remove the retaining screw. After this, the nut securing the assembly to the upper mount can be completely unscrewed. The adjusting screw also needs to be completely unscrewed, then remove the tension bar.
- After completing all these steps, you can remove the mechanism from the machine. The unit is being repaired with the replacement of all necessary elements. After the repair is completed, the generator can be put back in place; the installation procedure looks identical to dismantling, only all steps are repeated in reverse order. After installation, it is necessary to adjust the strap tension. If the belt is not adjusted, this may cause the mechanism to malfunction. After all the actions completing the repair procedure, the tension bar fixation nut must be tightened to a torque of 20 Nm.
Problems with the brush assembly of the VAZ 2114
The operation of the brush assembly depends on the brushes themselves and the electronic regulator, popularly called “chocolate” and “tablet”. Replacing the brushes of the VAZ 2114 generator can be done without dismantling the generator, but this is not very convenient.
To test the brush assembly you will need a regulated power supply and a 12 volt light bulb. Connect the power supply to the + and – of the regulator, and the light bulb to the brush - it should light up, and when the input voltage increases to 15 volts, it will go out. If it continues to burn at 16 volts, change the electronic regulator.
As for the VAZ 2114 brushes, their wear can be diagnosed by the following signs:
- lack of battery charge;
- low voltage on-board network;
- jumping charge voltage.
When free, the brushes should be more than 5mm long, and if yours is shorter, don’t hesitate to change them. To check the condition of the brushes, they must be moved in the grooves. They should move freely, and if they hang, lubricate them with a drop of oil.
Check the condition of the slip rings for wear. If present, sand the rings with the finest sandpaper. After replacing the brushes, if the problem was in them, the functionality of the generator will be restored immediately.
Comments • 16
I don’t know, I have the factory one. Simple 13.8. Not more. There's a lot of 14.2.14.3. Even though I put in a lot of music
Does it fit from the Priora without any modifications to the fasteners?
Suitable if the engine is injected. I don’t know about carburetor ones, I haven’t seen them
Hello, are you from Krasnoyarsk?
@Eugene Siberian can I find you on Instagram or VK?)
Good afternoon) where can I get such a dashboard for 14
Greetings! Car markets, websites and VK groups for the sale of spare parts and tuning for VAZs. The device is called Flash X3
Has your problem gone away?
@Eugene Siberian got it, thanks
Low voltage? After replacing the generator, everything went away, stable 13.7 and above with consumers turned on
I have 16 cells on my 2112, there is also a voltage drop for a second, there is such a regulator, please tell me, replacing the regulator solves the voltage drop when releasing the gas?
if you have trt or trw, I don’t remember the exact name, in general, it’s Chinese, then replacing it with Russian 849.3702 or 897.3702 should fix the drawdown when releasing gas
Who knows, Priorovsky generators are suitable for mounting on a VAZ 2114-2115 1.6. 8kl? 9402.3701-14 115A
You also need to look at the voltage regulator. It's either Russian or Chinese. If it is Chinese, then when you release the gas there will be a drawdown for a second
Yes, that’s right, either drill it out or buy new ones with a larger diameter, the generator itself fits in exactly the same way and the belt fits
@Eugene Siberian, as I understand it, you need to drill out 2 terminals and buy a connector for the signal lamp? I just didn’t understand anything from the video, the nuances, but actually everything is off topic.
Yes they fit no problem
In this video I installed such a generator. I also have a 1.6 8kl
make dubbings I have dubbings 14.4 everything I can include 14. exactly
@Aa Aa from the generator to the battery, I personally have 25 kg on both + and - and on the body there is an additional kg - 35
cool, gotta do it
The bolt must be installed on the other side once it has been removed. So as not to twist the wheels next time.
It’s easier to remove the bracket in one without any problems with pressing on the engine and even more so bending the body iron. I don’t know how anyone has it, but on my car there is a seat for 6 edges under the head of the bolt, and if you put it the other way around, the length of the bolt may simply not be enough, and you’ll have to struggle with attaching the nut. From the entire video, I essentially didn’t learn anything about what fits and what doesn’t, I only learned about the wire to the signal light on the panel. There’s essentially nothing to disassemble and assemble to explain. Tomorrow I’ll go get a new one, I don’t trust the old one anymore, although I invested a little over 1000 in it, bearings, slip rings, in the end I’ll scatter it for spare parts, I specially went to the service center, they called, they put it on a stand, everything is fine, after installation this demon stopped again charge after some time. As a result, I removed this goat in the evening in frost below 40 without a pit in an iron garage, again I installed a replacement in no better condition from another car, so the generator, not mine, ended up in the car again. The video is absolutely not informative; it does not correspond to the title “All the nuances of installation on a VAZ”.
I have a nine carb, the generator is weak, it doesn’t play music, can I put a generator like yours on it? And what will you have to do?
The generator on the VAZ-2114, which generates electricity while the car is moving and thereby recharges the battery, is primarily a mechanism. The latter, as you know, tend to break. A malfunction in the operation of the car's electronics can be caused by a malfunction of the generator. Fortunately, everyone can check it for functionality, select a new part and replace the worn one. But before you start practicing, you need to gain some theoretical knowledge.
Problems with the VAZ 2114 diode bridge
It is not difficult to check whether the diode bridge of the VAZ 2114 generator is working. Its breakdown may be indicated by a lack of charge and increased voltage produced by the generator. Both options can lead to unpleasant consequences for the electrical network and electrical equipment of the machine.
Failure of the diode bridge may be due to breakdown of power diodes, which can be replaced if you can find them. You can try to find the necessary spare parts from auto electricians, but it turns out to be much cheaper and easier to buy a new diode bridge and replace your old one with it. The work is carried out as follows:
- We install the contact bolt in the block and tighten it with nuts.
- We straighten and install the leads of the stator windings and tighten the nuts at the contact points.
- Tighten the bolts securing the rectifier unit.
- We install the brush assembly and tablet, screwing them to the back cover.
- We install the plastic protection and fasten the clamps.
After completing the work, we mount the VAZ 2114 generator in its place, connect the wires, tighten the belt and start the car.
COMMENTARE • 16
I don’t know, I have the factory one. Simple 13.8. Not more. There's a lot of 14.2.14.3. Even though I put in a lot of music
Does it fit from the Priora without any modifications to the fasteners?
Suitable if the engine is injected. I don’t know about carburetor ones, I haven’t seen them
Hello, are you from Krasnoyarsk?
@Eugene Siberian can I find you on Instagram or VK?)
Good afternoon) where can I get such a dashboard for 14
Greetings! Car markets, websites and VK groups for the sale of spare parts and tuning for VAZs. The device is called Flash X3
Has your problem gone away?
@Eugene Siberian got it, thanks
Low voltage? After replacing the generator, everything went away, stable 13.7 and above with consumers turned on
I have 16 cells on my 2112, there is also a voltage drop for a second, there is such a regulator, please tell me, replacing the regulator solves the voltage drop when releasing the gas?
if you have trt or trw, I don’t remember the exact name, in general, it’s Chinese, then replacing it with Russian 849.3702 or 897.3702 should fix the drawdown when releasing gas
Who knows, Priorovsky generators are suitable for mounting on a VAZ 2114-2115 1.6. 8kl? 9402.3701-14 115A
You also need to look at the voltage regulator. It's either Russian or Chinese. If it is Chinese, then when you release the gas there will be a drawdown for a second
Yes, that’s right, either drill it out or buy new ones with a larger diameter, the generator itself fits in exactly the same way and the belt fits
@Eugene Siberian, as I understand it, you need to drill out 2 terminals and buy a connector for the signal lamp? I just didn’t understand anything from the video, the nuances, but actually everything is off topic.
Yes they fit no problem
In this video I installed such a generator. I also have a 1.6 8kl
make dubbings I have dubbings 14.4 everything I can include 14. exactly
@Aa Aa from the generator to the battery, I personally have 25 kg on both + and - and on the body there is an additional kg - 35
cool, gotta do it
The bolt must be installed on the other side once it has been removed. So as not to twist the wheels next time.
It’s easier to remove the bracket in one without any problems with pressing on the engine and even more so bending the body iron. I don’t know how anyone has it, but on my car there is a seat for 6 edges under the head of the bolt, and if you put it the other way around, the length of the bolt may simply not be enough, and you’ll have to struggle with attaching the nut. From the entire video, I essentially didn’t learn anything about what fits and what doesn’t, I only learned about the wire to the signal light on the panel. There’s essentially nothing to disassemble and assemble to explain. Tomorrow I’ll go get a new one, I don’t trust the old one anymore, although I invested a little over 1000 in it, bearings, slip rings, in the end I’ll scatter it for spare parts, I specially went to the service center, they called, they put it on a stand, everything is fine, after installation this demon stopped again charge after some time. As a result, I removed this goat in the evening in frost below 40 without a pit in an iron garage, again I installed a replacement in no better condition from another car, so the generator, not mine, ended up in the car again. The video is absolutely not informative; it does not correspond to the title “All the nuances of installation on a VAZ”.
I have a nine carb, the generator is weak, it doesn’t play music, can I put a generator like yours on it? And what will you have to do?
Pokazuvati elementi keruvannya progravachem
- Published on March 16, 2020
- Motorring spare parts store - motorring.ru/?EugeneSiberian 7% discount using promo code "Siberian" UA-cam channel Motorring - ua-cam.com/channels/o3D3HPCRg_G2dBJa9DLaqg.htmlvideos Hello everyone!:) In this series we install a generator from the Priora KZATE 115A for VAZ 2114. I tell you all the nuances of this installation, what needs to be improved in order to install the generator on the VAZ 2108-15. Enjoy watching!:) Auto and transport
Replacing the VAZ 2114 generator
It is necessary to replace the generator on a VAZ 2114 in different situations, but the main reason is the installation of additional electrical consumers:
- powerful sound system;
- improved or additional outdoor lighting;
- lighting inside and outside.
Instead of a standard 80-amp generator from a VAZ 2114, motorists buy a 115-amp generator from Kalina or Priora, which is completely identical in mounting. The only thing you need to do with a new install is replace the drive belt pulley, but anyone can do that.
Video:
Video:
Which generator is better to install?
Regardless of which generator is installed on the Priora, the owners of these cars often replace the unit due to the fact that not all devices allow connecting various equipment to the on-board network. Which manufacturer is good and which device is better to install on the Lada Priora?
You can supply generators of the following brands:
- BATE 90 ampere;
- KZATE 115a;
- BOSCH 120 amp;
- devices manufactured by VAZ for 120 or 115a.
Generator unit for Priora
In principle, other models of generator devices for domestic cars can be found on sale. When purchasing, the main thing is to check the integrity of the unit so that there are no signs of damage on the body. It is better to use high power so that there is a power reserve, thereby the device will last longer. In addition, it should be taken into account that it is not recommended to install less powerful generators, especially if many devices are connected to the vehicle’s on-board network.
Types of electrical faults
The problem with the generator is that it stops producing current. The indicator on the dashboard lights up. Electrical faults lead to breakdown:
- The fuse or contacts have blown. Making a replacement is a matter of minutes. With contacts things are different.
- The brushes are worn out. You can change it yourself; you don’t need to buy a new device.
- The regulator relay has failed. You can repair it yourself or contact a professional.
- Diode bridge failure. Cannot be repaired, only replaced. To do this, you need to disassemble the generator; without experience, it is better not to carry out such work; it should be left to the experts.
- An open circuit in the stator or rotor due to a short circuit. Repairing is more expensive than purchasing a new electrical unit.
Signs to help detect an electrical problem:
- The battery indicator on the dashboard does not go out after starting the power unit or blinks.
- Burnt wire smell coming from under the hood (a serious problem that may not be related to the alternator).
- The appearance of sparks in the housing.
- Voltage drop.
- Constantly recharging the battery.
- The headlights are adjusted, they shine dimly, and when other sources of power consumption are turned on, they almost do not light up.
Mechanical breakdowns
If there is a mechanical breakdown of the generator, loud noise appears during its operation. But it also happens that this equipment begins to make unusual noise due to the fact that the bearings are worn out too much. Most often, the bearing located on the front cover requires replacement. It is he who takes on the highest radial loads, and therefore his service life is significantly shorter than the others.
By the way, if the drive belt is tightened too much, the load increases, which means the bearing will last much less.
The principle of operation of a generator in a car
The peculiarity of the generator is that it produces alternating current. Whatever one may say, when operating this electric machine, you can only get alternating current, and only then convert it to direct current. General generator design:
- Back and front covers with pressed bearings.
- Rotor with excitation winding.
- The stator with power windings is where the voltage is removed.
- Diode bridge - three-phase rectifier.
- Electrolytic capacitor - to get rid of the alternating component of current.
- Voltage regulator - necessary for accurately setting the supply voltage of the rotor winding.
- Carbon-graphite brushes are necessary for transmitting voltage from the relay regulator to the rotor winding.
- And the remaining components - brackets, nuts, bolts, belt.
For normal operation of the generator, two components are required:
- Rotation.
- Magnetic field (constant).
It is enough to remember the school physics course - an electric current will appear in the winding only if it is affected by a moving magnetic field. Moreover, the output voltage will depend directly on the magnitude of this magnetic field. This means that the rotor winding is a source of a constant magnetic field, and it is powered through a voltage regulator, therefore, the output will always have the same voltage.
The alternating voltage is removed from the stator winding. Moreover, there are three windings, they are connected in a “star”. Consequently, we get three phases at the output. This is necessary primarily in order to reduce current ripple in the on-board network. With the help of a diode bridge, which contains six semiconductors, the current is rectified. And the capacitor cuts off the entire variable component. According to Kirchhoff's law, an electrolytic capacitor is replaced by a gap when operating in a DC circuit and by a conductor in an AC circuit.