If you discover that the generator on your VAZ 2110 does not charge, you should immediately look for the cause of the malfunction, because the supply of all electrical equipment with current, as well as charging the battery, is at risk.
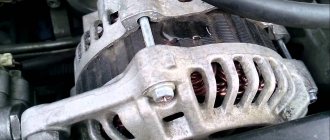
Generator
As you know, with a working generator, the battery does not require charging for many months and years, while maintaining at least 60% charge. That is, a battery with a capacity of 55 Ah, which is usually equipped with dozens, is replenished with current due to the operation of a working generator.
Basic problems
If the generator begins to act up, then the main causes of the malfunction should be sought either in the on-board network, or these are problems with the generator itself. If the generator gives a charge, but not enough, then perhaps it has been “loaded” too much by installing many other gadgets in addition to the standard electrical equipment, and it is already working at the limit of its capabilities.
Our motorists really love tuning the VAZ 2110, adding, for example, speaker power, enhancing the light, etc. In such cases, some people change the battery, for example, installing it with a capacity of 70 Ah, instead of the usual VAZ one with 55 Ah.
But although this may help at first, over time such a battery will run out even faster, since a standard generator will not be able to provide it with a full charge; it does not have enough power for this.
The reasons for battery discharge are described in detail in the following material:
The main reasons why the generator does not charge the battery
To identify problems, it is necessary to diagnose both the entire on-board network, which may draw too much energy, and the generator itself. If you have tuned your car, equipping it with additional electrical equipment, you will need to check its energy consumption level and serviceability.
Very often, to compensate for the current consumption of third-party devices, car enthusiasts install high-capacity batteries. However, the generator power remains at the same level, so this measure has no effect.
troubleshooting
To accurately determine the source of the problem with the generator, you need to perform a basic check. If you do not have “additional” energy consumers, you can immediately look for generator faults; if there are any, turn them all off for a while. Moreover, do not turn it off, but simply disconnect it from the car.
Test plan:
- Measure the current output on a cold car, when it is not running and all its life support systems are turned off. It will be ideal if there is no return at all. But this happens extremely rarely. On almost every VAZ 2110, somewhere due to insufficient contact, local short circuit, etc. There is still a small return. But - just a small one, and not one in which the battery can run out during a night of parking;
- If everything is normal, there are no current leaks, or they are negligible, the battery is not discharged, reconnect all those devices that you (no matter, independently or with the help of hired specialists) installed on your car on your own initiative. Repeat the same check. If it turns out that current is actively leaking, it means that the reason is not in the battery and is not related to the generator; it is the device not provided for by the designers of the VAZ 2110 that is to blame;
- But if even then no kickback is detected, we proceed to a thorough examination of the generator. And here there are many possible malfunctions: • there is not enough contact between the brushes and the rotor rings; • there is a break in the excitation winding; • an interturn short circuit is possible directly in the field winding coil. At the same time, the generator heats up and hums; • the field winding may short-circuit to the rotor housing; • breaks can also occur in the stator phase winding; • the stator can short-circuit to the housing; • possible short circuit of the “plus” to the housing; • diodes in the rectifier unit can be pierced; • mechanical failures also occupy a significant place on this list.
It is possible to repair or replace the generator yourself if you have the proper desire and knowledge of the nuances of the procedure. Details:
Now let's look at all of the above generator malfunctions in more detail.
Connection diagram for the VAZ-2110 generator
Connecting a generator to a VAZ 2110 car is not difficult. All you need is some wrenches and patience. First you need to determine which side the mechanism is installed on. Everything is simple here. You just have to look at the fastenings and location of the rollers. After this, you should place the device on the seat.
The next step is to connect the positive and negative wires. The positive wire is usually red and thick. The negative one is slightly smaller, black or brown. The wires must be placed in their places on the generator and tightly clamped with nuts. Make sure that the wires are securely and firmly fixed. This determines how well the electricity will flow from it. After this, you can fix the device in its seat using bolts. Next, we put on the belt and start the car to check its performance.
If there is no charging, then you should proceed to detailed diagnostics of the device. First, let's look at the VAZ 2110 charging circuit diagram. Electrical connection diagram for the generator on a VAZ 2110, VAZ 2111, VAZ 2112 car:
Winding break
If the excitation winding is broken, then there is no charging of the battery. To determine this, it is often enough to place your hand on the generator. When it breaks, it heats up. For an accurate check, you need to disconnect the end of the excitation winding from the brush, connect the battery wires to it, and connect the battery wires to terminal Ш of the generator (via a voltmeter or a light bulb).
If there is a break, the voltmeter needle will not deflect and the light bulb will not light up. To find which of the coils prevents the generator from working, connect the wires from the battery to each individually. Finally, check the soldering and coil terminals. If the break is internal, the coil needs to be replaced; for external ones, soldering helps.
What are failures?
Failure when pressing the gas pedal lies in the improper reaction of the engine to this. Thus, when trying to accelerate, the engine does not gain the required speed.
This leads to a drop in speed. It manifests itself with gradual and sudden acceleration. Dips appear when you press the gas pedal in different ways:
- Short-term failures. There is no response to pressing for a couple of seconds.
- Lingering failures. The engine loses speed for 4 to 10 seconds, and it is possible that the car will stall.
- Jerks. Dips up to 1 or 2 seconds. The car seems to be “twitching”.
- A series of jerks. The engine either increases speed or slows down, although the pedal is in the same position.
- The car jerks. Consists of a series of protracted failures.
see also
Comments 30
Change the generator! As practice showed me 3 months ago, REPAIRING A GENERATOR IS A ROTTEN BUSINESS! And besides, all this won’t last long! It’s easier to add a little and buy a new one! As I did)) it’s up to you, of course, see for yourself))
look at the diode bridge I also had it. good luck
ok thanks for the advice(
The other day I had the same problem, but since the gene was already done and redone, I decided not to worry and installed a new one and the problem was solved instantly =)
Topic: What goes to the generator exciter wire?
Theme Options
Search by topic
Pointer
Registration 03/25/2011 Address Kaliningrad Messages 92
| Thank you: |
| Received: 0 Sent: 1 |
I measured the blue wire and nothing seemed to be going through it.
Lupo
Registration 06/15/2011 Address Tver Age 36 Messages 230
| Thank you: |
| Received: 5 Sent: 0 |
That's right, the blue wire is needed to excite the generator. When the ignition is turned on, there should be supply voltage. It comes from the dashboard: 12 pin tidy, black 10-pin connector (1 pin) in the ECU box, then to the generator. Look for a cliff.
I confirm
Without this very wire, the gene is excited quite well
But first you need to accelerate.
Pointer
Registration 03/25/2011 Address Kaliningrad Messages 92
| Thank you: |
| Received: 0 Sent: 1 |
Depends on the residual magnetization of the armature and stator.
Well, yes, I agree. I started this recently. And if it stays overnight, he probably won’t get aroused without forced arousal.
Pointer
Registration 03/25/2011 Address Kaliningrad Messages 92
| Thank you: |
| Received: 0 Sent: 1 |
So the problem is in the tidy.
READ How to connect popcorn to computer
Source
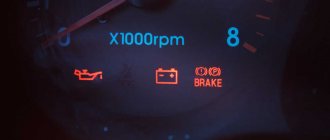
What to do if the battery charging light is on?
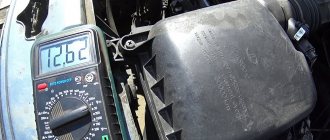
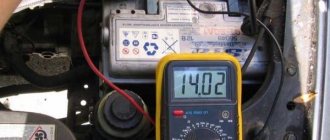
First of all, get out of the car and, with the engine running, measure the voltage at the battery terminals (do not remove the clamps under any circumstances).
If charging is in progress, the voltage should be at 13.6-14.2 Volts. In the absence of charge, the voltage level will be much lower - about 12 Volts.
To fix the problem, prepare the following tools:
- twelve volt indicator light,
- two screwdrivers (flat and Phillips),
- multimeter,
- pliers,
- knife,
- Use sandpaper to clean contacts.
So let's get started:
The readings of the on-board voltmeter indicate the presence of a charge, the charge signal lamp on the dashboard does not light up, there are about 12 volts at the battery terminals, and the battery itself is almost discharged.
In such a situation, clean the wire connections on the power source itself. If these measures are useless, measure the voltage level at terminal “30” of the generator itself.
Place one multimeter probe on this terminal, and the other on ground. If the voltage here is much higher than at the battery, then strip the thirtieth terminal. If necessary, replace the wire from the generator to the battery.
The voltmeter on the dashboard and the lamp show the presence of a charge, but the battery is discharged.
The voltage on the battery is normal (about 14 Volts). Turning on a load (for example, headlights) causes the charge arrow to shift to the extreme left position.
The main reason is weak belt tension on the generator pulley (tighten the belt, and if it is damaged, replace it).
This problem can also be caused by a breakdown of one of the diodes, as well as a break in the stator phase winding. Turn off the ignition and check the diodes with a multimeter. In case of breakdown, replace them.
Check the generator brushes. To do this, take them out and measure the length. If it is less than five millimeters, then it is better to replace the brushes.
When you turn the key in the ignition, the charge warning lamp does not light up, the charge sensor does not work, and there is no charge on the battery. The reason is a blown fuse.
Its designation is F10, rating is 10 Amperes. If installing a new fuse does not produce results, then the reason must be sought in the ignition relay or the lock itself.
After turning on the ignition, there is no charge, all devices work, the warning light does not light up.
The check is simple - remove the wiring from terminal “sixty-one” of the generator and connect it directly to the “minus” (car body). If the light comes on, then the cause of the problem is the generator field winding.
The second option is bad contact in the connector. If after cleaning there is no result, then there is a risk of the lamp itself burning out.
When you turn the key in the ignition, the charge lamp lights up, and after starting it continues to light up. In this case, there is no charging or appears periodically. The reason is insufficient contact of the wire at the connector with the dashboard (it may oxidize).
Finally, check the relay regulator. To do this, apply voltage from the battery to its contacts. If there is 12 volts on the brushes, then the relay is working properly. If not, the device must be replaced.
If you have problems charging the battery (the warning light does not go out or does not light up at all), then check all versions.
But, as a rule, the problem is always on the surface, and the cause is poor contact, a burnt out light bulb or a faulty relay regulator. Good luck on the roads and of course no breakdowns.
Dips when pressing the gas pedal during acceleration
Determined using computer diagnostics or the steps described below:
- The first thing you need to do is inspect the spark plugs. To do this you need to remove them. The presence of carbon deposits on the spark plugs, poor contact with the wires, or an excessively lean or rich mixture lead to spark plug malfunctions.
- High voltage wires can also cause engine malfunction, as can ignition coils.
- The throttle needs to be checked. If it is clogged, this causes the engine to respond untimely when pressing the gas pedal.
- It is necessary to check the condition of the air, fuel and oil filters. They tend to get clogged, which worsens dynamics, increases fuel consumption and causes pedal failure. They need to be changed constantly, you can do it yourself, they are inexpensive and easy to install.
- The presence of errors in the ECU leads to failures.
- Clogged injectors. If necessary, replace or repair injectors.
The wires, as well as the rubber bands on them, should not be damaged and should not spark when the engine is running. If damage is found, this indicates that the engine is shaking and jerking begins. This may occur due to the age of the car, worn-out or low-quality spare parts, poor contact with the spark plugs, or due to the temperature of the engine.
The resistance of the coils and the temperature change together, as a result of which a gasoline car begins to jerk during acceleration. In diesel cars, jerking cannot be associated with the coils, since they are not present.