Tuning and auto gadgets / From Autoclub
- What should a podium look like?
Internal podiumTable: advantages and disadvantages of internal podiums
- Table: advantages and disadvantages of external podiums
- Manufacturing and installation of an internal podium in the door
Gallery: covering the podium with artificial leather
Installing car audio requires a creative approach. Sound quality largely depends on where and how the speakers are placed. For them, podiums are elements of acoustic design. The elements are useful and in some cases necessary. What’s important is that you can make such podiums with your own hands.
What you need to know about podiums
So:
- Acoustic podiums have many advantages. If you simply install a speaker, for example, in a car door, then without a podium the sound will not be clear enough.
- The podium is very easy to attach, since it is not necessary to cut through the iron in the door. But thanks to the podium, various overtones will disappear, low frequencies will be added, and sound transparency will improve, so beloved by connoisseurs and professionals.
Acoustic podiums on daewoo nexia
- Wanting to install better acoustics, a car owner often encounters a problem. The fact is that good acoustic speakers can be large and many cars simply do not have space for them. For this reason, many make podiums with their own hands and install them correctly.
Note. One of the secrets of installing podiums in a car is the rigid mounting of the speaker. The more firmly it sits in the podium, the better the sound will be and, moreover, the higher the timbre coloring will be. To ensure rigidity, the podiums are placed on acoustic shelves, but are rarely used independently.
Speakers installed in ready-made podiums give a completely different sound than if they were played without them:
- It is best to make a podium from wood, since this material is acoustically combined with the metal of the car frame.
- The podium allows you to solve technical issues related to installing speakers. But this is not its only advantage. Thanks to the podiums, surround sound is created in the car.
Classic acoustic podium
- In addition to traditional acoustic problems, podiums can also solve aesthetic ones. In particular, the use of a podium is very beautiful, since it always fits into the design of the car interior, if, of course, the color tones and upholstery material are taken into account.
- Podiums will allow you to highlight non-standard and original speakers or, on the contrary, hide acoustics that are not very attractive in appearance from prying eyes.
- Podiums can be made not only from wood, but also from fiberglass or carbon fiber.
- Podiums can be trimmed with various materials: carpet, artificial leather, Alcantara, etc.
This is interesting: Installing and connecting a Pioneer car radio with your own hands
Preparations for work
To make your own, you will need a number of materials and equipment:
- plywood or chipboard with a thickness of 8 to 12 mm and an average size of 800 by 800 mm;
- stucco;
- polyurethane foam;
- epoxy glue, vinyl glue;
- paints and spray paints;
- electric drill;
- puzzle;
- Bulgarian;
- Screwdriver Set;
- sandpaper;
- knife;
- drawing materials (pencil, chalk, ruler, compass).
Information required before installation
- Installing an acoustic podium is necessary, since a speaker without a structure, for example in a car door, will not produce a clear sound, in addition, you will hear metal vibration;
- due to the variable shape of the design of the part, it is easy to attach it to the car without cutting the body iron;
- The podium, in addition to eliminating third-party sounds, will add low frequencies and improve sound transparency. This also requires a good sound system, which the car's factory design is not designed for in space. That's why you have to do it yourself;
- Wooden structures are considered the best - acoustic material of the highest quality;
- the podium also helps create surround sound inside your car;
- at the same time, the installation of this design provides services for improving and changing the interior design of the car. They allow you to focus on the speakers and hide the unsightly appearance of the system;
- In addition to wood, chipboard, podiums are made of carbon fiber and fiberglass. Any design can be additionally trimmed with leather, carpet or any other material.
Modern fashion for car audio
Today, most modern vehicles come with standard speakers. However, lovers of loud music in cars are often not satisfied with their sound, so they buy larger speakers. In this case, a different kind of problem arises - how to install large-sized equipment in the cabin so that, on the one hand, it does not disturb passengers, and on the other hand, to create truly clear sound?
One of the common ways to solve the problem is to make podiums for speakers. They can not only improve sound quality, but also take the performance of the speaker system to a whole new level.
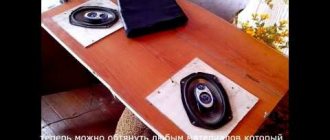
A DIY acoustic shelf allows you to mount speakers of different sizes and shapes
Installation and fastening of the podium in the car
The traditional method to securely secure a homemade podium is to screw it with self-tapping screws from the inside of the casing. This, on the one hand, will ensure the quality of fastening, and on the other hand, will not spoil the appearance of the entire structure.
To carry out this procedure, you will need only two tools: a screwdriver and soundproofing materials.
Main stages of the procedure
The process of installing and fixing any podium in any part of the car is as follows:
- Take a ready-made podium with a speaker built into it.
- The podium is screwed on the inside of the casing with self-tapping screws.
- However, to achieve truly clear sound, you will need to experiment with the installation - some screws will be tightened all the way, and some will not. That is, you need to give the podium such a position so that the speaker can reveal its sound to the maximum.
- It is recommended to soundproof the doors and ceiling (in this case you can achieve even clearer sound).
- After completing all the work, reassemble the ceiling, racks or doors (depending on where exactly the podium was mounted).
Making a platform for a column
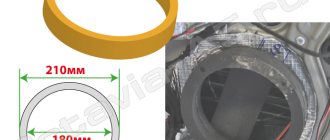
- Measure the size of the speaker for the radio. And also take measurements of the protective mesh.
- Draw a ring on the cardboard, taking into account the fact that the internal diameter corresponds to the diameter of the place where the column will be planted. And the outer diameter of the ring is equal to the diameter of the protective mesh. To get it right, you need to add 6 mm to the annular diameter. For a decorative ring.
- Transfer the cardboard model onto a sheet of plywood and trace it. It is better to take plywood of at least 8 mm.
- Cut out all the details - shapes. It is better to glue the decorative ring to the base and attach it with small nails.
How to make universal podiums for speakers
In most cases, you can do without investing in the purchase of factory podiums and make the element yourself. It's not as difficult as it might seem at first glance.
To successfully make a podium you will need the following materials:
- plywood 6–8 mm thick;
- degreaser;
- cardboard;
- polyurethane foam;
- putty;
- glue;
- epoxy adhesive;
- nylon tights;
- dye;
- fabric or leather for covering.
In order to put your idea into practice without any difficulties, it is best to prepare the necessary tools in advance:
- scissors;
- hacksaw/jigsaw;
- pencil;
- stationery knife/blade;
- sandpaper;
- putty knife.
Almost all the tools and materials for making podiums are available on the farm of an experienced craftsman
Dimensions and shape of the acoustic podium
The technology described below involves the manufacture of podiums for speakers located in the front or rear doors of the car. Most often, there is one speaker with a diameter of 13 centimeters in the door. However, regardless of its size, the podium manufacturing technology will be the same:
- First you need to figure out what kind of podium shape is suitable for the interior of your car.
- It is necessary to measure both the dimensions of the existing speaker and the dimensions of its protective mesh.
- The diameter of the speaker ring will correspond to the diameter of the seat for it in the podium. And the outer diameter of the ring will be equal to the diameter of the protective mesh.
- Once you have approved the form, you need to draw it on a piece of cardboard.
- The resulting template must be carefully cut with scissors.
- Next, we apply the template to a piece of plywood and trace it with a pencil.
- For two doors we will need two plywood blanks that can be cut with a hacksaw or jigsaw.
- It is necessary to cut out the hole in the podium as accurately as possible, since if the proportions are violated, the speaker in the pocket will not be securely fixed.
Photo: correct procedure for making a shelf in a car door
The process of creating podiums for speakers does not end here. The workpiece must go through several more stages of design.
In order to give the plywood podium an attractive appearance, polyurethane foam is usually used. It is applied to the surface of the plywood. Then you need to do the following:
- when the foam has completely hardened, you need to work on the shape using a stationery knife or blade - you can give the workpiece absolutely any shape;
- After initial processing, you will need to apply one or two layers of putty to the product. After it has dried, you will need to give the podium the smoothest and most embossed shape possible by treating it with fine-grained sandpaper;
- the resulting product can be painted in any color, and it is advisable to paint in three layers for deep color saturation;
- As another design option, reupholstery is also allowed - that is, the use of elastic fabrics that can be attached using adhesives to decorate the podiums. You can cover the podium blanks with almost any type of fabric or artificial leather, but you should take into account the practicality of the material and its durability.
What should you pay attention to?
How to make podiums for speakers with your own hands? In practice, this is not difficult, but some features of such additional equipment should be taken into account. First of all, you should choose the optimal shape for the podium. In particular, make sure that this element will not interfere with the door handles or window regulators. Also, you should not cling to the podium during operation.
Decoration is no less important. But here we are mainly talking about the finishing features. It is recommended to select a material similar to the main interior trim.
Design development
. Here, first of all, you should choose the optimal shape of the podium. It is desirable that it be compatible with the style of the interior. The selected option is first drawn on cardboard. After which they are transferred to suitable plywood, it is better to choose it with a thickness of 6-8 mm. Next you should use a jigsaw. With its help, the workpiece is cut out. It is better to immediately make 2 patterns, for the right and left doors. At this stage, problems usually do not arise. You just need to carefully measure the size, otherwise you will only ruin the material.
Travel trailer for travel: choosing the right one
- VAZ 2110;
- Ford Focus;
- Chevrolet Niva;
- Chevrolet Lacetti;
- Daewoo Lanos;
- Lada Priora;
- Nissan Qashqai;
- VAZ 21099;
- Lada Kalina;
- Mitsubishi Lancer, etc.
Cars usually already have standard, factory-installed speakers or at least mounting holes for them. The dimensions and shapes themselves depend directly on the specific brand of vehicle. Domestic cars usually have speakers with a standard diameter of 13 cm, while foreign cars have speakers with 10 cm, 16 cm, 16.5, 20 and even 25 cm. 6x9 podiums are also extremely popular.
For doors, speakers are used that have oval or no less common round shapes. Depending on what kind of car you have, you need to consider the shape when choosing a speaker. Although in reality any form can be used. After all, the main task of the podium is to ensure reliable and strong fixation. This is what gives the sound volume and improves clarity.
And if you are still thinking about whether to make it yourself or buy it, I advise you to study the range of finished products, look for podiums for the rear or front doors for your car, compare prices and decide.
Homemade designs will be cheaper. But here you will have to work hard, take the production into your own hands and try to achieve the maximum result. Otherwise you will be disappointed.
This is interesting: How to choose an inexpensive and good radio for your car
So, to work you need to have:
- Nylon stocking or tights. Don't be alarmed, nylon will be used as a material that will set the shape;
- Epoxy resin (“epoxy”), as well as glass mat or fiberglass;
- PVC pipe or a piece of thin chipboard, depending on which option you chose;
- Putty (automatic), a lot of sandpaper from fine to coarse;
- Painting brushes, rubber gloves, spatulas for working with putty;
- Paint, leather or some kind of “Plastidip” for finishing the podiums;
- Self-tapping screws, fasteners and other fastening elements. In this matter, everyone will have to get out, based on their own capabilities and the design features of the podiums themselves.
Depending on the configuration and features (car, podiums and tweeters themselves), the list may differ. I think this is understandable.
We do it ourselves
If you try, the homemade podium will not be much different from the factory one. But the price will be much less. Plus an additional reason for pride.
To complete the work you will need a set consisting of:
- plywood (take a thickness of about 6-8 mm);
- PVA;
- epoxy;
- cardboard;
- degreaser;
- nylon tights;
- polyurethane foam;
- paints;
- putties;
- leather or fabric (will be tight);
- scissors;
- pencil;
- hacksaw or jigsaw;
- sandpaper;
- spatula;
- stationery knife.
I will say right away that in this case we are considering the option of making a homemade speaker podium, which will later be installed with your own hands in the front or rear doors of the car. Often a speaker with a diameter of 13 cm is used here. But no one bothers to make a design for the rear shelf.
But size is not key. The entire preparation procedure looks like this:
- think over the shape of the podium;
- take measurements of the speaker and its special protective mesh;
- the diameter of the ring here will be exactly equal to the diameter of the corresponding landing socket or place on the future podium;
- the external diameter of the existing ring we need, in turn, corresponds to the diameter of the tread (protective) mesh;
- a sketch is drawn on cardboard;
- the template is cut out;
- applied to plywood;
- outlined and cut out;
- a perfectly even hole is cut for the podium.
Do everything as accurately as possible so that no problems arise later.
If you are done with this, proceed to the next step.
Manufacturing process
You have already made the preparation. But it’s too early to relax. There is still a lot of work ahead.
- A layer of polyurethane foam is applied to the surface of the workpiece;
- The foam hardens, and the required shape is given with a blade or sharp knife;
- Next, apply 1-2 layers of putty;
- When it dries, make the product smooth using sandpaper;
- The product is painted in a suitable color;
- It is better to apply the paint in 3 layers;
- An alternative to painting is upholstery with fabric or leather;
- The banner is secured with glue.
The installation process finishes it all off. The most optimal method of fastening is installation using self-tapping screws on the inside of the existing door trim. This will preserve the sound quality, ensure reliable fixation, and at the same time definitely will not spoil the appearance of the interior and the podium structure in particular.
Do not forget to additionally use soundproofing materials. They are used to make noise on doors. This is not necessary, but it is useful and effective.
I think you have figured out how to make podiums in the doors. They can also be installed in rear shelves and racks.
Construction principle
Making places for speakers or tweeters begins with taking measurements. You need to define:
- column diameter to accurately measure the seat;
- the thickness of the case, which should not interfere with the operation of the window lift mechanism;
- the amount of departure into the cabin. The podiums should not rest against the seat or plastic door sill when the door is completely closed.
Tools and materials
From the mandatory set of tools and materials you will need:
- material for making the housing to which the speaker will be attached. For example, you can use MDF panels. To support, adjust the reach and angle of inclination, supports are used, which can also be cut from MDF boards. It will be great if you find a piece of pipe. For example, a cylinder made of compressed paper, which is often found in many industries. A slight difference in size can always be corrected using available means. In this case, making podiums is largely a creative process.
- polyester resin and hardener for it;
- fiberglass, glass mat;
- thick fabric, construction stapler;
- screws or other fasteners, if you have chosen your own manufacturing option.
- brush;
- ruler, pencil, compass, marker;
- manual or jigsaw. A rounded rasp may be required for adjustment;
- putty. To adjust the shape of the podiums, you can use technical plasticine;
- sandpaper. The choice of gradations of abrasiveness will depend on the amount of work you will do yourself. For example, P80 and P120 will be sufficient for processing fiberglass before puttying; preparation for primer requires P240, P320. Before painting, the primer must be rubbed with P500 and then P800.
You can use ready-made solutions to create podiums with your own hands, or show technical ingenuity, focusing on the method below.
Where to put the acoustic podium
There are 2 ways to install an acoustic podium: monolithic and framed. Let's consider their features.
A monolithic podium is made using the “wet” method: a cement or concrete screed is constructed over the entire surface of the podium. The frame podium is a frame covered with two layers of plywood.
The advantages of the monolithic method are obvious: the result is a reliable, moisture-resistant podium. This podium is very easy to make and decorate. The disadvantage of a monolithic podium is that it creates too much load and it is impossible to hide communications in it.
The frame podium, on the contrary, is very light and multifunctional. You can even install drawers in it. Since the frame podium is empty inside, there is a need to isolate sound. Therefore, mineral wool or polyethylene must be placed under all supports and between the sheathing. There should be a small gap between the frame podium and the wall to allow the material to expand. And between the wall and the monolithic podium there should be a thick tape to prevent the possibility of concrete cracking.
Preparing to install an acoustic podium
To make an acoustic podium yourself, you don’t need any special skills - you just need to have the desire and be careful. The materials needed to create a podium can be purchased at any hardware store for a very affordable price. An important point is to accurately take measurements and determine the location of the future podium:
- For greater convenience, you need to remove the door panel. If it has a speaker, that should also be removed. The size of the future podium depends on the number of speakers and their sizes, as well as on the area of free space on the door panel.
- Make a template for the podium base from cardboard directly on the door panel, which will later be transferred to the plywood
- Cut a ring (from the same cardboard) to fit the size of the speaker
- To accurately determine the final height of the podium, you need to take into account that it does not protrude too much, otherwise it will interfere with the legs of the passengers sitting in front. A large podium makes it possible to install large speakers. The main thing is that it is comfortable and does not spoil the main interior of the car.
- If you want to slightly “recess” the speaker into the podium, make a frame from plywood and glue it along the contour to the main platform
- The correctly chosen design of the future acoustic podium is very important: it improves and makes the overall interior stylish.
Step-by-step instructions on how to make podiums for tweeters at home:
1. First of all, you need to dismantle the plastic covers; to do this, just unscrew a few screws.
2. Next we proceed to marking. To do this, it is necessary to designate the future location of the podiums.
3. Based on the size of the tweeters, we make rings from chipboard according to the diameter of the tweeters. Looking ahead, I will say that these rings will serve as the basis for installing tweeters.
4. Using self-tapping screws or other convenient fastening methods (I, for example, used toothpicks), you need to secure the resulting rings to the plastic pad where you made the markings. Here it is important to calculate everything properly so that both tweeters face the same direction and are located at the same level.
5. Now we take the tights and stretch them over the resulting frames. Then, using epoxy, we begin to impregnate the resulting form. When everything has hardened a little, take the fiberglass and glue it on top of the formed shape. Fiberglass will act as a reinforcing (binder) material. Each new layer must be impregnated with epoxy and applied only after the previous one has dried. There should be approximately 3-4 layers of all, after soaking the last one, let the entire “sandwich” dry. It should look something like this, see photo below.
6. Once the frame is created, you can begin sanding and puttying it. Before puttying, take coarse sandpaper and sand the “fresh” podiums, so to speak, prepare them for puttying.
7. When the surface is more or less flat, apply the first, thin layer of putty. Then we let it dry and sand it with sandpaper, removing everything unnecessary and forming future podiums for tweeters . Here, as they say, a complete flight of imagination, sculpt, sculpt the form that in your opinion is the most attractive. This is how I did it, see photo below.
8. After the first layer, we sand everything thoroughly with several sandpapers from coarse to fine, removing all unevenness, bringing the surface to perfection. Then we take the putty again and level the surface for painting, sealing the slightest pores in the “putty.”
Note! If you are not going to paint your podiums, but, for example, want to cover them with leather, then you shouldn’t “lick” the surface of the putty too much, the leather will hide everything.
9. The second layer of putty is sanded and ready for painting. I painted it with matte spray paint, after priming the podiums with a base primer. The primer can be different, so it’s difficult to recommend anything, the only wish is that it be quick-drying and less thick. The primer should be applied in 2-3 layers, allowing each layer to dry.
Stages of manufacturing and installation of the podium
1. Mold making
First of all, before starting to install the structure, you need to decide on a suitable location for it. When conceiving a form, you are limited only by your own creative imagination, but we must not forget not only about the aesthetic and design side, but also about the practical one.
IMPORTANT! When developing and installing the structure on their own, very often beginners do not take into account that the podium can interfere with the view of the rear view (podium towards the rear speakers) or make it impossible to open the doors or operate the power window. Please pay attention to this when making the model.
- Take a sheet of cardboard;
- draw a picture of the invented shape;
- cut out the template;
- attach the template to the plywood and trace it with a marker;
We drill holes in the plywood for the jigsaw blade and cut out the base blank for the future product.
Advice. For an audio system, experts advise using birch plywood, as this wood provides richer and higher quality sound.
2.Preparing the base for the speakers
IMPORTANT! The chipboard or plywood used must be at least 6-8 mm thick.
3. Assembly and filling of the podium
Advice. The stiffer the future podium frame is, the better. Most often, polyurethane foam is used for filling; some professionals also use epoxy resin, but working with resin requires skills, while anyone can handle foam; with its help, the podium can be given any shape.
- After the foam has dried (the period is indicated on the can), remove excess with a knife, giving the workpiece the desired shape;
- Next, take sandpaper and sand the product to a smooth surface;
- level the surface with a thin layer of putty (putty can be mixed in advance with PVA glue to prevent shedding);
- We repeat the process of polishing the product.
To make the podium structure more rigid and protect it from mechanical damage, the workpiece can be treated with epoxy resin or covered with fiberglass.
- Apply a thin layer of resin to the surface of the workpiece;
- We put fiberglass on top, carefully smoothing it out, leaving no folds;
- treat with another layer of resin and let dry;
- cut off the excess and sand it.
4. Painting or tightening the workpiece
- Painting
The finished structure can be primed and painted with aerosol paint, applying it in several stages, the main thing in this matter is to avoid smudges. After the paint has dried, the surface must be coated with aerosol varnish.
- Faux leather covering
Artificial leather is best suited as an upholstery material, because in appearance and physical properties it is most similar to upholstery. Most often, tension runs from the ring to the ends of the product, where each side must be tightened more than once. To perform this task, use a hair dryer. At the end of the work, the leather must be secured with a stapler, and the excess pieces must be cut off.
5. Installation of the podium
The most common mounting method is to screw it in with self-tapping screws from the back of the car trim. Before doing this, do not forget to install the speakers in the workpiece seats and securely fix them.
IMPORTANT! You can mount various speakers into a homemade structure, however, as professionals advise, you need to make sure of good sound and powerful bass before final mounting.
Ideally, to ensure ideal sound in a car, you should also take care of sound insulation. If the podium is installed, for example, in car doors, it is necessary to insulate them with special sound-absorbing materials. Also, in the podium design itself, it is necessary to provide and build an acoustic stage, selecting the position of high and low frequencies; you can also consult installation studios regarding the correct placement of speakers in the car.
You may not achieve ideal studio sound, but installing a podium yourself will cost you several times less, and by trial and error you can choose the best place in the car that will provide you with high quality sound.
For a more dynamic and visual overview of the procedure for creating and installing a podium, you can watch the attached video:
I want to change the old ones for new ones. But the new pancakes are very small, and there is absolutely no room for them in the car. No problem, now we will learn how to make a podium with our own hands.
Making podiums for tweeters (HF)
Tweeter device
Tweeters are small speakers that emit high-frequency sounds in an audio system. Despite their small size (usually 1 to 2 inches), tweeters play an important role in shaping the music scene.
Two types of high-frequency speakers are widely used.
- Conventional tweeters that have a convex, flat or concave shape. They are small in size. In them, the impulse from the coil is transmitted directly to the diaphragm.
- Horn tweeters, in which the radiation coming from the diaphragm is amplified by a horn chamber. The horn in the speaker ensures the directionality of sound waves. These tweeters are larger in size and have greater efficiency than conventional tweeters.
To make sound-emitting diaphragms-membranes of high-frequency speakers, manufacturers use a variety of materials: silk, paper, metal. Whatever material the tweeters are made of, they must meet certain parameters in terms of the range of reproduced frequencies, power and resistance. For high-quality reproduction of high frequencies in musical compositions, tweeters must have a lower limit within 3,000 Hz.
The role of tweeters in shaping the music scene
Although tweeters do not require an acoustic design in the form of a box, increased demands are placed on their installation and configuration, especially when installing two- and three-component speakers. The fact is that only high-frequency speakers raise the sound stage to the windshield area. They work through a crossover filter, which cuts the signal at the low end and sends only high frequencies to the speaker.
The high-frequency wave is short, only a few centimeters, reflects well from surfaces and is perfectly localized by the human ear. Therefore, when setting up an audio system, tweeters are treated with special care - they (properly positioned and tuned) give the depth of sound to musical works and place the music stage directly in front of the driver.
Features of installing tweeters in the car interior
The peculiarity of high-frequency waves is that they have a narrow directionality, short length and, therefore, are capable of good reflection. In practice, the ability of waves to reflect in the HF range leads to the formation of standing waves in the car interior, which, when superimposed in phase, enhance the sound of tweeters, and when superimposed in antiphase, remove them from the ensemble.
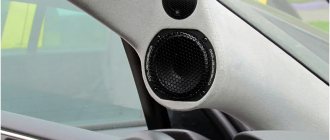
We install tweeters in the car's interior in such a way as to eliminate reflections of high-frequency signals - high-quality podiums play a huge role in this. In every car, regardless of the design of its interior, we find the optimal place for tweeters. We install them where there will be no unwanted reflections that can lead to the formation of standing waves. Excellent places for tweeters in the car interior are the A-pillars, the mirror triangle, and the surface of the dashboard.
When placing the tweeters, we adhere to installation rules that require placing them at the level of the driver’s ears or chest. In this case, we select the angle of inclination of the speakers along the horizontal axis so that the flow of sound waves converges at a point located between the driver and passenger.
Making podiums for tweeters
In most cases, correct placement of high-frequency speakers in the car can only be done by installing them on podiums. With their help, we mount tweeters in the exact location of the cabin and set the desired angle of inclination. In addition to the technical solution (speaker mounting, tilt angle), niches for tweeters bring the aesthetics of the original design of tweeters into the car interior. With a professional approach to the matter, podiums with tweeters can decorate the interior of the cabin and, of course, provide a musical stage.
Materials and tools
To make podiums for tweeters, we take materials with which we make the shapes of the structures and decorate them to match the interior design of the car:
- plywood, MDF, stretch fabrics;
- epoxy glue, polyester resin, fiberglass;
- white spirit, glue, brushes;
- primer, putty, sandpaper of different grain sizes, paint;
- finishing fabric - carpet, leatherette, etc.
All operations for the manufacture of products are performed with the following tools:
- jigsaw, milling cutter;
- screwdriver, drill, dremel;
- glue gun;
- spray gun;
- grinding and sewing machines.
Depending on the make and model of the car, as well as on the size of the high-frequency speakers, we suggest making podiums for the tweeters in the triangles of the rear-view mirrors or in the A-pillar panels.
Making podiums on the corners of mirrors
A good place for tweeters is the decorative triangles that cover the places where the rear-view mirrors are attached to the door. In different cars, the triangles have different sizes and can easily accommodate niches with tweeters.
At the beginning of work, we try on the tweeters at the landing site, visually determine their mounting points and angle of inclination. We mark the triangles, choosing the optimal height and width of the podiums. We dismantle the mirror protection from the door and continue manufacturing the structures on the desktop. We work with each triangle in turn so as to make optimal use of materials and time.
When making podiums for tweeters, we use several technologies for creating a housing. Quick and excellent results are obtained by using epoxy resin and fiberglass, followed by puttying, priming and painting the product. To mark the walls of the product when forming its body, we use stretch fabrics and nylon.
- At the first stage, we cut out rings for tweeters from MDF or plywood.
- We transfer the seating dimensions of the tweeter to the material.
- Using a milling cutter, we cut out a landing pad for the speaker (if the tweeter dimensions are small, then we skip this step).
- We cut the ring along the inner diameter, then along the outer diameter.
- Using a sanding machine we clean the edges of the workpiece.
- Using a drill, we drill holes in it to mount the tweeters.
Next, we set the seating rings for the tweeters on the triangles in accordance with our preliminary measurements. We fix the rings using thin wooden sticks glued to the ring body and the base of the triangle with a glue gun. We select sticks of different lengths in order to set the required angle of inclination for the future podium and ensure the seating depth of the high-frequency speaker. We achieve perfectly mirror-like fixation of the rings on both triangles.
At the next stage, using stretch fabric, we create a substrate for forming device cases.
- We alternately stretch pieces of stretch fabric onto both pieces so that there are no folds.
- We tie bundles of fabric with wire on the back side of the triangles, ensuring an even and tight stretch.
- We dilute epoxy glue with hardener.
- Using a brush, apply one layer of epoxy to the fabric surface of the blanks.
Reinforcement of the body with fiberglass
After the glue has dried on the fabric, we begin work on strengthening the body of the podium using fiberglass. We first cut the fiberglass into small pieces so that during the work a sufficient supply of material is always at hand.
- Using scissors, cut off the excess stretch fabric flush with the glue (places along the edges of the triangles).
- Cut the fabric around the perimeter of the ring.
- We dilute epoxy glue or polyester resin with a hardener.
- Using a brush, we coat the base of the workpiece with adhesive and overlap the pieces of fiberglass.
- Having laid out and coated several layers of fiberglass, let the workpiece dry thoroughly.
The hardened resin on the blank forms a solid base for the podium body. At the next stage of work, we sand the base, putty, prime it and prepare it for final decoration.
Sanding the workpiece
Sanding the surface is an important area of work; the smoothness of the walls of the podium and the smoothness of the transition lines on its body depend on the quality of its execution. We sand the surface with sandpaper of different grain sizes, achieving a perfectly smooth and even base.
The sanding process follows this algorithm.
- Using a Dremel, we clean off the places that are connected to the neck of the podium, where there are deposits of resin, and achieve perfect bends on both workpieces.
- Using a grinding machine filled with coarse-grain sandpaper, we clean the surface.
- In places of transitions we sand the body manually.
- We dilute polyester putty and apply it in an even layer to the body.
- After the putty has dried, we clean the surface with coarse-grained sandpaper, and then bring it to the required condition with fine-grained sandpaper.
- We cover the body with finishing putty.
- After the putty has dried, we clean the base with fine-grained sandpaper, achieving a smooth surface.
Further processing of the cases depends on what their decorative design will be. If we paint the podiums, then preparation consists of thoroughly priming the surface, applying several layers of primer and sanding in between. If we cover the frame with fabric, leather or leatherette, it is enough to apply one layer of primer.
Decorative treatment of podiums for tweeters in triangles
We offer a choice of several ways to finalize the podiums for tweeters, which we place in the corners of the rear-view mirrors located on the car doors.
One of the options, worthy of attention for its simplicity and high-quality content, is to paint the product with paint to match the color of the door trim or any other color of your choice.
- Using a spray gun, we prime the surface of the tweeter housings several times with intermediate sanding with fine-grained sandpaper.
- We select paint and spray paint the podiums.
- After the paint has dried, we polish the surface, giving it a finished look (we do not polish matte paint).
At your request, we decorate the podiums with carpet or other fabric. We are also ready to offer you to cover your products with leather or leatherette (there are many other materials available).
We carry out the work in this order.
- We stick masking tape over the entire surface of the putty and primed forms.
- With a marker we mark the places where we will make the seams.
- We cut the masking tape along the marker lines to create patterns.
- Using patterns, we make leather patterns. We sew the patterns on a sewing machine.
- We put the resulting cover on the frame.
We mount the finished podium in the corners of the mirrors. To make the structure stronger, we secure it with additional screws to the metal of the door.
Making podiums for tweeters on the A-pillars
Both dome and horn tweeters fit perfectly into the podiums that we make in triangles of mirrors. This place is especially suitable for installing horn tweeters, the great depth of which requires a significant supply of podiums into the depths of the cabin. Horn tweeters can also be installed in the front door pillar. However, from an aesthetic point of view, this is not always justified, and HF speaker holders extended into the cabin can interfere with visibility. Therefore, the front pillars are a good place for mounting dome tweeters (compact speakers) into podiums, which, when properly installed and configured as part of two- or three-component acoustics, provide a musical stage.
The process of making podiums on the A-pillars is not much different from making the same devices in the triangles of the rear-view mirrors. However, there are peculiarities and certain difficulties in this work. First of all, to form the body, we take sections of PVC pipe of suitable diameter. We cut them according to the depth of the tweeters and at an angle in order to, by attaching the stands to the trim, obtain the required direction of the sound flow of the speaker into the middle of the cabin, between the driver and the passenger. Then we remove the covers and begin manufacturing the structures.
General procedure
- We remove the covering (fabric, leather) from the lining and get a smooth plastic surface.
- We attach the PVC pipe blanks to the intended location using a glue gun.
- We put a nylon cover on each cover with attached pipes.
- At the bottom of the trim, we fix the nylon with tape in such a way as to ensure the smoothness of the wall of the podium and leave a free bottom for filling into the seat on the dashboard.
- We stretch the nylon on the workpiece in the upper part of the rack trim until a surface without wrinkles is obtained and fix it with tape.
- On the back side of the lining we stretch the nylon and clamp it with wire, thereby ensuring tension of the fabric along the entire perimeter.
- Coat the nylon with epoxy glue and dry it.
- We form the seats for the speakers from fiberglass and epoxy.
- After the resin has completely dried, trim off the excess nylon.
- We cover the surface with fiberglass putty to obtain a rigid podium body.
- After drying, sand with coarse and then fine grain sandpaper.
- We putty the workpieces with finishing putty and clean them again to a perfectly smooth state.
- We prime and paint the surface in the desired color.
In the case where we removed fabric or leather from the overlays, we restore the coating at the final stage of making the podiums. We make patterns from similar material according to patterns and sew them on a sewing machine. We install the overlays with finished products on the racks. When finishing them with fabrics or leather, we carefully process the edges so that the overlays fall into place without any problems upon completion of the work.
The podiums for tweeters in our design are always aesthetically verified and technically impeccable products. You can be sure that high-quality music in the interior of your car will be provided by a high-quality music stage, the basis of which will be tweeters enclosed in products manufactured by us.
DIY speaker podiums
Speakers of this size are usually located in the front of the cabin. The basis of the structure is 10 mm plywood. It’s good if there is impregnated material. Such plywood will not delaminate, and the podium will last a long time. First, installation rings of the appropriate diameter and a base are cut out of multi-layer plywood using a jigsaw. Two rings form a hollow cylinder, which will be the seat for the loudspeaker. The rings and the base are not connected coaxially, but so that the speaker system diffuser is directed in the required direction. This is achieved by shifting the vertical guides to the desired angle.
The guides are cut out of the same plywood and fixed with self-tapping screws. To make the connection more durable, a little epoxy resin is added to the connection point. Then the hollow structure must be filled with polyurethane foam. Thick paper rolled into a tube is placed at the speaker installation location. After the polyurethane foam has completely dried, the paper is removed, and the structure is processed with a sharp knife and sandpaper to give it the desired shape. Leatherette is used as a decorative covering. Its color is chosen taking into account the design of the car's interior. The artificial leather covering is glued with glue 88. This work should be done very carefully, since secondary gluing leads to a deterioration in the appearance of the structure. A loudspeaker of this diameter has low power, so no special fastening is required to secure the podium to the installation site.
Skeleton decoration
- The fixed rings must be covered with thick fabric. Secure the fabric around the perimeter with a stapler. You can put a small object inside the cut out ring. It is important to stretch the fabric well, which will give the entire structure greater strength later. You can treat the places where the fabric and rings come into contact with Super Glue, which will also have a positive effect on strength;
- saturate the fabric with polyester resin. Please note that the resin only reacts with the hardener after a few minutes. Be sure to follow the proportions. Leave the cards for several hours for the resin to dry;
- After drying, mix a new portion of resin. After pre-wetting the surface of the podium, apply glass mat around the perimeter. The places where the podiums meet the door frame must be sanded. Fiberglass mat, like fiberglass, must be smoothed with a brush. Make sure that there are no air bubbles left on the surface;
- For strength, place one layer of dense glass mat on each side. Wait for each layer to dry completely;
- clean off the lumps of dried resin with sandpaper;
- lay another layer of fiberglass with a density of 150 grams/sq. m. And then another layer with a density of 600 grams/sq. m.
DIY podiums for speakers
16 cm loudspeakers can be included in an acoustic system design consisting of two active elements. Podiums for such acoustics are usually installed on the doors of the car. To make podiums for 16 cm speakers with your own hands, you will need multilayer plywood, fiberglass, polyurethane foam and epoxy resin. The technology itself is quite simple, but it will require time to dry the layers of fabric after impregnation with epoxy resin. First, all the elements of the future acoustic system are cut out of multilayer plywood. These are the base, rings for installing speakers and vertical connections. The structure is then assembled into a single whole. Wooden blocks or metal fastening profiles can be used as vertical elements.
Next, the entire structure is filled with polyurethane foam, with the exception of places for installing loudspeakers. Then everything unnecessary is removed from the podium, and its surface is treated with fine sandpaper. For strength, a thin layer of epoxy resin with a hardener is applied to the surface and rubbed into the pores of the mounting foam. This procedure can be repeated several times. The finished podium is finally sanded over a layer of resin. The finished product is finished using artificial leather.
You can make podiums for speakers in doors yourself using another technology. After the frame for installing the speakers is made, the entire structure is covered with thin fabric, which is impregnated with polyester varnish or resin. After complete drying, a thin layer of epoxy resin and fiberglass is applied to the workpiece.
There should be at least three layers of fiberglass with epoxy resin. After the future podium has completely dried, a layer of fiberglass putty is applied to the structure. All excess is cut off, and the surface is brought to condition using coarse and fine sandpaper. To finish the finished product, you can use leatherette or several layers of enamel, which is matched to the tone of the interior trim. Using this technology, you can make podiums for speakers with your own hands for one, two or three speakers.
Why install speakers on podiums
The first and obvious justification for the need to use podiums is that with their help you can move the dynamic head out of the standard seat if it does not fit there in depth. However, this is not the only reason.
For any speaker to sound, it needs a properly calculated acoustic design and a rigid base designed to dampen parasitic vibrations.
In home and stage systems, heavy, rigid enclosures are used that perform both functions at once. Subwoofers are made in a similar way for automotive systems.
The acoustic design of the mid-frequency speakers and “midbass” is formed by the design elements of the car. In this case, the cavities behind the casing act as the internal space of the sound column.
During operation, car acoustics experience significant vibration loads. If they are not extinguished, they are transferred to the sheathing panels and other structural elements, usually made of rather thin materials. These vibrations distort the sound.
The purpose of podiums is to absorb vibrations and dampen them. Prevent the spread of parasitic vibrations.
DIY podiums for speakers under 20
The speakers with a diameter of 20 cm are large in size and have decent power. Such speaker systems are usually installed on the trunk shelf. In order to make podiums for 20 speakers with your own hands, you need to use thick plywood. First, a base is cut out of it according to the size of the seat. The thickness of the material should be as thick as possible, since high-power speakers and the mounting board can resonate at high power. Rings for acoustics and vertical posts are cut out of the same plywood to provide the necessary tilt.
The loudspeaker mounting areas are covered with thin nylon fabric and impregnated with varnish. The top part is cut out and removed. A layer of epoxy resin and fiberglass is applied to the hardened surface. After applying 3-4 layers and completely drying, the surface is cleaned and sanded. You can cover the finished shelf with any decorative material, upholstery fabric or artificial leather. Some car owners install speaker systems on the ceiling of the car interior. It is not difficult to make podiums for ceiling installation according to the described schemes.
How to make and install it yourself
To make any podium yourself, you will need the following materials:
To work you need a tool:
Manufacturing and installation of an internal podium in the door
Video: fiberglass podium
Manufacturing and rack installation of external podiums for tweeters
Gallery: covering the podium with artificial leather
A stand with a podium covered with leather. A workpiece covered with leather. Covering the workpiece with leather. Using a hair dryer to heat the leather. Preparing the workpieces for pasting with leather.
Video: making a podium for Twitter
Manufacturing and installation of a podium in the ceiling
The low ceiling height of a passenger car is the main obstacle to installing podiums and speakers. They are usually mounted in doors, shelves and racks. If there is enough space, the podiums are installed in the ceiling, following the general recommendations outlined above.
Pasting the ceiling around the podiums with vibration-absorbing material reduces distortion and improves sound
Holes for the speakers are cut out in the casing after installing the podiums and fitting
Video: installing rear speakers under the ceiling
Neat podiums for car speakers not only improve the sound quality in the cabin, but also look good. Making them yourself, although troublesome, is quite feasible for a careful enthusiast with his hands. The effort expended is worth the result.
Source
What should a podium look like?
As follows from the above, the podium for the midrange or midbass is not a simple decorative element, but a necessary component of the audio system that affects the sound quality. To effectively perform its task—damping unnecessary vibrations—the podium must be heavy. The heavier the better.
In order for a part to be heavy, it must be made of the appropriate material. But in practice, plywood is most often used, since it is easy to process at home.
Did you know that archaeologists discovered the first archaeological artifact made from a material reminiscent of modern plywood in the territory of Ancient Egypt. The plywood casket dates back to the 15th-16th centuries BC. e.
Plywood is a relatively light material. To increase weight, podiums are made as large as possible. Of course, taking into account the features of the car interior.
When determining dimensions, they focus not only on sound quality, but also make sure that the additional element does not interfere with the operation of the main devices. For example, a speaker installed in a door should not interfere with the use of handles.
The speaker podium should not be attached to the casing, only to rigid metal elements. Firstly, a weak base does not help dampen vibrations. Secondly, it will not withstand a heavy podium with a speaker.
Internal podium
There are internal and external podiums. The first ones are installed when they want to maintain the factory appearance without changes. For example, when they change a standard speaker to a diffuser that is similar in diameter.
The internal podium is entirely hidden in the internal cavity of the door or ceiling under the trim, which must fit tightly to the speaker. Otherwise, distortion is possible, as the speaker will “play under the casing.”
The outer casing should fit snugly around the speaker mounted on the inner podium
Table: advantages and disadvantages of internal podiums
| Advantages | Flaws |
|
|
External podium
An external or external podium allows you to install any speaker larger or smaller than stock. In addition, the head can be placed either parallel to the plane of the door or at an angle, directed towards the listener. An additional advantage of the external podium is that it presses the skin tightly, reducing vibration.
Table: advantages and disadvantages of external podiums
| Advantages | Flaws |
|
|
The external podium is not just a stand, but a single structure. Its components must be adjusted and fastened tightly, without gaps or cracks. This ensures maximum structural rigidity and prevents sound from escaping under the skin.
The podium components must fit together without gaps or gaps.
Acoustic design elements, including the podium, should not impede the free movement of air through the windows of the speaker basket. Interference may degrade bass performance.
The podium components must not obstruct air flow through the speaker basket windows
When the speaker is deeply recessed into the podium, the diffuser operates through a tunnel, which significantly affects the sound quality with a depth of only 1 cm.
The podium parts should not form a tunnel in front of the diffuser
The sound quality is also worsened by the tunnel being too long on the magnet side of the speaker. It is better to avoid such a design, but if it is necessary, make the opening as wide as possible.
The tunnel on the rear side of the speaker degrades the sound quality
A special feature of external podiums is the need for decorative finishing. If the internal one is hidden under the casing, then the external one is always visible. It should not spoil the appearance.
This problem is usually solved by covering and covering the finished podium with natural or artificial leather. In some cases, when the podium is quite high, before covering it is necessary to sew the cover to the shape of the base, since the material allows tension only within certain limits.
Another method of decorative finishing is painting in a suitable color after puttying and thoroughly cleaning the surface.
Tweeters do not develop much power and are less susceptible to vibration. Therefore, podiums for them are more decorative stands than elements of acoustic design. They are made in the form of overlays on the side pillars or built into the pillar trim panels, oriented, according to the subjective sensations of the listeners, approximately to the center of the cabin.
Adapter podiums from round seats to oval speakers are not fundamentally different from conventional external speakers. The only difficulty is to develop a drawing and install the head in compliance with the requirements stated above.